
Often referred to as color flakes, color chips, or epoxy paint chips, these little explosions of color can help create some beautiful custom garage floor coatings with just a little creativity. Besides some distinct advantages to using them, they also tend to create a lot of questions about color combinations, floor coverage rates, the size of the flakes, and how to apply them.
Editor’s note: This article was originally published in June, 2013. We have updated it for accuracy and to reflect current trends.
In order to avoid some of the typical confusion that occurs with this topic, we discuss what color flakes are made of and answer some of the more common questions that you may have. In addition, we specify when you may not want to use color flakes at all.
What are Vinyl Color Flakes
Known in the industry as decorative vinyl color flakes, they are actually polymer paint aggregates made up of a combination of acrylic and vinyl resins. This combination creates a thin flake that is 4 – 5 mils in thickness. They are U.V. stable and are available in over 150 custom colors. They can even be custom color matched.
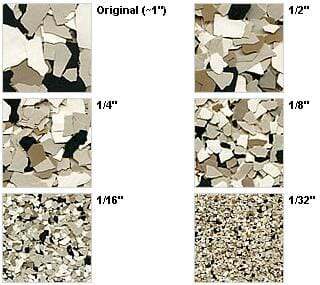 The shape of the flake is random and is available in sizes from 1” in diameter all the way down to 1/32”. The 1/4” flake is the most common size used in garage floor coatings.
Colors are blended together to create a particular look and then applied at a coverage rate that is determined by you. Typical coverage rates are light, medium, heavy, and full refusal.
Full refusal is when you apply the color flakes until the entire floor is covered and they will not stick anymore. One advantage to full refusal color flakes is that you can custom design your garage floor to almost any color combination you like.
As a tip, it’s always wise to err on the side of caution and get a little more flakes than what you think you may need when purchasing them.
One thing to keep in mind when determining your color choices is the base color coat of your floor. Grays and tans are the most common base floor colors, but you can do off whites and other colors as well. If you are doing a garage floor to full refusal, it’s still important to keep the base color coat in the same color tone range as the color flakes.
- Light coverage – requires .002 lbs per sf.
- Medium coverage – requires .01 lbs per sf.
- Heavy coverage – requires .04 lbs per sf.
- Full coverage – requires .15 lbs per sf.
Keep in mind these industry numbers are approximate and results can vary with application. We always recommend having extra on hand in case you run short.
Besides the obvious advantages of custom color combinations, color flakes also provide some sound deadening qualities and hide sub-surface imperfections in your concrete depending on how much flakes are applied. This means spider cracks and concrete patch work are less likely to show through the epoxy coating when using a heavy application.
In addition, vinyl color flakes are also flexible and strong. When applied to full refusal, they will add a minimum of 5 mils of thickness to your floor, improving both the durability and impact resistance of the surface.
Lastly, unlike epoxy they are U.V. stable. If you apply them to full refusal on an epoxy coating and then clear coat with a U.V. stable polyurea or polyurethene, you will never experience ambering (yellow tint) from exposure to direct or strong indirect sunlight.
There are some examples where you may not want to use color flakes. If your garage is used primarily for working on cars or other projects that may involve smaller parts such as nuts, screws, springs, cotter pins and etc, a coating without flakes is the preferred option.
The reason for this is that all those flakes tend to camouflage and hide these small parts. When dropped on the floor, you can spend quite a bit of time hunting the part down among the background of flakes. A garage floor coating with no flakes provides a solid color that makes it easy to find small parts.
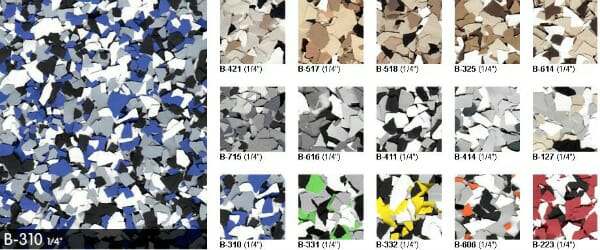
Torginol is one of the leading manufacturers and distributors of color flakes. They can be purchased directly or through most garage floor coating companies and vendors. They offer an overwhelming selection of colors and sizes to choose from. Our recommendation is to view their Signature Collection to get a good idea of what color combination you may like.
Most of their selections are a three or four color blend. This has proven to be the optimal number of colors that provide the best combinations that are pleasing to the eye. With so many combinations to choose from, it’s generally easiest to choose a predetermined blend. However, you can experiment with your own custom color blends if you like.
Torginol actually has very cool custom color designer. Just click on the garage floor image you like and then click “Color Flakes”. You can then choose to design your own blend on the right. They even offer the option to upload your own image of your garage floor to experiment with.
When doing your own blend, we recommend picking a dark color and then a light color to start with. Black and white is a good example. Pick a medium color for the third or forth option and then experiment with the blend ratios.
Just remember that flakes blend well when looking at them from a height of 5′ – 6′ instead of less than 2′ from your computer monitor or cell phone.
How to Apply Vinyl Color Flakes
When applying a garage floor coating yourself, the color flakes are always applied immediately after the application of the base color coat of your epoxy coating. You want to start application within 10 minutes of the final back roll while the coating is still soft and tacky. This allows the flakes to slightly sink into the coating in order to achieve a good bond.
Once the flakes have been applied, it’s very important to apply a clear top coat. The top coat is what locks in the color flakes and protects the color coat. A thinner top coat will provide some texture to a heavily flaked garage floor while a thicker top coat will create a smoother surface without as much texture.
One thing to keep in mind: though you may have some surface texture from a thinner top coat, it will not increase the anti-slip properties much more than what a smooth surface provides.
Additionally, home improvement store DIY garage floor kits only provide enough color flakes for a light coverage rate. This is because they do not include a clear top coat in their kits. Anything more than a light coverage results in flakes peeling up in high traffic areas when a clear coat is not used. If you want more flakes, you will need to purchase them separately along with the proper clear coat.
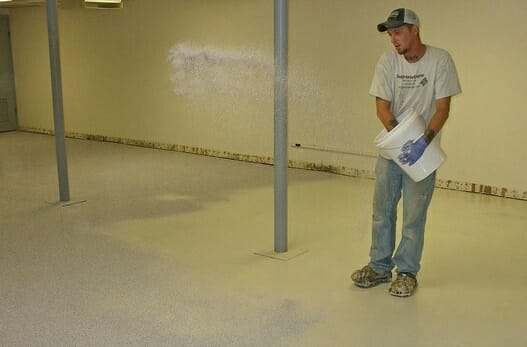 Color flakes being applied to full refusal – Photo courtesy of Supreme Crete
The most common question that people ask is; “What is the best method for applying color flakes”?
The most effective method is to place them in an empty bucket and then grab a small hand full at a time and toss them high into the air like you are feeding chickens. They should be close to bouncing off the ceiling. This allows for the flakes to disperse much better as they arc up into the air and then land back down on the coating in a nice and even dispersal.
The best way to practice your particular coverage rate is to toss them onto your clean concrete floor before you apply the epoxy. Do a small section to get the hang of it and then sweep them back up.
If doing your garage in sections, we highly recommend dividing your flakes up into equal amounts for each section. This will prevent over application of the first sections without enough left over for the remaining sections.
Do not toss the flakes directly at the floor! This will create dense areas of flakes that spread out in a “V” shaped pattern and are very hard to correct for.
If you are applying the flakes to full refusal, use a slightly modified method of not tossing them as high, but with larger handfuls of chips. You can work rather fast this way making sure you cover the entire floor.
If applying flakes to full refusal, you will need to remove all loose flakes that did not adhere to the floor. You should have quite a bit that were not able to reach the coating to stick. If you don’t, there will be problems with bare spots. Once done, sweep and then vacuum up the loose flakes. After that you will need to scrape the surface to break off flakes that are clumping in piles or sticking straight up in the air.
The easiest way to do this is to tape a 10” steel drywall taping knife to the end of an extension pole used for rolling. Keep the angle fairly shallow and push the scraper like you are sweeping a floor. You will not scrape the coating if enough flakes were applied. Once you are done, sweep again and then use a shop vac over the surface.
Because the surface is rough and irregular, the shop vac does a good job of pulling up any remaining loose color flakes. We even recommend using the plastic floor attachment of the shop vac as a final scraping tool as you go. Don’t fret about getting every last color flake. What you don’t get will become part of the top coat.
If not applying flakes to full refusal, you will still need to lightly scrape the flakes in order to break off any that are sticking up in the air at funny angles.
We like using a 10″ plastic drywall taping knife instead of a metal one like the full flake floors. In addition, apply a strip of duct tape across the edge as extra precaution to prevent scratching since the epoxy will not have fully cured yet.
Once the flakes have been scraped and cleaned up, you are now ready to apply the clear coat.
Now that you know how to use color flakes for an epoxy floor, have fun choosing your colors and the desired affect that you want. Whether you are applying your garage floor coating yourself or hiring a contractor to do it, you can feel confident in knowing that you chose the right color flakes and coverage rates for your taste.
Hi, I had my garage floor done with full flake to rejection and then top coated. There are a few spots in the corners that have some flakes sticking out and are rough. Can I use a taped scraper or sharp edge knife to remove the tip of the flakes out without touching the clear coat. Or should I call the company that did the job ? Thanks appreciate your feedback.
Hi Joyce. Call the company back and have them fix the issue. You shouldn’t have sharp flakes pointing out like that. If you try fixing it yourself, they may not claim responsibility if you need to call them back afterwards.
Ok thank you for your fast response
If I already applied the clear coat but some areas doesn’t have enough paint chips , can I apply another clear coat and put more paint chips on top and use another clear coat after so the chips get between coats ???
Hi Manuel. Yes, you can do exactly that and you should not be able to tell the difference.
can I do the all the edging first and then do the small sections in the middle? or should I do the edges in sections as well?
Hi Kevin. Are you referring to applying color flakes or applying the coating? When applying a coating, it’s imperative that you always keep a wet edge. If the edge gets a chance to set up at all, then there will be visible overlap marks of the coating. Small amounts of color flakes should be thrown high up into the air in order to allow them to evenly disperse as they fall to the still wet coating. Don’t apply them edges first and then the middle or a visible pattern will emerge. Just start at one side and work your way to the other, working back as you go.
Hi Kevin- I recently did my garage floor and I separated the floor into 4’x4′ sections. When applying the color flakes I started in the middle of each section and worked out, being sure to leave it thinner on the edge so that when I started to apply color flake to my next section I didn’t end with too much flakes on the edges.
For the process do I apply the first garage floor paint and apply the chips immediately and when do I apply sealer it so chips can harden
Hi Lulu. The color flakes are applied immediately after the coating. This is done so that the flakes can sink into the coating and adhere. If you wait to long, they will not adhere well. The color flakes do not harden. The clear coat is typically applied within 10-24 hours of the color coat, but this depends on the products you are using.
Hi, how long after the flakes are applied should a guy start scraping and applying the top coat.
Thank you
Hi Curtis. Since you are scraping the flakes, we are assuming it’s a full color flake application. You will need to wait approximately 10-12 hours before you can begin.
Hi Shea,
Is the 10-12 hour wait before scraping true for both polyurea and epoxy coatings? I’m doing a polyurea coating (full broadcast or near to it – it was hard to get the extra flakes right now) from Garage Flooring LLC and they indicated the time between coats is 2-6 hours (but must be no more than 20 hours).
I’m debating whether to use a pole sander or rent a floor polisher to smooth out the floor prior to applying the top coats. I’m not sure if this would require allowing the coating to dry longer.
Also, will the spiked shoes dent the previous coat when you apply the next coat?
Thanks,
Barb
Hi Barb. Many polyurea coatings require less time to cure between coats than epoxy. Based on Garage Flooring LLC’s recommendations, we would give it a minimum of 6 hours before scraping the flakes (yes, flakes have been hard to get, but it’s getting better now). As an FYI, the first coat of clear does not have to be applied within the recoat window. You could wait longer than 20 hours if you like. This allows you time to get the outcome you want. You can try the pole sander first. If you want something smoother, then you can rent a floor maintainer. The reason you can wait much longer is that all those flakes with their nooks and crannies that are anchored into the base coat is what provides the mechanical adhesion for the first clear coat. Any subsequent clearcoats, however, still need to honor the recoat window.
The spiked shoes are typically only used when applying color flakes to the color coat. They are not needed for clear coats since you should not need to be walking onto the still wet surface.
2 part question. Can I full broadcast with water based epoxy? Sherwin Williams 8100 low voc epoxy. And also, I was considering mixing 2 different size flakes. 1/4 mixed with the smallest available 1/32. Any opinions?
Thank you.
Hi Rob. No, Sherwin-Williams ArmorSeal 8100 is not an ideal base for a full color flake broadcast. The reason is that it’s a low solids epoxy with an average dry film thickness (DFT) that is thin. If you check the data sheets, you will see that it cures to a thickness of 2.0 -5.0 mils depending on the coverage rate. Full color flakes floors require a receiving colored base coating with a minimum 5 – 6 mils DFT. You would need to apply the 8100 at the lowest coverage rate of 130 square feet per gallon in hopes of achieving a full 5 mil dry film thickness. Color flakes average 5 mils thick and they get stacked up upon each other at odd angles when doing a full broadcast. Any receiving coating that is less than 5 mils DFT and the color flakes will not sink deep enough for the coating to spread around them and take hold properly. Most epoxy for full color flake coverage is greater than 90% solids with an average DFT of 9-12 mils. In addition, multiple coats of a clear coat are required due to the texture of the color flakes. Do you need a coating that is low to no VOC? Where do you plan to apply it?
In terms of the size of color flakes, you can certainly mix sizes, but it’s not recommended. The smaller size always tends to sink and get overlapped by the larger. It’s generally not the best of looks and why you don’t usually see it.
Thank you for the reply. I’m in California and that is why they offer a low voc product. We can’t even get mineral spirits here. The other reason is that my customer does not want me to grind the concrete, so I need to do a muriatic acid etch. The SW rep told me that would be acceptable. Concrete is in very good condition.
I am doing a top clear coat to the epoxy, and hopefully a medium broadcast will be acceptabe. Thanks again for your reply and knowledge.
Hi, what is a normal loss of flakes after application? I had the floor installed 2 weeks ago and still have loose flakes on my feet and clothes after I’ve been in the garage. Thanks!
Hi K. What type of epoxy coating system was installed? If it has a clear coat to lock in the color flakes, you should not have any flakes coming loose.
I had my epoxy floor just installed by a “professional” and I do not feel it is correct.
I do not like the coverage of the paint chips and feel that the speckles are in concentrated areas and that the floor appears patchy.
It was just done a day ago and when I run my hand over the floor, paint chips are coming up. The painter said this was normal and that it would help the patchy look. When I pass my hand over the top the floor does not feel completely smooth and I can feel sharp paint chips. To the eye the floor does seem shiny but I am concerned this is not done correctly.
What can I do to have them fix the floor as I paid a lot of money to someone who said they could do this correctly.
Thanks for any input!
Hi Sara. Was this professional and actual concrete coating contractor or a painter? What type and brand of coating was used and was a clear coat applied?
Professional painter who also said they could do epoxy floors. Real nice people, did a great job on the actual garage walls and ceiling painting… just concerned about blotchiness and finish of the floor.
I’ll have to get back to you about brand of coating and clear coat. Just sent a message to them about my concerns… waiting to hear back. Thank you for the quick response.
Hi
I was wondering what would be the best Sherman Williams paint to used with flakes as well as their best clearcoat? Thanks
Hi Trent. If you are going to use Sherwin Williams products, then we would recommend their ArmorSeal 1000HS epoxy and ArmorSeal Rexthane 1 polyurethane clear coat. The epoxy is a higher solids epoxy that is solvent-based. It’s much better than what you get from your local home improvement stores, but not as good as the product you can get from concrete coating vendors online that sell commercial quality coatings.
Thanks. I would like to do the garage myself and was hoping that you could point me in the right direction on a less expensive alternative. I am able to get the flakes for $1/lb. Also should I get 1/4 or 1/8 flakes for a one car garage or does it matter. I should also point out that I rarely park my vehicle in the garage for anything other than regular maintenance. Thanks again
Are you asking for a recommendation of something less expensive? Is so, that will put into the thin, water-based epoxy with a life expectancy in the 3
-5 year range. 1/4″ color flake is the standard size that you see for most garage floors.
Hi there
I had my epoxy floor done by a professional company about 3 weeks ago. I was wondering if I’m able to add another colour of flake ( black ) to the existing floor? What would that involve? And can it be done? Thank you
Hi Teresa. It would involve two additional clear coats of the same coating material used. The current surface would need to be deglossed and roughed up in order for the new clear coat to adhere. As the new clear coat is applied, the black color flakes would be applied as you go. The second clear coat will be applied on top to lock in and protect the color flakes. This tends to work well if you are adding color flakes to even out distribution. However, it will not work out as well if you are only doing it to add another flake color. The reason is that the black flakes were not premixed with the other colors from the start. As a result, the black flakes will not blend as naturally with the other colors. The other option is to apply the base color coat over the existing surface (same prep), apply a new mix of color flakes that includes the black color, and then clear coat over that.
I have a ? IM doing a floor in a restaurant the owner picked a dark grey color.Problem is he only wants blue chips flakes.So my ? Is can I paint the flakes before applying them
Hi Lynn. Why do you want to paint the color flakes? They are available in multitude of colors. Just contact Torginol. They must have at least a dozen shades of blue.
If I put down my epoxy and notice some areas that don’t have enough flakes. Can I put them down before the clear coat goes on? Or will they just come up with the roller.
Hi John. No, they will just come up with the roller as you suspected. The only way to fix the issue would involve mixing up a small batch of clear and applying it in those areas with not enough flakes. Apply flakes into the clear to your satisfaction, let it cure long enough and then clear coat the entire floor. It can only be done this way if are still in the recoat window for the color coat when it’s time to apply the second coat of clear. Otherwise, apply a full coat of clear, apply the flakes to the areas that you don’t like, and then apply another coat of clear.
We used Sherwin Williams Armorseal 1000 and 2 part Resutile 4686 as our top coat as recommended by the Sherwin Williams salesperson. We followed the directions exactly and have a few areas of our floor where the top coat that isn’t as hard and is kind of puffed up. We put an even coat over everything. What went wrong? Is there any way to fix this?
Hi Nicole. How long of a period (in hours) was there between application of the color coat and the Resutile? What was the humidity at the time? Also, what coverage rate did you use?
It was about 24 hours in between the base coat and the top coat. We applied this on our climate controlled garage with our air conditioner set at a constant 72 degrees. We used 2 “kits” of the A and B mixture of Resutile on 836 square feet with a bit left over.
Hi Nicole. You were well within the recoat window and the coverage rate it was applied at was not too thick. We are assuming the humidity was below 80% if you had an air conditioner running. Was air blowing across the surface by any chance? This can actually have an effect on coatings from creating air bubbles to not curing properly. The other possibility is a contaminant on the floor. If that is not the case, then we suggest contacting Sherwin-Williams and speak with a tech to discuss your issue.
We didn’t have any air blowing directly over it. And we actually ground the concrete floor before hand to ensure there was no contaminants.
My next question is it looked so bad that we took a puty knife and gently scraped some of the top coat off (we actually did this to the entire floor, not just the bad spots). Can we clean up what we scraped off and try to apply another layer of Resutile?
The contaminant would have been on the epoxy surface, not the concrete. The fact that much of the coating can be hand peeled helps to support this theory, but it does not substantiate it. An example of a contaminant would be a very fine (microscopic) layer of moisture on the surface. Though the air was conditioned, the cooler surface of the concrete could have been at the relative dew point and formed such a layer over 24 hours. Garage doors typically do not seal well. If it was hot and humid outside, some of that air could have found it’s way into the garage and come in contact with the floor.
We would recommend removing as much of the clear coat as you can. Light scraping of the epoxy surface to remove it is fine. Once it’s removed, you will need to rough up the epoxy surface with 120 grit sandpaper. It will haze the color and make it lighter. Sweep / vac and then just before application of the clear coat, wipe down the epoxy surface with denatured alcohol on a microfiber mop pad. This will remove any remaining dust and possible contaminants. It evaporates in about 30 seconds, so after than you are read to apply the clear coat. Once the clear coat begins to go on, the epoxy color and gloss will return just as before.
I recently had my porch and lanai floors done. They look beautiful! The porch feels very smooth but the lanai floor has a few lifting flake points. When I rub across in socks the socks snag in some spots. Will this correct itself by walking on it with shoes or do I need to call back and get it repaired? Ty…Christine
Hi Christine. You didn’t say what materials were used for your porch. I’m assuming it was a paint since epoxy should not be used outdoors or in areas where it is exposed to sunlight for periods of time. It sounds like a clear coating was not applied. If that is the case, then it’s perfectly normal for a few color flakes to come loose or lift at the edges and break off. They don’t all lay perfectly flat and adhere completely. A clear coat is what locks in and protects the color flakes and prevents them from coming loose.
If you are looking for 3 colors flakes over top of a resurfaced cement base, Do you mix all three colors in a bucket before application, or one color at a time. The end result is Blue as the primary color you want most to show with black and silver?
Also being that the polyaspartic coating can be slippery is it recommenced to add SSR-20 Antislip to the process… ? Upstate NY garage withs no and slush falling off car in winter -10 /90 temperature variation in the garage.
Thanks Diane
Hi Diane. You always fully mix your color flakes in the bucket first. This also gives you an idea of what the overall color palette will look like. When tossed up into the air, the flakes will randomly disperse into a nice pattern as they fall to the floor. Yes, we highly recommend mixing an anti-slip media into the final coat if the garage floor will be getting wet from snow and slush. If you want to avoid the floor getting wet from slush, road salts, etc., you might want to look into purchasing a containment mat to use during the winter. These keep the floor dry and allow you to squeegee the water right out of the mat and out the door.
Hi Shea – how would you mask a small epoxied section for the flake application stage? There is a small block of text in my slab (‘post-tension’ etc) that I’d prefer to keep legible and free of flake. Thanks.
Hi Arthur. You can’t mask it off since the flakes are tossed when the coating is still wet. This allows the flakes to sink in and the coating take hold. What you can do, however, is cut a piece of cardboard to the size you need to block the flakes. Stick a few toothpicks in it for legs so that the cardboard is only 1/2″ at most off the ground. Once the coating is applied and you are ready to toss flakes in that section, place the cardboard with the toothpick feet over the area. Toss the flakes as normal (high into the air to fall down naturally), then remove the cardboard immediately after. The coating will fill in the tiny depressions from the toothpicks as it does with spiked shoes.
Shea, I applied the top coat this morning. It looks great, but there is also a problem that the top coat is kind of thin, so I’m worried that it will wear out quickly over the flakes. And there’s also some flakes half attached to the base coat and I failed to remove them. They now stick out of the surface like a “L” shape. Does that matter? Anyway to get it right?
How much top coat do you have left?
Just one 1.5 gallon top coat and I applied all of it. I had compared 3 manufacturers and all of them provide 1.5 gal top coat to cover larger size than my 450 sqft garage. The one I used is https://armorpoxy.com/products/armorultra-military-grade-topcoat-3-sizes-1-5-3-15-gallon-kits/. The description says it can cover 525 – 600 sqft. Do I need to apply another coat? The shipment takes about 3 days and tomorrow is the Independence day. So the best chance I can get another kit is the end of this week and the recoat window will be far passed.
This was a light to medium flake application, correct? If so, the amount of clear coat is correct. Polyurethane does not go down thick, nor does it need to be. It has a very high abrasion rating which translates to long wear. The flakes that are standing will get knocked down with traffic and should not be very noticeable. Our recommendation is to leave the floor as is and use it. You can always degloss the surface with light sanding and apply another coat at some future date if you feel it needs it.
Great! I’ve been frustrated all day about that. Now I’m happy again. Thank you! : )