
Epoxy-Coat® is a well-known brand that has been around for over 35 years. They have always been recognized for their commercial quality, single coat epoxy garage floor coatings. Admittedly, we had been putting off doing a review for a couple of reasons. However, due to recent changes in their lineup we found that it was time to re-evaluate Epoxy-Coat® and everything they now have to offer.
Why did we put off a review? Simply put, it had to do with the fact that Epoxy-Coat® only offered one thing for many years. A highly successful 100% solids epoxy garage floor coating that they marketed as a durable one coat system.
We believe that their strategy was to compete with the less expensive and inferior DIY epoxy paint kits that were, and still are, available in the market today. It’s a very large audience that supports these types of DIY products.
Though their one coat kit is more expensive than these simple water-based DIY kits, the Epoxy-Coat® garage floor coating is up to 4 times thicker after curing. It’s 4-5 times longer wearing, more resistant to stains, much more glossy, and overall a far better value.
The benefits of garage floor epoxy are many and the quality of the product makes a big difference. If you are not familiar with high solids epoxy, we suggest reading our article that explains the differences in epoxy. It discusses solids content, and the advantages of a 100% solids epoxy and more.
The rub for us, however, was that for many years Epoxy-Coat® did not offer, nor did they recommend, an epoxy primer. The importance and benefits of using an epoxy primer with 100% solids epoxy cannot be overlooked.
High solids epoxy can occasionally develop some application issues when applied directly to concrete without the use of an epoxy primer. This includes fisheyes, bubbles, and pinholes. It’s one of the reasons that they address these issues in their application instructions.
In addition, 100% solids epoxy it does not always penetrate concrete as well as coatings with a lower solids content. This is due to the thicker nature of the coating which is more viscous.
As a result, it can lead to possible delamination issues with concrete that is more dense (harder and less porous). This is particularly true if it has not been prepped as well as it could have been.
Epoxy primer is technically not a requirement. However, our position at All Garage Floors has always been that the application of a 100% solids epoxy should include the use of an epoxy primer coat first. In fact, it’s standard practice for most garage floor coating contractors and professional installers.
Many vendors who sell 100% solids epoxy in kit form only offer it with an epoxy primer. You cannot opt out of using the primer in their kits.
Another issue was that for quite a few years Epoxy-Coat® offered a clear epoxy top coat option. However, they didn’t really promote the advantages of it either. Again, we feel this was a marketing strategy at the time to compete against the cheaper DIY epoxy paint kits.
None of this meant that their epoxy performed poorly without a clear coat or that people routinely suffered the maladies of applying a 100% solids epoxy to bare concrete. On the contrary, their epoxy is very good. The majority of people who used it during all those years left great reviews. And for the most part, they highly recommended it.
We also want to make clear (pardon the pun) that you do not have to use a clear top coat to realize the many advantages that their 100% solids epoxy offers.
So long story short, we just didn’t agree with Epoxy-Coat’s® philosophy regarding epoxy primers and we weren’t fond of the fact that they did not tout the benefits of a clear top coat. Thus, they were not high on our radar in terms of doing a review. If asked, we always stated that it was an excellent product though.
Well the garage floor coating market has changed over the years and so has Epoxy-Coat®. Not only do they offer an epoxy primer as an option with their kits, they also have various kit options that include an epoxy clear coat (which they highly recommend). They also have an additional option of using a high performance polyurethane clear coat.
Furthermore, they have a variety of other accessories and repair products that you can purchase in order to help accommodate most of your installation needs.
In short, Epoxy-Coat® has become a full service garage floor epoxy vendor that offers a variety of coating systems instead of just one.
This post may contain affiliate links. If you use these links to make a purchase, we may earn a small commission. You can read our full disclaimer here.
Reviewing the Epoxy-Coat® Garage Floor Coating Kits
Now that we have we have provided a brief history of Epoxy-Coat’s® evolution, let’s discuss what their kits entail. We will cover how they perform and what they can provide for you and your garage flooring needs.
100% solids epoxy
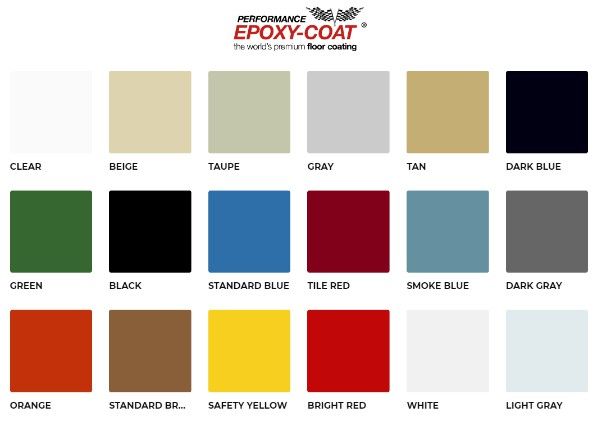
At Epoxy-Coat’s® core is their very popular commercial quality, 2-part 100% solids cycloaliphatic epoxy coating. It is available in 17 base colors plus clear. It may sound like a mouthful, but we will explain.
100% solids provides for a much thicker coating. It means that there are no carrier agents (water or solvents) to evaporate from the part-A epoxy resin and part-B hardener once the coating is mixed properly and applied.
All floor coatings are applied at an approximate wet film thickness based on stated coverage rates. As an example, one of the popular water-based DIY epoxy kits is 50% solids by volume. It will provide an approximate wet film thickness of 5 mils based on the coverage rate.
Once cured, it will have an approximate dry film thickness of 2.5 mils. This thinner film thickness occurs as the epoxy cures. The water evaporates and the coating thickness shrinks.
The average wet film thickness of Epoxy-Coat® is 9.7 mils when following their recommend coverage rates. Because there are no carrier agents in the epoxy to evaporate, the coating will not shrink and the dry film thickness will remain at 9.7 mils.
Additionally, because there is nothing to evaporate, the coating has no VOC’s and it does not produce a strong smell. This is ideal for applications within the home. A basement is a good example. It also means that it can be used in states with strict regulations for VOC content.
This thicker coating provides for much longer wear and durability. In addition, it provides better stain and chemical resistance, as well as high resistance to hot tire pickup and road salts.
Moreover, because the coating does not shrink while curing, it will self-level and hide spider cracks and other small irregularities in the surface of the concrete. The lower solids DIY epoxy kits will expose these irregularities as it shrinks while curing. This is a common complaint.
Lastly, Epoxy-Coat® also promotes their epoxy as being cycloaliphatic. This is achieved through special curing agents that are used in the part-B hardener.
Cycloaliphatic epoxies can be more chemical resistant, have improved moisture tolerance during application, have a greater resistance to water spotting, and increased outdoor weatherablity.
About that Epoxy Primer
As we stated earlier, Epoxy-Coat® now offers an epoxy primer option that you can select with the purchase of most of their kits. If the option is not available in kit form, you can always add it to your cart separately.
Most epoxy primers are either clear or offered in different color tints. Colored primers are ideal when using a light colored base coat as they can prevent color bleed through in light colored epoxy due to darker concrete.
The Epoxy-Coat® primer is actually dark in color. We discovered this when we made a few phone calls asking questions in order to evaluate their customer help line. The primer consists of a collection of remaining product from large batch runs that is leftover and cannot fill a standard packaging container.
As a result, the epoxy is dark in color from all the different color batches that are combined. It is then thinned to make it less viscous. Lab testing has shown increased penetration into concrete substrates (This is good!).
So don’t panic if you open up a primer kit to find it dark in color. In fact, dark primer is actually preferred when applying metallic epoxy.
Garage Floor Coating Kits and Systems
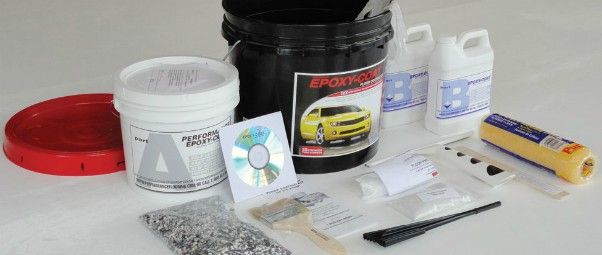
Epoxy-Coat® creates a number of garage floor coating kits that you can build around their 100% solids epoxy.
Most all kits include decorative color flakes, aluminum oxide non-skid additive, and a phosphoric acid clean and prep solution to etch the concrete.
Additional options that you can choose for most kits are application tools, epoxy primer, polyurethane clear coat, spiked shoes, and a U.V. additive. We listed their primary garage floor coating kits below.
Good Kit. This is their customary 9.7 mils single coat garage floor epoxy kit that they are famously known for. The kit includes your color choice of epoxy and enough color flakes for a light density application.
The Good kit is a good value for those on a limited budget that want a good quality coating for the least amount of money.
Better Kit. This is multi-coat kit that includes your base 100% solids epoxy color coat, enough color flakes for a medium density application, and a clear polyurethane topcoat to lock in the color chips. This kit provides for a total coating thickness of 13.7 mils.
Best Kit. It is similar to the Better kit, but includes enough color flakes to apply to full rejection. This means that the color flake combination that you choose will dictate how the floor looks. In order to cover all of those flakes in one coat, a 100% solids clear epoxy topcoat is used instead. Total thickness is 40+ mils.
Super Kit. It is similar to the Best Kit, but it also includes their high performance polyurethane clear coat to apply over the epoxy clear. This provides the best abrasion and chemical protection.
Interestingly enough, they do not include epoxy primer as an option in the Best and Super kits. We believe their reasoning for not offering it as an option is due to the color flakes. You wouldn’t have to worry about cosmetic issues in the color coat due to it being completely covered by color flakes.
You can find their epoxy primer here.
Metallic Kit. This kit consists of the 100% solids epoxy, metallic tint and the epoxy primer. We highly recommend the optional polyurethane clear coat for a metallic epoxy garage floor coating.
Accessories
In addition, Epoxy-Coat® has touch up kits available for purchase for their colored and clear epoxy. This is a great option to have available as many large vendors do not offer such kits for possible repairs later down the road.
They also have available a concrete patch kit. This can be used for crack repairs, filling divots, pitting, spalling, and filling joints.
About those Application tools
Our experience has shown that the application tools most garage floor coating vendors supply rarely is enough to get the job done. Epoxy-Coat® is no different. It’s a good start, but you need more.
Our suggestion is to purchase additional supplies online or from your local home improvement center. This would include high quality lint free rollers, latex gloves, a cheap tarp to do your mixing and assemble product, and etc.
The additional supplies and planning out all your steps in advance will always lead to better results and an experience that is not hectic and full of anxiety. Planning ahead this way allows for you to ask questions before you begin. You then will not be in the undesirable position of having a question right in the middle of your project.
Where to purchase Epoxy-Coat®
Purchasing Epoxy-Coat® products is actually quite easy. They have a full service website with all their product kits, options, and accessories available.
Shipping for most garage floor kits is free. However, the Best and Super Kits require a freight quote due to the additional weight of all the color flakes that are required. Orders over 250lbs require a freight quote as well.
CHeck here for Epoxy-Coat® Pricing
You can email or give them a call if you have any questions. We did this a number of times to evaluate their customer service. Our calls found their service representatives friendly and knowledgeable whenever we contacted them. We can’t emphasize enough how important good customer service is when working with concrete coatings.
Epoxy-Coat® even has an installation division if you do not want to apply their product on your own. You can contact them for more information and pricing for that service.
Final Thoughts
Can we recommend Epoxy-Coat®? Yes we can. We already knew they had good epoxy. Plus we readily admit that we like the changes they have implemented in the last years. It’s a great improvement to an already proven product.
Why the changes? Our guess is that it most likely has to do with the fact that the current DIY garage floor coating market has grown tremendously in popularity. As a result, consumers are becoming more educated with the process.
We feel that as good as their 100% solids one coat epoxy kit is, it had left them in a type of “no man’s land” so to speak. Educated consumers who didn’t want the limited performance of the cheap DIY epoxy paint kits began exploring options for multi-coat epoxy systems.
Fortunately, Epoxy-Coat® recognized the changes going on in the market and they adapted by providing more options. They truly are a full service floor coating vendor that offers high quality product and multiple garage floor coating systems at a good price point.
You can be assured that you will be getting a good value and excellent product if you choose Epoxy-Coat®
What is the process used to repair garage floor surface imperfections before applying the final coat? Road salt has eroded the smooth concrete surface.
Hello Mike. It requires cleaning the surface well and removing any loose debris. You then trowel into those areas a polymer-modified repair cement or epoxy repair slurry. We have an article on the process here. Such repairs do require that you grind the area flush with the existing concrete in order to provide mechanical bite for the epoxy and to ensure an even transition so that the repair does not telegraph through the coating.
Your website is awesome, and has been my bible throughout the process of choosing and installing an epoxy coating. I was originally going to use EpoxyMaster, but saw this review and checked out Epoxy Coat, eventually purchasing 2 premium kits (500 sq ft each) and 2 full primer kits for about $1400. While the price and quality of the product seems good, my order was riddled with mistakes. They only shipped half my color flake, they left out 1 of the 4 boxes of kit components (mixers, gloves, rollers, etc), and most importantly they put the Part B hardener for my clearcoat in the wrong bucket.
When I opened my primer, it had a Part B that said “Best used with clearcoat”. I didn’t think anything of this at the time, because I’d read in this article that they thin the primer to make it penetrate better and assumed this was how they did it. Base coat had a different Part B without this label. So come Sunday morning when I opened my clearcoat bucket, I was confused to find the clearcoat did not have a Part B that was “best used with clearcoat”. At this point I had 3 hours left until I was going to be over the 24 hr limit for recoating, and about that much time until it rained. A call to their after-hours technical support got a voicemail and I left a message that was never returned. I put down the clearcoat using the hardener that was for the primer, and as far as I can tell it looks fine. Though after 48 hrs I can still dent the clearcoat with my fingernail (and its supposedly ready for heavy traffic after 24). During their business hours, they have been very helpful, dealing with all these issues without hassling me about their mistakes, and adding some extra grit as well, but we’re still unsure of how it will impact things that we used the “wrong” hardener for both our clearcoat and our primer coat.
Also, when I asked them about their primer, they said it was exactly the same as their base coat, just a different color. I specifically asked if it was different to penetrate more easily and they said no. The “kit” components (at least for the premium kit) were comprehensive. Each 500 sq ft premium kit (w/primer) came with 3 rollers, 3 squeegees, 3 pairs of gloves, 3 paint brushes, 1 pair of spiked shoes, 5 lbs of (custom, 3 color) flake, a packet of non-slip grit, 2 packets of acid mix, 3 mixers, 3 paint/measuring sticks. Other than my own tarp and roller frame/pole, I didn’t need to buy anything else.
Do you know the difference between the hardeners used for clearcoat and other coats of epoxy? Is this something that is going to affect the integrity of our coating?
Is there a trick to keeping bugs from entombing themselves in each layer of epoxy as it dries?
Hello Nick and thanks for the great feedback. Unbeknownst to most people, clear epoxy is not “water clear”. It actually has a slight tint to it. It’s not noticeable at all unless it’s applied over a white surface or compared to a clear polyurethane or polyurea. The part-B hardener labeled “best used for clear” most likely has an additive that helps to reduce this slight tint to make it more clear. It actually takes almost a full week for epoxy to fully cure. This is why you want to hold off walking on it for 24 hours and waiting 48 to move items back onto the floor. You should wait 4 days before driving on epoxy. Keep checking it and if it has not become significantly harder within 4 days, then you will want to give them a call.
The primer is thinned. When we called asking some pertinent questions about the primer, we actually had to be transferred to one of their technicians to get the facts about it.
It’s good to hear that customer service with Epoxy-Coat has been good once you identified the issues. It’s the same response we have heard from others in terms of customer service. Unfortunately shipping mistakes can happen. Your feedback is a great example of why we always say that you need to plan out each step of the process well before you begin. This includes examining all materials. This usually allows for time to get things corrected before you begin. The last thing you want is to discover that you have an important question or that something is missing while in the middle of the application process. And as luck would have it for most people, it’s generally late on Saturday or sometime on Sunday when this happens.
As far as the critters go, try to keep any man doors shut during the application process and while it cures. When done or between coats, close the garage door down to a point where you can tape some cheap plastic drop cloths across the bottom of the door and then set some heavy objects across it on the driveway. This will usually keep most bugs out.
Since these coatings take a week to cure, can they be applied to different bays at different times? I have a large garage and it would be more secure to move everything to one side and epoxy half the garage, then move everything to the cured side a week later to coat the other side. Is this advisable? Can a new coat adhere to a cured coat?
Hello Scott. If you have a contraction joint that runs down the middle of the garage, then that can be used as a natural border to do half of the garage floor at a time. If you don’t have a joint then it can’t be done without a noticeable difference between the two halves. Coatings do not blend together like paint does on a wall. You will distinctly see where one half overlaps the other. If you don’t have a joint, one option is to rent a U-Haul moving truck. You can usually rent one for $16 – $26 a day depending on the size, with little charge on mileage since you can leave it parked and locked on your driveway. It makes for cheap and convenient storage.
Thanks for the ideas Shea! I appreciate the help!
You are welcome, Scott. 🙂
How can I find an installer?
Hi Deb. Companies that sell quality epoxy coating products typically do not have an installation service. If you want someone to install it for you, then we recommend hiring a professional garage floor coating contractor or company. They supply their own product and do the installation. Applying a high quality coating system is not like applying paint on a wall and should only be done by those who specialize in concrete coatings. DO NOT hire a handyman or local painter. We have an article here that discusses how to find a good garage floor coating company.
Hi Shea,
Your description and guidance was excellent. I have not yet committed to an epoxy product as I had been initially told about RockSolid being 20X stronger than regular epoxy, but then as I have done more research, this product does NOT cover the quoted square footage that as advertised. I have a 4.5 car garage and this will require approximately double the RockSolid product. As this becomes a big investment with many hours of labor divided up over 4-5 days, is there a product that you prefer or recommend over the other. Much appreciated.
Hi Al. RockSolid is actually comparing their product to 1-part epoxy paint and not a true 2-part epoxy coating as we discussed in our article here. It is not 20x stronger than epoxy. In fact a 100% solids epoxy such as Epoxy-Coat is going to be stronger than RockSolid. Also, RockSolid has complaints from coverage issues that results in a second color coat being needed when these issues are encountered.
Not knowing what your budget is, one of the best DIY coatings that is of commercial quality are the single-part polyurea kits. They are easier to install than epoxy systems. An epoxy system that consists of an epoxy primer coat, high solids based color coat, optional color flakes and a high performance clear coat is actually less expensive, but it does require a little more work on your end due to mixing and limited pot life. Epoxy-Coat offers such systems as do many of our sponsors.
Hi Shea,
I’m just starting to plan my garage epoxy project and have to say that this is the best site for advice that I’ve seen! Thanks.
I’m hoping to go with the Epoxy-coat Super kit. I’m still a bit confused on the pros and cons of ordering a primer. You say E-C thinks it’s not needed because of the thick layer of flakes. That’s aesthetically true, but I assume there are other bonding related benefits to a primer? Your advice would be great. Thanks again!
Hi Tony. The primer coat is sometimes referred to as the “ugly coat”. The reason for this is that it can look splotchy, have some bubbles from outgassing and other cosmetic defects that can occur with the first coat to bare concrete. In addition, a primer coat provides for a thicker overall build as well as better coverage rates and more thickness to the color coat since the concrete will not be absorbing it like it did with the primer coat. We also have an article here about the advantages to using a primer coat with 100% solids epoxy.
How long do you have to wait after the primer coat to apply the epoxy on this brands system?
Hi Jacob. Depending on temperatures, you need to wait 8-12 hours before applying the color coat. It should not feel tacky to the touch. If you wait longer than 24 hours you will need to rough up the surface before applying the color coat.
I need to cover a 28×28 shop floor, or 748 sq ft. I’m guessing that I need a full kit + half kit, but do I do it all at the same time, or tape off and do the full, and then the half?
If I do it all at once, what’s the best vessel to mix it all up in?
Thanks!
Hi Todd. You never mix more than one kit at a time when applying epoxy. Epoxy is exothermic and creates heat when the two components are mixed together. The more that is mixed in one bucket, the more that heat builds and reduces pot life (application time). This is why 100% solids epoxy is poured out on the floor in ribbons immediately after mixing. When doing a floor that will require more than one kit for a single coat, the key is to keep a constant wet edge as you go. A helper is important. In addition, coatings do not blend like paint does on a wall. They are very thick and where one coating overlaps another that has started to cure, it will be very obvious and does not look good. Always use a natural barrier such as a contraction joint if doing a floor in sections. I suggest you read our article on how to apply a garage floor coating.
Thank you for your reply, Shea,
That’s exactly what happened, I called them and I emailed them regarding the pigment amounts and they confirmed it was OK, that is why I am so frustrated, because they told me to go ahead basically.
Thank you for sharing that I can just go ahead and maybe sand the surface to make it porous again. I will try that, but the new coat is going to be from some other supplier instead.