

We’ve all seen them. Those annoying puddles of water that collect in low spots of your garage floor. They typically form when you hose out the garage or after you have pulled your car in and out a few times on a rainy week. Most are shallow enough that the water can evaporate in a few hours or so. However, it seems the deeper ones can linger long enough to start breeding mosquitoes if you don’t push the water out the door.
Examples of more serious low areas can be the sides, corners, or back end of a garage floor. They can collect large volumes of water from being lower than the rest of the slab. This is the type of concrete floor repair that needs careful consideration.
Low spots or depressions in the middle of a garage floor can be a nuisance as well. However, we don’t always recommend trying to fix them unless they are unusually deep. We will discuss this in more detail shortly.
If you plan to seal the concrete, apply a floor coating, or some other garage flooring option, then you most likely will want to explore the options of leveling unusually low areas before you start.
Even if you aren’t planning a flooring upgrade, deep low spots can cause efflorescence from constantly being wet. They can even discolor the concrete from water sitting for long periods.
Fixing low areas of the garage floor is never fun. However, the good news is that it oftentimes can be done. It just requires a bit of work and the right materials. What materials you use may depend on what you plan to do with the floor.
So let’s look at what causes low areas of the garage floor, determine if they should be repaired or not, and what materials are required to fix them.
Why your garage floor is not flat and level
Before you get too aggravated about these uneven areas of your floor, the first thing you should know is that garage floors are rarely level or flat. It’s very common to have the occasional low spot, high spot, or raised edges that trap water.
Most of these spots are acceptable and just an annoyance. However, sometimes you can have a low spot that is just too deep or too large to ignore.
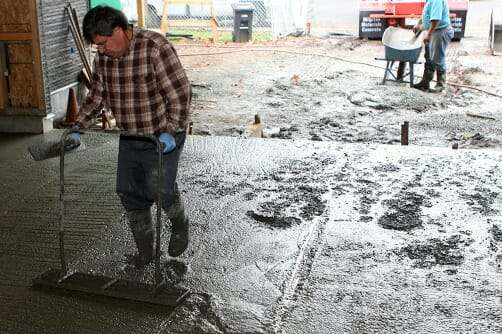
Garage floor slabs are typically placed separately from the rest of the foundation. As a result, they are not always given or demand the same close attention by builders as other areas of the home that require the floor to be as flat and level as possible. They are usually finished by hand and rarely machine-troweled due to the extra expense.
In addition, bad lighting when finishing, poorly set forms, overly wet concrete, and poor finishing techniques can all contribute to low spots.
Depending on what area of the country you live in, some building codes require that garage floors meet a minimum slope pitch toward the garage door. This is particularly true for homes with basements that may be underneath.
The slope is required to facilitate drainage or to allow for noxious, heavier-than-air gasses to flow out the garage door. This can make it more difficult to get the concrete flat (not level), particularly if the finishers are not paying close attention.
Drains are another consideration. If you have a drain in your floor, then the surface can’t be very flat since the slope of the floor has to pitch towards the drain. However, it can be frustrating when you have areas that form deep puddles and don’t flow toward the drain.
And then there is the issue of the floor being fairly level and flat. What??
Think about it. Concrete floors need a minimum pitch of 1/8” to 1/4″ per foot for water to flow across the surface on its own. The amount of pitch is dependent on how smooth the concrete is. That works out to a minimum 2.5″ – 5″ drop over 20 feet.
If your garage floor is reasonably flat and level, the water can’t move and doesn’t have anywhere to go. It will tend to puddle anywhere it can and just sit there. Any slight depression on the surface will create the illusion of low spots on your garage floor when there really isn’t any concern.
This post may contain affiliate links. If you use these links to make a purchase, we may earn a small commission. As an Amazon Associate, All Garage Floors earns from qualifying purchases. You can read our full disclaimer here.
Measure and Determine If Low Spots Need To Be Filled
The first thing you need to do is outline the boundaries and measure the depth of the low spots that you believe need to be fixed. Knowing the depth and area will also help to determine how much repair material will be needed.
If you are not sure where the boundaries of the low spots are you can use a straight edge to find them. You can also flood these areas of the floor with some water. Once most of the water has drained and settled, outline the boundaries with a concrete crayon marker.
Markers such as these require a little bit of effort to remove. You don’t want them erased from walking on them. We recommend something like this one from Amazon.
Remove any water that was used once marked. Next, place a straight edge over the low spot from boundary edge to edge. This will allow you to measure how deep the depression is.
For low areas in corners, sides, and back of the garage floor, we recommend placing a long level or straight edge from the boundary edge to the wall. This will help you to determine the depth as well as how far up the wall you will need to go with repair material.
If you don’t have a straight edge that is long enough, then we recommend using a string. Have someone hold the string at the boundary edge and then pull it tight to the wall. You can hold a level to the top of the string as you move it up and down the wall to find level and mark it.
We recommend that you consider filling any low spots in corners, sides, and back of the garage where water sits up against a stem wall, concrete block, or some other structure such as wood.
However, we don’t always recommend filling other areas in the middle of the garage floor unless they are greater than 3/16 of an inch deep. Particularly if you don’t plan on covering the repair with a floor coating or some other flooring option.
The expense and effort are not always worth it. More importantly, if not covering it up, the repair is going to stick out like a sore thumb and be very obvious. You cannot make a concrete repair blend with the rest of the floor no matter what type of material you use.
In addition, it’s important to investigate where this water will go once the low spot is made fairly level respective to the surrounding area. You don’t want to be chasing a puddle of water all around your garage floor because you did not consider this.
If water does move, it should be moving toward the garage door, a contraction joint, or a drain. Not just the next lowest spot on the floor.
Raised edges that create low spots
You could have a fairly flat garage floor that traps water and creates the illusion of low spots. This is most common near the troweled edges of the concrete slab and deep “V” shaped contraction joints.
The reason for this is that concrete shrinks as it cures. This happens when water from the concrete mix evaporates from the slab during the curing process.
The surface of a slab will cure faster than the rest of the concrete if not properly covered or kept damp. When the surface cures faster, it will contract at a rate greater and earlier than the rest of the slab.
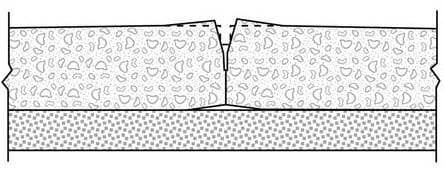
As a result of this contraction, the surface pulls at the edges of the concrete and troweled joints causing them to curl up slightly. These curled edges then create a dam of sorts that can trap water instead of letting it flow into the joint or out the garage door.
Attempting to fill in low areas caused by concrete edge curling is problematic. The best option if this appears to be the issue is to grind these edges flush with the rest of the floor. This has solved more than one low spot problem.
We have an article here about concrete grinding. We recommend using a 4″ or 7″ angle grinder with a concrete turbo cup wheel to grind such areas.
Repairing And Filling Low Areas Of The Garage Floor
Fortunately, most low spots in the middle of a floor are not too large or deep. They are usually less than 1/4″. For these areas, we like to use an epoxy slurry for the repair. This is a mixture of 100% epoxy with a silica sand aggregate. This is the same type of product used to repair pitting and spalling.
Epoxy slurry fills and repairs are extremely strong. The sand acts as a filler and provides the ability for the epoxy to be troweled smooth with a cement float. It is ideal if you are going to paint, epoxy coat, or cover your garage floor afterward. In addition, it acts as a sealer and is freeze-thaw resistant.
You can see an example of such a product here at Legacy Industrial.
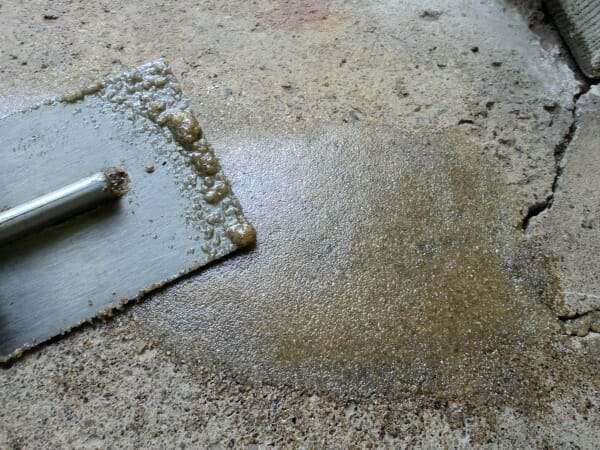
This is an example of an epoxy sand slurry used for a smaller repair. When mixed in larger quantities it works very well to fill and level low spots as well.
The areas to be filled and leveled need to be clean and dry, free of all oil stains, waxes, or sealers. Prep the surface by grinding or etching. It will not adhere well if this step is not followed. If grinding, you can use the same type of grinder we mentioned above for raised concrete edges.
Follow the mixing instructions for the epoxy patch repair material. You should use less sand for workable self-leveling properties and mix only that which you need. You can use the depth and total area of the low spot to determine how much material you will need.
Once mixed, immediately begin the application. You will only have approximately 20 – 30 minutes of working time.
Dump the repair material onto the low spot and apply it with firm pressure. Once it is spread out over the area you can begin troweling it smooth with a cement float. You can achieve a clean finish if you wipe the blade of your float with Windex or acetone before the final passes. Use a straight edge or level to check your work.
After the repaired area has cured for a minimum of 12 hours, you can finish prepping the repaired area if you will be applying a floor coating. This will require that you grind the surface and edges to make an even transition.
As good as epoxy slurry is, it can get expensive fast for large areas. Plus, it doesn’t self-level on its own.
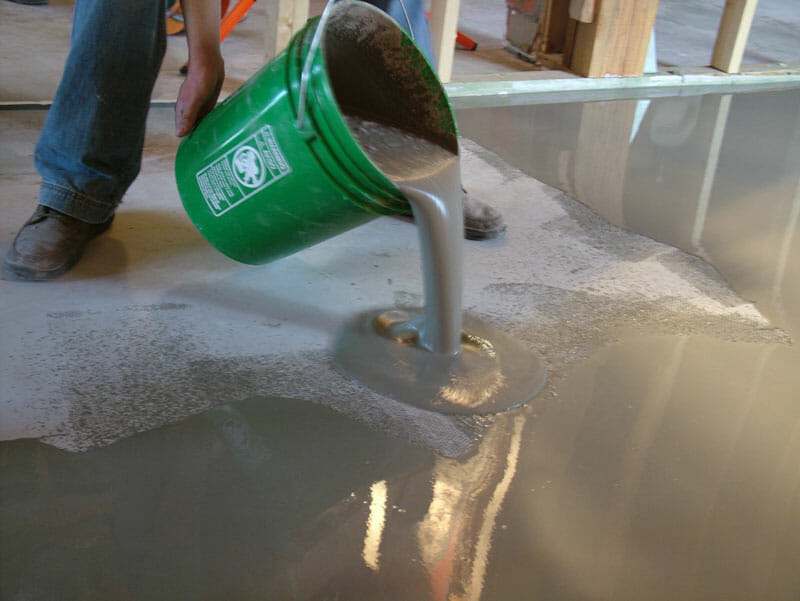
For low spots deeper than 1/4″ and larger than 15ft², we recommend using a polymer-modified cement topping. They consist of a mixture of Portland cement, sand aggregate, and polymers. You just add water.
These are self-leveling and adhere very well to concrete. The chemicals in the polymers of the cement help to act as a bonding agent. They are just as strong, if not stronger than most concrete. This article explains more about how they work.
In addition, polymer-modified cement toppings and fillers will accept paint, most stains (except acid stain), and coatings after it has cured. However, they will not accept penetrating sealers. We have more information about the different types of sealers here.
Never use regular cement mix. It will not adhere well to the concrete. In addition, it will break apart because it will not meet the compressive strength required for shallow fills and feathering edges.
You can find most self-leveling toppings and fillers from construction and concrete supply stores. Your local home improvement center is not the best source for this. An example of brands we recommend are Ardex self-leveling concrete, MG-Krete self-leveling concrete, and Sika
Contact the manufacturer to find a distributor near you. In addition, talk with tech or customer service to help determine which type will be best for your project.
Do not use self-leveling cement underlayments! They are not as strong, they will fail in freeze/thaw conditions and they wear quickly since the surface is not designed for traffic. These are less expensive and typically found at home improvement centers. If in doubt, contact the manufacturer.
Pay close attention to the surface prep instructions. Some product just requires a clean surface while others may require that it be profiled similar to the epoxy repair. Others may require the use of a primer. Regardless, the process for application is very straightforward and not hard to follow.
Once your surface is prepped properly and the repair material mixed, slowly pour it out onto the floor. It will naturally fill in the lowest part first and then work toward the edges of your low area. Be careful not to let it run far past your chalked borders.
The material does a good job of lying flat on its own. Use a trowel or cement float to feather the edges. Once it has cured for an hour or so, you can take heavy grit sandpaper to any raised edges or lines that were created from the trowel or float.
Once it has cured for 24 hours you can grind the surface for the proper profile if you are going to be applying a garage floor coating.
It’s important not to let the repair material cover up any contraction or expansion joints. If it does get in a joint, the easiest way to remove it is to use a putty knife or flat-bladed screwdriver about 20 to 30 minutes after it has begun to set up.
Final thoughts
These methods for fixing low spots in your garage floor are extremely effective. However, we recommend that you don’t get overly concerned with chasing down every spot you can find. The water has to go somewhere and if you have a fairly level garage floor then you will be chasing your tail.
Remember that garage floors are not perfect and are rarely completely flat. It’s normal to have the occasional few spots that will puddle slightly when water is introduced. However, if you have large areas or deep spots that puddle and do not evaporate within a day, it will benefit your garage floor, your safety, and your sanity to have these low spots fixed.
If I am going to use the Diamabrush concrete prep tool to prep the floor, do I still need to clean the old (set in) oil and grease spots? To be clear, there is no wet oil or grease residue on the surface, it is all set in.
Wouldn’t the Diamabrush scrape it all away?
Thanks
Hi Steve. Oil penetrates the concrete surface and acts as a barrier. How far it penetrates depends on how porous the concrete was initially and how long it has sat. It’s best to draw out all the oil you can first before you grind. You won’t hurt anything if you don’t do that first, but it may require cleaning the spot after grinding and then grinding over the spot again. Just make sure it passes the water drop test before you apply any patch repair or coating.
The Ardex representative recommended to install ARDEX K 301 from 1/4” to 3/4”. To feather the edges his recommendation is to saw cut 1/4” deep at the edge and back chip the existing concrete. What is your experience of feathering the edges?
Hello Bill and great question. It depends really on the product, the edge, what the manufacturer states and what treatment, if any, is going over it. We found that if the floor being repaired is going to receive a high solids, high build coating, then feathering out with a trowel along with some light grinding afterwards is all that is needed. The repair will not telegraph through high build coatings.
However, if Ardex is recommending to saw cut the edges for the K301 then we recommend following their instructions. It’s not difficult to do and will provide for a solid edge that can be ground flush.
I recently poured a patio slab for a customer and have an issue with a small birdbath and heavy broom marks through out the surface ( concrete was poured in 100 degree weather which didn’t help). The owner wants the birdbath fixed (2’X2′ area) and now a smoother surface in lieu of the existing broom finish. What do you recommend to repair the birdbath and refinish the surface? Thanks in advance
If you want to repair a low spot in a patio Luke, then you would definitely need to resurface the entire patio or the repair would stand out. You may want to offer the option to lightly grind the entire surface to create a smoother finish and then apply a good penetrating sealer to protect the concrete instead. Water may puddle in the bird bath, but the sealer will protect the concrete for years to come.
If that isn’t an option, then you will want to fill the low spot with a polymer modified cement if it’s deep. If not deep, then a resurfacer may fill the low spot on it’s own if applied correctly. We recommend contacting Ardex about using either Ardex K-301 or Ardex CD. Both can be troweled to a smooth finish and doesn’t require extensive concrete prep before application. They provide an example video here of how the Ardex CD is applied.
So after pouring a self levelling concrete you should still grind if you are applying an epoxy or polyaspartic overtop?
Or is it ok to go without the grinding since it is a polymer modified cement and is more receptive to other coatings?
Or, Perhaps a primer would suffice? If so, what type?
Having a hard time finding any solid info on this, would appreciate some info/advice.
It’s a good question Trevor. You need to grind the surface to accept a coating because you can’t acid etch polymer-modified cement. The surface is treated just like regular concrete in regards to coating.
Well…. I guess this will be a test to see how long it holds up without the grinded surface since I already did 2 small rooms. It is just in the basement with foot traffic so I’m hoping it’ll hold up.
I did test grind a very small patch and it didn’t seem to open the pours or remove any kind of latence or change the surface at all like grinding does on concrete.
Hopefully it will hold Trevor. There isn’t laitance with polymer-modified concrete and the grinding does not open pores like it does for concrete. What it does is profile the surface to provide bite for the coating.
That does make sense…
if just profiling the surface of the self leveller is the goal, can you suggest an alternative or easier way to do this other than getting a big floor grinder? The levelling compound seems much easier to scuff and profile than hardened concrete.
Would you also recommend a primer be used on the profiled surface to ensure a better bond ? If so, what type? Just whatever primer is recommended for the coating product being used?
Thanks for all your advice so far.
Polymer-modified cement should cure extremely hard Trevor – a minimum of 4,000 – 5,000 PSI. It is actually stronger than regular concrete and just as hard. Hopefully you didn’t use a self-leveling underlayment which many of the home improvement centers sell. Underlayments are not intended for coatings (though they may bond OK) or to be used as a wear surface. They are designed to have tile, carpet, wood flooring, and etc installed over them. If this is what you used, you may want to contact the manufacturer about possible issues. The good news is that if did use this, you didn’t use it in a garage that will see vehicle traffic. You may be able to rough up the surface with 40 – 60 grit sandpaper on a pole sander or orbital sander instead of grinding.
Regarding primers, you didn’t state what type coating exactly that you were using. Primers are recommended for very high solids or 100% solids coatings. Lower solids coating generally do not require a primer. Sometimes it works best though to use two coats. The first acts as a primer (the ugly coat) and the second coat is the finish coat.
We have an attached garage and the garage floor is holding water across most of the front wall (opposite the garage door) and also along the outside wall up to 3 feet out. There is not a floor drain. There are also areas up to 5″ x 5″ that have chipped or pitted away in other areas of the floor. Can the polymer material be used over the entire floor as long as the expansion joints are scraped out?
Yes it can Kathy. Just keep in mind that the floor can still eventually be damaged by that much moisture if the slab does not have a moisture barrier and the walls are not sealed from the outside or have some sort of drainage system.
Can you suggest a contractor in Lansing, MI area who can do this job
Thank you
Hello Pete. We don’t know of anyone in Michigan. However, you may want to contact EpoxyMaster. They are based in Michigan and may be able to help you with finding someone reputable.
I need to level areas of my unattached 24×36 garage. It has been insulated and heat installed. When we purchased the property in February the building had a 10′ wide overhead door which we replaced with a 16′ door. The original 10′ wide area is lower than the remainder on both sides of the 16′ door and a lot of water is finding the low areas of the garage! We installed an extra thick seal on the bottom of the door but no help. The apron is also a bit higher than the 10′ wide area of garage floor. It seems the concrete leveling compounds in my area stores are not what you recommend. We have all the big box stores, but all I can find is “Interior” underlayment leveling compounds. I asked employees there but they don’t have an answer? Where do I find “Exterior” concrete Leveling Compound? Thanks!
Hello Bob. Yes, sometimes this type of product can be difficult to find if you are not a contractor. What we suggest is contacting the manufacture’s themselves and ask where you can find their product in your area. They all have toll free customer service phone numbers and some have a page to find local distributors in your area. If you tell them about your project, some of these manufactures will offer tips and recommend which product would work best. Mg Krete, Ardex, and Euclid are examples.
My garage floor has a low spot in the front corner, leaving a gap between the driveway and garage floor of almost 1” height difference. During heavy rains, water will enter underneath the garage door in that low corner. (Currently I just place a towel next to the door to stop the water from coming in).
Will using a polymer modified cement work to level the garage floor in that area and eliminate the height difference between the garage floor and driveway? Anything else I would need to take into consideration? Thank you!
Hi David. Yes, it should level it out if it’s that simple and applied correctly. Don’t forget to take into consideration where the cement will butt up against the foundation/wall. Also, make sure that the product you purchase can be poured at that thickness. It may take two applications. Finally, do not confuse the proper product with floor leveling underlayment that can be purchased from the home improvement stores. It is made to have tile, carpet, wood flooring, and etc. installed over it. If it says underlayment, it’s not the right product.
Hi! Still along the lines of concrete being poured on top of the front edge of the garage door: I’m refinishing a 50 year old garage floor deep in the heart of the rust belt and putting an epoxy coating as a finish to the garage floor. I have the same seepage issues but my solution is a bit different. I plan to put down a 3/4″ high layer of concrete directly under the door to raise the garage floor level to the same level as the concrete driveway. Then slope both the outward and inward edges down to a feather edge. Would I be able to use a big box store mix labeled for concrete resurfacing or do I need a mix of polymer modified cement?
Hi MGriz. You definitely need to use a polymer-modified concrete product. Standard concrete mix does not adhere nearly as well and it tends to crack and break after a while if not applied to a minimum of 3″ thick. In addition, polymer-modified cement cures to a much higher compressive strength. Concrete resurfacers would not be the correct product to use. Because they can be applied to a feathered edge, they cannot be applied much more than 3/8″ thick. You will need to use a product that provides for thicker applications. Ardex K301 is one such example. It can be applied up to 3/4″ neat.
I called Ardex and found a dealer for their products. Problem is, they don’t stock the K301 and to have it shipped costs three times the cost of the product. Are there any other suggestions you have that I might be able to find?
I found a product that might be along the same lines as the K301. The product is from Interstate Products. It’s called Power Patch Epoxy Kit. It contains epoxy resin, hardener, and sand. Does the sand addition make it not ideal for low spot repair? My thought was that the epoxy base would be amenable to an epoxy coating. Am I understanding this right or am I still pretty lost?
Thank you so much! This site has been a huge help!
Here is where I found the product:
https://store.interstateproducts.com/products/Parking_Lot_-_Traffic_Safety/Power-Patch-Gray-1-Kit?gclid=Cj0KCQjwy8f6BRC7ARIsAPIXOjiP_kCJSML253nOlnBj6R_ff7FSHNzxYMCJpnEWCVs6IkQosM6ACfwaArJWEALw_wcB
Ardex can sometimes be hard to source depending on your area. Quikrete has a somewhat similar product that usually easier to source. You can view it here. The Power-Patch kit you reference is not a polymer-modified repair product. It’s a 100% solid epoxy/sand slurry. These make for excellent repairs on floors that going to receive a coating. They do not look like regular cement though as polymer-modified repair products do. You don’t plan on carrying the epoxy coating out past the garage door do you?
I have pretty bad build up of water run off in one corner of my garage and it is starting to ruin the walls. It is just concrete with no sealers or anything which it will probably stay this way for quite a while yet if not indefinite.
What would you recommend to stop this water build up preferably something that will blend in with the concrete floor and that doesn’t need to be coated with anything afterwards?
Thanks for any help and advice!
Hello Kyle. You would need to use a polymer-modified concrete skim coat or patch depending on how low the corner is. No matter what product you use, the repair will stand out and will not “blend” with the rest of the floor. It will be obvious. The only way to conceal it would require a proper floor coating. If you do decided to repair the low area, make sure that the water it displaces is going to be going where you want it.
I’m planning on adding ceramic/porcelain tile to my garage with a good amount of low/high spots. I plan on using self leveling compound but worried it won’t settle to the existing slope. Is there a technique to help it stay in the slope of the garage? Do you recommend a different product? The low spots range from 1/8 to 3/4 and maybe 1 inch.
Hello Eli. It actually takes a good slope for a self-leveling compound to run all to one side. Even on a flat surface, self-leveling products don’t automatically level on their own without being manipulated and the edges troweled. We recommend mixing with a little less water so that it is not too soupy. Pour it out and then use a large trowel to start filling in the areas and smoothing the surface out. A large straight edge works well for checking your work. LevelQuick RS by Custom is a good underlayment to use for this situation. It sets fast so you don’t have to worry about relative level changing while is cures. Plus, it has a rating of over 4000 PSI. This is important since it will be supporting a car and not just foot traffic.
Just a note for everyone else who may read this… Underlayment self-levelers are OK to use if you plan on tiling the floor. Do not use it if you plan on coating, painting, or sealing the floor. It is not compatible for that type of use and is not considered a wear surface.
I have a piece of a slab that cracked off and sank about 1/4″ to 1/2″ below the rest of the garage floor. I have not measured the exact depth yet.
The piece of slab is triangle size. 3 ft by 7 feet with a hypotenuse of about ~7.7.
I read in your other article that sunk slabs is a costly repair that is not an easy fix and should be done by a professional.
I’m wondering if…
1) there is a chance that my epoxy base coat will cover this up when applied
or
2) I can get away with using Ardex K-301 over the cracked slab to level the floor.
Any other suggestions would be great.
No Jeff, your epoxy base coat will not cover that up. To put it in perspective, a multiple coat commercial epoxy flooring system runs an average of 40 mils thick. That’s .04 inches or less than 3/64″. If you have had that large a piece of slab break and sink that deep, you may have other issues going on with the foundation under the slab that you are not aware of. While you could technically fill that area with Ardex, there is no guarantee that it will not sink any further or that another piece may break off. We would suggest having a professional assess what is going on with your slab before you proceed further.
I have an attached 2 car garage that has water pooling in 2 spots – both about 0.75 to 1 inch deep and approximately 3 ft by 3 ft. I plan to epoxy coat the garage. Would it be okay to use self-leveling concrete to fix the leveling issues? And if so, should I grind or acid etch the new concrete layer before I apply the epoxy coating?
Hello Adlai. 1″ is fairly deep for a low spot. Providing that the area is not too large, we would recommend using an epoxy/sand slurry to fill the low spots. These work great because they bond very well to the concrete and can be feathered down fairly well without worry of it delaminating at the edges. Since you need to grind these areas flush after they are filled, grinding the entire floor is the recommended method for the floor prep and repairs.
I have a 2 car garage turned into a wood working shop. It has a floor drain in the center and the floor slopes all around to it. I suspect the difference at the walls to the drain may be as much as 3-4 inches. What is the best approach and product to use to fill that much of a difference to level. Thank you
Hi Richard. Most concrete slabs for a garage are 4″ thick total. Unless the base the slab was poured on was hollowed out as well, a 3″-4″ difference is unlikely. Concrete with drains typically run a minimum slope of 1/8″ per foot for water to drain. Regardless, it can take some work to fill a depression that large if you are looking for level. It can get expensive as well. You would first need to determine where the new material would end. Would it be at the walls or someplace in between? If it’s not at the walls, it will require cutting in a groove to create a clean edge. That much material is not going to feather well and will eventually want to chip in places. Next you will want to run a string across the top from a few different areas to figure out the slope and depth. With those figures and the approximate square footage you can figure out how much material would be needed. We would recommend contacting a manufacturer, such as Ardex, to discuss your options for material. Regular cement is not an option as it will not adhere well and cracks easily when not poured thick.
I have a 3 stall garage (26’x38′) with 2 drains centered on 2 of the garage doors. I have a few low spots along with some areas of spalling to address before I epoxy coat the floor. Should I use an expoxy slurry for both the low spots and spalling areas and then prep the floor for the epoxy coating or prep the floor first? The garage floor has never been sealed before (poured in 2012). I also plan on doing the epoxy coating in 2 or 3 sections to properly manage application and then move all my garage items accordingly. Not sure if that is a good plan or not.
Hello Nate. Yes, an epoxy slurry is excellent for that. Just make sure you prep the surface well for the low spots and clean out any loose debris where the pitting is. If you are grinding, it’s generally best to do your repairs first then prep the rest of the floor. That way the grinding will help to make all your repairs even and flush with the rest of the floor. If your are going to etch, then do that first as it will properly prep the concrete for your repairs. Just keep in mind that grinding will still be required to smooth out the repairs afterwards.
Doing the coating in two or three sections is fine as long as you have contraction joints to act as a natural boundary between sections. Epoxy does not blend well like paint on a wall and will have very obvious overlap marks if you don’t have a joint to terminate the coating. As a tip, mix all the part-A colored resin together first and then use the appropriate amount when mixing your part-B with it in a separate container for each section. This will ensure that the color of all your sections look the same.
I have a garage floor that has 4” of slope but still holds water in a few low areas. The floor has already been epoxied by the home owner with a do it yourself kit. Will this epoxy need to be ground away before using an epoxy slurry or just cleaned well?
Hello Richard. Anytime an epoxy slurry is used it needs to be applied to properly prepared bare cement in order to create a very strong bond. Applying it to an epoxy coating will only invite possible delamination issues since it is subject to the bond of the current epoxy to the concrete.
Hi I have enclosed my carport to make a den, with the slope of the previous carport it makes the furniture obviously look tilted. I plan on fixing this but wanted to know if its best to square the den up with 2×2’s and use self leveling compound which would raise the floor a little. ( when it rains alot it seems that the lower corners seems to have moisture seep through the existing floor) also does the epoxy serve as a moisture barrier? or would I use something like Thompson’s? Any pointers is greatly appreciated
Hi Melinda. Concrete is like a big stone sponge. It soaks up moisture from the ground very well if there is not a moisture barrier underneath. A densifier such as this one here can be applied to the concrete first to slow down the water intrusion, but there is no guarantee of stopping it. Thompson’s will not work and will also prevent a self-leveling material from adhering properly. Regular epoxy cannot be used to seal out moisture as it will cause the epoxy to peel. Also, make sure you use the proper material to level. The self-leveling materials that you can find at your local home improvement centers are underlayments and not wearable surfaces. They are made to have flooring materials such as carpet, wood, tile, and etc applied over them. They are not the proper material if you want to apply a coating.
When my contractor put in the forms for concrete, he thought it would be a good idea to put in a couple of drains that were not on the plans. He didn’t bother to mention this to the plumber. As such, the drains go nowhere and is just a path for pests to get in. The drains are in a depression that is about 8″ across and maybe 3″ down. Can I fill these depressions with the methods you detail in this article?
I’m planning on epoxy coating this summer and am trying to get some of the prep work done early before the grinding starts.
Hi Andy. Yes, you can fill the drain holes and depressions with these methods. Just pay attention to how thick of a layer you can put down at one time depending on the product that you use.
2 car garage, 16’x7’ single door 4’-6’ extra depth into garage and 2’-3’ extra each side. 2 problems, quite a few low spots in floor, largest probably 2’x4’ 1/4” to 1/3” deep. Larger problem is water when squeegeeing towards overhead door. It runs back into the garage low points. Don’t think it was originally sloped properly from the get go. Can your “fixes” described here be done over one another to basically “build up” the rear of the floor towards the door to fix the slope problem and level out the puddle points as I go towards the door?
Hi John. Ugh.. unfortunately, it’s never an easy fix for slabs that were poured and sloped poorly or improperly. What you are essentially describing is called an overlay. In order to do it properly to fix the slope issue for the entire floor, it would require applying the overlay all in one shot and requires a few people to be involved. It can’t be done sections at a time. The layout is measured for the correct depth required to make it at least level or have a very slight slope. A proper slope that encourages water to move on it’s own toward the door would require 1/4″ of slope per foot, which isn’t possible for a standard garage unless it was prepped for that on the onset. The polymer-modified overlay material is mixed and poured from the back working towards the front and then troweled as it goes. It’s a fairly labor intensive job and it requires that the perimeters of the garage in the back accept a higher floor level.
You can fix just your low spots so that it’s more efficient to squeegee out, but that means any water that collects on the garage floor may be displaced someplace else since those low spots are gone. I doubt this was the answer you wanted to hear. Garage floors are rarely perfectly level without small high and low spots, however, floors that slope wrong are never easy to fix.
How can I level the garage for weight lifting use. Currently sloped from back wall to garage door. I want to completely leveled. Please advise.
Hi Tomo. It can be done, but it is expensive and requires a small crew to accomplish. It requires building forms along the three perimeter walls that are the same height as the tallest point of the concrete slab on the back wall. The proper polymer-modified concrete self-leveler (dependent on the total depth at the front of the garage) is then mixed and poured out on the slab. It’s generally available in 50 lb bags and requires a number of people to be mixing, pouring, and troweling out as you go. It’s a job that is generally performed by professionals, but a skilled DIY person familiar with such a project could organize the job and get it done.
I will put Horse stall mats on top. How durable is the concrete handle the weights? Can it be completely leveled? I have 2 car garage and the depth is around 2inches. 20×20 ft. How much will it cost and can you gave me a referral? Thank you
Polymer-modified cement is stronger than concrete when expressed in PSI. Costs for a job like that can range from $4 – $8 per square foot, dependent upon materials and what needs to be done to build the proper forms. We don’t have any referrals for you. I suggest you start searching for “concrete floor leveling contractors” for you area and start getting some estimates.
From back wall to the garage door. What is the minimum thickness and maximum? Obviously highest point will be less compare to the lowest. Approximately 2.5 inch gap.
Because the front of the garage is going to require the self-leveling material to be more than 1/2″ in depth, you can’t use a product that can be troweled to a feather edge. As a result,you will most likely require that the back of the garage be a minimum thickness of 1/4″. You can place a laser level on the floor at the highest spot at the back of the garage. Place a piece of wood in a few spots at the front of the garage and then point the laser at it and make a mark. This give you an idea of the lowest point at the front. If you do the math to figure out how high the laser is above the floor at the back of the garage (accounting for the 1/4″), you can then determine exactly what the slope is for the slab and what the depth will be at the front.
Hi I just had a slab poured in my front yard on side of the Garage and the slab has a spot where the water is setting which we didn’t know was there until it rained. How can I fill this in where the water will run off toward the front instead of backwards towards my front door. My husband is telling me that if I have this spot filled in the water will run backwards towards the door instead of to the grass?
Hi Marsha. There are two things that you have to consider before you fill in any low spots on a bare concrete slab. The first is that the material you use will never blend in and look like the rest of the concrete. You would need to apply a coating over the entire slab that is specified for outdoor use after the repair is made if want it all to look the same. The second is that you need to determine where the water will go that you are going to displace by filling the low spot. I can’t help you there without knowing the exact lay of your land, the slope of the slab, and etc.
My garage door has a rubber seal to keep the water out, however the floor threshold is bowed in the middle so the seal is not tight at the edges and water leaks in. How can this be corrected?
Hi Debra. Is the seal you refer to the black round strip that runs under the door? Also, does the floor have a depression in the middle or a high spot?
Yes, the seal is the black strip under the door. The floor has a high spot just under the door.
You have a couple of options, Debra. The first would be to replace the seal. When they get older they stay compressed and will not conform to the floor anymore. If you replace it with a tall seal and adjust the garage so that it comes down fairly snug on the high spot, it should seal all across the bottom of the concrete. If that doesn’t do it or the seal is fairly new, then you will need to grind down the high spot on the floor. This will require an angle grinder and turbo cup concrete grinding wheel.
How much water is needed to test for pooling in a garage? My home builder poured a couple of flower watering cans On & said it was less than 1/4” pooling & walked away.
Hi Valerie. Garage floors are never perfectly flat. Because they are typically screeded and troweled by hand, it’s not uncommon to have some areas where water will collect. Less than 1/4″ for a depression is considered acceptable. Very flat concrete is usually achieved via a powered concrete screed and power troweling. This is a more expensive process that is typically used for larger buildings, warehouses, and etc. It’s not common for garage floors unless specified and paid for by the home owner. Remember, when water is poured on concrete that is relatively level, it has to go somewhere. The concrete is not going to absorb much of it very quickly. It will either pool in that spot or seek a lower area if possible.
I see there’s a measurement they have to meet by local government but no test to prove. Any pooling is acceptable.
Sakrete self leveling resurfacer is polymer modified and says it can be poured up to 1” thick. I can get this at Lowe’s whereas ardex k301 is hard to find in my area. Think this would be a good option for about a 3/8” deep low spot? I plan to epoxy then medium flake and clear.
Thank you.
Hi Dave. Yes, if it’s the resurfacer and not the underlayment then it will work. Make sure to give it a few days for the water to evaporate out before applying the coating. You will need to grind the surface in prep for the coating since you can’t etch a polymer-modified cement.
Hi there,
I have a question. I am having a garage built by a local company, and they have set the concrete to gradually get higher from front to back of the garage. The cement bricks on the perimeter of the garage also show this incline. Unfortunately, the whole garage does, meaning that if I’m looking at the side of the garage (the side where lots of roof is visible), I can see that the whole garage is shorter near the front and taller toward the back. Is this normal/recommended?
Hi Anna. Yes, it’s normal for many garage floors to have a slight slope. The perimeter wall is called a stem wall. The garage floor slab is poured independent of the wall and has an expansion joint that separates it from the stem wall. When stems wall are formed concrete, you don’t notice the slope as much because there are no lines for reference. However, when the stem wall is cement block (common as well), then the horizontal grout lines of the blocks create a reference point that makes the slope noticeable when looking at it from the side. I’m not sure I understand your comment though about the whole garage looking shorter near the front and taller toward the back.
Have some low/worn spots in our 33yr old garage- but other areas are cracked. No drain in the middle.
Wondering if better idea to spot-treat the worst spot with a self-leveler or to just re-do the whole floor?
Ballpark estimate on a whole floor concrete re-laying?
Hi Dan. We can’t tell you for sure without inspecting it ourselves. The cost of placing concrete runs $4 – $8 per square foot, not counting what it would cost to demo the old slab. If you elect to do repairs instead, the cracks will have to be addressed first with the proper crack repair materials. You can’t just cover them over. Also, you need to use a self-leveling polymer-modified concrete product that is designed as a wear surface. You can’t use a self-leveling underlayment like those you can purchase from the home improvement centers. Those require that the surface be covered my another material such as carpet, tile, vinyl, or wood flooring.