
Learning how to grind a garage floor for an epoxy coating or paint hasn’t always been the easiest or most straight forward of projects for the average homeowner. It frequently raises more questions than answers and can lead to frustration when trying to figure out the best way to do it. Many of these questions relate to what type of grinding equipment to use.
While it is not the most difficult thing to do, trying to figure out the right tools to rent or buy can be daunting. Plus, dust control can be an issue unless you spend more money for the proper vacuum equipment. With so many choices, it can get plain confusing and even expensive.
Our objective here is to present to you an easier and more economical way to grind your garage floor. It can typically be accomplished in less than a day for most standard 2-3 car garages.
Besides helping to eliminate the confusion and questions that arise, it will also instruct you how to provide a nice profile for your coating of choice. It’s just one less thing to worry about when learning how to epoxy coat your own garage floor.
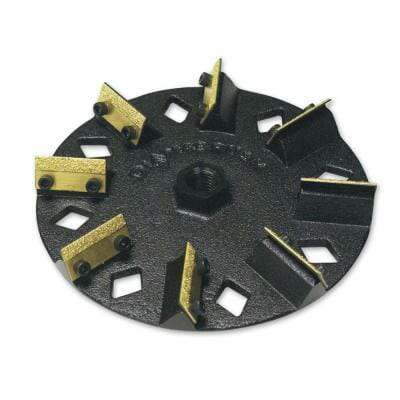
Diamabrush Concrete Grinding Tool
Fortunately, a company called Diamabrush has introduced a concrete prep tool that attaches to the bottom of a floor maintainer. It is available for use from a large assortment of rental companies. The Diamabrush is a great choice for garage floors that are in relatively good shape to begin with.
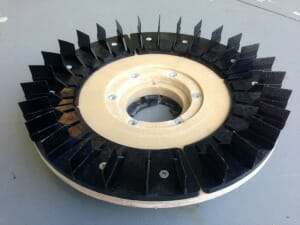
The Diamabrush consists of a series of diamond coated blades that are attached to a buffing wheel.
These blades abrade the surface of the concrete to provide the proper profile for an epoxy coating.
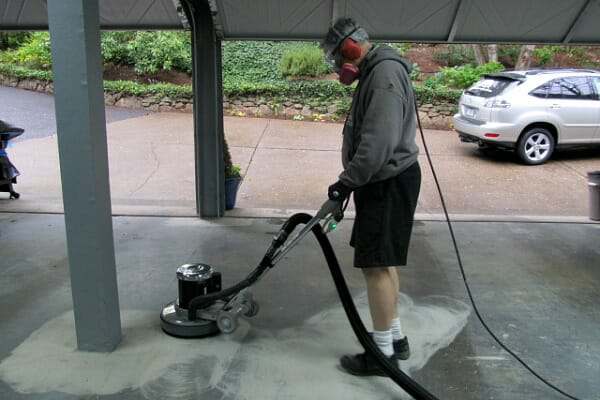
This process of grinding your garage floor is much easier to manage than the traditional 7″ angle grinder with a concrete turbo cup wheel. Plus, it keeps you off your knees.
In addition, the large size of the tool covers more area. Furthermore, the flexible blades prevent grooving or kiss marks that can happen when a turbo cup wheel is not held flat and goes up on edge.
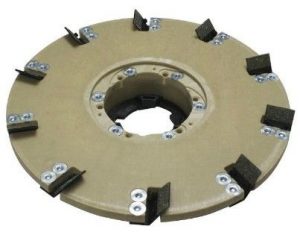
Diamabrush also offers a separate removal tool that is used for removing old paint, thinset, mastic, or even thin epoxy coatings.
You can identify it by the smaller number of diamond blades compared to the prep tool.
If you use this tool to remove old paint or a thin coating down to bare concrete, it will prep the concrete surface at the same time. You will not require grinding with the prep tool afterward. Diamabrush does not recommend the prep tool for removing old paint and thin coatings.
The nice feature about both of these is that they can be used either on a wet surface to avoid concrete dust or you can attach a dust shroud with a shop vacuum to grind dry. Dry grinding with the proper attachments prevents the heavy concrete dust or messy cleanup of a wet slurry.
Note: The Diamabrush is not an aggressive concrete grinding tool that can remove heavy layers of concrete. For example, it will not level high spots or smooth out heavily repaired areas of concrete. You will need to use a turbo cup grinding wheel or a more aggressive grinding machine for that type of work.
This post may contain affiliate links. If you use these links to make a purchase, we may earn a small commission. As an Amazon Associate, All Garage Floors earns from qualifying purchases. You can read our full disclaimer here.
tools for grinding your garage floor
These are the basic tools that you will need to acquire before you start grinding your garage floor. It’s a bonus if you already have some of these or know of someone who can lend them to you. You can apply the cost savings to your garage project.
Harbor Freight has cheap angle grinders for under $20. Unless you plan on using it for other projects, we don’t recommend spending more money on a better grinder.
The dust shroud for the angle grinder is optional but highly recommended. These small grinders will eat up concrete and create a small dust storm. It will need to be attached to a shop vacuum in order to use it. Keep in mind that pricing may vary depending on your area.
- 4 ½” angle grinder – Harbor Freight Tools – $16.00
- 4″ diamond turbo cup wheel – Amazon
- Optional dust shroud for the angle grinder – Amazon
- Floor maintainer rental – Home Depot
- Diamabrush concrete prep tool rental – Home Depot
Some Home Depot stores carry the optional dust shroud attachment and some don’t. Make sure to ask for it. If they don’t have it, you will need to grind the floor wet if you want to avoid the dust. If you find a rental with the dust shroud attachment, you will need to rent a shop vacuum to go with it or use your own.
The small angle grinder and turbo cup wheel work well for grinding flush any garage floor repairs or crack repairs. In addition, it will cover the areas near walls, corners, and other objects that the Diamabrush attachment cannot reach.
The small grinder is also good for smoothing out the raised edges and materials if you are filling contraction joints for a seamless floor appearance. They also work well to grind down any unusual high spots.
If you will be grinding dry with your own shop vacuum, then one other tool we can highly recommend is a Dust Deputy. Concrete dust is very fine and will clog up the filtration system of a standard shop vacuum fairly quickly. It requires frequent stops to clean them out.
The Dust Deputy works by creating its own dust collection system that keeps the filters of the vacuum virtually dust free. You can find the Dust Deputy here at Amazon.
Heavier Duty Concrete Grinding Equipment
As we stated earlier, the Diamabrush is a good choice for grinding and prepping garage floor concrete that is in fairly good shape to begin. However, it is not aggressive enough for anything more than that.
If you have high spots to take down, multiple concrete repairs that need to be ground flush, broom finished concrete, or some other type of rough surface, then a heavier duty grinder will need to be used.
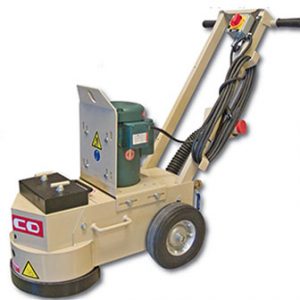
A good choice for that is the Edco 10” Concrete Grinder. It is a heavy machine (152lbs) that uses a 10” diamond impregnated grinding disc.
It can be plugged into a standard 110V outlet and has a vacuum attachment to keep down the dust.
We prefer a grinder such as this over the Diamabrush for removal of old paint and concrete coatings as well. It works much faster and does an excellent job at providing the correct surface profile for coatings.
These are fairly common and can be found at your local Home Depot and equipment rental centers. The rental costs vary from $150 – $175 per day. Be sure to check if there is an additional charge for the 10” diamond disc.
Grinding the Garage Floor
The first thing that needs to be done is to make any necessary repairs to your garage floor such as cracks, pitting, and other defects. It’s best to tackle these first before you rent any equipment. You don’t want to be making repairs while rental equipment sits.
After your repairs are complete, sweep the garage floor and clean any oil or grease spots from the surface. Grinding alone will not remove heavy oil stains and is why these need to be tackled first.
Next, if you have elected not to use a dust shroud and vacuum, prep yourself and the garage for the dust that will follow. While the Diamabrush does not create as much dust as a typical turbo cup concrete wheel, you will still have a small cloud of dust that will coat everything in your garage.
When dry grinding, make sure you wear an N95 dust mask or respirator approved for concrete dust. Concrete dust (crystalline silica) is considered a human lung carcinogen. Safety glasses and ear plugs are highly recommended for your own safety.
If grinding wet, start by wetting the surface of the concrete that you are going to grind. It’s best to work in sections when you do this. Using the floor maintainer with the Diamabrush attachment, start by slowly working the machine side by side and then a circular motion. It will only take a few minutes to figure out how long to work an area before you need to move on.
When grinding with the wet method, do not let the wet slurry dry out. It is a bear to clean out of the concrete properly if it dries. It can lead to a coating failure if it isn’t completely removed. Each time you finish a section, use your hose to blast the area clean while it’s still wet, and then move on to your next section.
To check your work, use the hose with a pressure nozzle to spray the area clean and then run your fingers across the surface. It should feel like fine to medium grit sandpaper and have a more granular look. Continue this way, grinding the garage floor one section at a time until you are done. Make sure to work the machine all the way up against the walls of the garage floor.
Because wet grinding can create quite the slurry, we recommend that before you blast a section clean, use a wet vac to suck up the majority of the slurry. This helps tremendously with keeping the amount of slurry that you hose out of your driveway down to a minimum.
Not counting the edge work or other hard to reach places, most people can grind a standard 2-car garage floor (approximately 400 ft²) in just over two hours or so when using this method.
Once done, this will leave a strip about 2″-3″ wide around the perimeter of the walls that the Diamabrush could not reach. There will be more in the corners. Use the small 4 ½” grinder with the diamond cup wheel to remove this remaining strip of concrete and the larger areas in the corners.
Be careful to keep the turbo cup wheel flat on the garage floor when grinding. If you apply too much pressure or angle it too much on the surface, it will leave “kiss marks”. These are small half-moon divots that can potentially show through your coating.
The concrete needs to be fairly dry or just damp when grinding with the turbo cup wheel. If it’s wet, you will need to use a ground fault circuit interrupter to prevent electrocuting yourself with the angle grinder. You can purchase these for about $25. Many times you can use the power cord extension that comes with the floor maintainers if you still have time on the rental. They usually have a GFCI built into the cord.
The other option which we prefer is to grind the edges first then follow up with the diamabrush. Just remember that if you are using a dust shroud on your grinder, a standard shop vacuum is not made to handle such fine dust and will clog up fast.
You may need to clean out the filter quite a few times while grinding the edges. Though you are not grinding a lot of concrete, if you elect not to use the shroud be prepared for the amount of dust this small grinder will put out.
Another Concrete Grinding Option
Another option for grinding your garage floor that is being used quite successfully is the 7” Diamabrush hand tool. This one is made to fit a 7” angle grinder and works fairly quick as well. You will need a dust shroud when using this tool and it works best with a variable speed grinder.
You can’t rent these, however. You will need to purchase them outright. Home Depot sells the 7″ version. You can also find them here on Amazon.
Diamabrush says that slower RPM’s are better. The high-speed grinders have a tendency of heating up and clogging the blades. If your only option is a single speed grinder, don’t use one that spins any faster than 6000 rpm’s. If you are worried about the speed, Diamabrush says grinding wet will keep the blades cool and prevent clogging or glazing.
Another tip is to keep it flat and do not lean into it in an effort to make it work harder. The weight of the grinder is enough to do the work.
Depending on how much suction your shop vacuum creates, you may need to shim the tool with a washer to raise the shroud off the floor to avoid suction lock. Some shrouds have a vent to adjust for this as well. Either way, these tools make quick work of the concrete.
Best Shop Vac for grinding concrete
If you are thinking of purchasing a new shop vac, we highly recommend that you look at this Dustless Wet/Dry shop vacuum at Amazon by Dustless Technologies. These are excellent vacuums that work extremely well when vacuuming up concrete dust, drywall dust, and variety of other fine dust particulates.

Professional installers are using these more and more as a backup or even as a replacement to the much higher priced specialized concrete dust vacuums. You can read the great reviews on these and find them here at Amazon.
They also offer an optional 25′ vacuum hose at Amazon that can reach twice as far as the original.
Final Cleaning
Once the grinding is done, it’s time to make sure the garage floor is clean of all the dust. If you ground the floor wet, then chances are the floor is clean.
To check, run your fingers across the surface when it has dried. If your fingers don’t have a lot of white residue on them, then you are good to go.
Another test is to press a strip of duct tape to the concrete and then pull it up. It should stick fairly well and come up fairly clean without too much dust. The floor will never be completely free of concrete dust, so don’t fret over small amounts on your fingers.
If you have a lot of white residue after a wet grind, then this is excess concrete dust that did not get hosed out well and will need to be cleaned. The best way to remove it is to mix up a solution of TSP (Trisodium phosphate) in a bucket, spread it out on the floor and lightly scrub it with a push broom or long handled scrub brush.
Using your high pressure nozzle, rinse the concrete real well making sure there is no more solution left behind. Work in sections if you need to so that the solution will not dry before you rinse it out. This will help lift any remaining slurry and dust that is in the pores of the concrete when you rinse.
If you did a dry grind, the easiest way to insure the concrete is clean and ready is to use the wide mouth attachment on your shop vacuum and just vacuum all the dust up. What’s nice about this method is you can start right away with applying your floor coating since there is no water on the floor that needs to fully dry.
Once the floor is done, test different areas by sprinkling water drops on the surface, paying particular attention to any areas that were coated in oil or grease or where you may have used a tire dressing that dripped onto your concrete. It should turn the concrete darker and absorb the water fairly quickly. If it just sits on the surface, then you may need to regrind and/or re-clean that spot before you apply your coating.
Grinding a garage floor with one of these easy methods will ensure the best profile for your garage floor coating to adhere to. It can be done in less than a day and is safer than using an acid etch.
First thank you for your site. You have a lot of great info here.
We are building a home for my parents with the intention of using a true two part epoxy for the finished garage floor. Knowing this we didnt go real excesive with the power trowell to avoid doing the concrete burn and too smooth a surface. I also came in a couple days later and grinded it with a diamond grinder on a buffer. A combination of building this home ourselves and a delay due to a major shoulder injury on my regular job the project has moved slow. The garage floor was poured almost two years ago now. It has never been parked on and other than clean up from sloppy drywallers has been untouched with no stains. Basically grinded and sat. I have a couple questions:
1. If we continue with plan of a true epoxy floor would we need to re-grind the floor?
2. Due to delays and costs we may deter from the epoxy on the floor. I told my dad I had concern of doing nothing because we did lightly trowell and grinded it. I said we sorta open it like a sponge ready to absorb stuff.
With that, thinking we need to do something.
2a. Fact it has been grinded is there an alternative sealer we can use. Somewhat cost affective. Was looking at sealing with a concrete densifier you wrote on with a silicone additive. Is this a good choice? Garage will see light DIY mechanical use MAYBE.
2B. If we were to use a densifer can we epoxy the floor at a later time? Or we sorta pigeon hole ourselves?
Thank you very much for any info you can provide.
Great questions Healing. You should not need to grind the floor again if you want to apply an epoxy coating. Just do the water drop test on the concrete to assure that the grind was satisfactory. If the concrete immediately turns dark and absorbs the water then you are good to go. All that is needed is to clean the floor real well. If you elect not to apply a coating, then a siliconate sealer like these here are a great choice and inexpensive. A densifier with siliconate added will not provide as much protection since you opened up the pores of the concrete with the grinding. It doesn’t have near the concentration of siliconate in it since it’s a dual use product. If you do apply a penetrating sealer and later want to apply an epoxy coating you will need to grind the concrete again in order to remove the sealer.
I rented the Diamabrush Prep Tool and a floor sander from Home Depot. It removed a small layer from the top of the floor, but from what I understand that is exactly what I want for laying down epoxy. I then tried to do the edges with a 4.5″ grinder with a diamond cup wheel. I wound up removing about 1/8″ of material (or more) in my test area! Thinking I’d have better luck with a Diamabrush product, I thought their 4.5″ removal tool. Again, I wound up gouging the concrete. I realize I must be using the angle grinder wrong, but I’m not sure how I can use it differently. Any advice?
The key Justin is to keep the grinder moving and keep it flat without applying much pressure to it. Just the weight of the grinder works in most cases. Moving it back and forth fairly quick from the area you are grinding to the area that has been ground already will feather everything in nicely. Don’t worry about being perfect.
How important is it that all discolorations in the concrete are grinded away? Have some spots in the garage that the diamabrush prep tool went over but didnt completely eliminate. i have a 4.5″ concrete abrasion attachment that i have been going over many spots, but i’m about 10 hours in and feel like I could end up spending another 20 hours grinding if i’m trying to get every little old paint spot/rust spot, dark spot etc… im going as light as i can with this tool to get as much of the paint off, but you can still see the marks in the concrete (little swirls, not really “kiss marks” as divots in the floor, just like round scratches) – hoping these will get covered up by the epoxy and not show through?
Concrete is rarely all one color Markus. It has to do with the final finishing after the pour as well as concrete density. Grinding will sometimes reveal this. If a drop of water immediately turns the surface dark and is absorbed into the concrete then you are good to go. Regarding the swirls, how well they are covered or not depends on the quality of coating. If you are applying a thinner one coat, lower solids home improvement style epoxy kit, then they may show through. If it’s a thicker, high solids color coat with color flakes and clear coat, then there are no issues what so ever.
Well using a buffer to remove old paint from an area of use bringing vehicles in and out of my garage, there is a lot of dust being created. Can I do the floor while it is damp, or should it remain dry?
If you are using the Diamabrush, Tony, you can grind the floor wet. It’s very important that you do not let any of the wet slurry dry on the surface or you will have a heck of a time cleaning it out of the concrete. Work in 4’x4′ sections and hose out each section as you go.
I want to make my concrete garage floor rough. It is now very smooth and very slippery when wet. Years ago when it was built the floor was left a bit too long before floating it and then over-floated. The floor doesn’t have paint, epoxy or any other coating. The floor is competent, but too slippery. I would like to mechanically make the floor rough, then densify and seal it. What is a good way to do this? And can I just leave it like that, or does it have to have an epoxy coating, and if so, will it still keep the roughness?
Hello Lyle. You can grind the concrete surface with a Diamabrush as detailed in the article above. This will open up the pores and make it much less slippery when wet. We recommend that you seal the concrete with a penetrating sealer after grinding. This will help to protect the concrete and resist staining. Penetrating sealers are non film forming, so they will not change the appearance or the grip when wet. A silicontate sealer like this one here would be a great example of what to use. There are also densifiers with sealers added that will work well also. This article explains how they work.
Thanks for all the information on your website. It had been invaluable in planning the project. I rented the Diamabrush yesterday and it is taking much longer than expected to achieve the “uniform white surface” mentioned in their training videos. It seems from reading other’s experiences I should be able to do a two car garage in 2-3 hours. I’m 6 hours in and not done. When I examine the concrete closely it looks like the darker non-uniform spots are slightly lower. To achieve the uniform white surface I need to make circles in the same spot for several minutes, which will seem to take about 20 hours by this point.
I feel like I’m overdoing it, but I’m not sure what the measure is to know of it’s enough. I can see small aggregate in some areas, but not others. Some areas appear slightly shiny with a flashlight. These are all things I’ve read to look for, but to achieve them seems impossible.
Any insight you might have is very appreciated!
Not all floors are going to come out evenly white Fred. The finishing process and changes in the density of the concrete during the initial pour can cause color differences which are revealed by the Diamabrush. Just do a water drop test in the darker areas. If the concrete immediately turns darker and absorbs the water fairly quickly like the other areas, then you are good to go. Check the spots that look shiny as well. There’s a possibility that the diamond tabs got too hot in those areas and started to polish the concrete some. If they don’t pass the water test, toss in a small little handful of clean sand on those spots and go over them again.
Hi there, I am interested in trying this on my newly poured concrete driveway with a broom finish and edged joints. The reason I do is because the finish looks like crap thinks to the guy that finished it. The concrete was floated correctly but he liked to talk. So I want to try this method. Any suggestions would be greatly appreciated
Yes, grinding will definitely knock down the broom finish Howard. We suggest that you seal the concrete afterwards with a penetrating sealer in order to protect it. The grinding will open up the pores of the concrete and will enhance staining if you don’t.
Thanks for putting this guide together. My home is a new build so the concrete is relatively new. Basically my issue is that my garage slab is “split” into 4 sections so it had those crevices between the sections. How do I manage to grind those? Thanks!
Hello Julian. Those dividing lines are called contraction joints. They encourage cracking to occur within the joint instead of across the surface of the slab. There is no need to grind within those joints.
Thanks! One last thing, It didn’t register in my mind to get the floor maintainer with the diamabrush because when I looked at HDs tool rental website it showed they have an edco concrete floor grinder that is diamond as well. It’s like sandpaper but I am worried this isn’t correct.
That’s the one Julian. The Diamabrush has little diamonds embedded in the blades that make it feel like rough sandpaper.
Thanks for all of the info Shea.
Overly anal, but what do you do for the very corners. Even a grinder will leave a bit. Just roll with it?
Also, was going to get the diamabrush for the 4.5 inch grinder but the cost of the wheel plus the variable speed grinder is spendy. Fixed speed grinder plus diamond cup grinder does a ok job for just the perimeter for a novice? It would be a lot cheaper.
Yes, Eric. Get the cheap fixed speed 4″ grinder from Harbor Freight with the 4″ turbo cup wheel from Amazon. You aren’t spending more than $26 and it will do great. That setup also works well for grinding out concrete repairs. Be sure to get an N95 respirator from your local home improvement center for a few dollars. The 4″ grinder will kick up a lot of dust.
Any idea of the drying time for the Diamabrushed floor after wet fiinishing? I don’t want to apply the epoxy too soon after tfhe process is done. I know concrete maintains a certain level of moisture naturally, but after the “flood”, how long. Thx, great site.
Hi Dave. Unless you are using an epoxy primer that can be applied to damp concrete, you will want to wait at least 48 hours to let the concrete dry out. The process of wet grinding really lets the concrete soak up the water. If humidity levels are high, you should go and extra day. You could always tape down a 16″ square sheet of plastic the night before (tape all the edges to seal it) and check it in the morning. If it’s dry underneath then you are good to go. Another tip is to apply the coating late in the afternoon or early evening after the temperatures have started to drop for a while.
Hello,
I first wanted to thank you for this article. I have spent A LOT of time scouring the internet for answers about how to smooth my floor and remove thinset from a room in our home.
I am trying to determine whether we should rent the Makita angle grinder and buy a diamabrush attachment OR rent the floor maintainer and rent the diamabrush attachment. My main concern is weight, I am 120 lb female and would be doing this alone in condo. I have read the HD floor maintainer can be hard to steer alone.
My other concern is dust. Since this is in an enclosed space I want to keep dust to a minimum. Right now I don’t understand how I can attach a dust shroud to the HD floor maintainer, and the link in the article takes you to a page with all types of dust shrouds instead of the specific one that is compatible with the equipment.
I hope that someone will be able to answer this question as this article is probably old. Again thank you for all the information! Prior to this I was going to rent a concrete grinder (so expensive!). This is a much better alternative.
Hi Viviana. For what you want to accomplish, the 7″ inch angle grinder with the Diamabrush attachment would be the best option. This is a very popular method for removing thinset on concrete. It will be easy for you to transport and maneuver on the floor, plus it will provide the best dust mitigation. You will need a good dust shroud to fit it, a shop vacuum, and we highly recommend a Dust Deputy like the one shown in the article. This setup won’t be completely dust proof, but it will be very manageable for indoors. Knee pads are your friend and make sure to wear an N95 rated respirator and eye protection. Regarding the floor maintainer, dust shrouds for the Home Depot floor maintainers are only available from Home Depot. Not all stores carry them.
Hello,
We love your website! So much great information on here.
We are currently in the process of removing an old carpet from an interior room. Underneath the surface looks slightly rough. While the current carpet is secured by tack strips it appears whatever flooring was there before has left some rough surfaces and there is paint, possibly glue on the floor.
I have read that if we are going to install tile then the surface must be clean, free of previous materials and level. What I have gathered from searching the web is I will first need to grind down any previous applications on our concrete subfloor to create a clean smooth surface. Then in order to lay tile we will need to use a Self leveling cement compound to pour over our concrete sub floor. After this we will be able to seal the concrete with a primer and install tile.
Is this correct? I don’t want to do more work than is necessary but I also want to do the job the right way.
If we do need to smooth down the floor first and remove previous coatings do you recommend us using the HD floor maintainer with diamabrush rental or the angle grinder with diamabrush head by hand?
Thank you for providing such a great website!
Thanks for the kudos Jacob. We just answered a similar question by Viviana in the comment above. If you are doing some rather large rooms then a floor maintainer with the Diamabrush works well since it will cover more territory in the same amount of time. However, if the rooms are not too large then the angle grinder is the way to go for the reasons mentioned. Yes, you do need to remove the old glue, paint, mastic, or other adhesive blockers from the surface before you tile. If the floor is not level, the self-leveling underlayments that you can find at your local home improvement centers will do the trick (for others reading this, do not use self-leveling indoor underlayment for garage floors). If the floor just has some irregularities, then many times this can be adjusted for with thinset when laying the tile. Using primers and sealers is really dependent on the situation and conditions of the surface. The John Bridge tile forum is a great place to learn about that as well as general tile setting information.
Hi, thanks for all the great information on this website! It has been an invaluable resource for me in planning my garage remodeling project.
I have a fairly small garage (~300 sq. ft.) that I am planning to apply primer, epoxy, and topcoat on. The floor is mostly bare concrete with light stains (the house was but in the 1950s) but there seems to be a strip of sealed concrete running down the middle. I currently own a 4.5″ fixed speed 11,000 rpm angle grinder that I would like to use to prep the area but I have a few questions to see if I need to invest in more equipment before getting started.
1. Would it be overly tedious to grind the whole area with a 4.5″ grinder vs. a 7″ grinder?
2. Do I need to get both a Diamabrush tool and a diamond cup wheel?
3. Is 11,000 rpm an acceptable speed for this task or do I need a variable speed grinder?
Thanks for your input!
Hello Gary. Yes, a 4.5″ grinder is a bit tedious for your what you want to do. That size works well for grinding flush patch work, crack repairs, and for getting close to edges and corners. A 7″ grinding wheel or Diamabrush on a floor maintainer is a much more efficient method for grinding your floor. 11,000 RPM’s work fine.
I’ve found much valuable information on this site; wish I had found it earlier. I’m looking for options to improve my garage floor. A few years ago I painted it with Drylok latex concrete floor paint (said for garages as well). About 1/3 of the floor paint is in good shape, like new and adhered very well, but the rest flaked off. The concrete where the paint came up is pitted. Being in western NY we have lots of road salt that gets into the garage. I’ve done my best to remove loose paint and salt residue (acid wash). Do I have any options to put down a quality floor system (epoxy? Polycuramine?) without griding off all of the good paint? I know I would have to do something to repair the areas that are pitted or spalled. Thanks for a great site!
Hello Bob. If you are going to spend the money for a quality coating, then you really should remove all the floor paint before applying it. Grinding is the easiest method and will prep the concrete at the same time. A quality coating is really only as good as what it adheres too. If you apply it over paint, you run a high risk of developing hot tire pick up and peeling since it’s the latex paint that is bonded to the concrete and not the coating. We just published an article about the best, easy to apply DIY coatings that are very high quality. You can read it here. Also, some of your quality coatings have some solvents in the ingredients which would soften latex paint.
Thank you for the advice. I took it and rented a floor machine with a diamabrush concrete prep tool. I spent 4 hours on a 1 car garage and could not get all of the paint off. Most of it is gone but there are areas where I kept getting concrete dust but the paint was remaining. I ran out of rental time and energy. Hopefully with the suggested primer which is supposed to account for a variety of conditions the epoxy will hold. The paint that did not want to come off is not in the area that the car will sit. I suppose I had the option to pay for another rental period and continue to grind but I was concerned about the amount of concrete I was removing. I had tried to do the grinding wet but that barely touched the paint so had to go dry. Just thought I’d let you and folks know about my experience. Thanks again for the advice!
Thanks for the update Bob. For removing paint, they should have set you up with the Diamabrush removal tool, not the prep tool. The removal tool will remove old paint much quicker and will prep the concrete in the process.
Is it preferable to NOT use a dust bag inside the shop vac when the dust deputy is in use? I have a HEPA filter inside my shop vac since I will be grinding a 50 ft strip of stem wall about 2″ wide and 3/8″ higher than the floor in 3 bedrooms, which would interfere with an upcoming flooring installation. Forty years ago, the slabs and stem walls were poured (separately, creating a cold joint), and many houses in my tract have “issues” like mine.
Correct Don. Do not use a dust bag in your shop vac, even if you use a Dust Deputy. Concrete dust is heavy and will blow out the bag before it is even half full.
I have cracks in garage floor mud jacking has been done to level but I have some spots that are still 1 quarter inch higher than other will 4 inch grinder grind cracks and level out high spots. Thank you
Hello Danny. 1/4″ is a lot of concrete to grind. A 4″ grinder and turbo cup wheel will take the concrete down that is close to the edge pretty darn quick. However, it will take some work to smooth it out more so that it’s not such an obvious elevation change in the concrete.
Preparing 1,000 square feet of main workshop floor for a commercial grade epoxy (no flakes – just non-skid). Shop 15 years old and was power trowelled and sealer applied. Used 4.5 inch Diamabrush removal blade with shroud and Dust Deputy to dry grind perimeter and corners. Worked great. Diamabrush and Dust Deputy added about $250 to the prep cost so far but my personal health is worth much more. Didn’t notice how yellow the sealer had become until the grind. About to dry grind the main floor with a rental Diamabrush on floor maintainer and using my own Dust Deputy and Wet/Dry Vac. Will push broom and vacuum afterward. Results of perimeter grind went so well I may not need to acid etch. Question: should I wet rinse floor multiple times (just like after acid etching)? What about using a large Swiffer with denatured alcohol? Your thoughts?
Hello John. Great to hear you are getting good results. There is no need to acid etch or rinse the floor after grinding. All you need to do is sweep and then vacuum up the dust real well. You can wipe the floor with denatured alcohol as well if you feel there is still some dust that needs to come up. What you don’t want to do is introduce water after the grind or you will have to wait a couple days for it to completely dry out.
I need to remove a concrete sealant on my garage floor before doing the epoxy. The actual sealant is translucide and thin. So can I use my 5-Inch Random Orbit Sander with a bunch of 40 GRIT discs to prepare the surface? I know it will take more time but that would be more convenient for me as I will do on several days during my spare time. Thanks !
Hello Remi. You might be able to remove the coating with 40 grit sanding discs (assuming it’s an acrylic), but it will not prep the concrete. All you will do is ruin the sanding discs. That is why concrete grinding discs are embedded with diamonds. Sandpaper will not work.
Hi Shea,
I’m planning a project for next week, and have a timing question. I plan to grind my garage floor and also to add concrete densifier to mitigate moisture issues. But, what order makes most sense? Should the densifier be applied before or after grinding the floor? Thank you, and thanks for all the great info on the site too!
Hello Mike. You need to put down the densifier before you grind and you need to do it soon. Densifiers are reactionary and take about 7 days to go through the chemical process with concrete. Putting a densifier down after you grind would prevent the coating from penetrating the concrete as well.
I need to remove a concrete sealant on my garage floor prior to epoxy. Which Diamabrush tool do you recommend removal tool or the prep tool for the most effective job?
That’s a good question, Cliff. If it’s a penetrating sealer and not a coating, then the prep tool is what you would want to use. The removal tool is only if you are removing a film forming coating or other topical substance such as mastic or or old tile mortar.
Hello! I love the site! It’s been a huge help to me and I’ve bought several of the products you suggested and they all worked great. My question is…How clean do I need to get the floor? I dry grinded and used a vac system that worked good. The concrete had stain and epoxy top coat which I removed it all and it absorbs water real good. My problem is when I wipe my fingers across it I get a slight layer of white dust, especially in the areas that were grinded heaviest. I have been over them about 5 times and ran a lightly damp dust mop over then several times. I can not use a pressure washer in the location (it’s interior). Visually the floors appear very clean but I can get a very light white dust on my fingers. Do you think it will be okay or do I need to keep working at it until spotless? Also, this is for a latex paint art project with artwork that will get a polyaspiratic topcoat. Hoping a very small amount of remaining dust might be acceptable because my back is tireddd.
Thank you!
Hello Stephen and thanks for the kudos. Light dust on the fingers is fine. Concrete will never wipe completely clean after grinding. If your fingers turned a heavy white after running them across the surface then you would have more cleaning to do. You should be fine by your description.
Hello,
What is the correct way to tell if the floor is ready for stain? I’ve done the water test and while the concrete turns dark all of the water is not absorbed and there are still puddles. Does all of the water need to be absorbed or just turn the concrete dark to show that some has been absorbed? I have done the acid etch and now I am thinking that I will need to rent the grinder from HD and do the whole floor that way. Any advice would be greatly appreciated.
Hello Bob. How much water are you putting on the floor when you test it? Also, what type of stain are you planning on using and what clear coat product are you going to apply over the stain?
I was planning on using H&C Colortop Solvent Based Solid Color Concrete Sealer and then using their Clarishield Clear Oil Based Concrete Sealer as a topcoat. I also was considering using their Infusion Water Based Semi-Transparent Decorative Stain instead of the Solid if I can get the floor clean enough. I would still topcoat with the Oil Based Clear Sealer. I am pouring a small amount of water on the floor, but even when I take my finger and just drip the water on it, it still puddles. Now, after reading some of your other sections, I may just have too much water in and under the slab as I have been cleaning it for the last 2 weeks.
It’s not a good sign if water beads and puddles just from small drips after an acid etch, Bob. It’s possible that there was a sealer applied to the concrete previously. When you did the acid etch, did it bubble and fizz quite a bit? Did you have a lot of white calcium powder that was washed away after you neutralized and rinsed? If not, then the floor has been sealed previously. If that is the case, then you will need to grind the surface.
Also, we want to make sure that you are not confused about concrete staining. Manufacturers are creating misinformation in this arena. Staining concrete actually involves the process of permanently changing the color of concrete. STAINS DO NOT SEAL CONCRETE. The only way to remove stain from concrete is to remove or wear away the layer of concrete that was stained. Stains are either acid (reactionary), solvent based, or water based. Once concrete is stained, it requires a film forming sealer such as a clear acrylic, epoxy, polyurea, and etc. to make the color pop. This clear coating seals the concrete as well. You can learn more about stains here.
The H&C Colortop is not a stain. It’s a very low solids acrylic coating that has been tinted for color. Unlike true stains that create mottled and variegated looks, tinted acrylics provide a consistent color. If it peels or is scratched, it will reveal bare concrete underneath. We are not saying not to use it. We just want you to understand the difference so that you know what you are applying to your concrete.
Hi Shea,
Thanks for the heads up on the Color Top Solid. Is the H&C Infusion Water Based Stain an actual stain?
The concrete is new, just poured on January 15th so no sealer on it. The acid did fizzle some but not for a long time. I scrubbed the concrete while the acid was down and never let it dry out. I also saw the White calcium get rinsed away when I was rinsing the slab. However, there is still a lot of white powder on the concrete and I was wondering if this is the slurry you mention in other posts? Since I never let the concrete dry I don’t understand why it is there. It doesn’t even wash away with the power washer.
Any help would be appreciated.
Yes it is, Bob. I meant to tell you that. Removal of the white calcium deposits is never easy. The key to avoiding it to begin with is to do a real good high pressure rinse after the acid has been neutralized. You may also have a fairly dense concrete surface that you are dealing with and may explain why the concrete will turn dark but not absorb all the water. What ratio of acid to water did you use? The easiest way to remove the white powder is to do another light acid etch. Lightly scrub the slab with a deck brush while the acid is working. Neutralize the surface and then use a high pressure nozzle on your hose or pressure washer to rinse everything out. That should be enough prep for the water based stain you want to use as well as the clear coat.
Thanks Shea,
Appreciate knowing that at least that stain is an actual stain.
I started with a 2 -1 ratio but ended up using undiluted acid which still did not fizz that much, nor did it really etch the surface very well. I let it sit for 30 minutes which was longer than it was fizzing before rinsing. I checked and my local HD has 2 different floor machines. One is an EDCO Concrete Grinder where the disc sticks out the front and the other looks more like a floor polisher that you put a diamond blade disc on. I think I will dry grind to avoid the slurry, vacuum and then power wash to remove whatever is left. Does that sound like it should work?
Wow… Ok. If you only got a small reaction from undiluted muriatic acid then the contractor definitely applied a “cure and seal” of some sort to the slab to help it cure properly. Acid only works if it can react with untreated, bare concrete. As a side note, undiluted acid will fizz like mad and damage bare concrete that is not sealed.
Either one of those grinders will work great as long as you don’t opt for an acid stain afterwards. The Edco usually has a vacuum attachment and will create less dust. It’s also the more aggressive of the two. No need to power wash. Just vacuum it well and you should be good. Since you are now grinding, Bob, you may want to consider a much more durable clear coat to apply over your stain. If it’s in the budget, a single-part moisture cured polyurea is extremely durable and will last years. Also, you may find some good info from this article about a water based stain.
Thanks Shea,
I actually am starting to consider DeltaDye as it offers more color choices than H&C. I also will consider the one part Poly Urea Clear Coat since it appears to be a better product as well. When I am finally at that point I will let you know.
So I just returned from HD Tool Rental and looked at both of the floor grinders. In talking to the rental department head, he told me that everyone comes back and complains about the swirl marks that are left behind. He told me that some people have been trying the Square Floor Sander that actually has an orbital motion with a 20 grit paper and that it doesn’t leave the swirl marks. Any opinion on that process?
What is the best way to avoid swirl marks as they will probably show through a stain since it is semi-transparent?
A sander isn’t going to work, Bob. You need to actually remove a very thin layer of concrete at the surface and sandpaper will not do it. If you had very smooth concrete that was not sealed, a sander such as that could work in order to get the stain to penetrate better, but not for sealed concrete. The Diamabrush is going to be the most forgiving in terms of swirl marks. It’s not as heavy as the Edco and the diamond blades flex. Keep the unit moving and keep it flat is the key.
Thanks Shea,
Saturday is the day I’m getting the machine so I will let you know how it goes after that. Thanks again for all of your advice.
Enjoy Your Day!
Hi.
I am planning a garage floor epoxy project in the next month or two (Michigan). The floor is pitted a bit. And it looks as though the top layer of concrete is breaking in small pieces underneath where the cars sit. Will grinding remove all of this and after epoxy it won’t reappear?
That is correct, Daniel. Depending on how bad the current damage is in that area, you may want to grind it first to remove all the loose material and then fill in the holes and low spots with the proper repair material. You can then grind the entire surface including the repaired area. Once you apply a quality epoxy it will be difficult to detect that the damage was ever there.