
Don’t hold off any longer on your garage floor project just because of some required garage floor repairs. Repairing a pitted or spalled garage floor is only intimidating because most people don’t know what to use or how to start. It really isn’t that difficult and in most cases can be tackled by the average DIY handyman. Once you understand what to do and which products to use, you will find that it’s not as difficult as you may think.
What is concrete pitting and spalling?
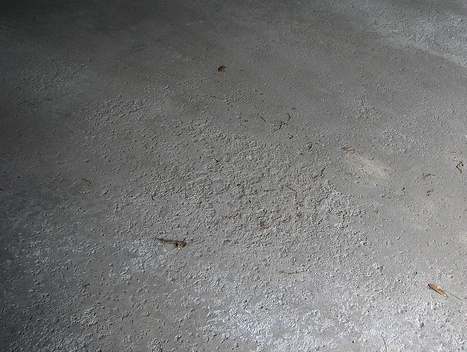
Pitting and spalling can sometimes look very similar to one another. Spalling will usually cause the surface of the floor to crumble or separate into thin layers. Pitting on the other hand can create smaller, deeper holes that have a more distinct cratered look.
Spalling is typically caused by cold winter climates that subject the concrete to freeze-thaw cycles. If water is deposited on the garage floor it can work its way into the capillaries of the upper surface of the concrete as it is absorbed. When the water freezes, it expands and causes microscopic damage to the surrounding concrete.
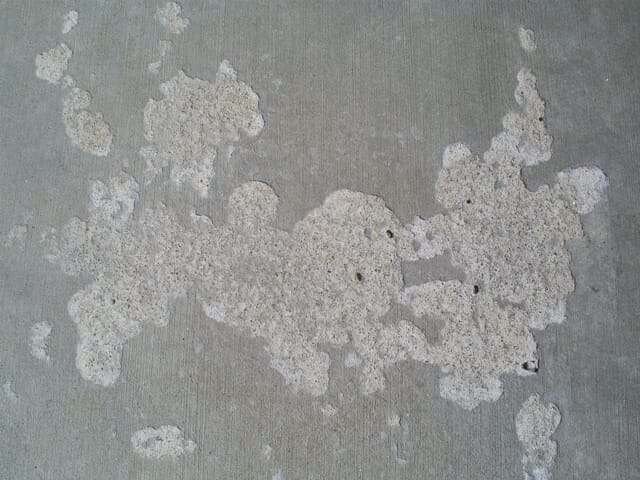
Over a few winters, this constant damage weakens the surface. As a result, the concrete starts to separate from the surface in sheets or crumbles.
Road salts and deicing fluids only contribute to making the problem worse. Salt is corrosive and will cause concrete to deteriorate. In addition, it lowers the freezing temperature of the water. This can allow the water more time to penetrate deeper into the concrete before it freezes.
Pitting, however, can be caused by improper finishing of the concrete, an inadequate concrete mix, improper use of an accelerator, or even old age. Pitting can sometimes cover large areas of the floor while spalling may be more localized.
Road salts and deicing fluids can cause localized pitting as well. It’s most common in areas where a parked car can deposit road salts and deicing fluid on the concrete.
Prepping the concrete for repair
Fortunately, the majority of pitting and spalling in a garage can easily be repaired. Typically, the depth of the damage is usually less than ¼” for spalling and ½” for some pitting. Many times it is less than that.
The first thing you need to do is clean the area to be repaired of any oil stains, wax, sealers, or anything that would be considered a bond breaker. Next, remove all broken and loose concrete with a hammer and chisel. It’s extremely important that you remove all loose or suspect material.
If you are repairing spalled concrete, we highly recommend firmly tapping the surrounding areas with a hammer and listening for a hollow sound.
Spalling starts damaging concrete from just underneath the surface. As a result, there may be surrounding areas of your garage floor that haven’t weakened enough to break free on their own and remain hidden.
Areas that sound hollow have deteriorated underneath and are weak. They should be hit hard with a heavy hammer to expose the damage for repair. This will eliminate the possibility of having to do any more repairs in the near future.
After you are done, sweep the area clean and then vacuum the remainder of the dust from the surface.
Many times instructions for concrete prep may state grinding or shot blasting of the concrete is recommended. If you are repairing smaller areas in which you have broken away all loose material with a hammer and chisel, then the surface profile of the concrete should be satisfactory.
Repair Procedures for pitting and spalling
There are a variety of product materials you can use. What you use will depend upon the size of the repair you are making, how deep it is, and in some cases, how you want it to look. In addition, considerations should be made if you plan on applying a garage floor coating.
The type of materials used is usually broken down into two categories. These include resinous repair materials such as epoxy and polymer-modified cement repair materials.
This post may contain affiliate links. If you use these links to make a purchase, we may earn a small commission. As an Amazon Associate, All Garage Floors earns from qualifying purchases. You can read our full disclaimer here.
Epoxy Concrete patch repair products
If you are going to be coating your garage floor with paint, or epoxy, or covering it with a garage floor mat, then we recommend using an epoxy-based product for most of these repairs. The exception to this is very large areas, which we will discuss shortly.
If you have just a few small holes from pitting, then we recommend using something like Rust-Oleum EpoxyShield Concrete Patch.
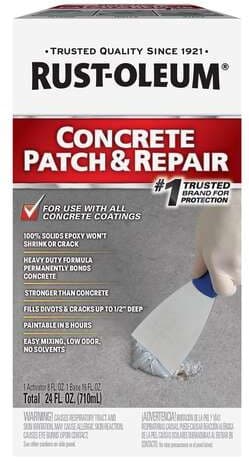
This is the same product that works well for crack repairs. If it’s not available from your local home improvement center, you can find it here at Amazon.
The EpoxyShield patch is a 2-part epoxy gel that you mix as you need it. Mix the Part-A and Part-B according to the directions. Apply it to the repair area making sure to work it in to push out any trapped air. Smooth it out as best you can with a putty knife or margin trowel. Within 8 hours the repair will be hard enough to grind or sand flush.
For larger areas of pitting and spalling, we recommend using a 100% epoxy concrete patch with a sand aggregate. The silica sand is mixed in with the epoxy to act as a filler. Legacy Industrial’s 5-Ton Epoxy Patch Kit is a good example of this.
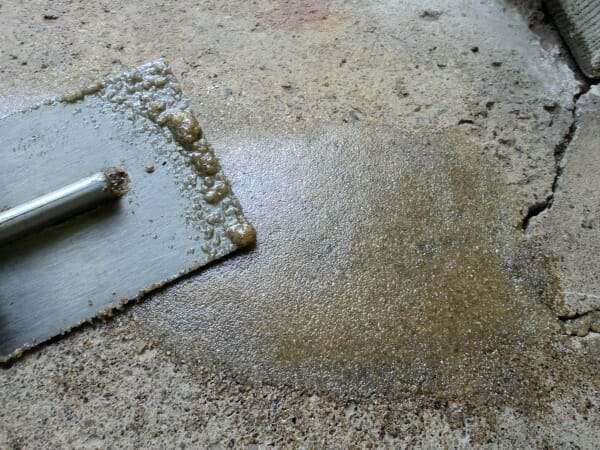
This type of repair works extremely well and is a popular method among floor coating contractors. Besides repairing pitting and palling, it does a good job of filling larger holes and cracks as well.
In addition, it can be trowelled out fairly smoothly. Once cured, these repairs are actually stronger than the concrete.
Depending on the size of their kit, you can cover from 7 – 16 sq. ft. at a depth of 1/4”, for pitting and spalling.
Rust-Oleum TurboKrete Concrete Patching Compound is a similar product. It uses a 100% solids epoxy resin as well. You can find the Rust-Oleum TurboKrete here at Amazon.
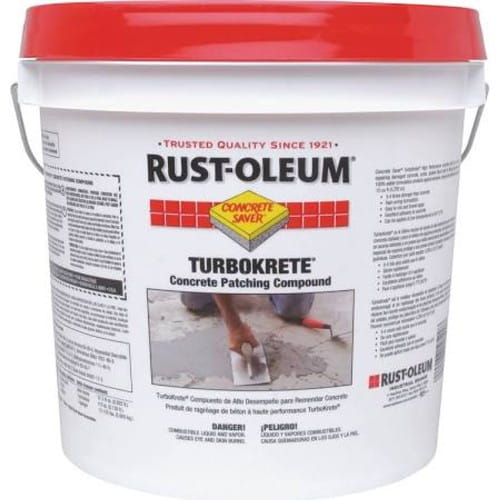
We’ve used this kit before and have found that the required mix of sand to epoxy is a bit too much. Reducing the amount of sand in the mix by 10-15% provides for a smoother finish and easier application.
After following the mix instructions from the manufacturer, you will want to trowel the epoxy patch onto your damaged area. Be sure to trowel it with some pressure. This forces the mix into the crevasses of the damaged area and works out any trapped air at the same time.
Once it’s trowelled in, you can smooth the mix with a cement float and feather it to the existing surface. One industry trick is to spray the float with a little Windex. This will keep the trowel from sticking and provide a nice surface.
Polymer-modified cement patches and toppings
Another product that works well is polymer-modified cement. These are a mixture of Portland cement, sand aggregate, and polymers. You just add water. They are used for patching concrete, overlays, and concrete resurfacing cement toppings.
The nice thing about polymer-modified cement products is that they are fairly easy to work with and adhere much better than standard concrete mix. Some can be mixed thicker or thinner depending on the depth of the damage that is being repaired.
Another nice feature is that many can be feathered to as little as 1/16” and can cure quickly. They can be ready for an epoxy coating, paint, or stain, sometimes within hours.
Pay close attention to what the manufacturer offers as some have special mixes for patches deeper than ½” and other mixes for overlays, shallow pitting, spalling, and complete resurfacing.
They may require prepping the area with a priming liquid before application so be sure to read the instructions carefully. Don’t worry, it’s a simple process.
Polymer-modified cement patches are a good choice for very large areas of pitting and spalling. This also includes broken concrete lips and edges, deep holes, and areas where the repair may need to be shaped. The edge of a concrete apron is one such example.
Ardex is a company that makes excellent polymer-modified concrete repair products. Ardex CP is their concrete patch and Ardex CD is used for resurfacing and shallow repair areas. You will need to call or use their website to find a dealer near you.
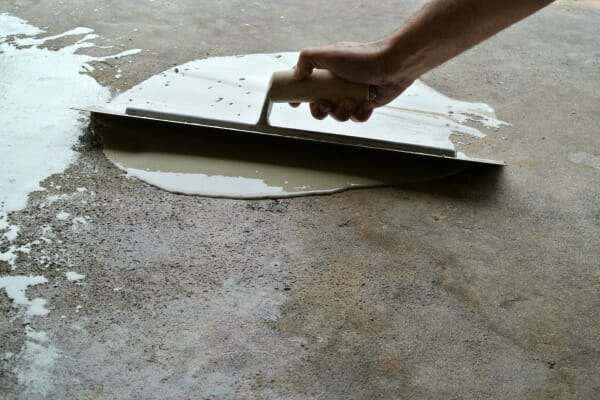
If you have large areas of shallow pitting and/or spalling, then a polymer-modified overlay or topping would be the best choice. These work well in areas where the damage is not much more than 1/8” to 1/4”, especially if you want to retain a standard grey color.
Mixed to a thinner consistency than a patching mix, a polymer-modified cement topping can be poured directly onto the area and spread using a hand trowel or metal-edged squeegee. If you have any spots that are deeper than 1/4″ within the area you want to cover, it’s best to mix a small, thicker batch first to patch over these spots.
In about an hour or so, you can rough these spots over with a mason’s stone, grinder, or a block of 60-grit sandpaper. Sweep and then apply the topping directly over it.
Because these products set up quickly, you should be able to tell fairly soon if you have any areas that have settled and created a low spot that needs a second application. Usually, within 4-6 hours you can rough up the area with 60 grit sandpaper and apply another coat.
Once you have finished and the repairs have cured, you may need to lightly grind any ridges or areas where the mix didn’t feather nicely into the existing concrete. This will help to create a nice smooth transition.
Do not use a polymer-modified self-leveling underlayment! This type of product is not engineered as a wear surface and is not approved for outdoors. Underlayments are only used indoors and require that they are covered with floorings such as carpet, tile, or linoleum. You cannot apply garage floor coatings over underlayments.
Final notes
Remember – If you are going to follow up with an epoxy coating or paint, these repaired areas will still need to be prepped by grinding. This provides the proper profile for coatings. You cannot etch polymer-modified concrete or epoxy patch repairs.
Also, always honor all contraction and expansion joints. Repair materials such as these are not designed for filling these joints up and will lead to surface cracks if you do.
When making repairs to your garage floor, be sure to pay close attention to the mixing instructions and any tips that come with the product. After all the repairs are made, be sure to protect the garage floor from further pitting or spalling by sealing the floor or applying a coating.
Like anything else, there is a bit of a learning curve to deal with depending on the product. Once you get started, however, you will find that doing most of these repairs on your garage floor is not as difficult as you may have thought.
I recently used the polymer based product from epoxy shield over the weekend. It turned out better than I had hoped though it will require me to feather in the edges a little better so that it won’t show up when I put a coating down. The hardest part was getting the floor clean before I used it.
Great website. Thanks so much.
Here’s my question. I needed to remove paint and grinded with diamabrush remover. I also have spalling issues across chunks of 3 car garage. Worked fine, but lots of work!!! Should I resurface entire garage to get things nice and flat and, if I do, do I need to redo with the diamablade prep tool, including the new resurfaced concrete? If so, How long to wait from resurfacing to prep tool?
Thanks for the kudos Stephen! The answer depends on what you want to do with your garage floor. First, deep chunks should be repaired with a polymer modified repair patch. If you are going to epoxy coat the floor, shallow areas can be filled with an epoxy sand slurry. It applies fairly easy. You will need to grind over these areas again to smooth out the transitions so the repairs will not telegraph through the coating.
If you are just going to seal the floor with a penetrating sealer or topical sealer such as acrylic, use a polymer modified resurfacing product for the shallow spalling instead of the epoxy slurry. Grinding over the repairs isn’t necessary for the sealer, but might be required for cosmetic reasons depending on how well you feather in the repairs. Most of these repair products are fast curing and can be ground the same day. Just check with the manufacturer.
Hello, I love your site and it has given me a lot of guidance as I prepare for putting my epoxy coat down. I have a couple question about the order of doing things.
My garage was built in ’77 and the floor was in relatively good shape. It had a clear sealant of some type down so I got the Diamabrush and ground it down then touched up spots that were still shiny with a 7″ diamond wheel. I’ve patched all of my hairline cracks with a Quikrete Concrete Crack Seal (which I still need to grind down some of the edges where it was overfilled) and now all that is left is some pitting/spalling. I’ve purchased some Rustoleum EpoxyShield and playground sand to cut it with to make the slurry.
I have purchased a couple gallons of muriatic acid to etch with (there are still some darker spots, though not shiny – and I figure an extra ten bucks and labor, even if its redundant, is better than laying down a four-figure coating and having it go bad, right?) but am unsure if I should etch and then patch the spots and grind down the feathering or if I should do all the patching and feathering first, then etch? I don’t know if the acid could negatively interact with the EpoxyShield material. Thoughts?
Also, I have two large 2’x2′ patches in my garage where the slab was drilled through to adjust the foundation. When I was grinding I noticed that when I hit these patches the grinder would “grab” the concrete of those patches much easier than the rest of the floor. The concrete seemed softer (I left a ton of ‘kiss’ marks in it before I adjusted my technique) and threw up a ton of dust relative to the rest of the floor (and I was using an attached shop-vac with concrete dust filter when grinding, crazy). I’ll be patching the edges around these patches but wanted to know if the foundation patches would present any issue?
I got the 600 sf. TrueLock 100% solids color coat + 100% solids primer coat + polyurethane topcoat w/ 100 lbs of flake from garageflooringllc for full broadcast coverage of a ~430 sf. garage so I’m not super worried about the underlying areas telegraphing through so long as I do a reasonable job evening them all up before coverage.
So long as this rain clears up I’m hoping to get it all done this weekend, thanks!
Hello Alex. Wow, quite a long question! We almost reduced some of it but thought it would make for good info for other readers. We are glad you like our site.
Do not use the acid etch. Grinding is much more effective than acid and you don’t have to deal with neutralizing the concrete and waiting for it to dry. Patch your areas first then run the grinder over them to feather everything in. Have you done a water test on the dark spots you refer to? The density of concrete can change as a slab is being poured with the more dense areas being darker. As long as they absorb water you are good to go.
Don’t worry about the 2’x2′ patches. What you experienced is normal and as long as you cover up your kiss marks you will be good. Good call on the slurry mix for your pitting and spalling as well. You purchased quality epoxy flooring products and with full broadcast flakes it’s unlikely any of your repairs will telegraph through. Just be sure to check on the humidity levels before laying it down and good luck!
What material is better suited for repairs of surface damages/ Spalling or shrinkage cracks on concrete roads? what will be the cost of repair per square metre.
Hello Abhay. We don’t have experience with concrete roads and can’t be making recommendations on that.
Thanks for the tips! I’ve noticed that my concrete stared spalling a few weeks ago. My concrete took a really hard hit this winter. The weather has been particularly sporadic with massive snow storms and sunny, late spring like weather. I didn’t know that road salts help to contribute to spalling. That’s good to know, because I’ve been using road salts quite liberally on my driveway.
Hello Shea, I need some advice on patching my concrete garage floor. I live in Northern Alberta, Canada and where they use salt on the roads. This mixture on snow and salt drip onto my garage floor causing spalling. Along with the freeze/thaw cycle we get it has caused some pitting on the floor as well. Can you recommend the steps to prep and what would be the best product to use. I need to tackle the problem before the snow flys again in the fall or I’ll have an even bigger problem on my hands. Thanks in advance. :o)
Hi Charles. The first thing you need to do is clean the floor to free it from the winter salts and deicing fluids. We have an article about how to do that here. Once clean, use a polymer modified concrete patching compound to fill the damaged areas. Do not use regular cement mix. We are not sure what you have available in Canada so we can’t make a manufacturer recommendation. Do a Google search for your area. Once you find a product, talk to a representative about what you want to use it for in case there any other special instructions. Once you repair the pitting and spalling, you will want to seal the floor by applying either a siliconate penetrating sealer or a densifier with siliconate sealer added. Concrete Sealers USA ships to Canada I believe. Their PS101 or PS104 would be good candidates for sealing the floor unless you can find something similar near home.
Good luck!
We just had a new basement floor poured (new construction). Immediately it showed some moderate spalling. The concrete co. Which poured it came highly recommended but the owner has not returned to fix the problem after repeated calls. We have decided to try to fix it ourselves if possible. The floor has perhaps 18-20 1/4″ to 1″ patches which have flaked. It is a dyed floor which we do not intend to cover. We are going to cut, grout and seal it to mimic tile.
Would the above method work for this type of situation.
Thanks so much for your time!
Hi Belinda. Sorry to hear of your floor issues. The above methods will patch the numerous areas that need repair, however they will stick out like a sore thumb for the cosmetic look you are trying to achieve. Also, you may have more serious issues. If you tap the floor with a hammer in various areas around the spalling, does it sound solid or more hollow? If it has a more hollow sound then you will have more spalling to come and a very suspect upper surface. We recommend that you do all you can to get the contractor back to inspect the floor.
Do you know of any contractors that do this work with your product in or near Staten Island nyc zip 10312
Hi Gene. None of these products are ours, but most can be purchased from suppliers near you or online. Unfortunately we are not familiar with contractors in the New York area.
I wasn’t even aware that concrete repair products existed, such as the epoxy product mentioned in the article, so I am happy to learn this is a possibility. I had previously thought that I would likely just need to wait until the flooring in my garage was so damaged that I would need to replace it completely. I’m happy I found this article when I did, because I believe my concrete is still at a stage where these kinds of repairs should be fairly easy and effective.
I found a a patch repair at home depot called rapid set cement all. Is this okay to use for my pits and spalling in my Pa. garage floor. It is all I could find locally that is good for hot tires and freeze & thaw. How long after use can I use the siliconate penetrating sealer. I hope to get this done before winter.
Hello Karen. Yes, you can use Rapid Set Cement All. You can use a penetrating sealer withing 24 to 48 hours after it is down depending on temperatures.
I have a new house in the Chicago area. The floor was poured in April 2014. Last winter we had spalling that occurred on the rain lip. There is a 2.5 ft by 1 ft area that has lots of spalling. It looks like that entire 2.5 ft by 1 ft area will eventually spall. Also, the area by an expansion joint in the rain lip spalled for 3 inches on one side of the expansion joint and 6 inches on the other side. The rest of the garage floor is perfect. The spalling seems excessive for only one winter.
I’ve already contacted the cement contractor who is talking with the cement supplier. So far they both think it is from the salt/freeze/thaw. In any case, they will be talking with me regarding options.
What type of repair do you recommend for this given that the area to be repaired is outdoor? Is an epoxy such as one of the Rust Oleum products good to keep it from further damage? Also, how long should I expect a repair to last?
My main concern is to ensure that the slab doesn’t ultimately fail because of the damage to the lip.
Hello Mike. Concrete exposed to the outdoors is usually repaired with polymer-modified concrete patch. If done properly, these repairs will last the life of the concrete and can be stronger than the concrete it is applied to. Epoxy is not a good choice because it will not match up with color and texture of the existing concrete. After that, it’s important that the rest of the concrete be sealed properly to prevent further damage. Penetrating sealers are excellent for this though some don’t work as well with polymer-modified concrete patch. Your contractor should know what will work best for his repair.
Hello,
I am planning on using an epoxymaster epoxy on my garage floors. My garage floor originally was sealed, so in preparation I ground the floor using the diamabrush as suggested on the website. Once I did this it became apparent there was a quite a bit of pitting and chips in the concrete that was not apparent before grinding. I have chiseled away the larger holes and am planning on filing them with the epoxy master crack patch kit. However, there are a bunch of smaller holes/pitting across the garage floor. They are extremely small so it is not practical to chip them all away and fill with the crack patch. I was planning on using the rustoleum epoxy resurfacer after filling the larger cracks to fill the remaining pitting. Two questions related to this.
One, after I fill the larger holes with the epoxy master crack patch, do I need to grind these patches before applying the rustoleum epoxy resurfacer? Or will it bond ok without grinding?
Two, Is it necessary to regrind the surface after I apply the rustoleum epoxy resurfacer before applying the actual epoxy coat from epoxy master? Or will the resurfacer provide an adequate profile for the epoxy?
Thanks,
Tom
Hello Tom. According to Rust-Oleum, the EpoxyShield Resurfacer needs a clean, grease free surface before application. Grinding or acid etching is not necessary. You can find their TDS Sheet here.
We recommend grinding the resurfacer after it has cured. This will provide enough bite for the epoxy to adhere to as well as smooth out any rough areas and possible roller marks. It will also create a nice smooth transition from the resurfacer to the original surface that will help prohibit the patched areas from telegraphing through the epoxy coating. We recommend grinding the your crack patch repairs for the same reason. Think of your floor as a piece of wood with holes and divots that is going to get a coat of paint. After applying the putty to fill those areas, you always sand it first to provide a nice even finish.
Can I use this method to resurface a driveway in Southern California area?
Hi Lino. Yes you can, polymer-modified overlays are very common for renewing concrete driveways.
Had a water softener ascendant sàlt water on concrete floor how do I clean it then seal it it has started to pit
Hello JD. You need to rinse liberally with water first, then scrub it with a solution of 1 gallon warm water to 1 cup of vinegar and a few shots of dish soap. Use a short bristle brush. Rinse liberally again after that. If you want to seal the bare concrete after that, we suggest using a penetrating sealer.
I have a stamped, tinted concrete walkway that spalled because the deicer I used that claimed to be safe for concrete was not. Are any of these products able to be tinted?
Thanks
Hello Steve. Tint is what’s added to the coating that is applied to the stamped concrete in order to give it color. These repair materials will all accept a coating, so yes, tint can be used. However, tint is translucent in nature so it’s best to use a repair that matches the original material as best you can. Since it’s stamped concrete, a polymer-modified material would most likely be your best choice.
Hi there, I need to repair my garage floor that has the pitting and spalling from the freeze/thaw cycles here in Colorado. One question- how do I match the color of the existing concrete? Another question- which product should I use on the garage floor and the driveway? Id like to seal the driveway as well. Thanks so much!
Hello Neil. All repair products come in cement gray. There is no way to try and match the existing gray color tone of your concrete unfortunately. The texture will be slightly different as well. Siliconate penetrating sealers are a great choice for protecting the concrete from salts and freeze thaw. Keep in mind that most penetrating sealers will not work well on the repaired areas due to the materials used. Most polymer-modified cement repair products are protected from freeze thaw and salt damage however.
Hi Shea! I have a problem with my concrete garage floor. For the past several years, it has been developing what I call “volcanos” of salts, which seem to erupt from the floor surface and build up, in many cases, one quarter to a half inch tall. If you sweep up the salts, you are left with an eroded pit in the concrete. I originally thought they may have been caused by acid in the condensate which dripped from my VW Beatle’s exhaust system, however, they have since erupted in areas of the garage where no cars are parked. These white, salty deposits are now pretty wide spread. Any idea what may be causing this, or how to stop it? I live in SE Texas, where it rarely freezes and no salt is used on the roadways.
Hey Stan. What you have going on with your concrete floor is efflorescence and it happens for a variety of reasons. It is caused when soluble salts and other water dispersible materials within the concrete come to the surface. This article here gives a more detailed description. You could have a source of ground water under the slab that allows water to travel up through the concrete and deposit the salts as the air dries the water. A humid environment, SE Texas for example, can cause it as well. The slab absorbs the moisture in the air. When the air dries out, the moisture in the slab comes back up to the surface and deposits the salts as it dries.
We recommend cleaning the concrete very well and then apply a siliconate penetrating sealer. The sealer will completely stop or significantly slow down the efflorescence.
Any way for me to post pictures of my garage floor for repair recommendations?
Thanks
Mark
Hello Mark. Use our contact page to send us an email. You can attach images there. Hopefully we can help you out.
Thank you for taking the time to write this. It’s highly informative and gives me the exact solution to my problem(s). I am getting ready to apply a white epoxy base with a white polyeurathane top coat (UV protection and won’t yellow) to my concrete floors. I have both spalling and pits and want to get them prepped properly.
Thanks!
You are welcome Sal.
I have a concrete floor in the sunroom of my new house. The builder applied a mureatic acid wash and one coat of 1-part epoxy paint, at which point numerous pits were noticeable in the floor as well as a couple of places that were initially trowelled roughly near the corners. I am most concerned about the pits. Is there a product that is simple to use that will still bond to the surface even though there is now a layer of epoxy paint on it? Will it look different from the rest of the floor once a second coat of paint is applied? If you can help, that would be great!
Hello Maggie. The paint needs to be removed first before the proper repair material can be applied. It will not bond to paint. You can do this via chemical strippers or it can be ground off. Grinding will smooth out the rough areas of the concrete as well. Once that is done and the pitted areas are repaired, you can apply a new coat. If the repairs flush with the concrete they will not show through the paint.
My garage is spalling at the base of the walls. The cement runs up on the sides and the studs are on top of the base. The melted snow and salt runs to the wall and seams to climb up a good 6 inches. Which of these products would work best on a vertical surface??? If it keeps spalling, I’m worried my garage will collapse.
Also, do I have to repair it? Can I just scrape away all the loose cement and then seal it to prevent further damage??
Hello Chuck. Both repair methods will work on vertical surfaces when mixed thickly. You do not have to repair it however. Unless the spalling is more than an inch or so deep, the repairs are basically cosmetic in nature. You will want to seal it though to protect it from further damage. Degrease and clean the garage floor first. After you do that, mix a solution of 1 gallon warm water to 1 cup vinegar with a squirt of Dawn dish soap. Scrub the spalled areas good and rinse. Once it dries for two or three days you can seal it. A siliconate sealer is best in most cases for this. The stem wall (vertical walls) are generally much more porous than the floor and may require a different formula.
We recommend contacting Mike at Concrete Sealers USA and describe your concrete condition. He is extremely knowledgeable regarding these issues and has excellent product.
I am in the process of refinishing our garage floor and had two questions. I plan on using the expoxyshield resurfacer due to spalling and pitting. Once put down, can I just seal it and be done or would an epoxy coating then have go down on top of that? Does the resurfacer even need to be sealed?
Hello Maciej. The concrete resurfacer will seal that area from water intrusion which will help prevent future spalling. The rest of the concrete around it can be treated with a typical penetrating sealer.
We have a 3-car garage with a smooth machine-troweled finish. The spot where I park my car is experiencing pitting and spalling, I believe mainly due to salt from winter driving. The pitting and spalling is around the rear tires. There is also some adjacent to construction joints that looks like efflorescence from the salt. Most of the garage looks good and has only very minor damage.
The floor has been sealed and I’ve done water penetration tests that show it still resists water except in the areas with spalling. Initially I thought some polymer modified concrete repair would work but because the damaged areas are small and shallow I’m not sure what would be best. The worst spots of damage are 1/8” to 3/16” deep and add up to around 2-3 sq. ft. max. The rest of the damaged areas are about 1/16” deep and total about 3-4 sq. ft. max.
My desire is to only address the areas that have damage, not the entire floor. I would greatly appreciate your recommendations.
Hello Tim. You want to use a polymer-modified cement patch that will trowel to a feather edge. Top-N-Bond by Sakrete is one such product and can usually be found at your local home improvement centers. Just make sure to clean and prep the repair areas real well before application. Use a hammer to tap on the damaged areas to find any loose spots. You will want to remove them with a chisel before application.
I am going to repair my concrete garage floor which has years of spalling. I would like to put an epoxy cover over that for added durability. It is probably about 50% of my floor size and I am going to use the Ardex CD product to repair first. My questions is should I then follow the instructions for the Epoxy and acid etch the whole floor (including Ardex Repair areas) or just the areas that haven’t been repaired with Ardex? Thanks,
Bob
Good question Bob. You will need to lightly grind the Ardex before applying a coating. This goes for any polymer-modified repairs. The reason is that the acid etch will not react well with the repair since there is not enough free lime available to cause a reaction with the acid. Grinding also does a good job of smoothing out any imperfections of the repaired area as well as create a smooth transition where it meets up with the concrete surface. Since it is such a large repair area, it just may be easier to grind the whole floor instead of trying to do half and half, but that is up to you.
According to your article, Ardex CD is a good choice for an all over repair but I can’t find a retailer in the Chicagoland area. Do you have an opinion on Quikrete Concrete Resurfacer (available at home depot, etc) or recommend a comparable product that is more accessible to the diy homeowner? Both bays in garage are badly spalled by salt, winter, etc. so I need something that can be troweled or spread not just patched. Thanks-
Hello Lori. Have you contacted Ardex Americas to find a distributor in your area? If they don’t have a distributor in your area, Sakrete is another product. Their Cement Fast Patch works for deep spalling and pitting as well as general repair. They also have Flo-Coat Resurfacer for light pitting, spalling, and leveling real low spots. It’s not recommended for anything deeper than 1/2″.