
Learning how to grind a garage floor for an epoxy coating or paint hasn’t always been the easiest or most straight forward of projects for the average homeowner. It frequently raises more questions than answers and can lead to frustration when trying to figure out the best way to do it. Many of these questions relate to what type of grinding equipment to use.
While it is not the most difficult thing to do, trying to figure out the right tools to rent or buy can be daunting. Plus, dust control can be an issue unless you spend more money for the proper vacuum equipment. With so many choices, it can get plain confusing and even expensive.
Our objective here is to present to you an easier and more economical way to grind your garage floor. It can typically be accomplished in less than a day for most standard 2-3 car garages.
Besides helping to eliminate the confusion and questions that arise, it will also instruct you how to provide a nice profile for your coating of choice. It’s just one less thing to worry about when learning how to epoxy coat your own garage floor.
Diamabrush Concrete Grinding Tool
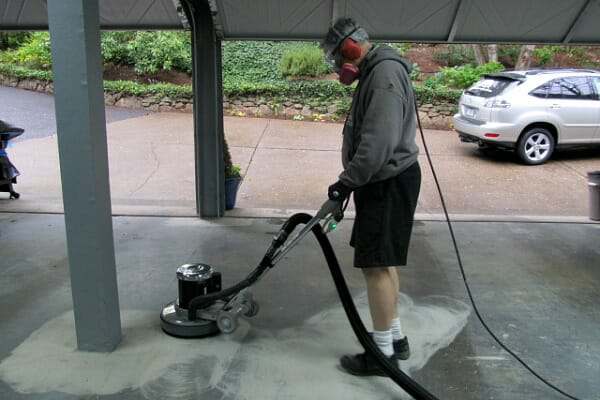
Fortunately, a company called Diamabrush has introduced a concrete prep tool that attaches to the bottom of a floor maintainer. It is available for use from a large assortment of rental companies. The Diamabrush is a great choice for garage floors that are in relatively good shape to begin with.
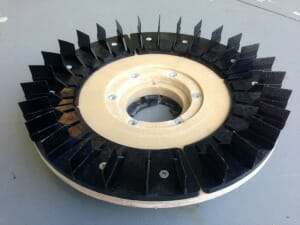
The Diamabrush consists of a series of diamond coated blades that are attached to a buffing wheel.
These blades abrade the surface of the concrete to provide the proper profile for an epoxy coating.
This process of grinding your garage floor is much easier to manage than the traditional 7″ angle grinder with a concrete turbo cup wheel. Plus, it keeps you off your knees.
In addition, the large size of the tool covers more area. Furthermore, the flexible blades prevent grooving or kiss marks that can happen when a turbo cup wheel is not held flat and goes up on edge.

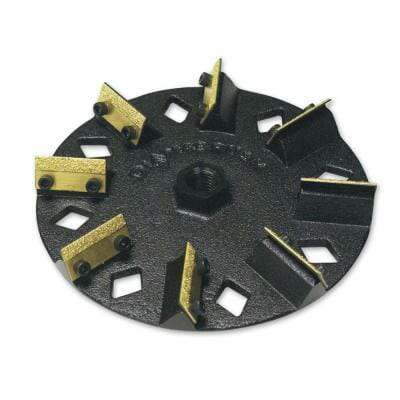
Diamabrush also offers a separate removal tool that is used for removing old paint, thinset, mastic, or even thin epoxy coatings.
You can identify it by the smaller number of diamond blades compared to the prep tool.
If you use this tool to remove old paint or a thin coating down to bare concrete, it will prep the concrete surface at the same time. You will not require grinding with the prep tool afterward. Diamabrush does not recommend the prep tool for removing old paint and thin coatings.
The nice feature about both of these is that they can be used either on a wet surface to avoid concrete dust or you can attach a dust shroud with a shop vacuum to grind dry. Dry grinding with the proper attachments prevents the heavy concrete dust or messy cleanup of a wet slurry.
Note: The Diamabrush is not an aggressive concrete grinding tool that can remove heavy layers of concrete. For example, it will not level high spots or smooth out heavily repaired areas of concrete. You will need to use a turbo cup grinding wheel or a more aggressive grinding machine for that type of work.
This post may contain affiliate links. If you use these links to make a purchase, we may earn a small commission. As an Amazon Associate, All Garage Floors earns from qualifying purchases. You can read our full disclaimer here.
tools for grinding your garage floor
These are the basic tools that you will need to acquire before you start grinding your garage floor. It’s a bonus if you already have some of these or know of someone who can lend them to you. You can apply the cost savings to your garage project.
Harbor Freight has cheap angle grinders for under $20. Unless you plan on using it for other projects, we don’t recommend spending more money on a better grinder.
The dust shroud for the angle grinder is optional but highly recommended. These small grinders will eat up concrete and create a small dust storm. It will need to be attached to a shop vacuum in order to use it. Keep in mind that pricing may vary depending on your area.
- 4 ½” angle grinder – Harbor Freight Tools – $16.00
- 4″ diamond turbo cup wheel – Amazon
- Optional dust shroud for the angle grinder – Amazon
- Floor maintainer rental – Home Depot
- Diamabrush concrete prep tool rental – Home Depot
Some Home Depot stores carry the optional dust shroud attachment and some don’t. Make sure to ask for it. If they don’t have it, you will need to grind the floor wet if you want to avoid the dust. If you find a rental with the dust shroud attachment, you will need to rent a shop vacuum to go with it or use your own.
The small angle grinder and turbo cup wheel work well for grinding flush any garage floor repairs or crack repairs. In addition, it will cover the areas near walls, corners, and other objects that the Diamabrush attachment cannot reach.
The small grinder is also good for smoothing out the raised edges and materials if you are filling contraction joints for a seamless floor appearance. They also work well to grind down any unusual high spots.
If you will be grinding dry with your own shop vacuum, then one other tool we can highly recommend is a Dust Deputy. Concrete dust is very fine and will clog up the filtration system of a standard shop vacuum fairly quickly. It requires frequent stops to clean them out.
The Dust Deputy works by creating its own dust collection system that keeps the filters of the vacuum virtually dust free. You can find the Dust Deputy here at Amazon![]() .
.
Heavier Duty Concrete Grinding Equipment
As we stated earlier, the Diamabrush is a good choice for grinding and prepping garage floor concrete that is in fairly good shape to begin. However, it is not aggressive enough for anything more than that.
If you have high spots to take down, multiple concrete repairs that need to be ground flush, broom finished concrete, or some other type of rough surface, then a heavier duty grinder will need to be used.
A good choice for that is the Edco 10” Concrete Grinder. It is a heavy machine (152lbs) that uses a 10” diamond impregnated grinding disc.
It can be plugged into a standard 110V outlet and has a vacuum attachment to keep down the dust.
We prefer a grinder such as this over the Diamabrush for removal of old paint and concrete coatings as well. It works much faster and does an excellent job at providing the correct surface profile for coatings.
These are fairly common and can be found at your local Home Depot and equipment rental centers. The rental costs vary from $150 – $175 per day. Be sure to check if there is an additional charge for the 10” diamond disc.
Grinding the Garage Floor
The first thing that needs to be done is to make any necessary repairs to your garage floor such as cracks, pitting, and other defects. It’s best to tackle these first before you rent any equipment. You don’t want to be making repairs while rental equipment sits.
After your repairs are complete, sweep the garage floor and clean any oil or grease spots from the surface. Grinding alone will not remove heavy oil stains and is why these need to be tackled first.
Next, if you have elected not to use a dust shroud and vacuum, prep yourself and the garage for the dust that will follow. While the Diamabrush does not create as much dust as a typical turbo cup concrete wheel, you will still have a small cloud of dust that will coat everything in your garage.
When dry grinding, make sure you wear an N95 dust mask or respirator approved for concrete dust. Concrete dust (crystalline silica) is considered a human lung carcinogen. Safety glasses and ear plugs are highly recommended for your own safety.
If grinding wet, start by wetting the surface of the concrete that you are going to grind. It’s best to work in sections when you do this. Using the floor maintainer with the Diamabrush attachment, start by slowly working the machine side by side and then a circular motion. It will only take a few minutes to figure out how long to work an area before you need to move on.
When grinding with the wet method, do not let the wet slurry dry out. It is a bear to clean out of the concrete properly if it dries. It can lead to a coating failure if it isn’t completely removed. Each time you finish a section, use your hose to blast the area clean while it’s still wet, and then move on to your next section.
To check your work, use the hose with a pressure nozzle to spray the area clean and then run your fingers across the surface. It should feel like fine to medium grit sandpaper and have a more granular look. Continue this way, grinding the garage floor one section at a time until you are done. Make sure to work the machine all the way up against the walls of the garage floor.
Because wet grinding can create quite the slurry, we recommend that before you blast a section clean, use a wet vac to suck up the majority of the slurry. This helps tremendously with keeping the amount of slurry that you hose out of your driveway down to a minimum.
Not counting the edge work or other hard to reach places, most people can grind a standard 2-car garage floor (approximately 400 ft²) in just over two hours or so when using this method.
Once done, this will leave a strip about 2″-3″ wide around the perimeter of the walls that the Diamabrush could not reach. There will be more in the corners. Use the small 4 ½” grinder with the diamond cup wheel to remove this remaining strip of concrete and the larger areas in the corners.
Be careful to keep the turbo cup wheel flat on the garage floor when grinding. If you apply too much pressure or angle it too much on the surface, it will leave “kiss marks”. These are small half-moon divots that can potentially show through your coating.
The concrete needs to be fairly dry or just damp when grinding with the turbo cup wheel. If it’s wet, you will need to use a ground fault circuit interrupter to prevent electrocuting yourself with the angle grinder. You can purchase these for about $25. Many times you can use the power cord extension that comes with the floor maintainers if you still have time on the rental. They usually have a GFCI built into the cord.
The other option which we prefer is to grind the edges first then follow up with the diamabrush. Just remember that if you are using a dust shroud on your grinder, a standard shop vacuum is not made to handle such fine dust and will clog up fast.
You may need to clean out the filter quite a few times while grinding the edges. Though you are not grinding a lot of concrete, if you elect not to use the shroud be prepared for the amount of dust this small grinder will put out.
Another Concrete Grinding Option
Another option for grinding your garage floor that is being used quite successfully is the 7” Diamabrush hand tool. This one is made to fit a 7” angle grinder and works fairly quick as well. You will need a dust shroud when using this tool and it works best with a variable speed grinder.
You can’t rent these, however. You will need to purchase them outright. Home Depot sells the 7″ version. You can also find them here on Amazon![]() .
.
Diamabrush says that slower RPM’s are better. The high-speed grinders have a tendency of heating up and clogging the blades. If your only option is a single speed grinder, don’t use one that spins any faster than 6000 rpm’s. If you are worried about the speed, Diamabrush says grinding wet will keep the blades cool and prevent clogging or glazing.
Another tip is to keep it flat and do not lean into it in an effort to make it work harder. The weight of the grinder is enough to do the work.
Depending on how much suction your shop vacuum creates, you may need to shim the tool with a washer to raise the shroud off the floor to avoid suction lock. Some shrouds have a vent to adjust for this as well. Either way, these tools make quick work of the concrete.
Best Shop Vac for grinding concrete
If you are thinking of purchasing a new shop vac, we highly recommend that you look at this Dustless Wet/Dry shop vacuum at Amazon by Dustless Technologies. These are excellent vacuums that work extremely well when vacuuming up concrete dust, drywall dust, and variety of other fine dust particulates.
Professional installers are using these more and more as a backup or even as a replacement to the much higher priced specialized concrete dust vacuums. You can read the great reviews on these and find them here at Amazon![]() .
.
They also offer an optional 25′ vacuum hose at Amazon![]() that can reach twice as far as the original.
that can reach twice as far as the original.
Final Cleaning
Once the grinding is done, it’s time to make sure the garage floor is clean of all the dust. If you ground the floor wet, then chances are the floor is clean.
To check, run your fingers across the surface when it has dried. If your fingers don’t have a lot of white residue on them, then you are good to go.
Another test is to press a strip of duct tape to the concrete and then pull it up. It should stick fairly well and come up fairly clean without too much dust. The floor will never be completely free of concrete dust, so don’t fret over small amounts on your fingers.
If you have a lot of white residue after a wet grind, then this is excess concrete dust that did not get hosed out well and will need to be cleaned. The best way to remove it is to mix up a solution of TSP (Trisodium phosphate) in a bucket, spread it out on the floor and lightly scrub it with a push broom or long handled scrub brush.
Using your high pressure nozzle, rinse the concrete real well making sure there is no more solution left behind. Work in sections if you need to so that the solution will not dry before you rinse it out. This will help lift any remaining slurry and dust that is in the pores of the concrete when you rinse.
If you did a dry grind, the easiest way to insure the concrete is clean and ready is to use the wide mouth attachment on your shop vacuum and just vacuum all the dust up. What’s nice about this method is you can start right away with applying your floor coating since there is no water on the floor that needs to fully dry.
Once the floor is done, test different areas by sprinkling water drops on the surface, paying particular attention to any areas that were coated in oil or grease or where you may have used a tire dressing that dripped onto your concrete. It should turn the concrete darker and absorb the water fairly quickly. If it just sits on the surface, then you may need to regrind and/or re-clean that spot before you apply your coating.
Grinding a garage floor with one of these easy methods will ensure the best profile for your garage floor coating to adhere to. It can be done in less than a day and is safer than using an acid etch.
If I go out and rent the Diamabrush and a floor maintainer, how would I get the edges, and especially the corners of my garage? Would I still need to get an angle grinder with a smaller cup?
(Same question goes for a concrete grinder, which may end up working better in my case as the garage cement seems to have some kind of sealant on it)
Hi Jesse. Yes, you would. It’s all detailed in the article including links for where to find them.
Shea, it’s not clear in this great article how to handle the corner. the disc on the angle grinder is still round, how can it reach the corner where 2 walls meet each other?
Hi Yonggang. That’s a good detail question. The little bit in the corner that the grinder can’t reach is not a problem. The coating will adhere fine as long as the surface is clean. Since you will not be walking or driving on it, it does not need to meet the profile requirements as the rest of the floor.
Shea, thank you!
So I had painted the floor before I put down epoxy. Rookie error as the stuff I bought at Home Depot was quickly ruined by hot tires. I then epoxied the floor with an epoxy specifically for a previously painted floor. Top line product very expensive. All good for 1 1/2 yrs. Now starting to lift on the tire tracks. I assume I have to take the floor down to the concrete again. Suggestions?
Hello Stuart. Quality coatings should never be applied to painted floors. There is a big difference between paint and actual coatings in terms of adhesion to concrete, wear, chemical resistance, etc. Your coating is only as good as what it is applied to. If it’s applied to paint and not a true coating then it’s going to peel up at some point. We don’t know of any quality epoxy that is specified for painted floors. What did you use? If you want to avoid peeling and hot tire pickup, then you need to remove what is currently on the concrete via grinding and then apply a quality coating or coating system. We can provide a few suggestions if you like. This type of coating here is an excellent example.
Shea, after a dry grind, can I still use hose to clear the garage floor and let it dry out for 1 or 2 days? It just feels more effective in cleaning up the debris and dust than a vacuum cleaner. Which one is better?
Yes, you can do that. However, we recommend waiting a full 48 hours though before applying the coating. Because the concrete is more porous, it will absorb more water that takes time to evaporate out of the concrete. Dry vacuuming is what’s done most of the time. The reason is that water is not introduced which slows up the project.
Thank you for the help!