
HellFire® Concrete Coating… Seriously, who wouldn’t be interested in learning more about a coating for workshops and garage floors with a name like that? So, when Legacy Industrial offered to send a sample for us to review, we couldn’t resist. We soon discovered that HellFire® is a floor coating with a vintage industrial look. It includes some interesting and desirable characteristics that should meet the needs of particular garage and workshop floors.
We’ll start by saying that if you want a decorative garage floor coating with color flakes and high gloss, then this is not for you. HellFire® is not a coating targeted toward that type of market.
However, if you like the idea of a no-nonsense, working man’s coating that makes cleanups easy and protects and seals the concrete of your shop floor or garage, then this is a product that deserves your attention.
What is HellFire® Concrete Coating?
HellFire® is a proprietary single-part, moisture-cured, aromatic polyurethane coating and sealer. It has good U.V. resistance and a very distinct, aluminum-metallic look.
It is uniquely strengthened with the addition of metallic additives, which according to Legacy Industrial, enables it to exceed many performance characteristics of competitive coatings. This includes high heat resistance, good substrate penetration, high chemical resistance, and long wear.
Furthermore, it can be applied to clean metal to prevent rust and oxidation. In fact, it is so robust, it is also used for marine vessel oxidation control and marine deck covering.
Lastly, it is designed for fast recoats with a long pot life. The single-part formulation means there is no mixing of A and B components to worry about. The moisture in the air is what provides the catalyst to start the curing process.
In short, HellFire® has been designed as a coating that provides excellent protection and is easy to apply. If you can paint a wall, you can apply HellFire® to your garage floor.
This type of coating is not necessarily new to the market. If it sounds similar to Rust Bullet, then you would be correct. Legacy Industrial realized the popular niche for such a coating. As a result, they decided to make available to the DIY public what they feel is a superior product.
A High Chemical and Heat Resistant Polyurethane Coating
The aromatic formulation of HellFire® provides excellent chemical resistance – more so in fact than some very good high-performance clear coats. We were very impressed with this, as you will see from our test results further below. Common automotive fluids have very little effect on the coating, including some very strong solvents.
In addition, the metallic additives in HellFire® are what help to provide a very high heat resistance compared to other coatings. One of the benefits of a high heat rating is that it will not experience hot tire lift.
For example, budget DIY epoxy coatings can begin to soften at 130-140 degrees. As a result, hot tires can be a problem and cause the coatings to peel up. HellFire® has a sustained heat resistance of 350 degrees. Your car tires will never come close to getting that hot. As a result, they cannot soften the coating and pull it up.
This high heat rating also means that HellFire® is more resistant than other coatings to some of the effects of metal fabrication such as welding spatter and grinding. Most garage and shop floor coatings can develop burn marks, pockmarks, and blisters from such exposure.
If you take a look at the video below, you can see a comparison of 100% solids metallic epoxy under flame compared to the HellFire® coating. Notice how the epoxy bubbles and burns. HellFire® is virtually untouched.
Does that mean it’s burn-proof? No, not at all. It’s not marketed as such either. A red-hot piece of metal is still going to damage the coating.
However, if you are doing metal fabrication high enough off the floor, most errant welding spatter and debris that fall to the floor may cool close enough to 350 degrees to prevent such damage.
Of course, the best way to protect the floor is to use a welding blanket, particularly when close to the floor performing torch cutting or welding.
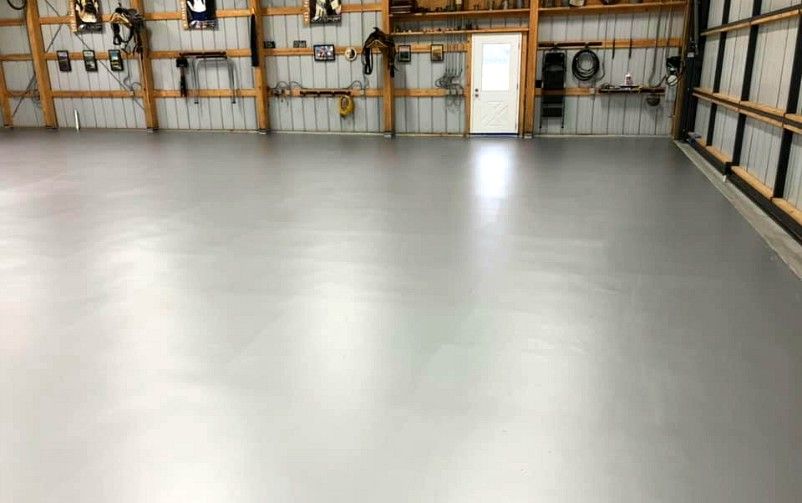
The silver-gray metallic additives are also what gives HellFire® Concrete Coating its distinctive color. It has a light aluminum-gray pigment with a slight metallic look and a satin finish. Legacy Industrial calls it Saber. It’s reminiscent to us of the silver-painted aircraft of the post-WWI era.
When applied to your garage or shop floor, it takes on a somewhat vintage look different from your typical light gray colored coatings. It is not glossy, but the satin finish does provide a surface that reflects light well.
Gray is the only color available. This is due to the color properties of the metallic additives. However, Legacy Industrial does offer a slightly darker gray called Citadel. It requires mixing in 2oz. per gallon of a black pigment additive. The pigment is an additional cost.
Easy DIY Application for a Workshop / Garage Floor Coating
Polyurethane coatings are thin and this one is no different. With a 71% solids content, it has a dry film thickness of 2-3 mils per coat. Coverage rates are 300 – 400ft² per gallon depending on the porosity of the concrete.
Legacy Industrial recommends three coats for the best finish and durability for residential garage floors. Four coats for auto-service shop floors. Their soft-skid media can be mixed into the final coat to provide a non-slip grip at the surface that is still easy to clean.
According to them, most garage floor applications are averaging 350 – 400ft² per gallon over a total of three coats. The coverage rate is much less for the first coat, but the subsequent coats make up the difference. This is because they are not absorbed into the concrete like the first coat.
HellFire® requires a clean and porous concrete surface for application. Due to its good penetrating abilities, an acid etch is usually all the prep required. Grinding is acceptable prep as well, but Legacy Industrial states that the coverage rate of the first coat will be reduced even further due to the concrete absorbing more product.
As stated earlier, the application is much easier than standard epoxy coatings. There is no mixing of A and B components and the long pot life allows you to take your time. You can just pour it out of the can into your paint tray as you go.
Once the first coat is applied, subsequent coats should be applied within 1-3 hours. If you wait longer than 6 hours, it requires roughing up the surface with 120-grit sandpaper first before reapplication.

Because HellFire® is moisture-cured, the amount of time required to wait between coats depends on the relative moisture (humidity) in the air. The more humid it is, the faster it will cure and vice versa. Three coats can easily be completed in one day.
In addition, HellFire® can be applied in temperatures as low as 35 degrees. Unlike epoxy which requires a minimum of 55-60 degrees, this is a big plus for those who need to coat their concrete during the cooler fall and winter months.
HellFire® Concrete Coating Benefits
- Excellent chemical resistance to oils, solvents, fuels, and road salts
- High abrasion resistance for long wear
- High heat rating – better resistance to heat damage and burn marks from metal fabrication
- No hot tire pickup, peeling, or flaking
- No primer required
- High U.V. resistance
- No mixing of A and B components
- Long pot life with fast recoat times of 1-3 hours
- Can be applied in temperatures as low as 35 degrees
You can review the technical data sheet in the link below.
This post may contain affiliate links. If you use these links to make a purchase, we may earn a small commission. You can read our full disclaimer here.
Where to Purchase HellFire® Garage Floor Coating
HellFire® can only be purchased from Legacy Industrial. Please call or email if you have any questions. Legacy Industrial will assist with questions about application, crack repair, concrete prep, etc. They want you to have a successful experience.

Don’t forget that you will need to purchase the black pigment additive for the Citadel color. You can find it here. There is also the option of purchasing their Soft-Skid anti-slip media for the final coat.
HellFire® will not ship to California. This is due to the various VOC restrictions throughout the state.
What not to expect from HellFire® Coating
As we stated earlier, HellFire® was not developed to be a decorative coating. However, many people find that they really like the utilitarian, industrial look.
HellFire® is technically designed as a high heat-resistant maintenance coating that seals and protects concrete from a variety of chemicals and other abuses.
It is not a high-build coating that is going to hide concrete imperfections. This is common for all durable, thin mil coatings. Though it may look like it’s doing this when initially rolled on, the wet film thickness shrinks as the solvents evaporate, thus revealing imperfections such as small divots, chips, and cracks.
In addition, it’s not a low-VOC formulation and cannot be shipped to California. This is due to their very stringent environmental regulations for the state.
It will have a smell when you apply it that will take a few days to completely disappear. It may be strong for the first few hours after application, but it quickly begins to dissipate after the last coat starts to cure. It is recommended to use a respirator when applying it if the garage door is closed or in a space that is not readily ventilated by fresh air.
Lastly, aromatic moisture-cured polyurethane coatings are extremely chemical resistant. However, they are susceptible to UV light. Though HellFire® has high UV resistance, it is not 100% U.V. stable.
Sharp eyes may notice “Version 2” printed on the can. The first version reacted to UV light at a rate similar to epoxy. Legacy Industrial wasn’t satisfied with that and worked hard to develop a second formulation with much better U.V. resistance. Hence, Version 2.
Can a Clear Coat and Color Flakes be Applied to HellFire® Concrete Coating?
Though HellFire® was designed as the working man’s coating, some people were requesting a clear topcoat for a high gloss look.
As a result, HellFire® ClearCoat was developed. It is a high-performance moisture-cured polyurethane that provides a glossy finish and even better light reflection. It also helps alleviate transfer marks. Transfer marks can occur when sliding metal wheels and other metal objects on the surface of HellFire®. We discuss this in our testing below.
Besides the glossier look, HellFire® ClearCoat is extremely U.V. resistant and has excellent stain resistance to many chemicals including solvents, fuel, and automotive fluids. Though this is on par with other high-performance clear coats of this caliber, it’s not going to be quite as resistant to some chemicals as HellFire alone.
There is something else to consider before you opt for the clear coat as well. Applying it will effectively negate the benefits of the metallic additives and high heat resistance at the surface that HellFire®provides. This is due to the clear coat being the final wear surface.
HellFire® ClearCoat does have a dry heat resistance of 350F° which means hot tires will not affect it. However, it is not the same type of rating that is resistant to flame and hot objects like HellFire.
Lastly, HellFire ClearCoat requires humidity of 60% or greater to activate and cure properly. Depending on the forecast, this might be an issue for some people, particularly in the southwest. Legacy Industrial states this is not a problem as long as you humidify the space above 60% before you begin to apply the clear.
What about color flakes? Technically, they can be applied into the final coat of HellFire® before the application of the clear coat. However, Legacy Industrial does not recommend it due to the odd contrast of the coating with the color flakes. If you want a traditional coating system with color flakes, then Nohr-S by Legacy Industrial is a much better option. We did a complete review of Nohr-S here.
Our Testing and Review of HellFire® Concrete Coating
Legacy Industrial sent us one quart of HellFire® Concrete Coating. This gave us the ability to judge for ourselves the application process, as well as how it would stand up to our own unscientific tests.
We have a particular garage in our family that we use for testing and reviewing different garage flooring products and accessories. Though it is currently covered with RaceDeck interlocking tiles, it allows us to easily pull up small sections of the flooring to expose the concrete underneath.
Fortunately, the concrete has previously been prepped via grinding. Though it has imperfections and small cracks in the surface, it makes for a good test bed for us.
After pulling up a section of the tiled floor, we made sure the concrete was clean and went over the surface with a shop vac. We then gathered together our supplies and opened up the quart of HellFire® to mix.
As you can see, it’s important to scrape the bottom of the can to gather up all the metallic additives that have settled. You want to mix the coating until you get a color that does not have a lot of darker-looking streaks in it.
It will never take on a creamy solid look like paint, so don’t worry that it doesn’t look like that. For anything larger than a quart can, a paint mixer with a low-speed drill is the recommended mixing method.
We then poured some of the contents into a paint tray and applied the first coat of our test section with a quality 3/8 paint roller. When we finished, we poured the remaining contents from the paint tray back into the can and resealed it. You can’t do this with epoxy.
It’s important to note that you should not pour out HellFire® from the can onto the floor as you can do with some coatings. The solvents in polyurethane require that you apply them thinly. If you pour the contents onto the floor or try to apply thick coats, the solvents will flash and create bubbles in the coating as they escape and evaporate.
With the relative humidity at just over 50%, we had to wait only 2 hours before each recoat. When ready, all we had to do was affix a new 3/8” paint roller and remix the coating in the can before pouring it into a new tray liner.
Once we were done with the third coat, we waited 72 hours before parking a vehicle on our test section. We waited for a full week before conducting any tests.
We found that HellFire® truly is very easy to apply. It rolls on nicely, particularly with the recoats. We even tested the pot life by letting a small portion of the coating sit in the paint tray.
It took almost an hour before it began to skin over, so we know pot life won’t be an issue as long as it doesn’t sit long without being disturbed by a paintbrush or roller. Other coatings will begin to thicken and be unworkable regardless.
One note to make is that coatings with metallic additives like this can develop roller marks or lines if you are not careful. Rust Bullet is one such coating that is known for this trait, so we were eager to compare the two.
What we found was that HellFire® was not as susceptible to roller marks as Rust Bullet can be. The key is to keep the roller wet and then back-roll for your final pass as you go. If you press down too hard or the roller is not wet enough you will get some roller marks. Even if you do, we found that they are harder to see and require that you catch them in a particular light.
As we stated earlier, this coating does not hide concrete irregularities. Small divots and other imperfections on our test floor are visible. This is common and should be expected unless you perform good repairs to the surface first or have a fairly blemish-free concrete surface to begin with.
Overall, we can see why this will be a good look that some people desire.
HellFire® abrasion and stain testing
Our stain testing of HellFire® Concrete Coating is what really impressed us. As you can see from the three images below, we subjected the coating to a variety of chemicals. These included MEK solvent, used oil, automatic transmission fluid, brake fluid, anti-seize compound, automotive coolant, and gear oil.
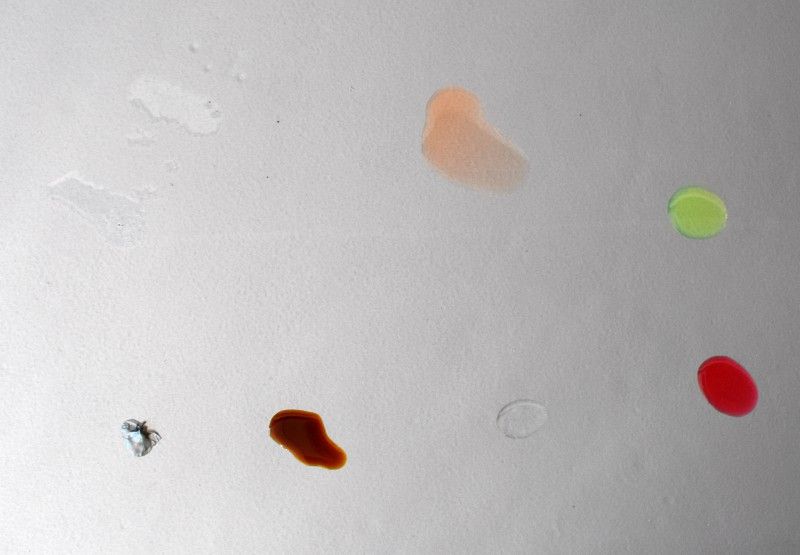
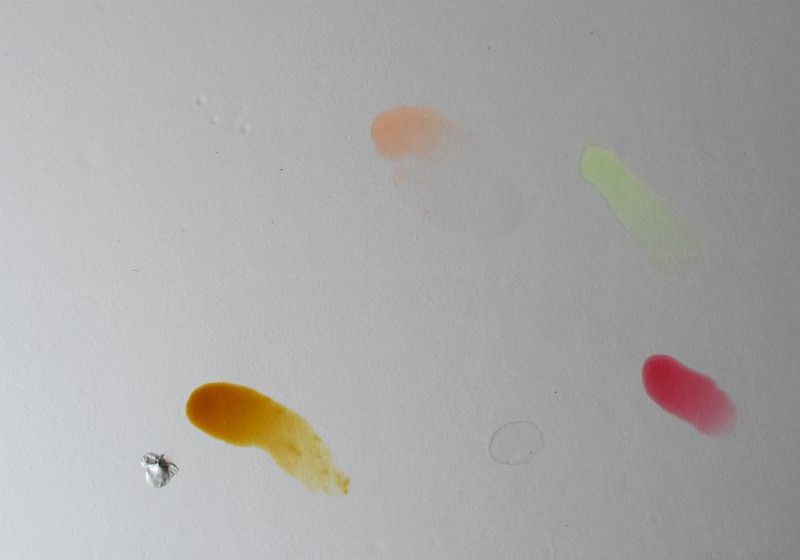
We let these chemicals sit for 24 hours before wiping them up with a paper towel. We then sprayed the area with some 409 cleaner and wiped up the remaining residue with a clean rag. The MEK had evaporated before the 24 hours were up.
Looking very closely, the only indication of any damage is a very faint mark where the brake fluid sat. Unless it was pointed out, others could not find it. In addition, we also rubbed in gasoline and acetone. It did not affect the surface and we only got a little bit of color on our rag from the acetone scrubbing.
This is very impressive and even outshines some very good high-performance clear coats that we have worked with in the past.
Something to note is that the chemical stain testing was done immediately after we had a couple of days of rain. The vehicle that was parked on the coating had left some dirty tire prints all over it due to the inclement weather. As you can see from all the pictures above, it had cleaned up nicely before we took pictures and conducted tests of the coating.
The next thing we did was some abrasion testing. HellFire® has a high test rating for abrasion in their data sheets which means it will take a long time to physically wear out. However, we wanted to check how it would perform to some hard abuse.
This is where we had some interesting results. Besides sliding tools and jack stands across the surface (with not much harm), we also subjected it to our 3-ton steel floor jack that weighs in at 72 lbs. We bounced it around a lot without issue, but when we purposely slid it back and forth fairly hard across the coating multiple times, dark marks began to develop in the coating.
Under closer examination, we found that what we were seeing was not dark scratches from abrasion. Instead, it was metal transfer marks from the wheels of the jack. In other words, the bare steel from the jack wheels was leaving metal marks on top of the coating.
This seems to be a result of the bare metal of the wheels reacting to the metal additives in the coating under hard friction. We tried removing the marks with a variety of cleaners to no avail. This is how we discovered that HellFire® was not affected by continued hard rub downs of acetone and other strong solvents.
Interestingly enough, when we contacted Legacy Industrial about this reaction to the wheels, they said that they had not had any complaints regarding this. It could very well be that people are not purposely abusing the coating like we do when testing and have not experienced what we did.
The fact that the coating did not show any wear by abrasion of the wheels was great. However, it now became a challenge for us to find a way to remove these marks.
After some research, we found that lightly scrubbing some Bar Keepers Friend with a soft scrub sponge actually removed most of the metal transfer. The key was the oxalic acid in the ingredients that broke down the metal marks. Success!
Hard scrubbing did dull the coating some. We found that light scrubbing was the key.
Final Thoughts
First things first. If your priorities are for a garage floor coating that will tend to look unblemished with a fairly new look for years to come, then this is not for you. HellFire® is not going to accomplish that task.
However, if your priorities for a garage or workshop floor coating are more for easy cleanup and overall protection than it is for decorative looks, then we think HellFire® can be a very good option.
It is going to seal and protect your workshop and garage floor from strong chemicals, road salts, and abrasion while maintaining great heat resistance. It will be easy to clean and still maintain its performance under hard use.
We feel that the cost of HellFire® is very reasonable for what you get as well. In fact, it currently costs less per gallon than its closest competitor, Rust Bullet. In addition, it’s less expensive than some high-performing epoxy and polyurea systems as well.
Lastly, the single-part moisture-cured formulation makes it easy to apply. If at some point you want to restore the looks, all it takes is roughing up the surface with 120-grit sandpaper, wiping it down with denatured alcohol, and then applying a fresh coat.
For further information or questions, we recommend contacting Legacy Industrial directly. They will be happy to help you and provide any other additional information that you may not be aware of.
I moved into a new build home in October. We live in Maryland so the warmer weather is approaching and I am looking to coat the garage floor. I have been researching for some time, (primarily using this site, thank you) and have been on the fence about what to do. I am trying to balance cost vs performance. I am not overly concerned about looks, just a solid grey is fine. I am more concerned with price and protection. I won’t have many projects happening in the garage that I need specific protection, just the typical, rain, snow, salt, minor fluids etc. The garage is just over 600 square feet. This is where I am at, I know that if I just paint it I will be doing it every year or 2 but it will be cheap and easy even if I use part 1 epoxy paint. I was initially interested in 100% epoxy but I know it is going to be the most difficult and expensive, north of $1000. The Polyurea coatings appear much more DIY friendly, however they are also just as expensive if not more so. Then I though maybe Duragrade was a good option, however I have seen a few not so great reviews. Also my house faces straight south which here in Maryland means all day sun and I have windows across the top of my garage door. So the UV amber effect would worry me with the epoxy products sans Polyurea. That kept bringing me back to the paint option until I saw the article on Hellfire. Now I would still have to acid etch, however 5 gallons of Hellfire will be at least half the cost of the Polyurea or epoxy options. I am not concerned with it maintaining a blemish free floor as much as just protection. I don’t mind the satin grey look, in fact I like it. So long as it prevents hot tire pickup I would be much happier than with a more basic paint like product. A couple questions with the Hellfire. If I put the Hellfire down, how difficult would it be to recoat with the same or similar product down the road? Do you think it would be wise to use a non skid mix with the final coat? and how would the non skid effect the ease of cleaning the floor and/or recoating years later? Also there is no direction to use a primer for the Hellfire, but it seems in most case a primer is beneficial, why not in this case? Thank you for your time!
Hello Jeremy. HellFire may indeed be a good option for you. To answer your questions, it is not difficult to apply another coat later down the road. All that is required is to rough up the surface with 120 grit sandpaper, vacuum, and then wipe the surface down with denatured alcohol on a microfiber pad or lint free cloth. Once the wipe down is done, it is ready for application. A floor maintainer with a black stripping/scrub pad or 100 grit sanding screen will accomplish the same task much quicker than sanding with a pole sander. In terms of hot tire lift, as long as you etch properly you will not experience it – period. HellFire is not as slippery as standard coatings due to the satin finish. However, we would recommend using an anti-slip additive in the final coat due to the weather you encounter. Legacy Industrial recommends their “Fine” media which you can find here. It will not affect cleaning of the floor. FYI – be sure to occasionally remix the media as you go or it will settle to the bottom of the can and come out in lumps at the end. A primer is not required because it is a 52% solids with a solvent base. This allows for good penetration into the substrate.
Regarding DuraGrade Concrete, it is a fairly new product. However, Amazon has some good reviews here. Are you sure you are not confusing Duragrade Concrete with Rust Bullet for Concrete? They are actually two different products.
Shea,
I purchased Hellfire and the dark pigment for a darker tint. Today I used Klean Strip concrete and metal prep and the etching went well. However now that I have cleaned and etched the floor I notice hairs coming out of the concrete, and in some areas small thicker patches. Do you think this is going to be an issue? I plan on applying three coats but I know Hellfire isn’t exceptionally think. If they need to be removed what method is most efficient? I was planning on letting the floor dry for the week and put down the Hellfire next weekend.
Thanks for your time,
Jeremy
Hello Jeremy. It sounds like you have fiber reinforced concrete. The little fibers at the surface become exposed when you etch. The easiest way to remove the fibers is to burn them off with a propane torch like this one. The flame quickly burns of the ends. If they are not removed, they will tend to stick straight up when you apply the coating.
Hi,
I see this is for workshops and garage floors. Usually, my company installs a 3 part epoxy flake system for these types of surfaces. Do you think hellfire would be better in your opinion than an epoxy flake floor? What is the durability like in comparison? Thanks for the great post.
Cheers-
Hello Jared. Judging the durability of HellFire to a 3 part epoxy flake system is like comparing apples and oranges. HellFire is a very easy to apply coating that has extremely high chemical resistance that performs better than the toughest polyurethane, polyurea, and polyaspartic coatings that we have unscientifically tested. In addition, it has an extremely high heat tolerance which traditional coating systems do not have. This makes it a great choice for a long wearing system that is an easy DIY install for those that value this type of performance and function over looks.
That said, the proper multi-coat epoxy and color flake systems such as those you install, are much thicker and decorative in appearance. They represent the typical look that people want. They also perform extremely well for garage floors that see a variety of use and may very well last longer in terms of general wear. They are also more expensive.
I had a chance to use the HellFire in January and i want to let you guys know it’s an awesome product. I help my buddy do his workshop and the abrasion and impact resistance on the HellFire is fantastic. I would recommend to anyone looking for that industrial floor look. I dealt with Scotty at Legacy Industrial and he was a big help and knew his stuff about floor coatings.
Hi Tyler. Thanks for the quick review. We are glad to hear how well it is working well.
How does one choose between hellfire and rust bullet concrete? Is being able to add decorative flakes the only advantage to the higher prices rust bullet concrete?
Hi Stephan. The biggest differences between the two is that Rust Bullet Concrete can be applied to concrete without having to etch or grind as long as it is not too smooth and the surface will absorb some water. HellFire, on the other hand, requires that you etch the concrete at a minimum before application. In addition, HellFire is a bit easier to apply. Rust Bullet sometimes has issues with roller marks showing. Other than that, the two products are similar.
I just had my floor pored and the concrete co. applied a top seal when the concrete was still wet! Will I have to bring that off to apply Hellfire?
Hi Daniel. What was applied to your concrete after the pour is commonly known as a “cure and seal”. It’s a type of acrylic coating that is sometimes used to help retain the moisture in concrete during the curing process. You will need to remove this via grinding before applying a coating. The good news is that the grinding will also properly prep the surface for HellFire or any other coating for that matter.
Thanks for the review. I’m looking to cover a 40×60 shop, and want a durable finish without the cost of polyspartic coating. Sounds like I’ve found it. Will update after I’ve laid it down.
Hi Chris. We look forward to it! Many that we have heard from have been happy with the results.
Just had two garages poured, hand trowelled finish. I am looking to apply LITHI-TEK® 4500 hardener first followed by HellFire coating. Is this possible?
Thanks!
Hello Mark. Densifiers work by reacting with calcium hydroxide in the concrete to produce calcium silicate hydrate (CSH). The CSH is what helps to fill pores at and near the surface of concrete to make it more dense/stronger. These are the same pores that coatings need to penetrate in order to create a strong mechanical bond. Typically, if a densifier is applied, the course of action is to wait a week for it to react with the concrete and then you grind the surface to provide the proper profile for a coating to adhere. Etching is not as effective since the densifier is acting similar to a sealer a will not let an etching solution penetrate well enough to work. Is there a reason you want to apply a densifier? Is your concrete soft or dusting? The best course of action would be to call or email Legacy Industrial and ask about using a densifier in conjunction with the coating. It’s not something that is usually done unless there are issues with the concrete.
How does this compare to TruAlloy from garageflooringllc? They seem very similar.
Hi Taylor. Yes, they are very similar. HellFire has a higher solids content of 72% vs 50%. This means that it will be slightly thicker after it cures for a given set coverage rate. However, overall thickness for these types of coatings doesn’t usually determine how well they perform. In addition, they don’t hide imperfections in the concrete well. TruAlloy has a higher continuous heat resistance of 400 degrees vs 350 degrees if that is important for your use.
Hello, excellent post, very informative. I am considering Hellfire for the garage of my yet-to-be-built house. I live in Wisconsin and am considering in-floor, hydronic heat for the garage. Will Hellfire be ok with hydronic heat? Thanks.
Hi John. Yes, HellFire or any other coating for the matter will work just fine with in-floor heating.
I have a 2500 sf concrete floor garage that is 4 years old. It was sealed with several coats of clear Super Sealer -30. I still get oil or gas stains that cannot be removed. Also, rubber mats have become stuck to the surface leaving a thick residue as they bonded to the sealer. Not sure why.
What prep do I need to do before applying Hellfire?
Hi Jeff. That’s a nice size garage. Super Sealer-30 is a 30% solids, solvent-based acrylic clear coat sealer. The plasticizers in the rubber are reacting to the solvent-based sealer and bonding. This is a common issue with acrylics. Applying the sealer too thick can cause the issue as well. All acrylics need to be applied in thin coats.
If you want to apply a new coating such as HellFire, it will require that you remove all of the Super Seal-30 via grinding to expose the bare concrete. HellFire and other high-performing coatings require removal of any existing coatings or sealers before application. Once HellFire is applied, you wont’ have a problem with rubber mats, oil, or gas.