
Learning how to grind a garage floor for an epoxy coating or paint hasn’t always been the easiest or most straight forward of projects for the average homeowner. It frequently raises more questions than answers and can lead to frustration when trying to figure out the best way to do it. Many of these questions relate to what type of grinding equipment to use.
While it is not the most difficult thing to do, trying to figure out the right tools to rent or buy can be daunting. Plus, dust control can be an issue unless you spend more money for the proper vacuum equipment. With so many choices, it can get plain confusing and even expensive.
Our objective here is to present to you an easier and more economical way to grind your garage floor. It can typically be accomplished in less than a day for most standard 2-3 car garages.
Besides helping to eliminate the confusion and questions that arise, it will also instruct you how to provide a nice profile for your coating of choice. It’s just one less thing to worry about when learning how to epoxy coat your own garage floor.
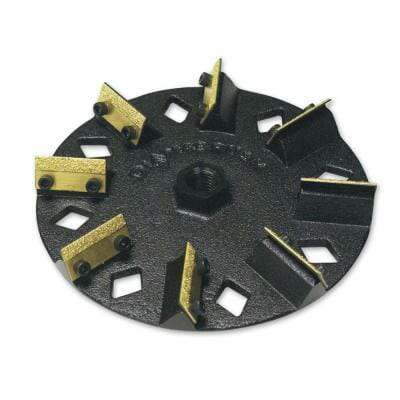
Diamabrush Concrete Grinding Tool
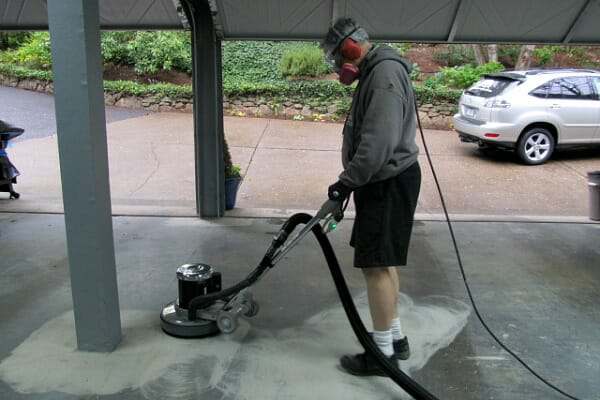
Fortunately, a company called Diamabrush has introduced a concrete prep tool that attaches to the bottom of a floor maintainer. It is available for use from a large assortment of rental companies. The Diamabrush is a great choice for garage floors that are in relatively good shape to begin with.
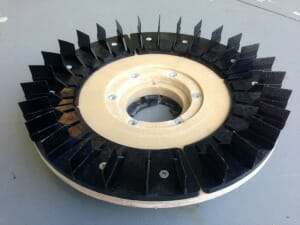
The Diamabrush consists of a series of diamond coated blades that are attached to a buffing wheel.
These blades abrade the surface of the concrete to provide the proper profile for an epoxy coating.
This process of grinding your garage floor is much easier to manage than the traditional 7″ angle grinder with a concrete turbo cup wheel. Plus, it keeps you off your knees.
In addition, the large size of the tool covers more area. Furthermore, the flexible blades prevent grooving or kiss marks that can happen when a turbo cup wheel is not held flat and goes up on edge.
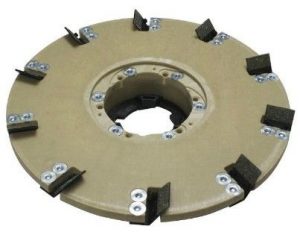
Diamabrush also offers a separate removal tool that is used for removing old paint, thinset, mastic, or even thin epoxy coatings.
You can identify it by the smaller number of diamond blades compared to the prep tool.
If you use this tool to remove old paint or a thin coating down to bare concrete, it will prep the concrete surface at the same time. You will not require grinding with the prep tool afterward. Diamabrush does not recommend the prep tool for removing old paint and thin coatings.
The nice feature about both of these is that they can be used either on a wet surface to avoid concrete dust or you can attach a dust shroud with a shop vacuum to grind dry. Dry grinding with the proper attachments prevents the heavy concrete dust or messy cleanup of a wet slurry.
Note: The Diamabrush is not an aggressive concrete grinding tool that can remove heavy layers of concrete. For example, it will not level high spots or smooth out heavily repaired areas of concrete. You will need to use a turbo cup grinding wheel or a more aggressive grinding machine for that type of work.
This post may contain affiliate links. If you use these links to make a purchase, we may earn a small commission. As an Amazon Associate, All Garage Floors earns from qualifying purchases. You can read our full disclaimer here.
tools for grinding your garage floor
These are the basic tools that you will need to acquire before you start grinding your garage floor. It’s a bonus if you already have some of these or know of someone who can lend them to you. You can apply the cost savings to your garage project.
Harbor Freight has cheap angle grinders for under $20. Unless you plan on using it for other projects, we don’t recommend spending more money on a better grinder.
The dust shroud for the angle grinder is optional but highly recommended. These small grinders will eat up concrete and create a small dust storm. It will need to be attached to a shop vacuum in order to use it. Keep in mind that pricing may vary depending on your area.
- 4 ½” angle grinder – Harbor Freight Tools – $16.00
- 4″ diamond turbo cup wheel – Amazon
- Optional dust shroud for the angle grinder – Amazon
- Floor maintainer rental – Home Depot
- Diamabrush concrete prep tool rental – Home Depot
Some Home Depot stores carry the optional dust shroud attachment and some don’t. Make sure to ask for it. If they don’t have it, you will need to grind the floor wet if you want to avoid the dust. If you find a rental with the dust shroud attachment, you will need to rent a shop vacuum to go with it or use your own.
The small angle grinder and turbo cup wheel work well for grinding flush any garage floor repairs or crack repairs. In addition, it will cover the areas near walls, corners, and other objects that the Diamabrush attachment cannot reach.
The small grinder is also good for smoothing out the raised edges and materials if you are filling contraction joints for a seamless floor appearance. They also work well to grind down any unusual high spots.
If you will be grinding dry with your own shop vacuum, then one other tool we can highly recommend is a Dust Deputy. Concrete dust is very fine and will clog up the filtration system of a standard shop vacuum fairly quickly. It requires frequent stops to clean them out.
The Dust Deputy works by creating its own dust collection system that keeps the filters of the vacuum virtually dust free. You can find the Dust Deputy here at Amazon.
Heavier Duty Concrete Grinding Equipment
As we stated earlier, the Diamabrush is a good choice for grinding and prepping garage floor concrete that is in fairly good shape to begin. However, it is not aggressive enough for anything more than that.
If you have high spots to take down, multiple concrete repairs that need to be ground flush, broom finished concrete, or some other type of rough surface, then a heavier duty grinder will need to be used.
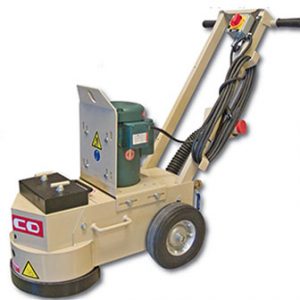
A good choice for that is the Edco 10” Concrete Grinder. It is a heavy machine (152lbs) that uses a 10” diamond impregnated grinding disc.
It can be plugged into a standard 110V outlet and has a vacuum attachment to keep down the dust.
We prefer a grinder such as this over the Diamabrush for removal of old paint and concrete coatings as well. It works much faster and does an excellent job at providing the correct surface profile for coatings.
These are fairly common and can be found at your local Home Depot and equipment rental centers. The rental costs vary from $150 – $175 per day. Be sure to check if there is an additional charge for the 10” diamond disc.
Grinding the Garage Floor
The first thing that needs to be done is to make any necessary repairs to your garage floor such as cracks, pitting, and other defects. It’s best to tackle these first before you rent any equipment. You don’t want to be making repairs while rental equipment sits.
After your repairs are complete, sweep the garage floor and clean any oil or grease spots from the surface. Grinding alone will not remove heavy oil stains and is why these need to be tackled first.
Next, if you have elected not to use a dust shroud and vacuum, prep yourself and the garage for the dust that will follow. While the Diamabrush does not create as much dust as a typical turbo cup concrete wheel, you will still have a small cloud of dust that will coat everything in your garage.
When dry grinding, make sure you wear an N95 dust mask or respirator approved for concrete dust. Concrete dust (crystalline silica) is considered a human lung carcinogen. Safety glasses and ear plugs are highly recommended for your own safety.
If grinding wet, start by wetting the surface of the concrete that you are going to grind. It’s best to work in sections when you do this. Using the floor maintainer with the Diamabrush attachment, start by slowly working the machine side by side and then a circular motion. It will only take a few minutes to figure out how long to work an area before you need to move on.
When grinding with the wet method, do not let the wet slurry dry out. It is a bear to clean out of the concrete properly if it dries. It can lead to a coating failure if it isn’t completely removed. Each time you finish a section, use your hose to blast the area clean while it’s still wet, and then move on to your next section.
To check your work, use the hose with a pressure nozzle to spray the area clean and then run your fingers across the surface. It should feel like fine to medium grit sandpaper and have a more granular look. Continue this way, grinding the garage floor one section at a time until you are done. Make sure to work the machine all the way up against the walls of the garage floor.
Because wet grinding can create quite the slurry, we recommend that before you blast a section clean, use a wet vac to suck up the majority of the slurry. This helps tremendously with keeping the amount of slurry that you hose out of your driveway down to a minimum.
Not counting the edge work or other hard to reach places, most people can grind a standard 2-car garage floor (approximately 400 ft²) in just over two hours or so when using this method.
Once done, this will leave a strip about 2″-3″ wide around the perimeter of the walls that the Diamabrush could not reach. There will be more in the corners. Use the small 4 ½” grinder with the diamond cup wheel to remove this remaining strip of concrete and the larger areas in the corners.
Be careful to keep the turbo cup wheel flat on the garage floor when grinding. If you apply too much pressure or angle it too much on the surface, it will leave “kiss marks”. These are small half-moon divots that can potentially show through your coating.
The concrete needs to be fairly dry or just damp when grinding with the turbo cup wheel. If it’s wet, you will need to use a ground fault circuit interrupter to prevent electrocuting yourself with the angle grinder. You can purchase these for about $25. Many times you can use the power cord extension that comes with the floor maintainers if you still have time on the rental. They usually have a GFCI built into the cord.
The other option which we prefer is to grind the edges first then follow up with the diamabrush. Just remember that if you are using a dust shroud on your grinder, a standard shop vacuum is not made to handle such fine dust and will clog up fast.
You may need to clean out the filter quite a few times while grinding the edges. Though you are not grinding a lot of concrete, if you elect not to use the shroud be prepared for the amount of dust this small grinder will put out.
Another Concrete Grinding Option
Another option for grinding your garage floor that is being used quite successfully is the 7” Diamabrush hand tool. This one is made to fit a 7” angle grinder and works fairly quick as well. You will need a dust shroud when using this tool and it works best with a variable speed grinder.
You can’t rent these, however. You will need to purchase them outright. Home Depot sells the 7″ version. You can also find them here on Amazon.
Diamabrush says that slower RPM’s are better. The high-speed grinders have a tendency of heating up and clogging the blades. If your only option is a single speed grinder, don’t use one that spins any faster than 6000 rpm’s. If you are worried about the speed, Diamabrush says grinding wet will keep the blades cool and prevent clogging or glazing.
Another tip is to keep it flat and do not lean into it in an effort to make it work harder. The weight of the grinder is enough to do the work.
Depending on how much suction your shop vacuum creates, you may need to shim the tool with a washer to raise the shroud off the floor to avoid suction lock. Some shrouds have a vent to adjust for this as well. Either way, these tools make quick work of the concrete.
Best Shop Vac for grinding concrete
If you are thinking of purchasing a new shop vac, we highly recommend that you look at this Dustless Wet/Dry shop vacuum at Amazon by Dustless Technologies. These are excellent vacuums that work extremely well when vacuuming up concrete dust, drywall dust, and variety of other fine dust particulates.

Professional installers are using these more and more as a backup or even as a replacement to the much higher priced specialized concrete dust vacuums. You can read the great reviews on these and find them here at Amazon.
They also offer an optional 25′ vacuum hose at Amazon that can reach twice as far as the original.
Final Cleaning
Once the grinding is done, it’s time to make sure the garage floor is clean of all the dust. If you ground the floor wet, then chances are the floor is clean.
To check, run your fingers across the surface when it has dried. If your fingers don’t have a lot of white residue on them, then you are good to go.
Another test is to press a strip of duct tape to the concrete and then pull it up. It should stick fairly well and come up fairly clean without too much dust. The floor will never be completely free of concrete dust, so don’t fret over small amounts on your fingers.
If you have a lot of white residue after a wet grind, then this is excess concrete dust that did not get hosed out well and will need to be cleaned. The best way to remove it is to mix up a solution of TSP (Trisodium phosphate) in a bucket, spread it out on the floor and lightly scrub it with a push broom or long handled scrub brush.
Using your high pressure nozzle, rinse the concrete real well making sure there is no more solution left behind. Work in sections if you need to so that the solution will not dry before you rinse it out. This will help lift any remaining slurry and dust that is in the pores of the concrete when you rinse.
If you did a dry grind, the easiest way to insure the concrete is clean and ready is to use the wide mouth attachment on your shop vacuum and just vacuum all the dust up. What’s nice about this method is you can start right away with applying your floor coating since there is no water on the floor that needs to fully dry.
Once the floor is done, test different areas by sprinkling water drops on the surface, paying particular attention to any areas that were coated in oil or grease or where you may have used a tire dressing that dripped onto your concrete. It should turn the concrete darker and absorb the water fairly quickly. If it just sits on the surface, then you may need to regrind and/or re-clean that spot before you apply your coating.
Grinding a garage floor with one of these easy methods will ensure the best profile for your garage floor coating to adhere to. It can be done in less than a day and is safer than using an acid etch.
Hi lots of great advice, I have an old (50 year) concrete garage floor and it has cracks and rough spots where the surface wore down along with pitting. I used Rust-Oleum Patch and repair to fill them. I would like to wet grind the floor with a floor maintainer and Dimabrush wheel will that work to grind down excess patch and repair epoxy? Thanks
Hello Tim. The Diamabrush is not the best for grinding down repairs. It’s a good prep tool for the surface, but not great for leveling concrete or making repairs flush. The reason has to do with the flexible diamond crusted tabs. A concrete turbo cup wheel on an angle grinder is a much better tool for that. Your other option would be to rent a 10″ Edco concrete grinder instead. These are more aggressive and use a grinding disc instead of the tabs like the Diamabrush. It can grind flush any repairs you have without issue.
What grit dymo-dots do you recommend for the EDCO tool to apply your Epoxy coatings over? I have to use an 18 or 30 to level my slab, do I need to go over with a finer grit prior to the epoxy?
TIA
Hello Todd. Just so there is not any confusion, we are not an epoxy manufacturer, nor do we sell it. That said, the 18 – 30 grit dyma-dots are fine for a high solids epoxy. You do not want anything finer than 30 grit if you can help it.
I have a poured concrete floor in my approximately 24 x 18 family room which had a carpet laid on it. I pulled out the carpet and am removing the carpet tack strips around the edge. For some reason the original owners had put about a 1 foot wide black adhesive on the floor with a trowel. I would like to remove this adhesive so I can lay a wood floor on the concrete. Any suggestions on what to use, grinder or solvent?
Hello Steve. Grinding is the quickest way to remove it, but it can be extremely dusty unless you use a shop vac with a dust shield on your grinder. Stripping with an Eco friendly remover such as this one may be a better method since it’s in the house. They do require some time to work, but there are no VOC’s to worry about and will prevent the possible dust storm from grinding.
Thanks, will give it a try.
going to pour a new floor for 30×40 garage. can I grind it before I have building put up and wash off with water before doing floor after building is put up?
Hello Dave. Yes, you can grind first, but it’s not recommended. Doing so opens up the pores at the surface and the floor is going to easily absorb and collect all kinds of dirt and debris that will need to be thoroughly cleaned out. We would highly recommend covering high traffic areas with plywood if you elect to do this.
ok thank you. i’ll probably cover it with 2 tarps and leave them on until building is erected. probably only for 1 day and just pull in the perimeter edges to protect the inside floor
My 660 sq. ft. concrete garage floor was already painted when I bought the house last year. It is smooth but the paint is dirty, has rubber marks on it etc. I want to take off the old paint down to the smooth concrete floor and epoxy seal with the colored sprinkles to dress up my garage floor. What is the most efficient way to remove all the old paint? Thank you
Hello Nick. The most efficient way to remove the old paint is to grind down to the bare concrete. This will properly prep the surface of the concrete for an appropriate coating as well. We recommend using a heavier duty grinder for the quickest results. You will want to use the single disc 10″ Edco grinder from Home Depot if you access to one or a double headed unit from your local equipment rental.
Hi Shea, we have a new pole barn and are going to grind and put down the Rustoleum rock solid polycuramine. We have a shallow hairline crack in the concrete. Do we have to fill it and if so, what is the best filler? I’m thinking something with a syringe application because it’s so thin. Thank you
Hi Lori. You will need to make the repair if you don’t want the crack to telegraph through the coating. We suggest using an epoxy filler with a low viscosity that allows it to penetrate. Simpson Strong-Tie is a good candidate for that. Apply it down the crack and let it soak in and cure. The grinding will remove the excess at the surface and create a smooth transition.
One important tip about RockSolid: If the the concrete surface is prepped via grinding, you will most likely require two color coats in addition to more product than anticipated to get a uniform appearance. The reason for this is that RockSolid has a thin dry film thickness to begin with and it does a good job of penetrating the concrete. They also tend to overstate the coverage rates (this is a common complaint). The first coat will penetrate the concrete well and will most likely reduce the coverage rates by more than 20%. When this happens, the coating will take on a dull and patchy look in many places due to the very thin application. The second coat goes on much more uniformly and with higher coverage rates since it does not soak into the concrete. It will also product a very consistent color with much gloss.
Thank you very much. You and your company have helped many of us
Thanks. We are happy to help, Lori. FYI, I included a link in the previous post to the Simpson Strong-Tie epoxy if you don’t know where to find it.
Hi Shea: I am removing 14 year old Armorseal 1000 epoxy which is on a concrete floor that is 15 years old. The concrete was poorly finished due to a raincloud that appeared just as we were placing it. The Armorseal performed well for about 12 years but is now brittle and the concrete is pitting underneath in dozens of spots to a max depth of about 3/8 inch (mostly shallower). I am planning to grind off the epoxy and the top of the concrete and recover with Nohr-S. Our local rental company has a twin head EDCO that I plan to use, but the rental guy says the Dyma Sert grit is too fine (110 grit) to remove the epoxy and the grit may gum up. They are the only diamond stones he has. Are they too fine? What grit do I need to accept the epoxy?
Thanks,
Bob
Hi Bob. Epoxy does not flex at all and will appear brittle if the underside is not solid enough to support it. A twin disc unit is a good choice for such a job, but the rental company is correct. You will need Dyma-Serts of 30 grit or less (preferably 18 grit) to remove the coating and grind the concrete as you intend. The idea with such a job is to remove the coating and the thin upper layer of concrete (1/32″ – 1/16″) that is soft due to the rain the day of the pour. The remaining pitting should be repaired with a 100% epoxy sand slurry.
Thanks! Your website is great and you helped me avoid a big mess.
Bob
Thanks for a great article. I have a very large concrete floor in a commercial space that was painted by a contractor. Unfortunately, there were some walls that he removed and the paint is constantly peeling from those areas. I’d like to sand down the area where those walls were and then re-prime, repaint and reseal. The areas where the walls were seems to contain some loose dust and is a little pock-marked. I’m thinking some light grinding, sanding, vacuuming and then priming with a good primer before reapplying the same paint. Seems like the diamabrush is a good starting point? Would appreciate any advice.
Hi David. What is the approximate width of the area where the walls were and the paint is peeling? Also, many linear feet are you dealing with?
Thanks for the reply. There are a few areas – the width of each of them is probably 12-18″ max (where the walls were removed), but there are peeling areas in several places – one is probably 3-4 linear feet, another area (from another wall) is 5-6 linear feet and probably another one like that. Large enough to spoil the look, small enough to not make it worth finishing the entire floor again (about 2000 sq ft).
OK. If you have wider areas like that then the DiamaBrush will be fine. Make sure to use the removal tool and not the prep tool. The removal tool has less blades and is designed for removing thin mil paints and coatings. It will rough up the bare concrete as well, just not as fast once you reach it. The prep tool does not do a very good job of removing coatings. The other option we were going to suggest for real fast work if it was a smaller area would be a cheap 4″ angle grinder and turbo cup wheel (about $26 total), but you need to get down on the knees and it’s not that fun if you have a lot of area to cover. You will also need to make proper preparations to collect the duct via vacuum equipment or you will have a small concrete dust storm on your hands.
Hi Shea,
I’ve got a new 2,400′ pole barn floor (poured 1 month ago) that I want to seal with a densifier and a solvent-carried sealer. It has a “polished” surface created with 5-6 passes with 2 different rotary power trowels, which is smooth and reflects light slightly, and which only minimally absorbs water, if at all.
The sealer rep said that the floor needs to be able to absorb drops of water within about 5 minutes in order for the sealer to seal it, and it doesn’t do that, so it looks like I’ll need to give it a light grinding.
Any advice regarding what grinder wheel type and grinder would be best to retain as much smoothness as possible, while breaking the glaze? I figure a large, multi-disk gas-powered grinder with diamond disks, but don’t really know anything about the correct grit, etc.
Thanks!
– Eric
Hi Eric. Yes, the dual head grinders will be the easiest and quickest to use. When concrete is polished, they start with metal bonded diamond discs and work their way up to a 150 grit. They then step down to a 100 grit resin bonded disc to start the polishing process and work all the way to a 1500-3000 disc. A 150 grit metal bonded disc should break the surface enough to allow enough water penetration without making it very rough. What product are you going to be using? I ask because sometimes what can be done is you can work the densifier into the surface with a floor maintainer and scrub pad instead of the light grinding. This what floor polishers do as they go. You may want to contact the vendor or manufacturer about that.
I was planning to use GhostShield LithiTek 4500 and SiloxaTek 8510 (perhaps with some blue acid stain after the LithiTek), with the idea of having a floor I can wipe spills off of without staining, and of avoiding a surface coating that could be susceptible to solvent spills, metal wheels and welding spatter. Their rep seemed quite honest on the phone in saying that his products were not perfect, and oils left for long periods might cause stains.
I have not bought anything yet, and so am open to suggestions.
I had initially intended to use a polyaspartate with a blue metallic stain, but then thought of every brake rotor, red-hot nut, and sledgehammer I’ve ever dropped and decided I’d destroy it.
Incidentally, after a month, the concrete surface is still dark-colored, and I’d thought it would be light grey by now. It is quite hard and suffered no damage from power washing.
Any thoughts?
Thanks,
– Eric
SiloxaTek 8510 with the densifier combo has been performing very well for a lot of people. It’s not stain proof, as no penetrating sealer is, but it does an excellent job if liquids that stain are not allowed to sit for long periods. If you were thinking of using an acid stain, then I would suggest staining first. The stain will actually etch the surface and should provide the penetration you need for the densifier and 8510. This would eliminate the need for the light grind. Just remember than the stain color will look dull and not pop since a film forming topical coating is required for that. Many vendors who sell acid stains also sell small color samples. I would suggest testing in an inconspicuous area on your floor for color and water penetration after you neutralize and rinse. How the stain looks when dry is how it would look with the densifier and 8510.
Interesting. The GhostShield rep suggested using the acid stain after the LithiTek, because it might require less stain that way, but you give a good reason to use the stain first.
I know that the color would be low-key, but that is what I’m looking for. If the concrete were to stay the same color it is now (still dark after one month), I wouldn’t bother to stain it, as it would barely show, but I assume it will lighten up in the near future, as I’ve never seen cured concrete this color (it’s dark grey with a hint of green, like uncured concrete).
I’ll check into getting color samples from the one or two companies that seem to make colors in the range that I like.
Meanwhile, I’ve got all this stuff waiting for me to put it in the barn…
Thanks,
– Eric
Hi Shea,
Thanks for this post. Your site has been very helpful at exploring the different garage flooring options. We decided on epoxy. Our garage currently has 25+ year old epoxy that was then painted over (and now faded). There are also some badly repaired cracks and some holes from bolts in the floor. How do you recommend filling in the holes from the bolts? Do you think we should fix the cracks first, fill in the holes, and then grind down the floor removing the old paint and epoxy to prep it for the new coat? Any advice on the grinder we should rent?
Hi Daisy. Yes, it’s best to try and do all the repairs you can first. Doing so allows them to be grinded flush as you are grinding the rest of the floor. We recommend filling the bolt holes with the same product you use for the crack repairs. We have an article here about repairing cracks. Since you are removing an old coating in the process, we highly recommend a more aggressive grinder to make the work easier. Home Depot rents a single disc 10″ Edco grinder that removes coatings well. If you have a larger garage, you can make even faster work of it if one of your local equipment rentals has a dual disc unit available. They are more expensive, however, and may require purchasing the diamond discs as well.
I have a newly poured garage floor (about 9 months old) that is finished to a very smooth surface.
What I’d the best way to prep it for Nor-s polyurea ?
Should I grind and etch?? I wonder why that question never gets asked 😁
Also, I own an Oreck orbital floor buffer. Is there a cement grinding pad that would fit it and perhaps do a light grind on the floor? I could then etch and well.
Thank’s
Bill
Hi Bill. Proper acid etching will generally get the job done. Don’t use the Eco safe citrus acid etches as they are not strong enough. If you grind the floor, then acid etching is not required. Grinding is the preferred and most consistent method for properly profiling concrete, while acid etching is not. However, sometimes grinding is not feasible for some people. This article explains the differences. The only time you would combine the two is if the etching did not do an adequate job for the entire surface. You would then finish up with grinding. No, your Oreck buffer will not get the job done. It’s not heavy enough to apply the proper down force required for grinding. Additionally, we don’t know of a manufacturer who makes the correct attachment to receive the diamond impregnated inserts required for grinding.
Hello – so glad I came across this article. We had a new garage floor installed about 18 years ago. I’m not sure if the contractor put a penetrating sealer on the floor, but we put down an acrylic sealer several years ago. The sealer is now worn off in some places, and it’s dirty and won’t clean up in others. We tried using xylene, but the fumes are just too much. A chemical stripper is out of the question in such a tight space, and I doubt a citrus stripper would work. Once the stripper is removed, we’d like to apply a colored penetrating sealer. Is grinding the floor a good option for us? I don’t want the floor to be rough. Thank you for any input.
Hello Laura. Just to clear up some possible confusion, penetrating sealers are not colored. Penetrating sealers penetrate into the concrete and form a barrier at the sub surface. That is why they do not change the look of bare concrete. Stains and dyes color concrete as do topical coatings. In terms of the acrylic sealer, grinding is the best way to remove it. It will open the pores of the concrete though and may require much more penetrating sealer to be effective. There are ECO friendly strippers, however, that do work very well. They just take some time to do the job. This product from Franmar is an excellent example.
Hello Shea – Thanks for the input. We found a penetrating sealer that can be ordered in colors called LastiSeal. We purchased a sample and will test it before purchasing. I will check out the product you linked, but most Eco friendly sealers have to be left on for a day or two and kept wet. The problem with that is my husband works a lot and has a flex schedule with rarely a weekend day off or two days off in a row. We’re quickly losing our window of opportunity as we’d really like this done before the winter weather. My biggest concern with grinding is compromising the integrity of the floor or making it rough as it’s in good condition – few cracks that showed right after it was poured, but no pitting or anything. Our local Home Depot does rent the grinders. We’d have to purchase a tool for the perimeter.
Once you grind the surface, Laura, if the finish feels rougher than you would like, we recommend visiting your local equipment rental. They should have floor grinders that will allow you to use a finer diamond segment disc to put more of a hone on the surface. A 100-150 grit diamond segment will do this. The finer segments will not remove old sealer old sealer, however.
Hello Shea, Thank you for the article and excellent website. We have a basement area we are finishing with a tool room and mud room. Area is directly off the garage. All three areas (tool room, laundry room, garage) appear to have the same concrete floor poured in 1942. We would like to finish the concrete in the tool room and laundry room by grinding the floor to expose the aggregate and seal. Prefer to grind dry and not wet, if possible. Any advice on the grinding process and the sealant you could provide? If the process works well, we are thinking to do the garage floor in the future in a similar manner. Thank you
Hello Mark. What you want to do is not as easy as it sounds. To give you a better perspective of what’s required for this task, the grinding equipment used to generate the proper surface profile for coatings removes approximately 1/64″ of concrete from the surface. It also creates a bucket or two of concrete dust for a standard 2-car garage. To reach the aggregate, you would need to remove approximately 1/8″ or more of the concrete depending on the slab. Once you begin to reach the aggregate, more grinding is required to flatten out the tops in order to create the look you want. This entire process usually requires larger planetary grinding machines with 16 grit discs. These larger machines work much quicker and are better at creating a flat surface. It’s very difficult to create a flat, even surface profile with smaller grinders when removing that much concrete without creating an uneven surface, grinding ridges and etc. This article here describes the process for polished concrete as a reference. If you were to do this, it would require that you smooth the surface a bit with 40-60 grit diamond discs after you expose the aggregate. This will provide a better profile for a coating to smooth out the surface and seal the concrete. Also, since the concrete is below grade, has it been moisture tested during the wet months?
Shea, another great article – your site has been an invaluable resource to me as I research my shop floor coating project. I’ve decided to rent a floor maintainer with dust shroud and vac from Home Depot for my surface prep. They only rent the 25 grit Diamabrush pad and I was wondering what you thought about using the 100 grit pad instead. I have 3200 sq ft to grind so it would be worth it to me to buy a brand new 100 grit Diamabrush (rather than the half-used 25 grit pad I’m likely to end up with as a rental) if you thought it would do the job. My concern is that I’d like to remove as little material as possible as my slab is brand new and perfectly smooth. Thanks in advance for your opinion!
Hi Will and thanks for the kudos. No, you do not want to use a 100 grit Diamabrush disc. 100 grit is not nearly course enough and will instead create a honing effect on the surface. This is the opposite profile required and will not allow proper penetration nor mechanical bonding to the surface of the concrete. A Diamabrush disc with 25 grit diamond tabs is what is needed. Concrete is extremely hard and a smooth troweled surface profile creates an even tougher surface to grind. All professional concrete coating companies and contractors use 16 – 25 grit diamond segmented disc, turbo cub grinding wheels, and etc. when prepping concrete for the proper profile. As you will discover, even 25 grit tabs on a Diamabrush is going to take some work for 3200 sq ft of concrete.
I have a 6 year old home. I removed the carpet and want to sand it for painting (not using any epoxy finish). The floors are pretty smooth with some paint when the walls were spackled and painted, mostly near the walls. What machine do you recommend? or will a floor cleaner be a better option? My objective is to paint the floor a light grey, kind of a white washed flat paint look. thanks for your help
Hello John. If it’s a latex paint you are applying, you can rent a 17″ floor maintainer from Home Depot to sand the floor. We recommend using 60 grit sanding screens. These should remove the spackle and paint near the walls and put enough texture on the concrete surface for the paint. Concrete is tough on sanding screens, so expect to go through a few of them in the process.
Hi there! We have a stamped concrete patio that I’m in the process of stripping. I’m currently using the rustoleum concrete stripper and power washing to pull the layers back. It’s an incredibly tedious process and I’m very close to trying out new methods. Do you think there is a brush or head that would assist in pulling up the old finish after the stripper pulls it to the surface? I was thinking of trying a floor machine with pad??
Hi Bryan. If you are chemically stripping the surface, you may want to try using a nylon bristle Malish brush attachment with a floor maintainer. Stamped concrete can have valleys and deep seems that a pad will have a hard time reaching.
we have a 38 year old home. The concrete patio area has a broom finish to it. It was also used by the previous owners as a small basketball court for their kids. This means they used a brush to paint the typical markings on the concrete that you would find on a basketball court.
I have had very limited success in removing this paint even with 3500 psig pressure washer concrete cleaners.
so, I am now sure that grinding it off is my only option as we want to consider the acid stained look. Since it currently has the broom finish, which grinding system do you recommend to prepare it for acid staining?
thanks.
Hi Glen. Acid stains are reactionary and depend on the free lime in the surface layer of concrete to react with and impart its color. If you grind, you remove much of this free lime and as a result, the acid stain will not take as well. You would need to use a water-based stain or dye instead. Delta Dye stain is a good example. We would recommend using a 10″ Edco concrete grinder due to the hard to remove paint and the rougher broom finish. Home Depot rents them if you have one near you.
Hi Glen:
Preparing a concrete floor for my business. I’ve removed linoleum, but underneath was sticky glue sorta like rubber cement. Paint thinner is the only thing that’s loosened it. I tried a Diamabrush coating removal tool, but that only spread the mess evenly. I’m considering renting an Edco 10″ grinder, but don’t want to damage the concrete’s finish unduly. Any suggestions? Thanks in advance.
Hello Krusha. What is the ultimate goal for the floor? What type of product?
Original plan was vinyl planks, but the installers won’t go near the floor as is. So now I’m thinking either bare concrete or more linoleum.
OK. A 10″ Edco diamond grinder is not going to ruin the finish if used properly. It will lighten the color of the concrete while at the same time creating more texture (rougher finish) and making it more porous. You just have to keep the head moving side to side to avoid creating ridges. It’s not hard once you get the hang of it. The resulting surface is excellent for laying a multitude of vinyl flooring, tile, and etc. It will also provide the correct profile for coatings as well. You can also stain it with a water-based dye and then clear coat if you like.
Thank you for your fantastic articles! I am renting a grinder to prepare my slab for All weather floor’s polyurea. I am renting the double head Edco as we have 2200 sqft to grind. the floor was power troweled but there are some non-level areas so I need to take down high spots in many areas. I’m not sure what dyma-dots to get. I have a choice of 30,50,100. I was worried the 30 might leave the surface too rough for the polyurea but it would work better for the high spots. Thoughts?
Hi Jessica. You have quite the project going on! You will need to get the 30 grit dotz in order to provide the correct surface profile and take down the high spots. The 50 grit is not aggressive enough and the 100 grit begins to hone the concrete (make the surface smooth).
Hello Shea,
Thanks for providing such thoughtful insights. It’s really great to go beyond what Google can provide!
Which brings me to my question.
I am building a new home and will be working with a perfect concrete garage floor. I don’t want to paint or stain the floor. I love the look of just natural concrete. I am thinking of applying some sort of clear epoxy with paint chips for texture. Maybe 2 coats? I can not find any instructions for this scenario.
I think I still need to grind and clean the floor, but what next? Clear 2 part epoxy? What brand? Is there a specific kind for raw concrete? Can you use 2 coats? Or will the first coat cancel the ability for a second coat? Or do you need to sand the first coat before the second coat?
Lol. You can sense my confusion. Any advice is very appreciated!
Thank you
Great handle, NewHouseMan. In order to apply flakes it requires that a first coat be applied to toss the color flakes into. If you want to protect the flakes and make cleanup easier, then a second coat is required to cover the flakes. However, you may want to reconsider applying color flakes into a clear coat. In all honesty, it doesn’t look good. That is why it’s rare to find even one picture of someone who has done it. They work much better with a color coat down first. If you want texture for grip, then we suggest applying a non-slip additive into the final coat instead.
Most clear coats are going to be glossy though there are some exceptions. One of the most durable and easiest to apply would be a single-part polyurea. You can read about it here. There is even an example of bare concrete with just clear. There is no mixing of two components required and you have almost unlimited pot life to put it down. As with all coatings, you can apply additional coats within a specified recoat window (usually 24 hours) before any additional prep is required. Polyurea is also water clear where as clear epoxy has a slight tint to it. In additions, epoxy will amber over time (yellow tint) if exposed to sunlight or strong indirect sunlight.
Wow! That is just what I was looking for. This site is crazy. Like the Wiki of garage floors.
So a follow up question if I may. How dangerous (friction wise) would it be to just lay down 2 coats of that stuff with no anti-slip?
Thanks for the kudos! As long as the surface does not get wet there are no issues at all. Where things get tricky is when it gets wet – especially when new. As time goes by the coating does develop microscopic scratches that help with traction when it gets wet. If you live in a climate where you are parking wet cars in the garage quite a bit, then you may want to consider an anti-slip additive. The one drawback is that it will slightly reduce the gloss if that matters.
I’m curious if any prep work is needed for the small vertical walls along the edges. They appear to be pretty rough and I’m assuming they can be left alone and I will not have a bonding issue. Can anyone comment on that? My apologies if I missed this somewhere.
Hello Andres. It’s not necessary to prep the stem walls along the perimeter of the slab. They usually are plenty rough enough and you won’t be walking or driving on them. However, they will also suck up a lot of the coating. Unless you plan to continue the entire coating system up the wall, many people just color match the coating with concrete paint and just paint the walls a solid color to match.
Hi, I have concrete deck around our pool. At one end, the concrete has started pitting. My plan is to grind the concrete down to get an exposed look and then put an epoxy coat on top. 1. What Product should I do to fix the pitting ? I assume this needs to be done before I grind. 2. What grit Level should I use? 3. Lastly, Is there a type of epoxy you would recommend? Thank you
Hello Mitch. Grinding concrete down far enough to expose and smooth out the aggregate requires a lot of aggressive grinding. 16 grit diamond segmented pads are a starting point to get down to the aggregate and then you work up to finer grits from there depending on the coating being applied. I’m assuming you are looking for the bare concrete look? If so, the repair material will clash with the exposed aggregate look. This is an example of products that are typically used to repair pitted concrete. Traditional epoxy coatings cannot be used as an outdoor coating because they are not U.V. stable. They will chalk and deteriorate over time in constant direct sunlight. Pool decks require special coatings that are U.V. stable. Acrylic epoxy is an example. I would recommend discussing options with a company like ArmorPoxy. They provide coatings for outdoor use.
Thank you for the wealth of knowledge! What would be the removal depth for grinding? If the pitting is minimal (depth wise), could I avoid patching and just use the grinder? Ideally I would like to have the exposed aggregate look and apply a clear coating on top. If I patch the pitting, is there no way to avoid the dissimilar appearance? If so, would my options be then either be ok with the dissimilar appearance or use an epoxy that is a solid colour so it looks uniform? Lastly, would you recommend an epoxy patching material or polymer epoxy? Thank you
The depth required to reach the aggregate will vary depending on the initial mix when it was poured. You may have to grind and remove 3/32″ to 1/4″ of concrete before you reach it. You may or may not go as deep as the pitting. It’s a HUGE job to remove that much concrete, Mitch. It requires large planetary grinders to reach the aggregate and then top it off to a size that you like. After that, it requires more grinding to smooth out the 16 grit profile to something around 25-40 grit for the proper coating. It’s not a job that is recommended for DIY. This article about polishing concrete explains part of the process including what it takes to reach aggregate. Have you checked on the proper clear coating yet?
I guess I don’t absolutely require an exposed look. I really just want to smooth it out, remove damaged concrete and get a coating on it for protection. I don’t believe I have looked at the proper clear coating, what is this being referred to?
Thank you
Check out ArmorPoxy for the proper coating, Mitch. You may want to give them a call. We left a red link to them in a previous comment. Coatings that are used outdoors have special requirements to stand up to U.V. rays. You can’t use your typical garage floor or indoor coatings.
This page has been a great resource – thank you!
I have 50+ year old concrete slab floor. We had to cut into it to put some plumbing and floor drains. The concrete is very strong, about 6” thick, and despite being very old has little cracks. We found the concrete to be very dense and hard when saw cutting and drilling for dowels.
We are now preparing the surface for a novolac epoxy (I need something that has a higher chemical resistance). We rented an edco floor grinder and spent a long day profiling the 1,100 ft2 of concrete surface.
We power washed the floor to clean it afterwards and it appears that water does not absorb and dissipate quickly. It takes a 5-6 hours for the water to dissipate.
Will this create any issues with adherence for the epoxy we are putting down? We also plan to use a primer if that helps. Should I rent the grinder again? Or do I just have very dense old concrete?
Hi David. Despite the grind, a dense concrete slab is only going to absorb so much water after pressure washing and such. You should have had puddles everywhere. Let the concrete dry completely for a few days and then do a water drop test in various areas. If drops of water immediately turn the concrete darker and get absorbed in less than a minute then you are good to go.
Hey, thanks for the great resource. I purchased a Polyurea kit from Legacy Industrial due to your recommendation.
I have degreased garage floor despite there still being visible spots where the two cars parcked. and I have some slight spalling in a few spots, (the biggest being around 5 inches wide and they are 16th to a 32nd of an inch deep.
1. Do i grind first? or fix the spots first?
2. with what do I fix the spots with?
3. Can i just grind with a max and suck up all the dust afterwards?
4. is it recommended to wash afterwards? and if so, how long do I wait for it to dry before I apply primer and other coatings?
This is my first time and the customer had a rocksolid kit that she decided to return and upgrade for the polyurea 3 coat system. I just want to do a good job. Thanks for the help.
Hey Chris. I will address your points as you numbered them.
1) Do any repairs that need to be made first and then grind.
2) Judging by the small size, you should be able to pick up some Rust-Oleum Concrete Patch and Repair from your local home improvement center. It’s a 2-part epoxy patch. Don’t mix it all at once because you only have limited working time. Once mixed, press it into those spots with a putty knife. Make sure there are no low spots. Once cured, you can spot grind it to make sure it’s flush with the concrete.
3) No, you need some sort of vac system. Grinding creates a tornado of concrete dust without a vac. It’s very important to wear an N95 rated respirator or mask. Spot grinding without a vac system is OK, but be prepared for the dust! We have an article on grinding here.
4) No, do not wash if you can help it. You want to keep the concrete dry. Introducing water means you will have to wait a couple days minimum for the concrete to dry. A good vac should take care of it. If you run your fingers across the surface you should only get a limited amount of dust on them. They should not be coated white.
If you have any questions about application, Chris, just give Scotty from Legacy Industrial a call. He is great with the DIY help.
Thank you so much for the informative article. I have a 9 year old epoxy floor that never took well in the garage. It peeled off here and there but mostly where the car tires rest. I have called Home Depot about renting a machine but have been told that the grinder with Diamabrush won’t work to remove epoxy or that it will ruin the floor with swirling. (Depending on who I talk to!) I don’t want to ruin the concrete but it looks awful and I do not want to epoxy it again. What do you suggest?
Ugh.. That’s the problem with home improvement centers when it comes to garage floor coatings, Aly. No one there has actual knowledge gained through experience. Diamabrush has two grinding attachments / tools like we show in the images in the article. One is the prep tool for bare concrete (more blades) and the other is the remove tool for paint and thin mil coatings (fewer blades). It’s the removal tool that you would need to use. In addition, all grinding wheels for coatings are going to leave swirl marks. The point is to grind the concrete, not polish it 🙂 When it comes to removing coatings, our favorite machine to rent from the home improvement centers is the 10″ Edco unit. It is a little more expensive to rent, but it will remove the old coating much faster. Just make sure to put down a high quality coating product afterwards and you won’t have the problem again.
Sounds good! What do you recommend for a high quality coating?
There are many good quality coatings available. You won’t find them at a home improvement center though. You need to purchase them online from concrete floor coating vendors. They are more costly, but they end up saving you a lot of money in the long run and you won’t be going through what you are now in a few years. We have an article here with a list of our sponsors that carry such coatings. The most budget friendly would be a system that consists of an epoxy primer and high solids epoxy color coat. We recommend the high performance clear coat if the budget allows for it. The easiest to apply are the newer single-part polyurea coatings, but they are little more expensive.
Thank you!