
One of the more common questions about garage floors is how to fill contraction and expansion joints. In particular, many would like to know if you can fill the joints on the garage floor before applying an epoxy coating. Still, others want to know if you can fill the joints before or after a sealer is applied. What about sealing the expansion joint between the garage floor and the driveway?
We will answer all these questions and more. In addition, we’ll discuss how to fill expansion and contraction joints in your garage floor. But first, you need to understand the difference between these two joints. It determines exactly which types of joint-filling materials you can use and why.
Difference between expansion and contraction joints
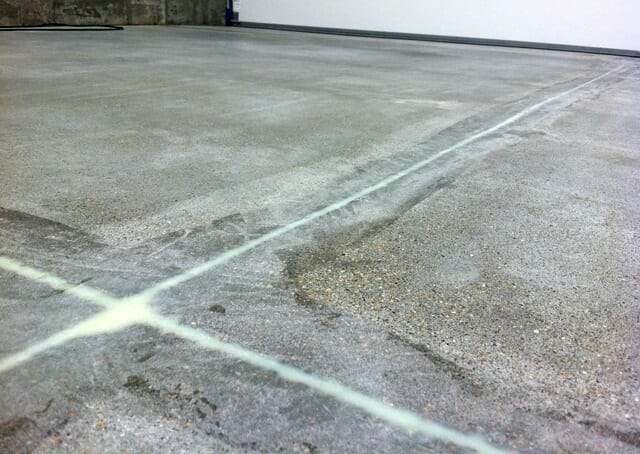
In a typical 2-car garage, contraction joints usually look like a big plus sign that divides your garage floor into what appears to be four separate slabs. These joints (sometimes called control joints) are the deep V-shaped grooves that run from one end of your garage floor to the other.
Some concrete floors may have saw cuts used as contraction joints instead. Saw cuts are usually a minimum of 3/16” wide and 1” deep.
Because concrete slabs will crack with expansion and contraction, these joints create a weakened line in the concrete that encourages cracks to follow the line within the joint. This helps by discouraging cracks from following a more resistant path across your garage floor.
Expansion joints (also called isolation joints) separate one slab of concrete from another. They are typically a minimum of 1/2” in width.
In simple terms, expansion joints help prevent adjoining slabs from damaging each other when they expand and contract.
They are commonly filled with compressible fiberboard or similar material. The joint between your garage floor and driveway is a good example of an expansion joint.

Garage floors are typically poured independently of the home foundation. When this is done, an expansion joint will run along the perimeterwhere the garage floor meets the house foundation.
Filling contraction joints before epoxy coatings
When the time comes to paint or epoxy coat the garage floor, many people want to fill their contraction joints to achieve a seamless-looking floor. So, is this advisable? Well, the answer depends on what material you use.
When your garage floor expands and contracts with temperature changes, it can create very slight movement within the contraction joint. This is why there are cracks within the joint in the first place.
If the joint is filled with a solid material that does not flex and then covered with a coating, you have created the potential for the crack to telegraph through the material and the coating.
If you want to fill your contraction joints, the key is to use the proper joint filler.
This happens because you have a solid, seamless coating that does not flex (epoxy) and is bonded to both sides of a surface joint that can move. As a result, you can create a break in the surface of the epoxy right above these joints if they are filled.
Though the chance of this happening is not great, many professional contractors will not warranty an epoxy coating for cracks where the owner has asked to have the joints filled. Most contractors will fill the joints if asked, but they will warn you about the possible problems.
The best material to use is a 100% solids epoxy or polyurea filler with an elongation rate (flex %) that is higher than that of the coating you are using. It will cure to a hard solid that is sandable, yet will flex slightly (relative to the concrete) underneath your epoxy coating to prevent cracking.
This flexibility also prevents the filler from pulling away from the concrete as the floor expands and contracts. These qualities help tremendously to keep the paint or epoxy coatings in one piece and not crack.
This post may contain affiliate links. If you use these links to make a purchase, we may earn a small commission. As an Amazon Associate, All Garage Floors earns from qualifying purchases. You can read our full disclaimer here.
product recommendations
Many of these special joint-filling compounds can be found online from concrete floor coating vendors. Home improvement centers do not carry them. They work well, but they are not inexpensive like a typical crack filler. There are a few different products we can recommend.
The first is a fast-setting, 2-part 100% solids polyurea gel called Xtreme-Set 100 by Legacy Industrial. You can read our review here.
It works very well for filling contraction joints as well as filling cracks.
The big benefit of Xtreme Set 100 is how fast it works. You can fill the joint and grind it flush 20 minutes later. You can purchase Xtreme-Set 100 here.
Another good source is Garage Flooring LLC. They have two different 100% solids products that will work well. The first is TL-821 epoxy gel. The second is their new pourable joint filler, TL-831. You can find them here.
An epoxy gel like this is less expensive than some other contraction joint fillers and works well. It’s a better value if you don’t need a fast-setting product. Just be aware that you will need to wait at least 8 hours before grinding it flush.
ElastiPoxy is yet another product that works well for filling joints. Because the epoxy is less viscous, it helps to mix in a little clean sand to stiffen it and increase coverage.
You can price the 2-quart version here at Amazon. Make sure to estimate the correct amount. Many have found that they needed the larger 2-Gallon kit instead.
Application of these joint fillers is not hard and requires little preparation of the joint other than making sure it is clean.
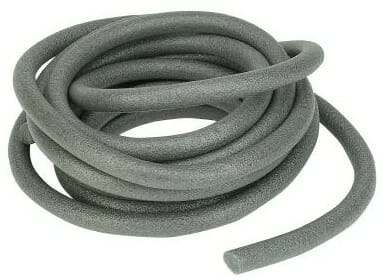
If you have saw cut contraction joints, we recommend that you fill them first with a foam backer rod or silica sand so you don’t use as much filler. You want to leave approximately 3/8″-1/2″ from the surface.
If you have “V” shaped contraction joints, the foam backer rod will not work well. Silica sand is a better choice.
Both the silica sand and foam backer rods can usually be purchased from your local home improvement center.
When using a foam backer rod, make sure it’s approximately 1/8” wider than the joint. If you choose to use sand, it will prevent the filler from slowly sinking into the cracks at the bottom of the joint and creating low spots as it cures.
Once the joint is prepped, follow the instructions of your product of choice and fill the joints. Make sure you don’t have any low spots or you will have to go over them again. It helps to use a putty knife to force out air pockets and to remove excess material.
Once the joint filler has cured, you will need to grind the joint flush to create a seamless surface to paint or epoxy coat over.
Grinding the joint is important. If you apply the filler but don’t grind it flush with the surrounding surface, your joints will telegraph through the coating and become visible because of their irregular shape.
It’s not unusual for troweled “V” grooves on garage floor surfaces to be slightly lifted at the edges of the joint. This happens as the slab’s surface cures and contracts more quickly than the rest of the concrete, slightly pulling the rounded edges up.
Use a level or straight edge to check for this. It may require a bit more grinding to get the floor flush so that you don’t have a visible hump.
Contrary to what you may have read somewhere, do not use latex caulk or self-leveling joint sealers if you plan to coat over the joint.
Caulk and self-leveling joint sealers cannot be ground flush. In addition, they are too soft and will flex under weight, causing the coating to crack.
Furthermore, caulk will slowly shrink. As a result, you will end up with slight depressions that outline where your contraction joints are.
Filling contraction and expansion joints after epoxy coatings or sealers
Sometimes the contraction joints in a garage floor and the expansion joints around the perimeter can be very wide, collecting a lot of dirt and debris.
This can create an eyesore for some people plus make it more difficult to clean them out. The same can be said for the expansion joint between the driveway and garage floor.
You can always fill these joints in your garage floor after an epoxy coating is applied. It can also be done after clear sealers, stains, or other floor treatments are applied. Not before.
DO NOT fill expansion joints with the same products used for contraction joints. Epoxy and polyurea are stronger than concrete once cured and will not flex nearly enough. This can cause crumbling and cracking of the slab edges.
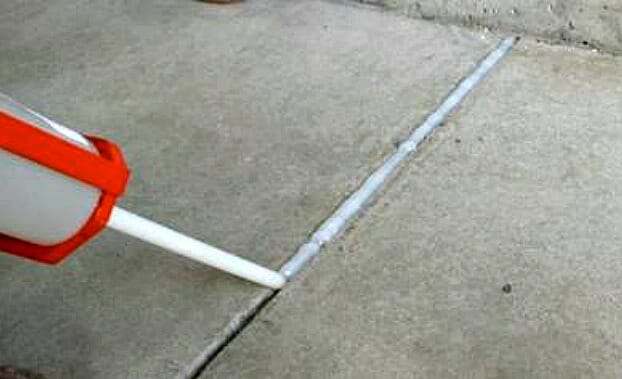
The easiest solution is to fill these joints with a self-leveling polyurethane joint sealer/filler. Most are 100% solids polyurethane. This means that it will not shrink as it cures. Most are gray and applied with a caulk gun.
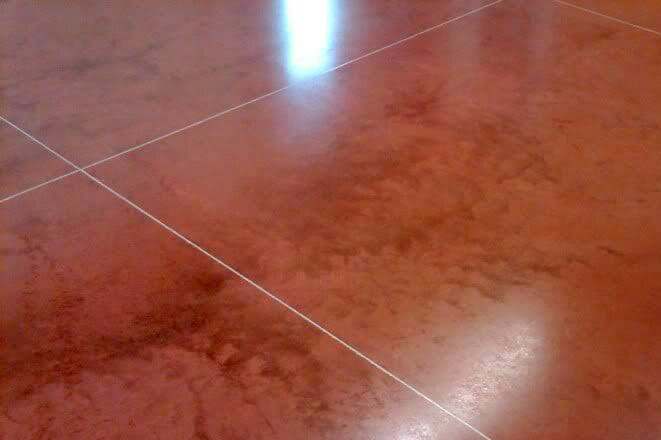
These types of joint fillers are inexpensive and can last for years. They also do an excellent job of sealing the joint from moisture. The material is flexible and feels somewhat spongy under pressure, yet is strong enough to drive vehicles over. Most are not paintable.![]()
We personally like SikaFlex SL for these types of projects. You can find it at your local home improvement centers for less than $20 for a 10-oz. tube.
The best deal is the 29 oz. tube, but you will need to purchase the larger 29oz. caulking gun to use it. If a home improvement center isn’t nearby, you can also find SikaFlex here from Amazon![]() .
.
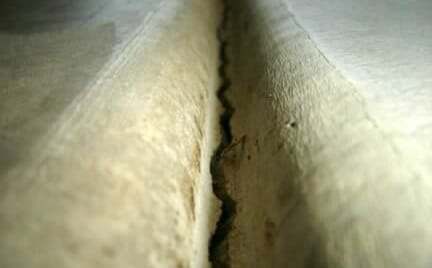
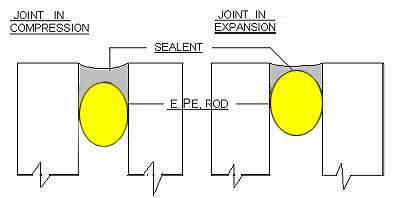
This is a good example of how to fill an expansion joint when using a foam backer rod
Prep of the joint is the same as before; however, do not use sand to fill up an expansion joint. Expansion joints need the material within the joint to be compressible and sand is not.
One exception is if you are applying a thin layer of sand over old fiberboard to prevent sealant from leaking through.
It is also extremely important that the concrete is bone dry before application. If not, it will not adhere well. For expansion joints, it’s important to remove any old filler using a utility knife or grinding wheel.
If the joint is filled with fiberboard or felt, be sure to remove any protruding material from the joint.
If the fiberboard in an expansion joint is missing or deteriorated, you will want to clean out the joint and insert a backer rod before applying the joint sealer. Do not place it more than 1/2″ deep from the surface.
Because these joint fillers are self-leveling, their viscosity is similar to that of honey. As a result, they will seek out any low spots along the joint. So be prepared ahead of time for any areas where the filler may want to run out of the joint.
Once applied, it skins over in an hour or two and completely cures within 3 to 5 days. You need to wait at least 24 hours before driving over a freshly filled joint.
Final points
Sealing and filling your garage floor’s contraction and expansion joints is not difficult. The key is to use the proper sealer or filler, depending on the intended purpose and the type of joint.
Just remember that expansion joints should always be sealed and filled with a flexible joint sealer and never epoxied or coated over. Contraction joints can be filled in the same manner after a coating or sealer is applied, if desired.
If you want a seamless-looking epoxy or garage floor coating, contraction joints must be filled with a specialized epoxy or polyurea joint filler that cures hard and has a higher elongation rate than the coating. This provides the required flexibility to help prevent the garage floor coating from cracking at the joints.
The post mentions a 100% epoxy filler with close to a 50% elongation factor. Do you have any commercially available examples of this type of filler?
Hello Jerome and thanks for the question. There are many commercially available products for 100% epoxy joint fillers or polyurea joint fillers with higher elongation percentages. RustOleum makes a polyurea joint filler with and elongation of 82% as an example. Wolverine products makes a flexible 100% epoxy joint putty called Integra Flex 1921 available from Alpha Garage with an elongation of 50% as another example. They are out there, you just have to look for them. Legacy Industrial makes a joint filler called HD-821 that they have had much success with but their TDS states an elongation factor of only 14.1%. Remember with all products to check the manufacturer for compatibility with whatever coating you want to use.
Please be careful as many ASTM tests can be misleading. In the case of a slab on grade concrete joints, elongation is nearly meaningless. The ASTM’s that are being quoted are performed in a linear pull test. The concrete joints are simply cuts to induce where the pours will crack. The joint will open in a width fashion rather than an elongated fashion. A rubber band is a prime example. You can easily stretch it over 1000 percent when elongated. But when stretched width wise, you barely achieve a fraction of that. It’s the same with on grade slabs. They are shrinking aay from each other when 1st poured. This will go on for about a year. From then on, the joint movement will depend on many factors. The most influential of which would be temperatures and humidity levels. Please keep in mind there are joint filler and there are joint sealants. Obviously the sealants are the group that are designed move and seal a joint, and the fillers are designed to prevent joint damage from heavy duty loads and to provide a flush contiguous bridge for what ever needs to cross it uninterrupted (high heels, garage floor creepers, forklifts, etc.
Hello Craig and thanks for the informative comment. Yes, ASTM tests can be misleading and you bring up some very good points. In this case however, the elongation we are referring to has more to do with the filler being used and not the slab. The reason for using a filler and not a sealant is to prevent stress cracking of the epoxy when rolling heavy objects over the joints as you have alluded to. You want the filler to be able to move well in both directions. Your rubber band explanation is a great example of why we want a filler with a high elongation rate. When the filler is pulled width wise, it needs to stretch much further in relation to its width than the other way around. If the filler has a low elongation rate, it can actually pull away from the edges of the joint because it will not stretch enough.
Well explained! Expansion joints allow for the floor in which they are placed to move without restraint, and they control where the movement manifests, avoiding random cracking in the floors.
Based on your recommendation I plan on filling ~3/4″ contraction joints in a newly poured slab with Sikaflex SL. I will also seal the floor with VSeal 101. Do you recommend sealing the floor first and then apply the Sikaflex to the joints?
Yes Tom, that is the best way to go about it.
The expansion saw cuts in our concrete driveway have widened over the years;however, only the long ( 50 ft. ) center cut has done this and not the intersecting cuts of every 10 ft. The center cut is 1.5 inches at its widest point and 1 inch at its closest point and 4 inches deep. Using silica sand to back fill most of this depth would it be necessary to use a back rod then the filler or could the filler be atop the silica sand? Unable to locate any back rod more than 7/8 inches wide. Would the silica sand and/or back rod run the entire 50 feet uninterupted or stop at every intersecting expansion cut ( every 10 feet ) ?? Thank you in advance, Dave Heckman.
Hi Dave. Using sand to fill expansion joints (not the saw cut contraction joints) is not the best idea. These joints need a compressible filler due to the expansion and contraction of the concrete. If you fill it mostly with sand it could cause heaving or possibly cracking since the sand will not compress well when the concrete expands in summer. That said, people in milder climates have done just that without problems. It’s up to you. You can apply the sealant directly on top of the sand.
You can purchase the backer rod you need however. Best Materials sells it. The advantage of the backer rod is that is leaves room underneath for the concrete to expand and contract. It also allows for the polyurethane self-leveling sealant to take on an hourglass shape which is best for the flexible sealer when the concrete moves. You run the entire length of the expansion joint without interruptions when you lay the backer rod and flexible joint sealant.
One tip. If you use the backer rod you will get some settling and leak-through with the self-leveling sealant. Fill the joint half way first to allow for this settling to occur. Then come back and fill it to the top to get a nice even looking joint without low spots.
Should I use a D-cell solid core backer rod for the expansion joints in our concrete driveway ( 1.25 to nearly 1.50 ” at widest point in the expansion joint. Should the ‘flat’ side of the D-cell backer rod be installed facing upward to lend a flat surface for the SL sealant ? Thanks again, Dave Heckman
Keep the round side up Dave. This allows for an hourglass shape of the self-leveling sealant. You can use the the D-shaped rod, but it’s more difficult to keep the round side up. That’s why we prefer standard round. Be sure to use closed cell as well.
For a 4″ deep concrete driveway with moderate slope (about 30 or so degree slope) with size 12 (width) x 90 (length), should the contraction joints be filled up to 1″ more when the saw-cut depth is 2″ deep, i.e., too deep? Part of the problems is that contraction joints were saw-cut to 1″ around the top of the driveway, but, saw-cut unevenly to 2″ for one contraction joint in the middle (slope) of the driveway and 1″ for the later contraction joints toward the street level area. If filling up to 1″ deep for the 2″ contraction joint is a solution, what materials should be used to fill up?
Thank you in advance of any advices you can offer.
F.M.
Hello FM. I wouldn’t worry about the joint being cut deeper than 1″ in those areas. In order for saw cut joints to work properly, they need to be cut at least 25% the depth of the thickness of your slab. So a 4″ slab should have a minimum of a 1″ deep contraction joint. A 2″ deep joint is OK.
Thanks, Shea. I forgot to mention why there is a concern of a 2” deep joint. The surface of the driveway at around 1/3 from the top of the driveway slope covers three contraction joints from left to right and one vertical contraction joint from the top to where the thee horizontal contraction joints ends. The first horizontal contraction joint is 1” deep, the second joint is 2” deep and the third joint is 1” deep. Not only we saw the water stay for couple hours around the 2” deep contraction joint, the water don’t flow down to the next horizontal joint. In addition, the surface is not flat and is very uneven with the side next to the house siding relatively lower (although a slight ramp was made at the foot of the siding hoping the water will run to the neighbor’s side) and the side next to the border of the neighbor relatively higher as such the water run toward the house side rather than the neighbor side. In such a scenario, is the 2nd joint that is 2” deep a main concern? Should it be filled so that it becomes around 1” deep joint hoping the water can run to the next horizontal joint and toward the bottom of the slope, if the water does not flow to the neighbor side (the other side of the vertical joint)?
By the way, it is okay to have the joint very narrow in width because of using the cut instead of the more traditional wider joint?
Thank you in advance of your reply.
FM
What you need to be aware of FM is that contraction joints are not created for drainage. They are created to form a weakened line within the concrete to encourage cracking within those lines so that you don’t see it. Because concrete cracks, contraction joints help to prevent visible cracking on the surface. The fact that water will drain down your driveway because of these joints is just a byproduct of the joint. It is not why the joint was created in the first place. If your driveway was flat, the water wouldn’t really go anywhere. It would sit in the joint and evaporate or seep through the cracks in the joint until dry.
The type of joint you have are saw cut joints. They are very common and many concrete contractors prefer them because it enables them to create a nice clean line versus hand troweling a wider groove instead. For an additional fee, some contractors will offer multiple cut joints to create a decorative pattern such as large or small diamond shapes.
If it still bothers you that the water sits there for a while, you can try filling it partway with a self-leveling sealer like SikaFlex. The problem however is that saw cut joints are narrow and it would be hard to get the sealer to the bottom of the joint without some sticking to the sides and top. Your other option is to fill your joints all the way and just let the water drain off your driveway naturally without the joints interfering.
Dear Shea,
What are likely consequences of such cracks soon formed shortly after the contraction joint deep cuts were made ?
FM
Concrete starts cracking the minute that it begins to cure and dry. It’s the nature of concrete. The contraction joints help to minimize cracking just to the joints, but that is not always the case due to a large number of factors. You can’t really project the consequences of cracks after they have formed. The cement needs time to completely cure and dry which can take weeks. Many times these type of cracks are superficial and produced just at the surface due to the concrete constricting as it cures and they will not create any structural problems as they are extremely shallow.
Great tip on expansion joint! Thank you. Also – my driveway is pulling away from the home approx. 1 – 1 1/2 “. It is on a slight grade. Fiber Board was used when originally poured. Now there is a gap between the fiber board and the Foam board insulation that was placed against the exterior side of the garage floor slab-separating the inside slab from the outside slab. What is the proper way to fill this?
Hello Gary. You can tackle a large gap like that the same as smaller ones. Pull as much of the fiber board out that you can and fill the joint with larger backer rod before applying a self-leveling joint filler. Backer rod is available in larger sizes but isn’t always found from your home improvement center in the size you would need. This site here is a good place to acquire odd sizes for larger gaps such yours.
I am converting my garage into a game room 22′ x 22′. I have a contraction joint going across the floor that is 3/4″ wide and 1″ deep. I am going to acid etch stain the floor and then epoxy clear coat it. The floor is all prepped and ready. Do you recommend self-leveling and backer rod before I start the acid etch and epoxy clear coat? Or something else at a different point of the process. THanks for your help.
Hi Kevin. Do the acid stain and epoxy clear coat first, then fill the contraction joint. That way you will have a nice clean look to the joint when you fill it.
Hi,
I just filled up a crack in my garage floor with sika flex crack sealant. Will Rustoleum epoxy floor coating bond to it? I should’ve done this research before filling the crack but it’s done now. I’m worried that the rustoleum professional epoxy will not bond to the polyurea based sika flex crack sealant.
No, it won’t Nauman. SikaFlex is a self-leveling, non-paintable flexible joint filler. It can be used to seal cracks to prevent water intrusion, but it is not a crack repair product. It is typically used to fill contraction and expansion joints after a decorative coating has been applied. This article here talks about crack repair products and what the difference is.
I ran into same situation as mentioned above. What to do in this case to get if fixed? Do I need to scrape off a layer of self-leveling sealant and then apply some concrete so that Rustoleum epoxy will bond to it?
Hello Kedar. There are a couple examples above this. What type of product did you use to fill the joints?
Hi Shea, thanks for this article. In my 2 car garage it appears they used a very thin sheet of aluminum to create only one expansion joint right down the middle. For about the middle 1/3 it runs even with the surface with a thin straight crack, elsewhere it runs below the surface of the concrete with a slightly jagged crack. The crack is generally little more than 1/16 of an inch, widening to little more than 1/8 of an inch only at the very surface. I am painting my garage floor with tan/beige epoxy. I would think no matter what I do, it’s going to crack, correct? If I use an epoxy filler after painting, I’ll be left with an ugly grey line through the middle of my garage. What’s my best bet to fix this in a way that will blend in the best with the paint? Would I be better off with a thin bead of clear or colored caulk AFTER painting, or something else?
Hello Brad. From your description, it sounds like you may have a type of metal key joint as your contraction joint. If you want to make this go away, your best solution is to fill it with an epoxy gel joint filler first, such as the examples we talk about in the article. They are designed to flex slightly if there is any more movement in the slab. You will need to grind the joint flush after it cures. You can then epoxy coat right over the joint and you won’t even know it’s there. Other than that, any other filler after the fact will create a visible line.
Is the xtreme set 100 from legacy OK to use to fill contraction joints. The article doesn’t mention it but it is used in one of legacies videos. Just wanted to hear it from a second source. My concern was if it would be to hard or brittle. I use my garage to work on vehicles and would like something that small caster wheels under heavy load won’t damage.
Hello Doug. The Xtreme set 100 from Legacy works great. It is stronger than your concrete yet has some flexibility so that it won’t crack if you have movement in your joints.
can I use sika for fixing crack garage floor before I do epoxy, but I went to Home Depot saw too much type Sika self level sealant, sika concrete fix, crack fix. Which one I can use before I do epoxy coating.
Hello Melanie. No, you cannot you SikaFlex. It’s too soft and it can’t be sanded to create a flush repair. You need to use something like Rust-Oleum epoxy crack repair.
In the Home Depot there have quikrete polyurethane concrete crack sealant. Can I use this product because I can’t find Rustoleum epoxy crack repair
It can be used for small cracks Melanie, but it’s not the best choice. It’s paintable, meaning you can coat over it, but it’s also very flexible and hard to sand smooth with the surface. You need to wait 72 hours before sanding and coating over it. You can order the Rust-Oleum epoxy concrete repair kit here from Amazon if you don’t need it today.
Does a person have to fill the expansion joints before applying an epoxy coating? Can I just put a thin layer of epoxy coating over the expansion joint or will it end up cracking the epoxy coating? Or should I just leave the joints uncovered? I don’t need to have a seamless floor I just don’t want the epoxy coating to get damaged in the future. Thanks.
Great question Travis. Are you talking about the expansion joint that runs the perimeter of the floor or contraction joints in the middle of the floor? Most epoxy coated garage floors don’t fill the contraction joint. When doing the floor, just have a paint brush handy to run down the middle of the joint to coat it as you go. Expansion joints on the other hand are best left alone. If you coat the joint with the epoxy you run a good chance of the epoxy cracking during big temperature extremes when the concrete will expand and contract.
Thanks Shea. I am talking about the contraction joints in the middle of the floor (sorry I called it an expansion joint). I will probably just fill the joints after I apply the the epoxy coating, this seems to be the least expensive option. Thank you for your quick response. Love your website.
Can the following product be used for filling the control / contraction joints in the garage floor ?
https://www.amazon.com/Rust-Oleum-215173-EPOXYShield-Concrete-24-Ounce/dp/B0008JHBD2/ref=sr_1_1?ie=UTF8&qid=1464105285&sr=8-1&keywords=elastipoxy
or this
https://www.amazon.com/Sika-Corporation-106711-Leveling-29-Ounce/dp/B000RUKZSA/ref=sr_1_4?ie=UTF8&qid=1464105285&sr=8-4&keywords=elastipoxy
Hello Rajesh. If you plan on applying an epoxy coating over the filled joints, then no, you cannot use those products. The first one is a crack repair product. It cures extremely hard and has no flexibility as we discuss in the article. The other is too soft and cannot be painted over. You can use it to fill the joint after applying epoxy however. We recommend using the type of material we discuss in the article.
Thank you. Okay. Im planning to use the rust oleum garage kit (the one 20x stronger then epoxy). So I want to get neat smooth finish.
Can I still do it and apply sika after coating the floor ?
Yes you can Rajesh. The SikaFlex will fill the joint and self-level for a nice look that compliments the epoxy.
Thanks Shea. Before applying the rustoleum garage coat, Im cleaning my garage and should I use any other product or step before coat ?
This is brand new house. Concrete in smooth. In particular, I saw rustoleum product called moisture patch or something.
Should I use it ?
second question, concrete etch comes with the garage kit is enough or I should buy additional ?
Moisture stop is only for garage floors with suspected moisture issues Rajesh. The concrete etch that Rust-Oleum provides is adequate but not the best in our opinion. It’s a citrus based etch that is eco friendly, but it doesn’t do as good a job of profiling the concrete as muriatic acid does.
all products bought and im ready to do my garage project.
1. when using garage kit, what should I do on the contraction joints. im planning to fill with sika
2. can I still use back rod . which is right way?
this site is really helpful for rookie like me. thanks again
If the contraction joints are deep then use the backer rod so that you don’t use so much SikaFlex. Make sure it’s wedged in good though or it will float to the surface. Don’t worry about running epoxy in the joints since you will be filling those afterwards. Just make sure that the epoxy coats around the edges.
Hi Shea, I filled the joints but I didn’t pay attention and it ended up over flowing once its started levelling. Though it didn’t look bad or anything. Should I do anything ?
There is nothing wrong with it overflowing Rajesh other than how it looks. If it still looks fine to you then leave it as it is.
Awesome. Thanks. Is there a way I can post pictures of floor I did. Probably the Garage Kit review page you have might be the right page. Please let me know if I can share.
You sure can Rajesh. You can upload pictures of your floor to our email address. Please list the products used and feel free to add any other input you like. We will most likely place them on our gallery page with a link to the article it refers to.
Hello Shea…
Great article!! I am converting my garage into a game room. We decided to forego any complicated floor treatment and lay down in outdoor carpet. I would like to fill the contraction joints so the carpet doesn’t dip into the gaps. I’m getting lost in the comments on which products I can walk into my local home improvement store and purchase. I am thinking I want to use the backer rod and a filler since the compound will not be seen and I am not terribly concerned about it being perfectly level. Is Sika a product I can buy today at a store and is that what you would recommend? I am running short on time. I have a pool table being delivered Thursday! Yikes!
Hello Anthony. For your project SikaFlex with a backer rod would work just find. You can easily find both at your local home improvement center.
Hello Shea…
I skipped using the backer rod. Now I am a little nervous about how much product I used and whether or not it is going to ever fully cure. Is it possible for this to actually never set completely? Would starting over be better?
Thanks again.
Anthony
It will cure without issue, it just takes a little longer. You may need to apply a little more if it settles while it cures however.
We covered our garage floor with Rocksolid (tan in color) and now on to the expansion joints. Is there any material for the joints that would match the tan besides gray?
Hello Dave. SikaFlex makes a sandstone color of their very popular self-leveling polyurethane joint filler. You can find an example here from Home Depot.
I using a black epoxy on my floor, can you recommend a good sealant that is also black? It appears the sikaflex SL is not offered in that color.
Hello Brett. Here is a product that is available in black. We’ve never used it, but it’s spec’d for use in parking garages. We suggest giving the manufacturer a call to verify before you purchase it.
Hello Shea,
I have a large contraction joint (+ sign) in my new garage. I would like to have a smooth level surface to make the epoxy coating look seamless. Would Rustoleum InstaPatch be the best option for this use? If so, do I still use a backer rod?
Is there a better product to put in the joint?
The Rust-Oleum InstaPatch is a great crack repair product Joey, but it’s not the right application for contraction joints. It has an elongation rate of only 6-8% – you want at least double that. Because the joint can move, you need something that will move with it. Of course, it can’t be too flexible or you will not be able to grind it flush either. Something in the 15-30% range works well. Also, you do not want to fill the joint with backer rod. It needs to be filled completely with a joint filler. Backer rod is suggested for expansion joints. Expansion joints are different than contraction joints and should not be coated.
Epoxy gel fillers work well for filling contraction joints since they can be ground flush after they cure in order to create a nice seamless look. Both Legacy Industrial and Garage Flooring LLC (TL821) offer such a product. The elongation rate is around 14-15%. These are used routinely with great success.
Am I using the right term, contraction joint, for the large + sign joint dividing my garage in to four quadrants? Also, are there more budget friendly options or options available at big box stores that you can also recommend for the job?
I saw a painter online that recommended Sherwin Williams SherMax. Any chance that would work?
Also, how about Rust-Oleum EpoxyShield Concrete Patches?
Yes, you are using the right term Joey. The proper product for the job is not going to be found at a home improvement center. The Sherwin Williams SherMax is just a paintable latex caulk for windows, doors, and etc. It can’t be ground smooth, it will shrink, and it will only accept latex paint, not epoxy. Plus, it doesn’t even come close to proper Shore ratings for hardness. Remember, you are going to be driving on this. The EpoxyShield Concrete Patch is good for patch work and cracks, but not filling contraction joints. You would also need approximately, 7 boxes to fill them as well. Only up to a few years ago or so, commercial installers would not even fill contraction joints for fear of developing cracks in the epoxy until a proper product was produced for the job.
I am pressure washing my garage floor to prep for epoxy painting and when I went over the joins in the center of the garage floor it started pulling up earth and mud. I stopped because I don’t want to undercut the slabs. Is there a joint filler or process you would recommend in this situation?
What type of joints to you have Jay? Are they saw cut, a deep “V” troweled groove, or something else? Something is different because dirt should not be washing up onto the surface.
I plan on using Sika self leveling sealant to fill the contraction joints in my courtyard. The slab has textured concrete on top of it so the joints are pretty wide -about 1″ wide and about a half an inch deep. The joints have a wide “V” shape so the backer rod will not “wedge” into place. The 5/8 foam doesnt set below the surface so it is too big. The 3/8 and 1/2 foam just sit in the joint and Im unable to wedge it in there. Im afraid it will float when I install the sealant over it. Do you know if the foam will float or if there is a way to keep the foam from floating up when the sealant is applied?
Thanks.
Yes Tom, the foam will float. For the “V” shaped joints like that your only real option is to fill the entire joint. You could lay about 1/8″ silica sand in the bottom of the joint, but you don’t want anymore than that. The SikaFlex needs enough concrete on the sides to adhere properly.
Thanks Shea- I was hoping for a better option because this will use quite a bit of Sikaflex and probably increase my cost 2 or 3 fold. Do you think using double sided tape or construction adhesive on the backer rod would work? Also I just saw a product on Sikas website that shows “breaker tape” being used on vertical surfaces. Do you think this could work for me?
Thanks again. I appreciate the help.
You could give it a try Tom. Adhesive would be a better bet. Just make sure the top of the backer rod is at least 1/4″ lower than the top of the concrete.
I have a wooden 2×4 expansion joint that runs the width of my 20×30 garage. What do you suggest the best way to handle it before I apply the epoxy.
If you don’t like the look of the joint David, you can always fill the joint with SikaFlex once the coating has cured. Another option would be to fill it with a 100% gel epoxy joint filler and then grind it flush before coating. It would be the more expensive option however.
Are you saying to remove the 2×4 and then fill the cavity with the gel epoxy filler
No, you leave it in David. If it’s flush with the concrete you will need to shave it down a 1/4″ first. Most are set below level though.
I’m using legacy hd40 on my floor and am wanting to fill the contraction joints. They are saw cut maybe 1/8″ wide. I was going to use sika flex from lowes. But now I’m a little confused. The cuts are 2 in deep. What is my best option and procedure? Thanks.
Hello Mark. What you want to do is go ahead and treat the floor with the HD40. You will want to apply the SikaFlex after the floor is done. For deep contraction joints, we recommend filling the joint about 3/8″ of inch from the top with silica sand or use 1/4″ backer rod. If your local home improvement center doesn’t have the backer rod you can order it here.
If your concrete is real flat and smooth at the joint, some people like to slightly overfill the joint and then cut it flush with a razor blade a few hours after it has set up. However, most people just fill the joint to the top and let it level out on its own.
Thanks for the helpful article. I have a 3 car garage and the floor is a suspended slab. It has an epoxy paint coating which has cracked over the saw-cut (I assume-very narrow) contraction joints. It leaks water into the room below in the winter when the floor gets wet. I’m planning on opening the crack some (1/8 or 1/4in ?) with a crack chasing grinder and then sealing it with Legacy 821 gel epoxy to waterproof it. Will this work? Other recommendations?
Providing that is the only place that the leak is coming from Neil, that plan will work well. You don’t need to make the crack much wider than it originally is.
We have a sunroom that has a concrete floor with one joint in the middle. We are getting ready to put down a vinyl click flooring system. They told us that we do not need to put anything between the concrete and the planks. But, we have gotten mixed answers on how to handle the joint. We are not sure if we should fill it and if so with what. My husband came home with ready mixed concrete patch and I am not so sure that is the right thing to use. They joint does already have a crack running along the inside canal. Thank you in advance for your advice. (We will be coming back to this article when we get ready to do the garage floor!!)
Hi Felicia. We were actually curious about this ourselves and made a few phone calls. We received mixed answers as well regarding whether or not you should fill a joint with this type of flooring. The general consensus is that if you have a saw cut contraction joint then it would not be necessary. Saw cut joints are no more than 1/4″ wide. If you have a troweled “V” shaped contraction joint, then those should be filled since they are typically much wider.
Since this for a sun room and you are not applying a coating, you don’t need to fill the joint with the same type of fillers used for coatings. If you have the “V” shaped joint, we suggest using an inexpensive self-leveling underlayment which you can find at your local home improvement center. It’s easy to mix up and just pour into the joint until level. The crack running down the middle of your joint is normal and illustrates why the joint is constructed. It encourages cracks to run within the joint and not across the surface of the floor. The joint filler will most likely crack down the middle as well. No worries though, the filler is only used to provide support for the flooring and does not serve a structural need.