
One of the more common questions about garage floors is how to fill contraction and expansion joints. In particular, many would like to know if you can fill the joints on the garage floor before applying an epoxy coating. Still, others want to know if you can fill the joints before or after a sealer is applied. What about sealing the expansion joint between the garage floor and the driveway?
We will answer all these questions and more. In addition, we’ll discuss how to fill expansion and contraction joints in your garage floor. But first, you need to understand the difference between these two joints. It determines exactly which types of joint-filling materials you can use and why.
Difference between expansion and contraction joints
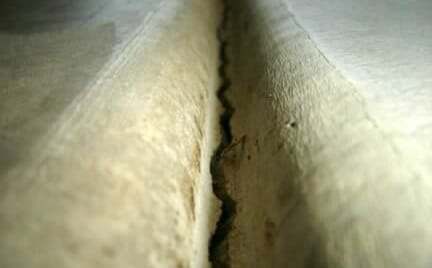
In a typical 2-car garage, contraction joints usually look like a big plus sign that divides your garage floor into what appears to be four separate slabs. These joints (sometimes called control joints) are the deep V-shaped grooves that run from one end of your garage floor to the other.
Some concrete floors may have saw cuts used as contraction joints instead. Saw cuts are usually a minimum of 3/16” wide and 1” deep.
Because concrete slabs will crack with expansion and contraction, these joints create a weakened line in the concrete that encourages cracks to follow the line within the joint. This helps by discouraging cracks from following a more resistant path across your garage floor.
Expansion joints (also called isolation joints) separate one slab of concrete from another. They are typically a minimum of 1/2” in width.
In simple terms, expansion joints help prevent adjoining slabs from damaging each other when they expand and contract.
They are commonly filled with compressible fiberboard or similar material. The joint between your garage floor and driveway is a good example of an expansion joint.

Garage floors are typically poured independently of the home foundation. When this is done, an expansion joint will run along the perimeterwhere the garage floor meets the house foundation.
Filling contraction joints before epoxy coatings
When the time comes to paint or epoxy coat the garage floor, many people want to fill their contraction joints to achieve a seamless-looking floor. So, is this advisable? Well, the answer depends on what material you use.
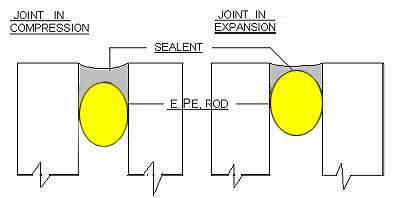
When your garage floor expands and contracts with temperature changes, it can create very slight movement within the contraction joint. This is why there are cracks within the joint in the first place.
If the joint is filled with a solid material that does not flex and then covered with a coating, you have created the potential for the crack to telegraph through the material and the coating.
If you want to fill your contraction joints, the key is to use the proper joint filler.
This happens because you have a solid, seamless coating that does not flex (epoxy) and is bonded to both sides of a surface joint that can move. As a result, you can create a break in the surface of the epoxy right above these joints if they are filled.
Though the chance of this happening is not great, many professional contractors will not warranty an epoxy coating for cracks where the owner has asked to have the joints filled. Most contractors will fill the joints if asked, but they will warn you about the possible problems.
The best material to use is a 100% solids epoxy or polyurea filler with an elongation rate (flex %) that is higher than that of the coating you are using. It will cure to a hard solid that is sandable, yet will flex slightly (relative to the concrete) underneath your epoxy coating to prevent cracking.
This flexibility also prevents the filler from pulling away from the concrete as the floor expands and contracts. These qualities help tremendously to keep the paint or epoxy coatings in one piece and not crack.
This post may contain affiliate links. If you use these links to make a purchase, we may earn a small commission. As an Amazon Associate, All Garage Floors earns from qualifying purchases. You can read our full disclaimer here.
product recommendations
Many of these special joint-filling compounds can be found online from concrete floor coating vendors. Home improvement centers do not carry them. They work well, but they are not inexpensive like a typical crack filler. There are a few different products we can recommend.
The first is a fast-setting, 2-part 100% solids polyurea gel called Xtreme-Set 100 by Legacy Industrial. You can read our review here.
It works very well for filling contraction joints as well as filling cracks.
The big benefit of Xtreme Set 100 is how fast it works. You can fill the joint and grind it flush 20 minutes later. You can purchase Xtreme-Set 100 here.
Another good source is Garage Flooring LLC. They have two different 100% solids products that will work well. The first is TL-821 epoxy gel. The second is their new pourable joint filler, TL-831. You can find them here.
An epoxy gel like this is less expensive than some other contraction joint fillers and works well. It’s a better value if you don’t need a fast-setting product. Just be aware that you will need to wait at least 8 hours before grinding it flush.
ElastiPoxy is yet another product that works well for filling joints. Because the epoxy is less viscous, it helps to mix in a little clean sand to stiffen it and increase coverage.
You can price the 2-quart version here at Amazon. Make sure to estimate the correct amount. Many have found that they needed the larger 2-Gallon kit instead.
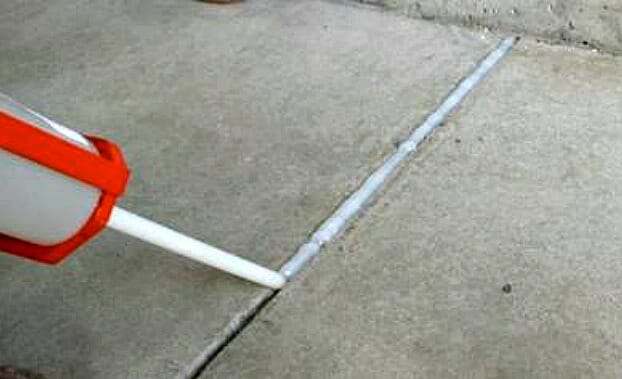
Application of these joint fillers is not hard and requires little preparation of the joint other than making sure it is clean.
If you have saw cut contraction joints, we recommend that you fill them first with a foam backer rod or silica sand so you don’t use as much filler. You want to leave approximately 3/8″-1/2″ from the surface.
If you have “V” shaped contraction joints, the foam backer rod will not work well. Silica sand is a better choice.
Both the silica sand and foam backer rods can usually be purchased from your local home improvement center.
When using a foam backer rod, make sure it’s approximately 1/8” wider than the joint. If you choose to use sand, it will prevent the filler from slowly sinking into the cracks at the bottom of the joint and creating low spots as it cures.
Once the joint is prepped, follow the instructions of your product of choice and fill the joints. Make sure you don’t have any low spots or you will have to go over them again. It helps to use a putty knife to force out air pockets and to remove excess material.
Once the joint filler has cured, you will need to grind the joint flush to create a seamless surface to paint or epoxy coat over.
Grinding the joint is important. If you apply the filler but don’t grind it flush with the surrounding surface, your joints will telegraph through the coating and become visible because of their irregular shape.
It’s not unusual for troweled “V” grooves on garage floor surfaces to be slightly lifted at the edges of the joint. This happens as the slab’s surface cures and contracts more quickly than the rest of the concrete, slightly pulling the rounded edges up.
Use a level or straight edge to check for this. It may require a bit more grinding to get the floor flush so that you don’t have a visible hump.
Contrary to what you may have read somewhere, do not use latex caulk or self-leveling joint sealers if you plan to coat over the joint.
Caulk and self-leveling joint sealers cannot be ground flush. In addition, they are too soft and will flex under weight, causing the coating to crack.
Furthermore, caulk will slowly shrink. As a result, you will end up with slight depressions that outline where your contraction joints are.
Filling contraction and expansion joints after epoxy coatings or sealers
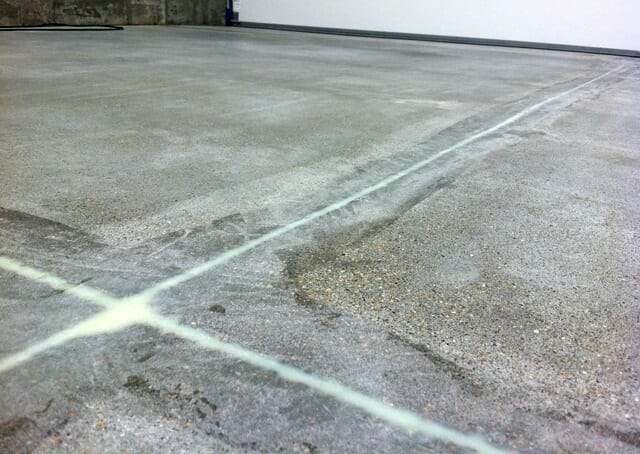
Sometimes the contraction joints in a garage floor and the expansion joints around the perimeter can be very wide, collecting a lot of dirt and debris.
This can create an eyesore for some people plus make it more difficult to clean them out. The same can be said for the expansion joint between the driveway and garage floor.
You can always fill these joints in your garage floor after an epoxy coating is applied. It can also be done after clear sealers, stains, or other floor treatments are applied. Not before.
DO NOT fill expansion joints with the same products used for contraction joints. Epoxy and polyurea are stronger than concrete once cured and will not flex nearly enough. This can cause crumbling and cracking of the slab edges.
The easiest solution is to fill these joints with a self-leveling polyurethane joint sealer/filler. Most are 100% solids polyurethane. This means that it will not shrink as it cures. Most are gray and applied with a caulk gun.
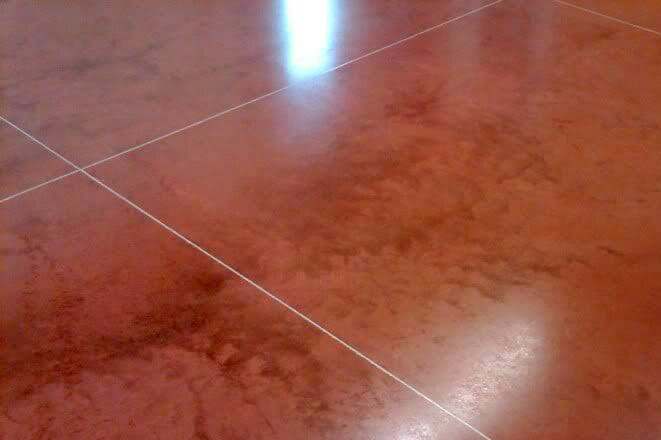
These types of joint fillers are inexpensive and can last for years. They also do an excellent job of sealing the joint from moisture. The material is flexible and feels somewhat spongy under pressure, yet is strong enough to drive vehicles over. Most are not paintable.![]()
We personally like SikaFlex SL for these types of projects. You can find it at your local home improvement centers for less than $20 for a 10-oz. tube.
The best deal is the 29 oz. tube, but you will need to purchase the larger 29oz. caulking gun to use it. If a home improvement center isn’t nearby, you can also find SikaFlex here from Amazon![]() .
.
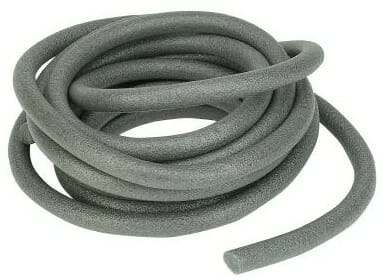
This is a good example of how to fill an expansion joint when using a foam backer rod
Prep of the joint is the same as before; however, do not use sand to fill up an expansion joint. Expansion joints need the material within the joint to be compressible and sand is not.
One exception is if you are applying a thin layer of sand over old fiberboard to prevent sealant from leaking through.
It is also extremely important that the concrete is bone dry before application. If not, it will not adhere well. For expansion joints, it’s important to remove any old filler using a utility knife or grinding wheel.
If the joint is filled with fiberboard or felt, be sure to remove any protruding material from the joint.
If the fiberboard in an expansion joint is missing or deteriorated, you will want to clean out the joint and insert a backer rod before applying the joint sealer. Do not place it more than 1/2″ deep from the surface.
Because these joint fillers are self-leveling, their viscosity is similar to that of honey. As a result, they will seek out any low spots along the joint. So be prepared ahead of time for any areas where the filler may want to run out of the joint.
Once applied, it skins over in an hour or two and completely cures within 3 to 5 days. You need to wait at least 24 hours before driving over a freshly filled joint.
Final points
Sealing and filling your garage floor’s contraction and expansion joints is not difficult. The key is to use the proper sealer or filler, depending on the intended purpose and the type of joint.
Just remember that expansion joints should always be sealed and filled with a flexible joint sealer and never epoxied or coated over. Contraction joints can be filled in the same manner after a coating or sealer is applied, if desired.
If you want a seamless-looking epoxy or garage floor coating, contraction joints must be filled with a specialized epoxy or polyurea joint filler that cures hard and has a higher elongation rate than the coating. This provides the required flexibility to help prevent the garage floor coating from cracking at the joints.
I made the mistake of putting self leveling sealant in between contraction joints before epoxy. How do I remove it now? The space is less that 0.25 inches and may be around 0.25 inch deep or less. If using angle grinder to remove what wheel attachment to use? Can I simply use a wire stripping brush attachment and be done with it?
Hi Pavan. SikaFlex need to be mechanically removed from concrete. You can try a wire stripping brush if you have one. However, the best way would be the use of a crack chasing wheel attached to your grinder. Here are examples of them from Amazon.
Hey there, this site really is a treasure-trove of information!
I have an old concrete patio and car port with very ugly, cracked Contraction joints in it. It looks like it was painted some sort of red paint a long time ago, but that’s mostly worn away now. I want to spruce it up and make it look good with a flat surface I can paint over with something like rust-bullet duragrade and a grip-additive. I bought some Sikaflex SL and backer rod to try filling the joins, but after reading this article I guess that’s not the way to go…
So what I *should* be doing is filling with an epoxy product like those you mentioned, probably using silica sand as a backing? And then I’ll be able to sand or grind it level (love my angle-grinder…) and paint?
Thanks for all the great advice.
Hi David. Yes, a 100% epoxy or polyurea with some flexion is what should be used in the joints if you want to fill them and grind them flush for a seamless look. Our favorite to use is Xtreme-Set 100 by Legacy Industrial. It’s a fast setting 100% solids polyurea. You fill the joints with clean silica sand and then saturate them with the polyurea. You can grind 20 minutes later. We have a review of the product here.
Thanks!
I’ll investigate whether I can get hold of that here in Australia…
Your article states:
“If you want a seamless-looking epoxy or garage floor coating, contraction joints must be filled with a specialized epoxy or polyurea joint filler that cures hard and with a higher elongation rate than the coating. This provides the required flexibility to help prevent the garage floor coating from cracking at the joints.”
Do you address these products? The photos are of seamless floors, most likely having expansion joints around the perimeter. So, I remove the material between the floor and foundation wall, then what should I do using a different product than say the Extreme 100 I used on contraction joints? Thanks for you time.
Hi William. You can’t make the floor seamless from wall to wall if that is what you are asking. You can only fill and coat over contraction joints. This is what is referred to as the “seamless look”. The perimeter joints are expansion joints and must be honored. You don’t coat over them. In the latter half of the article we address using self-leveling joint fillers (such as SikaFlex) to fill expansion joints. This should be performed after the coating has been applied and cured. Does that answer your question?