
Learning how to repair the concrete for your garage floor isn’t as intimidating as it sounds. You may be surprised to learn that many repairs can easily be done by yourself, and for less expense than you think. Typically, three types of repairs are most common for garage floors. These are surface cracks, pitting or spalling, and chips or divots.
If you are applying paint or an epoxy coating system, you will want to ensure your garage floor is repaired properly to make it as blemish-free as possible. This is important if you don’t want cracks or other imperfections to show through.
If you plan on sealing your garage floor, it’s important that you use the correct concrete repair products to prevent moisture intrusion.
Lastly, proper repairs can stop a continuing problem with pitting and spalling. This type of damage can be just as easy to repair as most cracks. It just takes a little more work. So, let’s discuss how to repair concrete cracks and other damage. We will also recommend the proper materials to use and where to purchase them.
Why do garage floors crack?
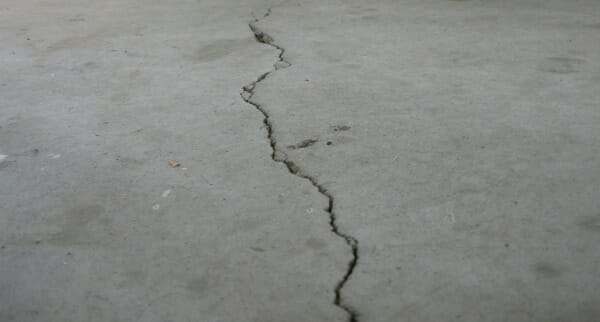
Garage floors crack – period. Concrete is not a ductile material, meaning that it neither stretches nor bends without breaking. However, it does contract and expand with temperature, and as a result, it can crack.
Most garage floors have contraction joints in the slab. These typically are the deep V-shaped troweled grooves or saw-cut joints that you see in the concrete. They appear to divide a typical two-car garage into four separate sections.
These grooves or cuts create a weakened line in the concrete. This line of less resistance encourages cracks to follow along the bottom of the groove or cut instead of wandering across the surface. Though contraction joints work well, the slab can still encounter cracks in other parts of the concrete. This can be due to the settling of the earth underneath the slab, curing issues, or other variables beyond your control.
The good news is that the majority of cracks are cosmetic and not structural. This means that they can be repaired to accept almost any garage flooring.
This post may contain affiliate links. If you use these links to make a purchase, we may earn a small commission. As an Amazon Associate, All Garage Floors earns from qualifying purchases. You can read our full disclaimer here.
How To Repair Cracks in Your Garage Floor
There are a few steps involved when making crack repairs to concrete. They are as follows:
- Chase the crack to remove sharp edges and any loose or weak material
- Clean the inside of the crack with a wire brush if not using a crack-chasing wheel
- Remove all dust and debris with a shop vac
- Apply the recommended crack repair material
- Sand or grind flush once cured
The first thing you need to do when making a crack repair is to chase the crack. This is the process of breaking away or removing any loose or sharp edges of concrete within the crack.
The repair is only as strong as the material it adheres to. If the concrete edge is sharp or weak, it can break under pressure and require further repair.
Crack chasing can be performed with a hammer and cold chisel. If you don’t have a cold chisel, you can easily find them at your local home improvement center or purchase them online here from Amazon. We prefer the ones with the handguard.
Chase the crack by placing your cold chisel at an angle that runs in line with the crack. Firmly tap it with a large hammer or small handheld sledgehammer.
The chisel will break away any loose material as you go. We recommend wearing safety glasses to protect your eyes. Continue in this fashion until you have chased the entire crack.
Use a shop vac to clean out the loose debris and then scrub the crack with a wire brush. This will remove any weak laitance and prep the surface for the repair material. Vacuum out the crack again and you are ready to apply your repair.
Our favorite process that works well for chasing cracks is to use a small 4″ angle grinder with a crack-chasing masonry wheel. The wheel is tapered to form a nice clean groove in the concrete. You can see how it works in the video below.
This is by far the most efficient method for chasing cracks. It preps the concrete for repair better than any other tool we have used.
You can purchase 4″ angle grinders from Harbor Freight for less than $20. The crack-chasing wheel is little more expensive. You can find them here on Amazon.
Be sure to follow the directions carefully for the concrete repair product that you use. Try to calculate how much you will need before you make your purchase. You are better off having too much than not enough. You can always return unopened products.
When using a thicker 2-part epoxy or gel, work it well into the crack to push out any trapped air. Use a putty knife to scrape it somewhat smooth before the material begins to set up. Watch for any low spots that may need additional repair material.
If using the Simpson Strong-Tie or similar product for larger cracks, it works best to fill 3/4 of the crack with silica sand first. Apply the Simpson Strong-Tie over the sand up to the top of the concrete. Allow a couple of minutes for it to soak in and then apply it again to fill in the low spots.
Once you do that, apply more sand loosely over the repair and let it sit for 20 minutes. After it has sat, you can scrape off the top layer with a paint scraper or putty knife.
Once the repair has cured, grind it flush with the concrete to create a smooth transition. This will prevent most repairs from telegraphing through the coating and you will not see them.

Contrary to some information out there, you do not need to chisel cracks to form an inverted or backward-angled cut. This is only required for very large section repairs or replacement of concrete using new concrete or a cement-based patch.
Because concrete does not adhere well to previously cured concrete, the backward-angled cut helps to keep the material from lifting out. Epoxy, polyurethane, and polyurea crack repair products form a tenacious bond to properly prepared concrete and do not need an inverted cut to stay in place.
When repairing deep cracks, it’s best to fill the crack partway with silica sand. This will prevent the repair material from seeping down deep into the concrete and settling. It saves you from using excess material as well as creating low spots that need to be refilled.
Recommended Concrete Crack Repair Materials
When making concrete crack repairs, you should always use an epoxy or polyurea crack repair product that is sandable. They will cure and harden to a strength greater than concrete.
In addition, the bond is stronger and they will prevent water intrusion. Once cured, you can grind or sand the repairs flush with the concrete to accept paint or an epoxy coating.
One example of an epoxy-based crack repair product that we recommend is the Simpson Strong-Tie Crack-Pak at Amazon.
It comes in a 9 oz. cartridge that requires a caulking gun to apply it. The part-A and part-B contents of the epoxy are separated inside the container. The cartridge uses a self-mixing tip that eliminates the step of mixing the 2-parts separately. This makes the application easy.
Price Simpson Strong-Tie Crack-Pak Here
In addition, Simpson Strong-Tie flows very easily. It’s a great choice for repairing spider cracks and cracks less than 1/8″ wide.
For deep cracks or cracks larger than 1/8″ wide, you will want to partially fill the crack with clean play sand or silica sand first when using this product. This will slow the flow of epoxy from going deep into the crack to prevent using more epoxy than necessary.
Another excellent crack repair product that we have experience with is PC-Concrete Epoxy Crack Repair at Amazon.
It is a thicker flowing epoxy that requires using a putty knife to work into the crack. Thicker-flowing products like this work well for larger cracks.
Price PC-Concrete Epoxy Crack Repair Here
In addition, PC-Concrete works well for filling small holes, divots, and chips in the concrete. Like other cartridge epoxy repair products, it comes with a self-mixing tip.
What we like about PC-Concrete is that it fully cures in only 4 hours. This means that you can repair your cracks and grind them flush the same day.
A third product that we can recommend is Rust-Oleum EpoxyShield Concrete Patch. This is a thick 2-part epoxy that requires you to mix the separate Part-A and Part-B materials first. A putty knife works best for application.
When mixing the two components, be careful not to mix too much at any one time. The epoxy does set fairly quickly and you will have a limited time to use it. If all of your repairs are not ready to be filled, you will run out of working time and the epoxy will become stiff and unworkable.
You can generally find it at most home improvement centers or you can purchase it here at Amazon.
If you are repairing numerous cracks that are 1/4″ wide or larger, then your best bet would be a 100% solids epoxy gel crack filler. These are available in 1-gallon kits.
This type of product is an excellent choice for deeper and larger width cracks that span a long length of the garage floor. It’s also a better value if you need to repair numerous cracks. Our favorite is TL-821 by Garage Flooring LLC.
Price TL-821 Gel Epoxy Repair Here
TL-821 is a fast-setting epoxy gel. The key is to make sure that your repair areas are ready. Mix only that which can you use in less than 10 minutes.
It also works well for filling divots, chips, and other imperfections. This includes small pitted areas of concrete or even spalling.
One of the favorites that we reviewed is Xtreme Set 100 by Legacy Industrial. This is a fast-setting 2-part polyurea. It requires that you fill the cracks with sand to the surface and then pour the polyurea filler into the sand.
This was the fastest and easiest of crack and concrete repair products we have used to date. However, it is one of the more expensive as well. You can purchase Xtreme Set 100 here from Legacy Industrial.
We did a complete review of Xtreme Set 100 which you can read here.
Most of the above products mentioned can’t be found at a home improvement center. They are much more prevalent in the professional floor coating industry. As a result, they are commonly purchased online.
Repair Materials Not To Use
Do not use latex-based concrete crack fillers or self-leveling sealants. This is what most home improvement centers carry since they are cheap and easy to use.
The reason not to use them is that they are not sandable, most will not accept paint, and some will shrink over time and pull away from the concrete.
More importantly, they do not repair the crack and make it stronger. They just seal the crack. If you are just looking for a cheap and easy solution to sealing a crack, then they will work.
Do not use cement for repairs or cracks. Cement bonds poorly to cured concrete and will delaminate and lift out of the crack. It also tends to crumble over time within the crack repair.
Repairing Spalled and Pitted Garage Floors
Pitting of a garage floor can be caused by improper finishing of the concrete or a bad mix. Sometimes it is most notable at the edges of contraction joints or where the concrete might meet up with another slab.
However, spalling is generally caused by freeze-thaw cycles in colder climates. It is aggravated even more by deicing salts. Pitting can be a result of this as well.
During cold weather, water can migrate into the surface of the concrete and freeze. The expansion of the water causes microscopic damage to the concrete and after a few years of this, it begins to break up into small dusty pieces and flake or chip away.
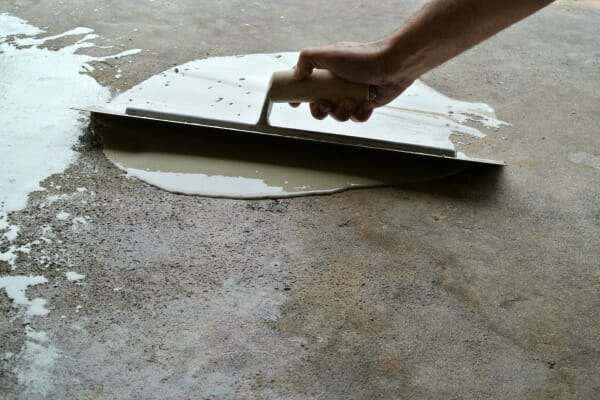
For repair of the floor, you will want to use an epoxy sand slurry or a polymer-modified cement patching mix. Which type you use depends on the extent of the repair. It requires a little more effort than repairing a crack, but it’s not that hard to do.
After the surface has been prepared properly, apply the mix over the pitted areas using a trowel. Some mixes are self-leveling and can be applied with a metal squeegee.
Be sure to feather in smoothly and let it cure according to the instructions. You may need an additional application to fill in any small divots or low spots you missed.
You should end up with a nicely repaired surface that won’t be noticeable once it is painted or epoxied over. We cover this procedure in more detail, including recommended materials, in our article on how to repair spalled or pitted concrete.
There is one thing to be aware of if you are planning on applying a clear coat sealer to your concrete. Any patchwork that you have done will be enhanced by the sealer. However, if you are applying a colored paint or colored epoxy sealer, then you should have the appearance of a smooth concrete slab free of blemishes.
Low Spots and Other Repair Issues
Concrete garage floors are rarely flat. It’s not unusual when cleaning the floor to have small puddles here and there. However, if you have deep low spots on your slab that collect a lot of water, then there are some repair options available.
You can use a self-leveling polymer-modified topping or epoxy slurry to fill in those low spots. Don’t fill in any of your contraction joints. If you do, you can scrape it out later as it starts to harden. Just make sure the product you use is designed for outdoor use.
We suggest reading our article on how to repair low spots on a garage floor.
Sunken slabs are another issue. Unfortunately, these are not a quick fix and can be costly to repair. They can be caused by severe settling of the soil, poorly reinforced slabs, or something worse such as underground water problems.
Mudjacking or polyurethane expanding foam injection are some of the repair options. Sometimes the only alternative is to tear out the old slab, address any soil compaction requirements, and pour new concrete. We recommend calling in a concrete repair expert to assess issues with a sunken slab.
Final Tips
The key to long-lasting and strong garage floor repairs is proper concrete preparation and the use of the correct concrete repair material.
Pay close attention to the instructions. If you have questions about how the repair material should be used, contact the manufacturer. Many have toll-free numbers to talk with tech or customer service to answer questions.
Also, make sure to properly calculate how much material you need. There is nothing more frustrating than running short. It wastes time and can delay your project.
If you can patch a wall before painting, then you have the skills to do the same for your garage floor. You will avoid the more expensive option of having someone do it for you. Plus, you will have a repair that will last years if not the lifetime of the concrete.
Your article has been very helpful for me, since I am trying to repair cracks and prep my garage floor for sealing. But I have a problem that I have not seen addressed in the articles or comments. There is a groove about 4-6″ wide that was cut in the garage floor from driveway into the house for an electric line. This was filled with a rather soft gray material. I would like to fill it in with a layer of material that will allow it to be ground to the level of the floor and sealed. I can scrape the soft material to the needed level but don’t know what material to use to fill it in. All the products you recommend appear to be for smaller cracks, etc. Any suggestions?
Hello Al. It sounds like it was filled with a self-leveling polyurethane sealant. You don’t mention what you want to seal the floor with. If you plan on using a densifier/sealer or a penetrating sealer to protect the concrete, then the polyurethane sealant in the groove is good as is. It’s a sealant as well. Just don’t apply the sealer to the material in the groove. If your goal is to create a hard patch repair over the groove then it will require some elbow grease on your part.
A hard patch requires a stable surface and you don’t have that with the sealant. You will need to dig it all out in order for the repair material to rest on and adhere to a stable surface. You may need to grind the sides of the groove to make sure all the sealant is removed in order for the patch repair to adhere there as well. Once the groove is prepped, you will want to fill it with a polymer-modified cement patching mix designed for repairs greater than 2″ deep. We talk more about them in the bottom of a post here. You usually will not find them at a home improvement center. Instead check with your local concrete construction supply center or do an internet search.
It mixes easily with water and can be troweled smooth. Do not use a regular concrete mix. The polymer-modified cement cures harder than regular concrete, adheres better, and it will not chunk out. Once cured you can grind it nice and flush with surface if you are doing a coating.
Awesome website. Thanks for all the info and for all the replies to comments.
My wife and I just moved in to a new house with a detached garage. The garage is in great shape and just one small crack running down the center of the floor.
However, the fill under the slab is deteriorating around the outside of the garage. Mostly in the outside corners with 3 to four inches of space between the bottom of the slab and the ground. It was recommended that we add new fill so the slab doesn’t start to deteriorate (more). What is the best way to do this? It seems like we need to remove some material to add sand/gravel. Is it dangerous for the integrity of the slab to remove too much? What is the best way to proceed? Thanks!
Hi Chris. It’s hard to say what should be done in your situation without being able to assess the situation properly. It could be a sign that the ground under the slab was not compacted properly. The first thing you should do however is some erosion control. About the only reason the fill would be deteriorating is due to water erosion. Installing rain gutters (if you don’t have them already) and taking action to prevent water from draining away from the edges would be the first step.
One option to fill the void is to build a small form close to the edges for containment and then dry pack the void with something like Quikrete Fast-Setting Concrete Mix. Once you get the dry mix packed in well you will just add water. It’s the same procedure for setting fence posts. Once it has cured you can remove the forms. Keep in mind this fix would only be to prevent any more possible erosion. It is not a structural repair. For structural repair you would need a professional to come out and take a look. Many times these repairs can be expensive and require a process of foam or grout injection.
Is there company that can fix the garage floor cracks for us?
Yes, there are companies that can do that for you. Many are garage floor coating companies. We recommend doing a Google search for garage floor crack repairs using your local city in the search terms.
I have a crack in one corner (1/8″ mostly with some 1/4″ spots where chunks came free) as well as pitting and a couple shallow 6″ divots where I chipped away loose material.
Can I use EpoxyShield Patch and Repair (for local availability) on the pitting and divots? Would the same product also work on the crack, or would a flexible product like Sikaflex Self-Leveling Sealant work better on the crack?
I am also not clear on whether I should etch before doing the repair or etch after the repair. One reviewer on the Home Depot site said he used the Patch and Repair product, then etched, then applied epoxy floor and could see clearly where the repairs were. Mfr said he should have etched before repairing. Any thoughts on the proper order? Will the etch eat away the Sikaflex sealant if that is used on the crack?
The EpoxyShield Concrete Patch and Repair will work just fine. Do not use the SikaFlex for cracks. SikaFlex is a flexible self-leveling sealant, not a patch repair product. It seals only and cannot be sanded, painted, or coated over.
Acid etch the floor first. This will prep the floor for the repairs as well as the coating and reveal any other issues at the same time. The epoxy patch is going to cure extremely hard. Once you do the repairs, you will need to sand (40 to 60 grit) or grind your repairs flush with the floor. This will help prevent the repairs from telegraphing through the coating. Another tip – the more color flake you use, the less you notice irregularities of the floor.
Hi:
I just finished with the diamond grind on the floors and notices a small crack about 8 feet long…but its pretty small. My question is: Do all cracks need to be repaired before I start the basecoat, epoxy, flakes , and seal ?
Will the multiple coats cover it up ?
If it’s just a spider crack Rodney, don’t worry about it. If you can stick a business card in it, then you will need to repair it.
Thanks for the reply.
Last question:
We have a two inch side wall before the baseboards start…does this part need to be grinded also? I didnt grind it because I didnt want to mess up the base board if the grinder got away from me! The concrete on this area has a pretty rough texture to it
No need to grind Rodney. The rough texture will allow the epoxy to adhere and you won’t walk on it anyway. Just be aware that the rough texture will require more epoxy than if it was smoother.
I have a customer who has a porcelain garage floor. The floor is in good shape except the tile was also placed where the garage door comes down to close. Over time, the tile floor has broken from the repeating of the garage closing on that section of tile. The customer would like to remove the tile from this entry area of the garage floor and patch the area across the front of the garage with a product that will look good. Asphalt was used for driveway with a 1 1/2″ step down from the garage entrance. I appreciate your assistance in recommending a product that would look good with this application. Thank you.
Hello Cindy. We recommend removing the front edge of tile approximately 3″ from the back of the garage door and then install a Schulter Reno-Ramp at the front edge of the tile. This will facilitate vehicles being driven up onto the tiled garage floor. It creates a nice finished look to the tile floor as well.
The concrete that the old tile sat on should not be damaged. We recommend sanding or lightly grinding it to remove any leftover thinset and to create a nice smooth look. You can then seal the small area in front of the Reno-Ramp with an acrylic concrete sealer to protect the concrete from water intrusion. Acrylic sealers can be tinted as well to add a translucent colored appearance.
You didn’t mention what kind of garage door your customer has – tilt up or sectional roll-up. Porcelain tile is extremely tough and not easy to damage by a garage door. You may want to check that it is closing correctly and properly sealed at the floor as well. Many times if a porcelain garage floor is damaged at the front near the garage door, it can be from having an abrupt front edge to it that can be sheared from cars driving over it. Hence the Reno-Ramp.
We have a garage slab that has a crack down middle, the entire length. The crack doesn’t seem to be getting bigger over the 23 years we’ve lived here. The size of the crack goes from very thin to up to almost 1″ wide at the widest part. The floor is lower in different areas of the slab at about a maximum of 3/4″ difference in height.
Do you have any products to fill the crack then resurface and re-level the floor? Are there any videos that show how to fix this common problem in garages?
Hello Fixit Man. A crack that wide with an uneven slab is not a common problem with garage floors. It sounds like the earth settled at some point then stabilized, thus creating a sunken slab problem with the large crack. Proper repairs usually require mud jacking or foam injection to first raise the slab and then fill the crack with the proper repair.
You can mask the issue somewhat by filling the larger areas of the crack with a polymer-modified concrete patch. The smaller areas can be filled with polyurethane crack repair product. You can then work on leveling the lower areas with a self-leveling polymer-modified concrete mix. This is not the same stuff that is used for flooring in the home. We have an article you can read here about fixing low spots in your garage.
I live in N OH where Winter really beats the garage floor up
My wife parks our car in the garage and the snow melts off
The water does run down and out under the door but every Spring i have alot if salt on the floor
I have to use a leaf blower to keep it under control
It is causing pitting all over the floor and some flat larger chips
Any recommendations how to best repair this and protect it in the future?
Thank you for your time
Hello Bill. We have an article about repairing pitting and spalling to a garage floor here. You can apply a penetrating sealer after the repairs to prevent further damage. Since the repairs will give the floor a patchy look, you can always apply a nice epoxy coating afterwards as well. Not only will it protect the concrete from winter, it will create a nice looking floor as well.
Very informative article, thanks! We are buying a house with a garage floor that has cracks, and the current owner has been using some kind of black tar like product to try to fill the cracks but it doesn’t look like it’s been working. My question is, when we move in and try to use an epoxy repair product in the crack, will I have a hard time getting it to adhere to the sides, inside the crack itself? I’m assuming the current owner’s “tar” has seeped or been deliberately inserted into the crack so does that mean the epoxy product we’ll be trying to use won’t work because it’s not contacting concrete? It’ll be trying to stick to this black substance, right? Any advice is welcome, thanks in advance.
Hello Jerry. You are correct, the epoxy will not stick to it. If the cracks are not too wide, we recommend using a crack chasing blade to clean up the cracks and expose the concrete. You can then use and epoxy patch repair on the cracks. You can get blades that are up to 7/8″ inch wide.
I need advise. My garage floor is not just full of large wide cracks, one to two inches wide, but holes where concrete has literally come apart from the surrounding structure. I’ve tripped over a few of these areas. The entire floor is bad. The area is maybe 20 by 22. I’m not in financial position to have it entirely ripped out. What can you recommend?
Hello Dave. Unfortunately, when a slab gets that bad there are many things at issue. The only real fix is to save your money and then rip it all out and pour a new one. In the mean time, about the only thing you could do is mix up some inexpensive ready-mix cement and trowel it into the cracks and holes. It will not be structurally sound and will eventually come loose, but it will reduce trip hazards and help to smooth the floor out some.
Need help in Canada,my garage floor is chipping and crumbling away where 16 ft door comes down,salt and road chemicals in winter gather by door and seem to be crumbling floor,is there a budget fix,dont really want to spend $2500 for the boys to cut it and place new concrete,i could do job,but not sure of how to prepare concrete or prepare exsisting floor so it will bond to each other,has to come out at least 6 inches or more would be better,what are my options/ thanks
Hi Robin. You can do a repair with a polymer-modified concrete patch. Polymer-modified concrete is extremely strong,freeze thaw resistant, and will adhere very well to the existing concrete. You need to break out all the loose concrete using a hammer and chisel until you get to a solid footing. Clean it out well and then apply the concrete patch according to directions.
Our garage has thin cracks that have been patched by the previous owner. We have been in the house for almost 3 yrs and it appears to be working well. It is a corse concrete looking material but we have no idea what it is. Is there a way to test it before attempting a thinset or epoxy finish? The floor is stained and ugly and we just want to give it a maintained look. Any recommendations?
Hello Scott. You can take a hammer and/or chisel to it to see if it easily gouges or pops out. If it doesn’t then you should be fine. If you are planning an epoxy coating, you will still need to fill any remaining cracks with a proper filler.
I have a concrete floor in my new garage, and when the contractor machine troweled the floor there were several small leaves that the troweled over. The result left the imprint of the leaves in the concrete. Since I use the shop to restore cars I planned to seal the surface to prevent staining from oil. How would I repair the indents left from the leaves before I seal the floor?
Hello Craig. The repair can depend on what type of sealer you will be putting down on the floor. If you are applying a penetrating sealer the repair is going to stand out regardless, so you may want to consider leaving it as is. If you do fill the indents, your best bet would be a polymer modified cement patch in order to try and maintain some semblance of a natural looking repair. If you are going with colored coating such as epoxy, then the repair will not stand out. For something like that, we recommend an epoxy patch mixed with silicate sand as a filler.
I live in Toronto so have a freezing/thawing and road salt environment to think about. My situation is that I have a 2-car garage floor with some spalling and a low puddling zone that measures about 6’x2′. I was hoping to level the floor, fill the spalling, then cover with an epoxy finish. Can you tell me the order of operations I need to follow, as well as recommend compatible products that will do the sequence of jobs?
Hello G. All the loose concrete from the spalling needs to be removed first. Pounding a large hammer on top of the surface will reveal any loose areas. It will have a more hollow sound. Use the hammer or hammer and chisel to break it away. You will then need to acid etch or grind the surface to provide for the proper profile. We recommend filling the low spot and any other spalling with an epoxy sand mix like the one we mention in this article. After that, your floor should be ready for an epoxy coating.
I’m just getting ready to epoxy my new garage floor (poured in march 2016) and there is one hairline crack going diagonally across part of the floor. I’m concerned that if I repair it now, without the floor going through a full seasonal cycle (we have big swings from summer to winter), I’ll end up with more crack next year and an epoxy floor that needs repair. How do you recommend dealing with that?
Hi Matt. If you want to repair it now, your best bet is to use an epoxy gel crack filler. You can see an example here. This type of crack filler bonds hard, but unlike regular epoxy, it has flex that will allow some movement in the slab. If slabs in your area are known for cracks growing during a full seasonal cycle, it would be best to wait it out and make your repairs then.
The home we moved in to last Sept. has a cracked garage floor. It appears to have settled across the entire 30′ width of the back-end, about 1-foot inside the back wall. It’s on a floating slab, I believe? On the worst side, the crack has sunken and pulled away about 1.5″ from the main slab, and shows outside as well as inside. On the other side of the garage, the crack is barely visible on the floor. This pretty large crack was present when we moved in 9 months ago. It’s an extra long, detached 3-car garage constructed on a gravel base, built-up on a sloping gravel driveway. The backend was leveled by raising it 1-2 feet.
We were told we needed a 30′ concrete retaining wall behind the garage in addition to the floor repair. My question is whether or not this sounds necessary & reasonable? The garage is ~10 years old and otherwise in pretty good shape. We are somewhat out in the sticks and have had only this one concrete contractor agree to look at it.
Thanks!
-Sam
Hello Sam. A crack that is 1.5″ in width, in addition with the slab sinking, is not good at all. This tells us there is serious ground movement going on and involves something more than just a poorly compacted base for the floor. While it may take some time based on your location, we seriously recommend getting three different contractors out to your home to assess the problem and explain to you in details that you understand, why the slab did what it did, what needs to be done, and why. You will get a much clearer picture this way and a better idea of what it will cost to fix and prevent from happening again.
Thank you Shea for your quick response.
I did get a second quote. This gentleman felt that part of the problem was the fact that no rebar was used. A west-facing sloping bank of dirt and gravel against the back of the garage likely led to large temperature differential inside vs outside and uneven heaving and thawing. Water running down the sloping driveway toward the garage may have may have made things worse. The combination of these factors being the source of the problem. His plan is to cut out the damaged concrete back to the good area. He will drill holes and insert rebar into the sound floor area and then tie-in the new pour across the back using that rebar. It sounds reasonable to me but I’m not sure that it would prevent any reoccurrence, say cracking further in toward center of the garage, beyond the rebar. He says there is a foundation and that it looks good. I’ve chosen to go with this rebar approach. I hope I can make a good report in 10 days or so. Thanks for the forum!
Hi! Thanks for your great article. I’m about to etch my 1 car garage floor, in prep to apply a Behr 1 part Epoxy paint. But before I do that, want to fix a small crack, < 1/4" wide, that runs about 3ft, at the back of the garage. Also have some salt-caused spalling (we're in Springfield, MA where there's usually quite abit of winter ice & snow), and some low spots where water tends to pool. My question is: what order should I do these things? I'm thinking:
repair crack 1st; repair spalling 2nd; level/fill-in low spots 3rd; etch floor 4th, neutralize & rinse floor 5th, allow it to dry thoroughly (6th), then paint floor 7th. Correct?
Your close Steve. Etch the floor first, then do everything else in the order you have. Etching first will prep the concrete for the repairs that you have to make.
THANKS Shea!
Have a great 4th of July 2016 !
Hi.
Does anybody have experience with Rapid Set’s NewCrete product? I am considering it as an alternative to Ardex’s CD Fine because its cheaper and easier to find. Can you recommend it?
Thanks.
Hello Avi. We haven’t used in much in the past, but we have heard good things about it. Ardex is not the only manufacturer of quality polymer-modified cement.
Great article! I have a question about chasing cracks prior to repairing them. I have several minor cracks that run the length of my garage floor. I am looking at using an angle grinder to chase the cracks however, I am not sure if this is required. The article states the first thing that needs to be done is to chase the crack. Later in the article it states ” Contrary to some information out there, you do not need to chisel cracks to form an inverted or backward-angled cut. This is only required of large repairs that are made using concrete or a cement based patch.”
If chasing the crack is required, do I back fill with silica sand when using a product such as Simpson Strong-Tie?
Thank you. I appreciate your help.
It’s always a good idea to chase cracks Steve. It eliminates the weak edges at the crack in order for the repair material to form a solid and strong bond. You should be able to purchase a crack chasing wheel fairly inexpensively if you don’t have one already. The silica sand is recommended for cracks that are deep and wider than a couple business cards. Some crack repair materials such as Simpson Strong-Tie are of a low viscosity compared to other epoxy products and can seep deep into the crack. This isn’t necessarily a bad thing, but it requires more material and a second application after it settles while curing.
Our home in Iowa was built in 1941. The single car, attached garage floor has begun to slope just enough that water (rain; melting snow) end up flowing to an area, about 6 feet long, in the garage’s SE corner. When we noticed some moderate surface damage on the concrete block on the interior stairway to the basement, we new where it was coming from. But how concerned should we be? What should we do? A handyman lightly caulked the joint where wall/floor meet; but that hasn’t really solved the problem as the interior surface damage continues. I hate the prospect of tearing up the
garage floor to gain a level floor, but I am worried about the interior wall deteriorating. Your thoughts would be appreciated!
Hello Elle. Is your question how to stop water from coming through the concrete block and collecting on the garage floor? Is so, the first thing to do when you start to develop a moisture issue that you had not had in the past is to determine what has changed that is causing the moisture intrusion. Look to see if the drainage has changed around that area. Is water collecting against the foundation and not draining away from it? Are your rain gutters (assuming you have them) working properly? It’s hard to evaluate what the problem is exactly according to your description, but we would recommend starting there. For vertical surfaces, sometimes a basement sealer such as RadonSeal can help with preventing moisture intrusion.
Hi,
I have hairline crack in my garage. Really thin cracks that are barely visible unless I observer closely. Do I need to repair those before applying epoxy. The crack are really thin, so it is going to be difficult to fill it. Please advise.
Thanks,
Gaurav
Hairline cracks that thin generally do not require treatment Gaurav.
I am using “Valspar 2-Part Gray Semi-Gloss Garage Floor Epoxy Kit (Actual Net Contents: 120-fl oz)” that I purchased from Lowes. I purchased 3 kits for my 2.5 car garage. I etched the garage floor and sprayed it down really well. It was after that, that I noticed some cracking in my garage floor. I decided that I needed to bust it up before it cracked on my finished product. My question is, what should I fill it with and how long should I wait before proceeding? The hole is about 8 inches long, 2 inches wide, and the deepest it goes is about 2 inches. I was told not to use an epoxy that I should use straight up concrete. Is that correct? If so, what is the cure time before I can proceed with the Valspar epoxy kit. I can’t find this information anywhere!
I am lost on where I go from here. Should I be concerned about the tire burn marks because some of those spots are relatively smooth? Can I do a section of the garage while I wait for the hole to be cured?
Any help is greatly appreciated!!
Do not use regular concrete Joe. It will shrink, crack, and pull out. You need to use a polymer-modified concrete patch repair mix. It is stronger than concrete, it will not shrink, it will adhere much better, and you can apply the epoxy over it after 24 hours. Sakrete Fast Setting Cement Patch is one such product which you can find it at your local home improvement centers. It can do repairs up to 2″ deep.
If you have contraction joints that will divide up the garage floor evenly, then you can do your floor in sections using the joints as borders. Do not coat to one spot and then come back later. The overlap will stand out and not look good. This is why you always keep a wet edge when applying epoxy. What do you mean when you mention tire burn marks?
The tire hot spots. Those areas where the tires were from a parked car. Those spots are fairly smooth from the hot tires resting on there.
Thanks for your help!
If these spots absorb water easily and do not bead up then you should be OK. If the water just sits there or beads, then you will need to etch these spots better or grind them. A coating will not adhere if it cannot penetrate the concrete.
I have put epoxy paint in my garage floor. First coat only. Can I use a polymer patch on top of the paint to cover the small holes on the floor. Please give advise. Many thanks.
No you can Zahir. You will need to remove the paint first in order to expose the bare concrete. A patch will not adhere to paint.
My etching went great thanks to your advice here. My next task was to repair the cracks in the floor. I was able to find 2 part epoxy locally so today I got out my grinder to chase the crack like your video shows. There is a sheet of plastic about 1/16″ thick running the entire crack cross section from a support beam that I can only imagine is what they put in to make a expansion joint prior to pouring the concrete. The plastic comes up to floor level and I’m worried it will interfere with the epoxy when applied. The crack for the most part is about 1/8″ wide and I chased it easily with a .045″ masonry blade. The next largest masonry blade I could find is 1/4′ should I chase it out to that and grind down the plastic or leave the crack like it is with the plastic in place. Also I could not find silica sand locally, would regular sand work? Thank you for your help!!
As long as the sand is clean Ruben, it should work OK. This plastic you are talking about – does it run the length of the crack? Or is this a joint with plastic in it?
It runs the length of the cracks. All four directions (cross) from the support beam to the foundation on all sides.
OK, that makes sense then. These are not actually concrete cracks that need repair Ruben. They are a form of contraction joint that uses a metal key joint. It allows concrete to run under the joint. Here is a link to a picture of what they typically look like before installed. The plastic is a protective strip that runs on top of the metal joint. Most likely, the plastic strip is just under the surface and was covered by the finishing process. Concrete likes to crack as it cures and this type of joint encourages cracking at the joint instead of across the slab at an ugly and uncontrollable angle. As a result, a crack has formed over each of the joints. Usually a removable rubber strip is used to form a rounded joint and the cracks form at the bottom of the joint. This picture demonstrates that.
You can still fill the joints, but you need to be careful not to damage the plastic strip too much. A regular 2-part epoxy will not work though. You need a special epoxy or polyurethane joint filler that is flexible since concrete expands and contracts along the top of these joints creating movement. That is why the finishing work over the top has cracks. Regular epoxy is not flexible at all and will also crack over a contraction joint. I suggest you read this article on how to fill contraction joints. It will give you a better idea of the type of material to use and what contraction joints do. It also explains the difference between contraction joints and expansion joints.
Yes I knew they were expansion joints just didn’t know why they used plastic in them. Now it makes sense. My main concern is this will be a commercial kitchen (I’m a caterer) and I want to make it where no dirt can intrude/fill the crack and my health inspector have issues with it. I’m also prepping to paint with Sherwin Williams 8100 epoxy concrete paint and wanted to make sure something would stick to it. Thank you for your help!!