
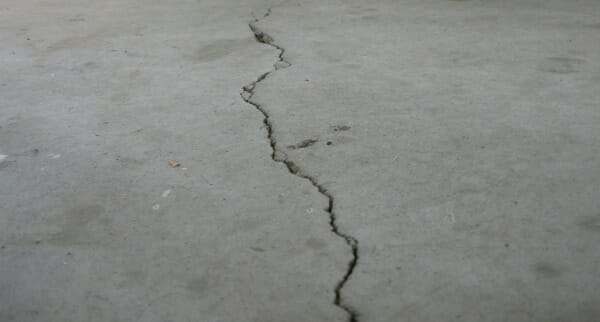
Learning how to repair the concrete for your garage floor isn’t as intimidating as it sounds. You may be surprised to learn that many repairs can easily be done by yourself, and for less expense than you think. Typically, three types of repairs are most common for garage floors. These are surface cracks, pitting or spalling, and chips or divots.
If you are applying paint or an epoxy coating system, you will want to ensure your garage floor is repaired properly to make it as blemish-free as possible. This is important if you don’t want cracks or other imperfections to show through.
If you plan on sealing your garage floor, it’s important that you use the correct concrete repair products to prevent moisture intrusion.
Lastly, proper repairs can stop a continuing problem with pitting and spalling. This type of damage can be just as easy to repair as most cracks. It just takes a little more work. So, let’s discuss how to repair concrete cracks and other damage. We will also recommend the proper materials to use and where to purchase them.
Why do garage floors crack?
Garage floors crack – period. Concrete is not a ductile material, meaning that it neither stretches nor bends without breaking. However, it does contract and expand with temperature, and as a result, it can crack.
Most garage floors have contraction joints in the slab. These typically are the deep V-shaped troweled grooves or saw-cut joints that you see in the concrete. They appear to divide a typical two-car garage into four separate sections.
These grooves or cuts create a weakened line in the concrete. This line of less resistance encourages cracks to follow along the bottom of the groove or cut instead of wandering across the surface. Though contraction joints work well, the slab can still encounter cracks in other parts of the concrete. This can be due to the settling of the earth underneath the slab, curing issues, or other variables beyond your control.
The good news is that the majority of cracks are cosmetic and not structural. This means that they can be repaired to accept almost any garage flooring.
This post may contain affiliate links. If you use these links to make a purchase, we may earn a small commission. As an Amazon Associate, All Garage Floors earns from qualifying purchases. You can read our full disclaimer here.
How To Repair Cracks in Your Garage Floor
There are a few steps involved when making crack repairs to concrete. They are as follows:
- Chase the crack to remove sharp edges and any loose or weak material
- Clean the inside of the crack with a wire brush if not using a crack-chasing wheel
- Remove all dust and debris with a shop vac
- Apply the recommended crack repair material
- Sand or grind flush once cured
The first thing you need to do when making a crack repair is to chase the crack. This is the process of breaking away or removing any loose or sharp edges of concrete within the crack.
The repair is only as strong as the material it adheres to. If the concrete edge is sharp or weak, it can break under pressure and require further repair.
Crack chasing can be performed with a hammer and cold chisel. If you don’t have a cold chisel, you can easily find them at your local home improvement center or purchase them online here from Amazon. We prefer the ones with the handguard.
Chase the crack by placing your cold chisel at an angle that runs in line with the crack. Firmly tap it with a large hammer or small handheld sledgehammer.
The chisel will break away any loose material as you go. We recommend wearing safety glasses to protect your eyes. Continue in this fashion until you have chased the entire crack.
Use a shop vac to clean out the loose debris and then scrub the crack with a wire brush. This will remove any weak laitance and prep the surface for the repair material. Vacuum out the crack again and you are ready to apply your repair.
Our favorite process that works well for chasing cracks is to use a small 4″ angle grinder with a crack-chasing masonry wheel. The wheel is tapered to form a nice clean groove in the concrete. You can see how it works in the video below.
This is by far the most efficient method for chasing cracks. It preps the concrete for repair better than any other tool we have used.
You can purchase 4″ angle grinders from Harbor Freight for less than $20. The crack-chasing wheel is little more expensive. You can find them here on Amazon.
Be sure to follow the directions carefully for the concrete repair product that you use. Try to calculate how much you will need before you make your purchase. You are better off having too much than not enough. You can always return unopened products.
When using a thicker 2-part epoxy or gel, work it well into the crack to push out any trapped air. Use a putty knife to scrape it somewhat smooth before the material begins to set up. Watch for any low spots that may need additional repair material.
If using the Simpson Strong-Tie or similar product for larger cracks, it works best to fill 3/4 of the crack with silica sand first. Apply the Simpson Strong-Tie over the sand up to the top of the concrete. Allow a couple of minutes for it to soak in and then apply it again to fill in the low spots.
Once you do that, apply more sand loosely over the repair and let it sit for 20 minutes. After it has sat, you can scrape off the top layer with a paint scraper or putty knife.
Once the repair has cured, grind it flush with the concrete to create a smooth transition. This will prevent most repairs from telegraphing through the coating and you will not see them.

Contrary to some information out there, you do not need to chisel cracks to form an inverted or backward-angled cut. This is only required for very large section repairs or replacement of concrete using new concrete or a cement-based patch.
Because concrete does not adhere well to previously cured concrete, the backward-angled cut helps to keep the material from lifting out. Epoxy, polyurethane, and polyurea crack repair products form a tenacious bond to properly prepared concrete and do not need an inverted cut to stay in place.
When repairing deep cracks, it’s best to fill the crack partway with silica sand. This will prevent the repair material from seeping down deep into the concrete and settling. It saves you from using excess material as well as creating low spots that need to be refilled.
Recommended Concrete Crack Repair Materials
When making concrete crack repairs, you should always use an epoxy or polyurea crack repair product that is sandable. They will cure and harden to a strength greater than concrete.
In addition, the bond is stronger and they will prevent water intrusion. Once cured, you can grind or sand the repairs flush with the concrete to accept paint or an epoxy coating.
One example of an epoxy-based crack repair product that we recommend is the Simpson Strong-Tie Crack-Pak at Amazon.
It comes in a 9 oz. cartridge that requires a caulking gun to apply it. The part-A and part-B contents of the epoxy are separated inside the container. The cartridge uses a self-mixing tip that eliminates the step of mixing the 2-parts separately. This makes the application easy.
Price Simpson Strong-Tie Crack-Pak Here
In addition, Simpson Strong-Tie flows very easily. It’s a great choice for repairing spider cracks and cracks less than 1/8″ wide.
For deep cracks or cracks larger than 1/8″ wide, you will want to partially fill the crack with clean play sand or silica sand first when using this product. This will slow the flow of epoxy from going deep into the crack to prevent using more epoxy than necessary.
Another excellent crack repair product that we have experience with is PC-Concrete Epoxy Crack Repair at Amazon.
It is a thicker flowing epoxy that requires using a putty knife to work into the crack. Thicker-flowing products like this work well for larger cracks.
Price PC-Concrete Epoxy Crack Repair Here
In addition, PC-Concrete works well for filling small holes, divots, and chips in the concrete. Like other cartridge epoxy repair products, it comes with a self-mixing tip.
What we like about PC-Concrete is that it fully cures in only 4 hours. This means that you can repair your cracks and grind them flush the same day.
A third product that we can recommend is Rust-Oleum EpoxyShield Concrete Patch. This is a thick 2-part epoxy that requires you to mix the separate Part-A and Part-B materials first. A putty knife works best for application.
When mixing the two components, be careful not to mix too much at any one time. The epoxy does set fairly quickly and you will have a limited time to use it. If all of your repairs are not ready to be filled, you will run out of working time and the epoxy will become stiff and unworkable.
You can generally find it at most home improvement centers or you can purchase it here at Amazon.
If you are repairing numerous cracks that are 1/4″ wide or larger, then your best bet would be a 100% solids epoxy gel crack filler. These are available in 1-gallon kits.
This type of product is an excellent choice for deeper and larger width cracks that span a long length of the garage floor. It’s also a better value if you need to repair numerous cracks. Our favorite is TL-821 by Garage Flooring LLC.
Price TL-821 Gel Epoxy Repair Here
TL-821 is a fast-setting epoxy gel. The key is to make sure that your repair areas are ready. Mix only that which can you use in less than 10 minutes.
It also works well for filling divots, chips, and other imperfections. This includes small pitted areas of concrete or even spalling.
One of the favorites that we reviewed is Xtreme Set 100 by Legacy Industrial. This is a fast-setting 2-part polyurea. It requires that you fill the cracks with sand to the surface and then pour the polyurea filler into the sand.
This was the fastest and easiest of crack and concrete repair products we have used to date. However, it is one of the more expensive as well. You can purchase Xtreme Set 100 here from Legacy Industrial.
We did a complete review of Xtreme Set 100 which you can read here.
Most of the above products mentioned can’t be found at a home improvement center. They are much more prevalent in the professional floor coating industry. As a result, they are commonly purchased online.
Repair Materials Not To Use
Do not use latex-based concrete crack fillers or self-leveling sealants. This is what most home improvement centers carry since they are cheap and easy to use.
The reason not to use them is that they are not sandable, most will not accept paint, and some will shrink over time and pull away from the concrete.
More importantly, they do not repair the crack and make it stronger. They just seal the crack. If you are just looking for a cheap and easy solution to sealing a crack, then they will work.
Do not use cement for repairs or cracks. Cement bonds poorly to cured concrete and will delaminate and lift out of the crack. It also tends to crumble over time within the crack repair.
Repairing Spalled and Pitted Garage Floors
Pitting of a garage floor can be caused by improper finishing of the concrete or a bad mix. Sometimes it is most notable at the edges of contraction joints or where the concrete might meet up with another slab.
However, spalling is generally caused by freeze-thaw cycles in colder climates. It is aggravated even more by deicing salts. Pitting can be a result of this as well.
During cold weather, water can migrate into the surface of the concrete and freeze. The expansion of the water causes microscopic damage to the concrete and after a few years of this, it begins to break up into small dusty pieces and flake or chip away.
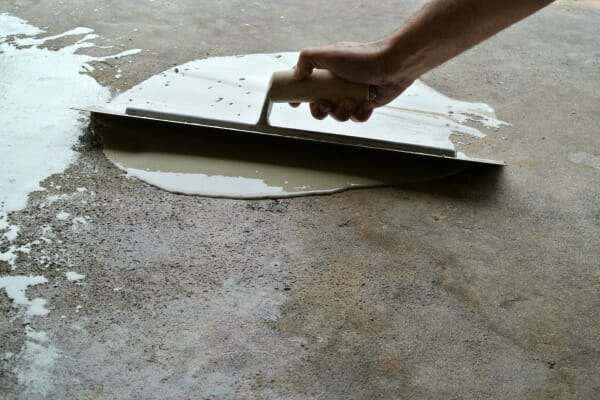
For repair of the floor, you will want to use an epoxy sand slurry or a polymer-modified cement patching mix. Which type you use depends on the extent of the repair. It requires a little more effort than repairing a crack, but it’s not that hard to do.
After the surface has been prepared properly, apply the mix over the pitted areas using a trowel. Some mixes are self-leveling and can be applied with a metal squeegee.
Be sure to feather in smoothly and let it cure according to the instructions. You may need an additional application to fill in any small divots or low spots you missed.
You should end up with a nicely repaired surface that won’t be noticeable once it is painted or epoxied over. We cover this procedure in more detail, including recommended materials, in our article on how to repair spalled or pitted concrete.
There is one thing to be aware of if you are planning on applying a clear coat sealer to your concrete. Any patchwork that you have done will be enhanced by the sealer. However, if you are applying a colored paint or colored epoxy sealer, then you should have the appearance of a smooth concrete slab free of blemishes.
Low Spots and Other Repair Issues
Concrete garage floors are rarely flat. It’s not unusual when cleaning the floor to have small puddles here and there. However, if you have deep low spots on your slab that collect a lot of water, then there are some repair options available.
You can use a self-leveling polymer-modified topping or epoxy slurry to fill in those low spots. Don’t fill in any of your contraction joints. If you do, you can scrape it out later as it starts to harden. Just make sure the product you use is designed for outdoor use.
We suggest reading our article on how to repair low spots on a garage floor.
Sunken slabs are another issue. Unfortunately, these are not a quick fix and can be costly to repair. They can be caused by severe settling of the soil, poorly reinforced slabs, or something worse such as underground water problems.
Mudjacking or polyurethane expanding foam injection are some of the repair options. Sometimes the only alternative is to tear out the old slab, address any soil compaction requirements, and pour new concrete. We recommend calling in a concrete repair expert to assess issues with a sunken slab.
Final Tips
The key to long-lasting and strong garage floor repairs is proper concrete preparation and the use of the correct concrete repair material.
Pay close attention to the instructions. If you have questions about how the repair material should be used, contact the manufacturer. Many have toll-free numbers to talk with tech or customer service to answer questions.
Also, make sure to properly calculate how much material you need. There is nothing more frustrating than running short. It wastes time and can delay your project.
If you can patch a wall before painting, then you have the skills to do the same for your garage floor. You will avoid the more expensive option of having someone do it for you. Plus, you will have a repair that will last years if not the lifetime of the concrete.
Thank you for the great advice. I saved a bunch of money .
Thanks for stopping by Darryl. We are glad we could help!
Hi, I am really concerned and maybe you can help me. I bought a house that has some cracks in the garage floor , the inspector told me it was not a problem, in fact inside the house there isn’t any crack , but now I heard that it could be a foundation problem. Yesterday I couldn’t even sleep just thinking about that, I can post some pictures later for you to give me your opinion. Thanks in advance
Hello Sonia, thanks for the question and we are sorry for your worries. It’s more common than you may think to have some cracks in the garage and not the house. Slabs in most garages are poured separately than the one for the house. Inspector’s are trained for things like this, but if you are still worried we recommend that you contact a licensed contractor in your area that specializes in foundations and have them give you a second opinion.
My 30 year old garage floor (540 sq. ft.) has a single crack down the middle and spalling where the cars have brought in water and salt in winter. I’m considering a PolyUrea coating as a DIY project. There is quite a bit of spalling and areas where the otherwise smooth surface becomes very rough ( probably spalling but to a lesser degree) that will need to be repaired first.
Just to make sure: Are “polymer-modified cement topping or patching mixes” different from “latex based or silicone concrete fillers and sealers.” Put another way: will the Polymer products be ok under a PolyUrea coating?
Also…will the patched areas need to be opened up with a diamond grinder or etching after they are repaired?
Steps I am considering are:
1. Clean/Degrease (minor spot or two) with soap, water and pressure wash.
2. Patch/repair cracks and spalling.
3. Diamond Grind – floor failed the water test – -I can rent an Edco machine.
4. Clean up dust with acetone.
5. Apply Poly Urea product.
Do this sequence make sense?
Also, could you name some companies that provide DIY PolyUrea products. I have one in mind, but would like to do some comparison shopping. I understand you might be limited in what you can say in this regard, but even the companies you’re aware of would be helpful to me.
Thanks
Tim
Hello Tim and thanks for the visit. The polymer-modified mixes are what you want. They work well for a coating of any type, polyurea included. Another option if the spalling isn’t too deep is to use a 100% epoxy fortified with some silica sand. It’s self leveling and easy to spread out.
The order of your steps is fine. It’s a good idea to lightly grind the polymer patch mix (same for epoxy patch) to insure a good profile and to make sure you have a smooth transition from the patch to existing concrete as well. That way the patch won’t telegraph through if you are not applying color flakes to full refusal. Acid etching will not work well with a polymer mix.
There are not as many companies that offer DIY polyurea or polyaspartic coating kits because they require some skill due to the faster working time required. Make sure you have a helper. Versatile Building Products, RockSolid Floors, and Garage Flooring LLC, all have DIY kits as an example.
Thanks Shea. Your website sets the standard for explaining what it takes to repair and manage garage floors. I wish there were similar sites available for other home projects.
Our 1960s era garage is attached to our 1920s era home. We are not handy people, although we can “patch a wall before painting.” But Tim’s questions above just plain scared me. 🙂 The garage floor probably needs to be replaced, but we would like to use this one a little longer if we can. It gets very wet in rainy and snowy weather, is definitely pitted and flaking in places, and has a significant crack across the entire width of the floor. It doesn’t appear deep, but with the associated pitting and flaking it is 1/2 inch across in parts. The water may be coming through a fault in the foundation of the garage. Is this something two 60-somethings without a lot of experience should tackle? We are looking for a fix that would last 3 or so years.
Hello Merry. It sounds like for being 40 years newer, your garage floor hasn’t fared as well as your home. From your description the floor has some serious moisture issues and may need extensive repair if not replacement. You should really have a licensed contractor inspect it to be sure.
What you can do however is cover your floor with interlocking tile. It will allow air to circulate underneath to dry the concrete when it gets wet and the moisture won’t transmit to the surface of the tile which will allow for a dry tile surface. The tile will span the cracks you mention and follow the contours of the concrete making your floor look like new. They can be reused for a new garage floor later down the road and should be easy enough for two 60-somethings to install.
Thanks so much, Shea. I wasn’t aware of this option, and will definitely look into it.
Thanks for the advice. I have 2 cracks causing 2 low spots in my detached garage right by the overhead door, leaving gaps under the door on both sides allowing rain and snow into the garage where it pools. I’m wondering if the self-leveling polymer modified topping would be the right material for this repair. Also, could you describe this topping mix a little more? I am having trouble finding it. Thanks!
Hello Dan, thanks for visiting our site. Your cracks should be repaired first with a good crack repair material as is explained in the article above. After the cracks are filled, you can address your low spots with a patching mix. Here is an article explaining some of the differences of polymer modified mixes along with some product samples. Having cracks where you have low spots may also be a sign of part of your slab sinking. If it continues after you patch it, you may want to have a contractor take a look at it.
I had a large crack about an inch wide and 1 1/2 inches deep repaired with epoxy by a water proofing specialist. One side of the crack was an inch higher than the other and it ran across the full width of my two-car garage. The floor was then painted. Both a contractor and an engineer looked at it and assured me my house is stable. I then had the floor painted, but the uneven floor on either side of the repaired crack was unattractive. Therefore, last week I hired a handyman to apply a concrete topping around the crack to improve the appearance. The result is he removed the epoxy from the crack and filled it with an inexpensive sand/concrete mix which is already cracking. The area around the crack looks more level; however, I now have an unsightly area of very rough concrete. How should all of this be removed? How should it be repaired to hide both the crack and the unevenness?
Hello Ellis. You would have to hire a concrete contractor to do a lot of grinding to try and level out a crack like that and even then they may say it’s not feasible. It sounds like one side of the slab settled, thus creating the 1″ height difference. Where your handyman went wrong was using an inexpensive ready-mix type of concrete topping. It’s much weaker than the surrounding concrete and does not adhere well to cured concrete and has a rough finish as you say. You need to use a polymer-modified concrete patching mix such as the examples on this page or you can find a video and example of another product here. This will allow you to build a softer transitional ramp to the higher part of the crack, allow you to trowel it smooth, and make for a patch that is less noticeable to the eye.
Garage repairs always seem to be expensive! But you suggested the easy and cheapest method of repair. Polymer-modified cement is good option to repair. Thanks for sharing this cheap and quick method.
We just moved into a brand new home that we had built. The inspector wrote the garage floor as substandard. There are little blisters popping up out of the concrete all over the three car garage floor. The home builder has said that they will rip out the garage floor and pour a new one or have a local epoxy company come and grind the floor down and apply an epoxy type surface.
I’m torn on what to do. Will ripping out the floor with jackhammers cause damage to my house foundation or HVAC/water heater which is right there? Also I’ve heard there will be large joints in between the new garage floor and wall.
If I go the epoxy route, will these blisters pop up down the road and will grinding it solve the problem?
Thank You
Hello Mike, we’re sorry for your dilemma! There are many things that can cause blisters and it usually has to do with the surface sealing prematurely causing air or bleed water to get trapped under the surface. This can be caused from wind blowing over the surface causing excessive evaporation, to the use of accelerators for a cold day, or to just poor finishing. The entrapped air then makes its way to the surface causing the blister. Generally the slab is structurally sound, but the surface looks bad.
I would first check with the inspector to insure that the slab is structurally sound. If so, ask the home builder if the local epoxy company is going to grind out and patch the blisters first before grinding the rest of the surface for epoxy. Also make sure they would apply a good quality system. You can read more about epoxy systems here. If the slab is sound, the epoxy system is good, and the home builder will guarantee the work for no more blisters, then I think that you will end up with a nice floor for your troubles.
If any of the above questions are “no”, then I would have them tear out the slab and pour a new one. Garage slabs are separate from the foundation and removing it should not affect the home. The joints between the walls are contraction joints and they need to be there. They are not that wide however and really aren’t that noticeable.
I hope we have helped and good luck with your decision.
Hi there,
We are purchasing a 66-year-old home that has a pretty damaged garage floor. There are many cracks that are lifted about 2 inches up. Can this be grounded down, then patched?
My concern with repaving the floor is of course cost, but also I worry that the floor will crack again quickly due to the soil on our property.
Do you have any recommendations? Thank you.
Thanks for the visit. Unfortunately a floor such as yours is usually beyond repair. Garage slabs are generally 4″ thick to begin with and grinding it down will not only expose the aggregate underneath, it would weaken the floor considerably. Soil, roots, or some other factor (water) has created your problem and should be dealt with or it will only happen again. We are sorry to say, but more than likely your only option would be to tear the old slab out, correct the soil issues, then pour a new slab.
This site was… how do you say it? Relevant!! Finally I’ve
found something which helped me. Thanks a lot!
We have a basement floor that has been painted. We would like to fill the joint cracks and lay vinyl. What product should I use to fill cracks on a painted floor?
Hello Tamara. Vinyl on concrete has a tendency of telegraphing irregularities in the concrete through the tile, such as a slightly raised ridge from contraction joints or an uneven crack. Because of this you want all joints or cracks to be flush with the floor. You stated “joint cracks” so I’m not sure if you have contraction joints that you want to fill or just cracks. For laying vinyl, if you have cracks that are less than 1/8″ of an inch you can use a blended latex product such as this product from Quikrete. If they are larger than 1/8″ of an inch you want to be able to sand or grind the surface of the crack or joint smooth after you fill it. For that you would want something that you can sand or grind like this product from Rust-Oleum. It doesn’t have to be these exact products, just something similar.
Where can i buy self leving polymer-modified toppingto fill in low spots?
Hello Ed. You need a product that will allow you to feather the edges when trying to fill in low spots. I would call these two companies to see what you need based on your requirements. They may have a distributor in your area or they can ship it to you. This product is excellent for filling in low spots https://www.mg-krete.com/ and these guys have a great product as well https://buyrhino.com/.
Just cleaned out my detached garage and noticed about a 15′ section on the right side where the wall is “floating” and lifted right off the slab. Some of the floor boards near the separation are starting to crack and I had to shim the side access door because the sill was swaying free. I am guessing this does not look good for the long term of my garage. In the short term is it structurally safe to even store our vehicles in? By eyeball only I do not notice any major leaning/sagging anywhere.
Wow, sorry to hear that Dan. It sounds like your slab has sunk on one side of the garage. As long as your garage is not build on top of a hillside that can move or you live in an area with sink holes then you shouldn’t have a problem keeping your vehicles in there. Your garage is not going to topple over from a sunken slab. We do recommend that you have a contractor come out to put some real “eyeballs” on the situation to make sure you don’t have any safety issues however.
My husband and I purchased a model home in a short sale a little over 5 years ago. Our 3-car garage was utilized for office space in the model home so right after purchase, we ripped out walls, poured a driveway, purchased garage doors and pulled up all the wood flooring in the garage area. We have divots all over the garage from the nails used for the wood planks. We are ready to level and epoxy coat. Since all the holes (1/2 inch deep) have concrete crumblings….should we have this done professionally or would it be a project we could handle on our own? If we did it….what would be the very best substance you would recommend to use on this slab to level and seal?
thank you for your time….I’ve enjoyed reading all the questions, answers and advice from this site.
Kathi
Hi Kathi. Great question and thanks for the kudos. You can easily make these repairs yourself. First clean out the holes and knock out any loose debris using a small chisel or an old screw driver with a hammer then vacuum it out. Patch the holes using a 2-part epoxy repair product like the Epoxy Shield kit by Rust-Oleum. It’s easy to use, cures to a strength stronger than the concrete, and it can be ground smooth if necessary when prepping your floor for epoxy.
My garage gets standing water in early spring with heavy rain. I think it is coming from the drain in center and the cracks is the floor and around the outside edge. What can I do to stop this?
Hi Debbie. The first thing you should do is determine if the drain is working or not. Call a plumber if you need to. After that, repair all your cracks with an epoxy based or polyurethane crack filler. Most of these can be purchased from your local home improvement centers. The final step would be to determine if you have proper drainage around the perimeter of your garage and make any adjustments that are necessary. Does the soil slope away from the garage taking water away or does it slope towards the garage bringing runoff with it? Water should run away from your garage, not towards it.
My question is similar to Debbie’s. We had a 16×16 shed built last summer. Poured concrete, no cracks, smooth finish. I noticed this spring/summer that after a heavy rain, water will pool in the middle of the slab. Nothing around doors, windows, sides….just in the middle…almost like it is seeping up through the precut joints. Is this possible, normal, and is their a fix? Only happens after heavy rain. Just got back from squeegee about half inch standing water in center of shed after heavy 12 hr rain. Thanks.
Hi Jason. It sounds like you didn’t put down a vapor barrier before the concrete was poured. In your case it would have been as simple as plastic sheeting. As a result, water works its way up through the wet soil into your slab due to capillary action and/or hydrostatic pressure after it rains. This article on moisture testing explains how it happens. The best you can do is make sure that all water runoff drains away from your shed. Then seal the concrete with a good penetrating sealer. This helps to close the pores in the concrete and block the water from coming up through the bottom of your slab.
I have a garage floor that has been professional epoxyed and flaked and sealed. The expansion joints have cracked and a handyman in the area sealed those with a silicon material several years ago. Now the silicon has stretched and left gaping holes in the cracks. How can I fix this? I would like to seal the joints but not use more silicon. Apparently this was the wrong material to use…..
Hi Barbara. The problem with silicone is that it eventually will shrink and create the problem you have now. What you need to do is chase these cracks and clean them out to get rid of all the silicone. The epoxy should have a roughed up texture to it or the concrete exposed in order for a repair material to adhere properly. Once this is done, we recommend that you fill the cracks with SikaFlex self leveling polyurethane crack filler. It’s designed to flex and move with the crack, will do a much better job of sealing, and it will not shrink. You can usually find this product at your local home improvement centers.
i have a cement board verandah that has been there for 20+ years. It has some areas that hold water after heavy rain, being the sheets are no longer completely flat. Even though it has a roof, rain does get on the floor from the sides when windy. It has been painted with concrete paint a few years ago. Can I use floor leveler to fill the uneven spots, then re-paint without it cracking or do I need to replace the flooring.
Hello Shenan. There is no guarantee that it won’t crack. It all depends on how well it is reinforced underneath. If it flexes at all, it will crack. If you feel fairly confident that it is reinforced well, we recommend using a flexible polymer modified cement to fill the low spots. You will need to remove all the old paint first.
Hi Shea,
What a great site with a lot of helpful information. I’m in the middle of preping a basement floor for an epoxy coating and have filled some cracks with the epoxy shield crack repair kits. I put down 2 coats due to settling of the filler in the crack and I did wait the recommended wait period between coats, 1hr. I then began to grind the floor with a 36grit flap disk on 4 1/2 grinder and quickly stoped due to two things. Firstly, it appeared in small spots the top layer appeared to come off unevenly from the one underneath, like it did not adhere fully (15 hour cure). Secondly the 36 grit flap disk was smoothing out the concrete around the patch ruining the nice gritty surface I had worked so hard to achieve with an acid etch. I now think I’ll go over the repairs lightly with a diamond cup wheel and dust shroud on 4 1/2″ grinder. Is this the best way to level the repair and regain concrete grit where I started first to grind? I also have a few areas where slight concrete efflorescence remains, could I also go over these areas with the diamond cup setup to get a better surface tooth and not have to deal with the acid, its clean up and remaining ph levels? Thanks, Plato
Hello Plato. The Epoxy-Shield crack repair kit requires a minimum wait of 8 hrs at 70 degrees and 50% humidity between coats, not 1 hour. That would explain why the second application appears to be separating from the first. The instructions from the TDS can be found here. The surface of concrete will feel different between and acid etch and grinding. Just do a simple water test on the concrete where you did the grinding. It should soak it up just as fast as the surrounding area (not the epoxy patch though). If it doesn’t, the diamond cup wheel will definitely work.
Regarding the efflorescence, did you moisture test first? Some basements are not the best substrate for epoxy due to moisture issues. In most cases muriatic acid removes efflorescence unless it was mixed to a weaker ration or if you etched with a citric based acid instead. Grinding will remove the remainder for sure or you can etch again with a stronger mix ratio of the acid.
Hi and thanks for the response. You are correct about the wait time, but the instructions on the box are clear that’s for sanding and painting, it specifically states apply second layer of patch 1-2 hours after first layer. It would have been closer to the 1 hour mark though and was one of the reasons I began sanding because I ran out of patch and still had some areas that need a second coat. Would you suggest removing all epoxy up to the crack rather then just feathering the edges?
I did a moisture test and everything was dry. Basement was completed about 6 months ago and had a lot of efflorescence on top, I’m told it was likely over troweled. I used muriatic acid at 1 acid to 5 water mixture and have been over the floor 3 times (1600 sq/ft) 95% looks and feels great but a few areas still leave a slight chalk if run over by fingers.
“Would you suggest removing all epoxy up to the crack rather then just feathering the edges?” – Feathering the edges is good, but what you want to do Plato is grind it like you would for a dent in a fender. You want to create a smooth surface that doesn’t have any humps where the patch is. Otherwise the hump will telegraph through the coating.
“I’m told it was likely over troweled.” – OK, this make sense. What you have is excess laitance on the surface created from too much water with the troweling, not efflorescence. Grinding works much better at removing laitance than acid etching. You definitely want to remove this.
Great thanks, one last question, what is it best to remove the “hump” diamond cup, 36 grit flap disk or other?
The diamond cup wheel works best.
Thanks for all your help its very generous of you to answer all these question.
I just moved in my new house 4 days ago and today I found this 5 foot long crack in the garage floor! It wasn’t there earlier in the day, but I heard a loud pop and when I went to investigate, I discovered that crack.
I’m freaking out! Is this a precursor of what’s to come?
The contractor said it was normal, but I don’t believe him.
Should a crack that size be there this soon? Will it get worse? Do I need to be worried?
I thank you in advance for your help.
P.S. Should I be looking for legal representation if this is bad?
Hi Terrence. Nobody wants cracks on their garage floor, especially in a new home, but unfortunately they are not uncommon. All concrete cracks and contraction joints and saw cuts are put into the slab to encourage cracking within the joints, but they are not always 100% successful. Cracks usually show themselves with the the first few weeks to few years of a slab being poured as the ground underneath settles. As long as it isn’t more than 1/8″ wide I wouldn’t lose too much sleep over it.
If it still bothers you or it’s wider than 1/8″, take a few pictures of the crack along with a ruler across it to show the width. Send a certified letter along with the pictures to your contractor expressing your concerns, asking for a written response back. This will document the date as well as the contractor’s response. If it gets wider or more cracks develop, contact a professional concrete contractor in your area for a second opinion to see if your slab is structurally sound or if legal action is worth the effort, providing your contractor isn’t willing to offer a fix.
Great website!
After properly cleaning & grinding my garage floor, I installed the RockSolid Garage Coat Polycuramine system. When I looked at the floor this morning, it looks great except for very small “hairline” cracks (1/16″ wide or so) that show through the epoxy in some spots. Though I had filled in some small areas of pitting/spalling with Rustoleum EpoxyShield Patch & Repair, I didn’t fill in the tiny cracks as I thought they were so small that the Polycuramine would just fill it in. Now, I’m wondering what to do? My main concern is making sure that the coating is sound and will be properly sealed so salt and water won’t seep in and cause future issues, more so than the slight cosmetic issue.
I’m considering doing the clear top coat too, but not sure that I want to spend that much more. Would that solve (seal) the cracks issue? Or, is there a better solution?
Thanks!
Chris
Hello Chris, sorry to hear the coating didn’t the small cracks. Because the RockSolid coatings go on thin, they don’t do as good a job at bridging the gaps of the smaller hairline cracks in a garage floor. The same goes for other thin filmed coatings as well.
If you can’t get a finger nail in the cracks right now, then a second coat of the clear should seal the cracks up. If you can fit a business card or thumb nail in the cracks, then chances are the cracks will not be completely sealed with a second coat. Your only option is to seal them up with more of the EpoxyShield patch kit if you don’t want to chance it. You can always check with RockSolid customer service to see if they offer a touch up kit to go over the freshly sealed cracks.
Thanks Shea,
Yeah, unfortunately I think the cracks are still just wide enough (fingernail) that the same thing would likely happen again if I just used more of the GarageCoat. So, I’m assuming the proper method would be to chase the cracks with a grinder, fill in with EpoxyShield patch kit, sand, clean, then use the GarageCoat to touch up? Any tips for patching with the GarageCoat over existing GarageCoat? I’m assuming the key is prepping the surface for proper adhesion?
Other than for cosmetic reasons, do you think it’s worth the effort? Will I have problems in the future with these little cracks if I don’t? I’d guess that 2% of the total area has some cracks, if that. The majority is just fine.
Thanks again,
Chris
Unfortunately Chris, deicing fluids and road salts are the number one cause to spalling and pitting of garage floors and driveways. If your main goal is to protect the floor from that, you will need to close up the cracks as the salty brine will find its way in them. Your methods for the fix are right on the money. After you feather your repairs smooth, just rough up the surrounding coating, not remove it. Wipe the area down with denatured alcohol and apply the coating. Try not to leave roller marks and chances are it will not stand out.
Good luck!
Thanks for the good advice Shea!
I recently bought a house and am looking at doing a few minor repairs to our garage. There are some minimal oil stains and a few small cracks that I would like to fix before painting the floor to give it a more finished look. Is this a project that should wait until the weather is warmer? I am in the Midwest and currently have fairly mild weather (40’s) with a cold front coming through next week. I would like to get this project done before spring but do not want to cause more damage in the process if cold weather/moisture could become an issue.
Hello Megan. It all depends on what products you plan to use. Latex garage floor paint can only be applied in temperatures down to 50 degrees and most epoxy coatings can be applied in temperatures down to 55 degrees. If you opt for a polyurea floor coating, then you can apply in temperatures down to 0 degrees. The same holds true for crack repair products. Most are epoxy and polyurethane based and can’t be applied below 50 degrees. You can get a more expensive polyurea crack repair sealant however than can be used in extreme cold conditions. Most DIY floor coating kits are going to fall into the mild temperature range. The one exception you might be interested in is the RockSolid garage floor kit.
My garage has been enclosed for over 20years and is part of our house. My problem…the floor slants in 2 directions. From what use to be the garage door the floor slants down into the room about 2feet in (to compensate for rain when it was a garage) and then the floor slants upward towards the back of the room (probably about 10 feet). I want to remodel the room but want to level the floor first. What do you recommend? Thank you.
Hi Marsha. The answer depends on the perimeter of the floor. If the perimeter is fairly level all the way around, you can mix and apply a concrete leveling underlayment such as this one from Ardex. Because it is self leveling and will seek out the low spots, the perimeter is what contains the mix as it levels out your floor. If your perimeter is not level then it gets more complicated and expensive. If that is the case, you may want to get an estimate from a concrete flooring company as it will require building forms and possibly pouring more concrete to get it right.
What would you suggest to someone like me who is considering going with a local contractor to do the repairs? Specifically this company: https://bonedrywp.com
Hi Brandon. Repairs to garage floors in most cases are not that difficult unless it’s an unusual problem or something more severe than normal. If you feel uncomfortable doing it yourself or feel that the extent of the repairs may be more than you can handle yourself, then hiring a local contractor who specializes in concrete repairs is recommended. The company you mention looks like a good place to start.
Two years after our house was built, the garage floor cracked both lengthwise, as well as across the floor. We used a “pourable concrete crack seal” to seal the cracks, before we applied an epoxy garage floor coating. That was two years ago, and now during the winter months, the treated cracks have what looks like “lime” rising through the surface of the floor, and is a white powder type substance. Is it possible to re-seal the cracks; and if so, can we apply another coat of the epoxy garage floor coating over the existing coat? Other than the lime coming through the treated cracks, the floor is in good shape.
Hi Bud. Yes, you can re-seal your cracks. We recommend chasing the cracks with a concrete crack chasing wheel on a small grinder to clean out the old sealer and epoxy. Use a flexible 2-part flexible epoxy or polyurea crack repair with a high elongation rate. We highly recommend HD-821 from Legacy Industrial or the flexible joint sealer from EpoxyMaster. You can mix these with silica sand if necessary for larger cracks. Once cured, they can be ground flush with the floor so the cracks will not show. Unless your slab moves a significant amount, these repairs will be permanent and flex with the concrete.
You can easily apply another coat of epoxy if you like. Degloss the existing coating with some 150 grit sandpaper or use a 100 grit sanding screen on a floor buffer. Vacuum, wipe down with denatured alcohol on a rag and then apply the new coat.