
Learning how to repair the concrete for your garage floor isn’t as intimidating as it sounds. You may be surprised to learn that many repairs can easily be done by yourself, and for less expense than you think. Typically, three types of repairs are most common for garage floors. These are surface cracks, pitting or spalling, and chips or divots.
If you are applying paint or an epoxy coating system, you will want to ensure your garage floor is repaired properly to make it as blemish-free as possible. This is important if you don’t want cracks or other imperfections to show through.
If you plan on sealing your garage floor, it’s important that you use the correct concrete repair products to prevent moisture intrusion.
Lastly, proper repairs can stop a continuing problem with pitting and spalling. This type of damage can be just as easy to repair as most cracks. It just takes a little more work. So, let’s discuss how to repair concrete cracks and other damage. We will also recommend the proper materials to use and where to purchase them.
Why do garage floors crack?
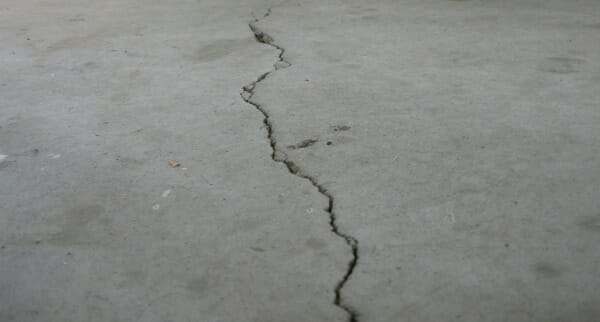
Garage floors crack – period. Concrete is not a ductile material, meaning that it neither stretches nor bends without breaking. However, it does contract and expand with temperature, and as a result, it can crack.
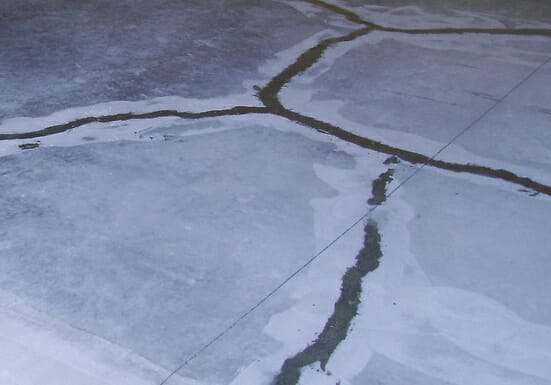
Most garage floors have contraction joints in the slab. These typically are the deep V-shaped troweled grooves or saw-cut joints that you see in the concrete. They appear to divide a typical two-car garage into four separate sections.
These grooves or cuts create a weakened line in the concrete. This line of less resistance encourages cracks to follow along the bottom of the groove or cut instead of wandering across the surface. Though contraction joints work well, the slab can still encounter cracks in other parts of the concrete. This can be due to the settling of the earth underneath the slab, curing issues, or other variables beyond your control.
The good news is that the majority of cracks are cosmetic and not structural. This means that they can be repaired to accept almost any garage flooring.
This post may contain affiliate links. If you use these links to make a purchase, we may earn a small commission. As an Amazon Associate, All Garage Floors earns from qualifying purchases. You can read our full disclaimer here.
How To Repair Cracks in Your Garage Floor
There are a few steps involved when making crack repairs to concrete. They are as follows:
- Chase the crack to remove sharp edges and any loose or weak material
- Clean the inside of the crack with a wire brush if not using a crack-chasing wheel
- Remove all dust and debris with a shop vac
- Apply the recommended crack repair material
- Sand or grind flush once cured
The first thing you need to do when making a crack repair is to chase the crack. This is the process of breaking away or removing any loose or sharp edges of concrete within the crack.
The repair is only as strong as the material it adheres to. If the concrete edge is sharp or weak, it can break under pressure and require further repair.
Crack chasing can be performed with a hammer and cold chisel. If you don’t have a cold chisel, you can easily find them at your local home improvement center or purchase them online here from Amazon. We prefer the ones with the handguard.

Chase the crack by placing your cold chisel at an angle that runs in line with the crack. Firmly tap it with a large hammer or small handheld sledgehammer.
The chisel will break away any loose material as you go. We recommend wearing safety glasses to protect your eyes. Continue in this fashion until you have chased the entire crack.
Use a shop vac to clean out the loose debris and then scrub the crack with a wire brush. This will remove any weak laitance and prep the surface for the repair material. Vacuum out the crack again and you are ready to apply your repair.
Our favorite process that works well for chasing cracks is to use a small 4″ angle grinder with a crack-chasing masonry wheel. The wheel is tapered to form a nice clean groove in the concrete. You can see how it works in the video below.
This is by far the most efficient method for chasing cracks. It preps the concrete for repair better than any other tool we have used.
You can purchase 4″ angle grinders from Harbor Freight for less than $20. The crack-chasing wheel is little more expensive. You can find them here on Amazon.
Be sure to follow the directions carefully for the concrete repair product that you use. Try to calculate how much you will need before you make your purchase. You are better off having too much than not enough. You can always return unopened products.
When using a thicker 2-part epoxy or gel, work it well into the crack to push out any trapped air. Use a putty knife to scrape it somewhat smooth before the material begins to set up. Watch for any low spots that may need additional repair material.
If using the Simpson Strong-Tie or similar product for larger cracks, it works best to fill 3/4 of the crack with silica sand first. Apply the Simpson Strong-Tie over the sand up to the top of the concrete. Allow a couple of minutes for it to soak in and then apply it again to fill in the low spots.
Once you do that, apply more sand loosely over the repair and let it sit for 20 minutes. After it has sat, you can scrape off the top layer with a paint scraper or putty knife.
Once the repair has cured, grind it flush with the concrete to create a smooth transition. This will prevent most repairs from telegraphing through the coating and you will not see them.
Contrary to some information out there, you do not need to chisel cracks to form an inverted or backward-angled cut. This is only required for very large section repairs or replacement of concrete using new concrete or a cement-based patch.
Because concrete does not adhere well to previously cured concrete, the backward-angled cut helps to keep the material from lifting out. Epoxy, polyurethane, and polyurea crack repair products form a tenacious bond to properly prepared concrete and do not need an inverted cut to stay in place.
When repairing deep cracks, it’s best to fill the crack partway with silica sand. This will prevent the repair material from seeping down deep into the concrete and settling. It saves you from using excess material as well as creating low spots that need to be refilled.
Recommended Concrete Crack Repair Materials
When making concrete crack repairs, you should always use an epoxy or polyurea crack repair product that is sandable. They will cure and harden to a strength greater than concrete.
In addition, the bond is stronger and they will prevent water intrusion. Once cured, you can grind or sand the repairs flush with the concrete to accept paint or an epoxy coating.
One example of an epoxy-based crack repair product that we recommend is the Simpson Strong-Tie Crack-Pak at Amazon.
It comes in a 9 oz. cartridge that requires a caulking gun to apply it. The part-A and part-B contents of the epoxy are separated inside the container. The cartridge uses a self-mixing tip that eliminates the step of mixing the 2-parts separately. This makes the application easy.

Price Simpson Strong-Tie Crack-Pak Here
In addition, Simpson Strong-Tie flows very easily. It’s a great choice for repairing spider cracks and cracks less than 1/8″ wide.
For deep cracks or cracks larger than 1/8″ wide, you will want to partially fill the crack with clean play sand or silica sand first when using this product. This will slow the flow of epoxy from going deep into the crack to prevent using more epoxy than necessary.
Another excellent crack repair product that we have experience with is PC-Concrete Epoxy Crack Repair at Amazon.
It is a thicker flowing epoxy that requires using a putty knife to work into the crack. Thicker-flowing products like this work well for larger cracks.
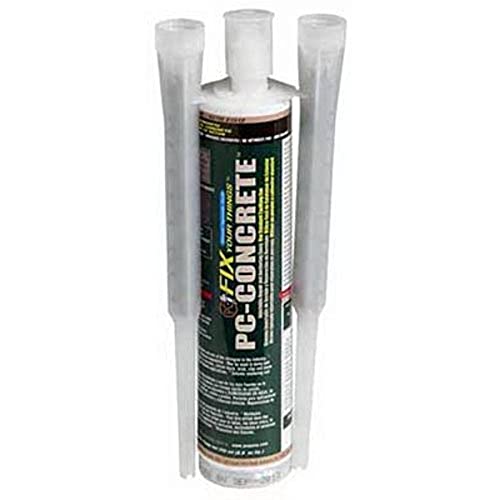
Price PC-Concrete Epoxy Crack Repair Here
In addition, PC-Concrete works well for filling small holes, divots, and chips in the concrete. Like other cartridge epoxy repair products, it comes with a self-mixing tip.
What we like about PC-Concrete is that it fully cures in only 4 hours. This means that you can repair your cracks and grind them flush the same day.
A third product that we can recommend is Rust-Oleum EpoxyShield Concrete Patch. This is a thick 2-part epoxy that requires you to mix the separate Part-A and Part-B materials first. A putty knife works best for application.
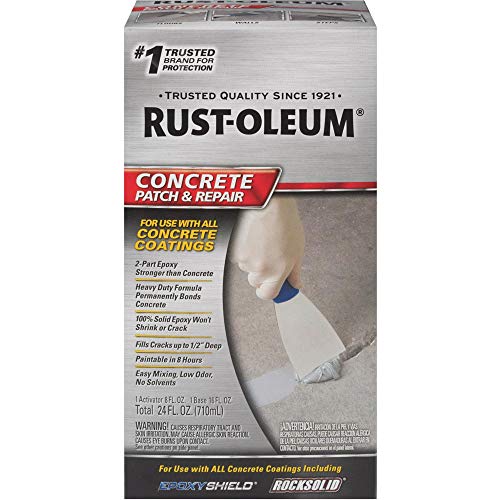
When mixing the two components, be careful not to mix too much at any one time. The epoxy does set fairly quickly and you will have a limited time to use it. If all of your repairs are not ready to be filled, you will run out of working time and the epoxy will become stiff and unworkable.
You can generally find it at most home improvement centers or you can purchase it here at Amazon.
If you are repairing numerous cracks that are 1/4″ wide or larger, then your best bet would be a 100% solids epoxy gel crack filler. These are available in 1-gallon kits.
This type of product is an excellent choice for deeper and larger width cracks that span a long length of the garage floor. It’s also a better value if you need to repair numerous cracks. Our favorite is TL-821 by Garage Flooring LLC.
Price TL-821 Gel Epoxy Repair Here
TL-821 is a fast-setting epoxy gel. The key is to make sure that your repair areas are ready. Mix only that which can you use in less than 10 minutes.
It also works well for filling divots, chips, and other imperfections. This includes small pitted areas of concrete or even spalling.
One of the favorites that we reviewed is Xtreme Set 100 by Legacy Industrial. This is a fast-setting 2-part polyurea. It requires that you fill the cracks with sand to the surface and then pour the polyurea filler into the sand.
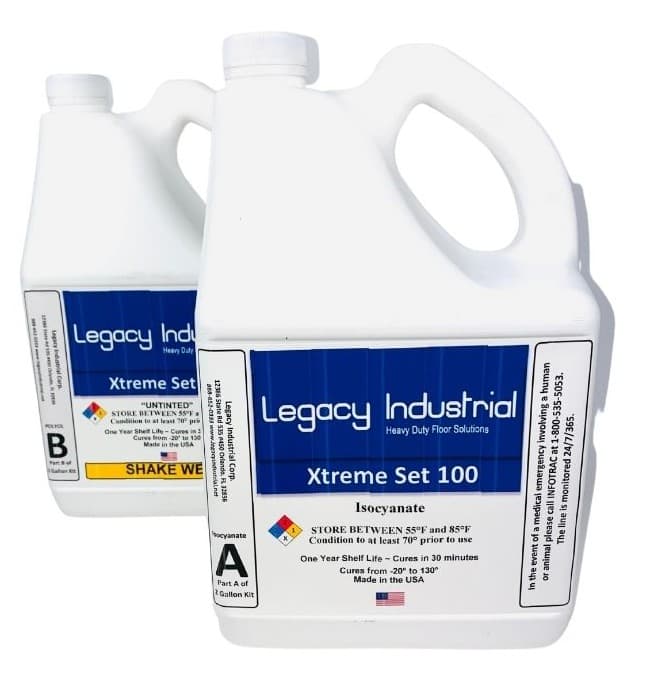
This was the fastest and easiest of crack and concrete repair products we have used to date. However, it is one of the more expensive as well. You can purchase Xtreme Set 100 here from Legacy Industrial.
We did a complete review of Xtreme Set 100 which you can read here.
Most of the above products mentioned can’t be found at a home improvement center. They are much more prevalent in the professional floor coating industry. As a result, they are commonly purchased online.
Repair Materials Not To Use
Do not use latex-based concrete crack fillers or self-leveling sealants. This is what most home improvement centers carry since they are cheap and easy to use.
The reason not to use them is that they are not sandable, most will not accept paint, and some will shrink over time and pull away from the concrete.
More importantly, they do not repair the crack and make it stronger. They just seal the crack. If you are just looking for a cheap and easy solution to sealing a crack, then they will work.
Do not use cement for repairs or cracks. Cement bonds poorly to cured concrete and will delaminate and lift out of the crack. It also tends to crumble over time within the crack repair.
Repairing Spalled and Pitted Garage Floors
Pitting of a garage floor can be caused by improper finishing of the concrete or a bad mix. Sometimes it is most notable at the edges of contraction joints or where the concrete might meet up with another slab.
However, spalling is generally caused by freeze-thaw cycles in colder climates. It is aggravated even more by deicing salts. Pitting can be a result of this as well.
During cold weather, water can migrate into the surface of the concrete and freeze. The expansion of the water causes microscopic damage to the concrete and after a few years of this, it begins to break up into small dusty pieces and flake or chip away.
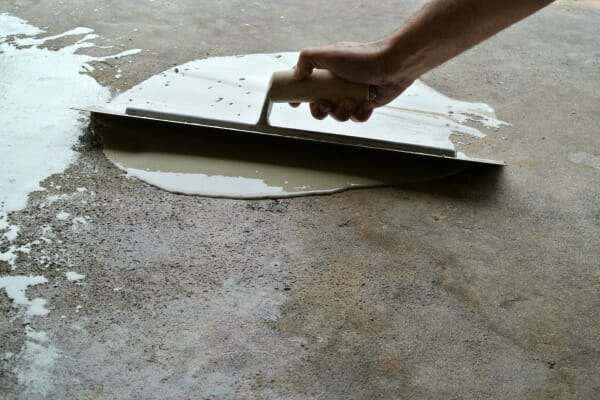
For repair of the floor, you will want to use an epoxy sand slurry or a polymer-modified cement patching mix. Which type you use depends on the extent of the repair. It requires a little more effort than repairing a crack, but it’s not that hard to do.
After the surface has been prepared properly, apply the mix over the pitted areas using a trowel. Some mixes are self-leveling and can be applied with a metal squeegee.
Be sure to feather in smoothly and let it cure according to the instructions. You may need an additional application to fill in any small divots or low spots you missed.
You should end up with a nicely repaired surface that won’t be noticeable once it is painted or epoxied over. We cover this procedure in more detail, including recommended materials, in our article on how to repair spalled or pitted concrete.
There is one thing to be aware of if you are planning on applying a clear coat sealer to your concrete. Any patchwork that you have done will be enhanced by the sealer. However, if you are applying a colored paint or colored epoxy sealer, then you should have the appearance of a smooth concrete slab free of blemishes.
Low Spots and Other Repair Issues
Concrete garage floors are rarely flat. It’s not unusual when cleaning the floor to have small puddles here and there. However, if you have deep low spots on your slab that collect a lot of water, then there are some repair options available.
You can use a self-leveling polymer-modified topping or epoxy slurry to fill in those low spots. Don’t fill in any of your contraction joints. If you do, you can scrape it out later as it starts to harden. Just make sure the product you use is designed for outdoor use.
We suggest reading our article on how to repair low spots on a garage floor.
Sunken slabs are another issue. Unfortunately, these are not a quick fix and can be costly to repair. They can be caused by severe settling of the soil, poorly reinforced slabs, or something worse such as underground water problems.
Mudjacking or polyurethane expanding foam injection are some of the repair options. Sometimes the only alternative is to tear out the old slab, address any soil compaction requirements, and pour new concrete. We recommend calling in a concrete repair expert to assess issues with a sunken slab.
Final Tips
The key to long-lasting and strong garage floor repairs is proper concrete preparation and the use of the correct concrete repair material.
Pay close attention to the instructions. If you have questions about how the repair material should be used, contact the manufacturer. Many have toll-free numbers to talk with tech or customer service to answer questions.
Also, make sure to properly calculate how much material you need. There is nothing more frustrating than running short. It wastes time and can delay your project.
If you can patch a wall before painting, then you have the skills to do the same for your garage floor. You will avoid the more expensive option of having someone do it for you. Plus, you will have a repair that will last years if not the lifetime of the concrete.
I patched some cracks with 5 minute epoxy from Loctite (100% solids I believe). Unfortunately I forgot to sand the patches before applying the base coat, and the patched areas were much more glossy than the rest of the floor, which matted out from the porous concrete. I figured this would go away after applying a clear glaze coat, but the patched areas are still more glossy than the rest of the floor and the glaze coat continued to matte out on the non-patched areas. I’m thinking a thorough sanding of those spots and another coat may help, what do you think?
No, it won’t help Michael. What you needed to do was apply another color coat to even out the look. We are assuming the product you used was not a real thick high solids epoxy. As a result the color coat acted like a primer and did as you said. A second application of the color coat would have created a much more consistent color tone and gloss. A clear coat is not the answer to fix such an issue. A clear coat is exactly as stated – it’s clear. So any color and tone inconsistencies that you have will still remain. In some cases they can be highlighted even more by the clear.
You mentioned a clear glaze coat. One of the few manufactures to use that terminology is H&C products. If that what you used, their glaze coat is actually an acrylic sealer and not an epoxy. You would have to completely remove the glaze coat by sanding down to the color coat in order to apply a second coat of color. Epoxy cannot be applied over acrylic coatings.
We just purchased a home with a really nice epoxy garage floor in the garage. The finish is great but there are separation cracks in the contraction joints… nothing outrageous but for me and my obsession with looks it bothers me. Any suggestions on how to fill these cracks?
Contraction joints are created to induce cracking within the joints and not across the surface Navarone. If the joints were filled and then coated over, there is always a risk that cracking will eventually telegraph through the coating. Repairs to epoxy stand out and the cracks will only come back. If the joints were not filled and you can see cracks at the bottom of the joint where the concrete is, you do have one option. You can fill the joints with a gray self-leveling polyurethane joint sealant such as SikaFlex. These type of joint sealants have high elongation rates and will move with the joint and will not crack. It will, however, change the look of your floor since the sealer will divide the look of your garage floor into separate sections.
I have low area in my concrete carport floor that causes water to stand at my door. the lowest area is about a 1/4 of an inch. what would you recommend to level the floor? What do you recommend coating the rest of the carport to get the color the match?
We have an article about fixing low spots here, Anthony. The typical type of coatings you may be familiar with are generally not recommend for outdoor use. They can amber (turn yellow) and be very slippery in certain weather if a proper anti-slip is not applied in the final coat. What many companies do for carports and drives is to apply a micro topping or overlay. This will cover all repairs and provide brand new surface to work with. They can be left bare or stained and sealed with an acrylic sealer.
This video here is an example of a driveway that was repaired and resurfaced with a micro topping. Sakrete has a video of their product being used on a patio.
What would be your definition of a “hairline” crack? I have one that goes basically the width of my garage that is not wide enough to fit a coin in. I would like to make sure I don’t need to chase that crack and repair it or if it is a safer bet to just chase it and then fill it in with some leftover Rust-Oleum’s EpoxyShield Concrete Patch (mentioned above). Please let me know. Thank you much
A hairline crack would be something you couldn’t fit a business card in. Even then filling them depends on what type of coating you are using. If it’s a low solids home improvement epoxy kit, EpoxyShield for example, then you may still run a chance of seeing the crack. Higher solids coatings do a better job of filling these cracks since you get less material shrinkage from water or solvents evaporating from the coating as it cures. If ever in doubt, it’s best to chase it and fill it. The EpoxyShield concrete patch works fine for that.
Thanks- i’m worried that since i would be chasing the crack the entire width of the garage, that after i fill it and sand flush that it would show through the epoxy coat – using rustoleum’s “professional” solvent based kit (light gray). thank you sir for the guidance
The Rust-Oleum Professional is much better choice of the water based kits Thomas. It cures slightly thicker, has more abrasion resistance, and adheres better. You shouldn’t see the repair if it’s ground or sanded flush with the concrete. It’s the same process that a wood worker does when filling holes or an auto body shop does on a fender. Also, the more color flakes you have on the floor, the less you notice imperfections.
I have a hole in my garage floor approx. 180mm long x 90mm wide, 20mm deep at the driveway end back to nothing. the garage floor is painted with a floor paint fro Bunnings that has a flake spread over it after painting. This hole has been repaired twice with the patch breaking up after 2 weeks. The patch is where the car runs over it. I am looking for something to fill and repair this patch and recoat the floor with the Bunning floor coat after.
Hello Terry. We are not familiar with the name brand products you have available in Oz. However, a 100% solids epoxy mixed at a ratio of 1 part epoxy to 3 parts clean sand will make for a repair that is stronger than concrete. Mix the epoxy first and then quickly add the sand to the mix. Once mixed, press it in the hole good with a margin trowel to avoid air pockets and then spread it evenly. Grind it flush after it cures before you paint over it. Just make sure that all the loose debris and dust is cleaned out of the hole first.
HELP!! We had our garage floor done last week with an epoxy finish. The contractors filled cracks but left other visibly damaged spots. Now the epoxy finish is done and we now have to figure out how to repair the floor and start over. Any help and information would be greatly appreciated!!
Hello Tammy. I’m assuming these weren’t actual floor coating contractors then. Painters or a general contractor maybe? You didn’t state specifically what is wrong or what specific type of product was used, however, it generally requires making the needed repairs and then recoating the entire floor to get things right.
We have several long cracks in out garage and one good size section about 5×3″ were the rebar is actually showing. We also have a quit large low spot by the garage back door that fills up with melted ice coming off the car in winter. We are both handicapped and would like suggestions on the easiest and best way to repair looking forward to your suggestions
Honestly Carolyn, we would recommend that you hire the job out to a concrete specialist or concrete flooring contractor. Making repairs like that requires labor that puts you on your hands and knees as well as using some hand tools. It may be too much for a person with a handicap to tackle.
If I have cracks running through spalled and pitted areas, should I chase and fill the cracks first then cover the area with a patching mix, or vice versa?
You will want to chase and fill the cracks first, Gary, after you prep the area and remove all the soft and loose concrete. Use the patching compound for the pitted and spalled areas after that.
The corner of my garage has settled (I believe) to where there is about a 3/4” difference between the garage floor and the driveway. During heavy rain, water sometimes comes through the small gap between the garage door weather stripping and the garage floor. My plan was to use epoxy slurry or a self leveling compound to fill that low spot on the floor, does that sound like it will work?
When filling a low spot of that size (about 3/4”) can that be done on one coating or should I do two coats in that area?
Hello David. You will want to use polymer-modified concrete to fill in your area. An epoxy slurry would be very expensive for a 3/4″ depth. Do not use the self-leveling underlayment that you can find at your local home improvement centers. It is not strong enough and it is not designed as a wearable surface.
I’ve got a garage floor where someone has attempted to patch cracks and low spots with a self leveling compound, and then installed carpet on top with a tough latex adhesive. I’ve gotten the carpet removed, and given a shot at scraping the adhesive (which at best leaves a light visible residue) and is well nigh impossible to get off the patched areas. Do you have any suggestions on how to get this back to being a functional garage floor?
What you need to do, Ren, is grind the garage floor. This will remove the glue residue and smooth out the patched areas. A more aggressive grinder like the 10″ Edco unit works better at smoothing out patched areas. Hopefully an actual polymer-modified concrete patch repair was used and not a self-leveling underlayment for wood flooring, carpet, tile, and etc. Underlayments are not formulated as a wear surface.
Will polyurea/polyaspartic coatings stick to an epoxy crack repair product like the Simpson strong-tie or rustoleum epoxyshield crack repair?
Yes it will, Daniel. Just make sure to rough up the repair with 100 grit sandpaper if you didn’t grind it.
I just bought a SoCal house that was built in 1988, it’s time to give this garage the attention it’s been deserving! After reading your articles, I could use some advice on making sure my workflow is chronologically correct below?
1.) Finish dry-walling exposed areas, then texture/primer/paint
2.) Patch any cracks/pitting/small missing chunks in concrete
3.) Clean the garage floor, including the degreasing steps
4.) Acid etching
5.) Apply top coat (epoxy, etc.)
Could I potentially tackle the drywall piece after I’ve finished with the floor? Theoretically, I could wipe up whatever mess I’ve made off the epoxy, no?
Thanks again!
Your workflow is fine, Matthew. Ideally you want to do the floors last, but as long as you throw down some drop clothes you can always do the drywall after the floor. Paint is hard to remove from a coating without causing it to loose gloss so you want to be careful. Coatings are easy to clean, but they aren’t like Teflon where nothing sticks either.
Hi Shea,
Thanks for your response to my question yesterday. I am using a 2 part self mixing epoxy from a company called SIKA, it’s called Pro Crack Fix. Are you familiar with this? Its a clear free flowing liquid used with a caulking gun. My cracks are fairly large and are using a lot of the material. Can I fill with sand like the Simpson product you talk about to use less product?
Also I assume I can grind this down after to make it flush with the concrete? I am using Epoxymaster coating will there be any problem fir coating to adhere to the SIKA?
Thanks again,
You can fill the cracks partially with sand if they are deep, Rob. You still need enough material to provide strength. Don’t use sand in shallow cracks. If the product is somewhat runny, you can mix sand with the product when filling the cracks. This is better since the sand acts as a filler and bonds with the epoxy at the same time. Grind them all even with the surrounding concrete after they cure and you will have no issues applying a coating.
Hi. We hired a handyman to apply Rustoleum Rocksolid to our garage. He cleaned and etched it well but did not repair any cracks or uneven concrete patches before applying it. Now you can still see all the bumps and cracks through the colored coat. Is there anything we can do to level it out without removing what we just applied?
Hello Ti. Unfortunately, there is nothing you can do without grinding through the current coating to properly repair all the issues.
Would we have to grind through the whole garage or just the areas of concern and then re-coat? Will an extra cost on top of the rough area or a clear top help the look at all? Thank you.
The areas of concern will need to be ground down to the concrete to repair and smooth out. The remainder of the coating will need a light grinding or sanding with 120 grit sandpaper to degloss and rough up the surface for a new coat.
Vicky says,
I am a new homeowner. brand new house built in 2018. it is a townhome.
Soon after moving in about 2 weeks later I saw one crack from the wall of the garage to the center of the garage. The builder came to repair but by the time they came the first crack was completely across the garage floor and several other spider vein cracks appeared.
After their inspection of the garage floor cracks one person came and filled in the cracks. They are still visible. Should they have sanded the floor to make the cracks not so visible? Should I also asked what sealant they used? I am not satisfied and I want to make another complaint to the builder? Should I ?
Hi Vicky. One thing is guaranteed about concrete – it will crack. It’s not if, but when. It sounds like your concrete is still going through the final curing stage. Concrete shrinks slightly during the curing process and this is what causes cracks to appear. Contraction joints are put into most garage slabs to encourage cracking within the joint so that it will not be noticeable, but there is no way to 100% stop cracking across the top of a slab where you can see it. Cracks at the surface are not a structural concern unless they go all the way through the concrete. If they do that, then an inspector should be brought in to look at it. Spider vein cracks at the surface are known as crazing. When the surface of the concrete dries quicker than the underlying layer, the shrinking will cause the upper layer to craze and create those type of cracks. It’s fairly common.
Unfortunately concrete crack repairs will always be visible. There is no way to hide them unless a coating is applied over a properly repaired crack. We always recommend using an epoxy or polyurea repair product for surface cracks. These will bond the cracks and are actually stronger than the concrete. Chasing of the crack with a chisel or special grinder wheel should be done first to remove weak edges. We don’t recommend a self-leveling concrete crack filler. These are softer and only seal the cracks from moisture intrusion. They do not harden it. If that type of repair was made, we would recommend contacting the builder to have them repaired properly and not just sealed.
Hello,
I have a garage floor that not only needs cleaning but it needs patching due to a decent amount of pitting from the previous owner. I’m assuming its from winter salt (Chicago) from their car. Because the pitting is where the tiers would have been. I plan on painting the floor using Drylok E1. I am also going to repair the pitting (and some thin cracks) with Top n Bond.
I understand that I have to clean and etch the floor prior to applying E1. My question is.. Should I clean, etch then patch the pitting? Or should I clean, patch then etch? Or should I patch, clean then etch? Or should I clean, patch, clean then etch? Basically, in what order should I do this?
Thoughts?……. awesome website by the way!
Hi Joe. Clean the concrete first. This will expose anything else that may need attention. After that, do your patch work and then etch.
We live in Michigan and have a 2 story garage. The lower level is below grade and always smells. The plastic test shows its dry but smells and any paper, plastic or clothing stinks as well. Will painting the walls or floor help?
Hello Shirley. The smell is a result of the constant high humidity that you have in the lower level. If you have concrete or masonry walls, painting them with a product that helps to repel moisture will help. DryLok makes such a product for masonry walls. For the floor you will want to use a penetrating sealer. RadonSeal makes such products. Treating the walls and floor in conjunction with a dehumidifier will generally reduce or eliminate smells for most spaces.
Hello Shea – super helpful info here – thx! My garage floor has previously been painted (epoxy I believe – did the water test) and has some chips and spalling. My plan was to grind away all paint, repair spalling and cracks using one of the recommended products (large areas of spalling – will need to use a product that I can pour out and squeegee) then re-grind, and then epoxy paint. Problem is that i cant get all of the old paint off! The diamond chip commercial grinder did a good job but after four hours there are still some ‘swirly areas’ where paint exists – although the grinder definitely reduced it and no longer has any type of sheen (in other areas the paint has been removed and it worked great!). At this point Im done grinding though. Does ALL the paint need to be completely removed? Thoughts on what to do next? Thx!
John
Hello John. If it is epoxy that is on the surface then you will be fine. Paint is what we want completely removed since it does not adhere nearly as well as epoxy does. If you were using a commercial grinder then it would have easily removed paint. Epoxy can be a bit stubborn and if there is still some left behind after the grinding, then you should not have to worry about it lifting in the future.
Thx Shea – Thats great news! One more question please – I think I am going to use the Ardex CD product to repair major spalling and minor chipping. I think I may have some minor moisture issues from the slab given the way the last treatment failed – I will do the moisture test to be sure. Educating myself about the vapor epoxy primers and then also about the densifiers. Can’t tell the difference – can you please explain? Also if I plan on using the Ardex CD product, what should the order be with these applications – Moisture treatment, Ardex, Grind, Epoxy paint finish? Thx again so much Shea!
A densifier is a penetrating treatment that is non film forming. It gets absorbed by the concrete and creates a reaction that helps to fill the open capillaries witin the concrete near the surface. This reaction also helps to harden the concrete. Penetrating sealers breathe. They might block physical moisture, but not moisture vapor. An epoxy moisture vapor barrier primer is film forming. It soaks into the upper layer of concrete and forms a coating on the surface. They do not breathe and effective block both moisture and moisture vapor. If you suspect moisture or test positive for it, then a moisture vapor barrier epoxy is what would be required. It does not work well over polymer-modified repair patched areas. As a result it should be applied first and then an epoxy sand slurry used over it for the repair areas. If moisture is not suspect, then apply the Ardex, grind it all flush, and then apply your coating.
Hello Shea – Cant find the Ardex CD product for sale doing a google search. Henry Products seem to always come up, Is the Ardex product still available. Is there a similar Henry product Henry-625)? Thx Shea!
Hello John. You aren’t always going to find Ardex doing a google search. It’s generally carried by contractor supply stores, concrete supply stores, and etc. These type of stores usually don’t advertise via the internet. That’s why it’s best to go to the Ardex website and find a dealer near you. Henry 625 works best for thin applications, but it’s not best to use for pitting and spalling repairs (not sure what you are trying to accomplish). Henry also has a lower PSI rating. Here are the data sheets for it.
Hello Shea,
I am repairing my garage floor, used polymer modyfied cement for damaged areas. There are parts which need another layer as they sunk lower or simply were not not smoothed enough. It has been 2 weeks since they were applied, is grinding my only option to prepare the surface for the second coat? I used cts cement rapid set newcrete. Thanks in advance!
Dorota
Hi Dorota. We checked the Rapid Set specifications for Newcrete. It states that the surface should be prepared to a minimum CSP 2 profile. Grinding is what provides a CSP 2 profile, so that is what you will need to do.
Shea,
Done! Now I have another question: will these repaired areas accept densifier? I am looking for solution which would reduce dust, and simplify cleaning. My garage is fairly dry but do not want any coating to come off, sometimes the floor gets wet by the door when it rains a lot. Besides, I like the look of concrete in the garage:) I understand that thinner sealer would also work as long as the moisture can come through, same question here. How would polymer modyfied cement pathes take the sealer?
Thanks for your quick response before! Great site!
Dorota
Hi Dorota. Polymer-modified cement will accept a densifier or densifer with siliconate sealer added, but they don’t react with it nearly as well as standard concrete. Sealers need the free lime in concrete in order to react. Polymer-modified cement has very little of it. However, polymer-modified cement is freeze thaw resistant and it will not dust. You will find that once your repaired areas have cured, they will not absorb water well. This is what makes them freeze thaw resistant. When applying a sealer to it, do not let it puddle on the repaired areas and work it in well or you can get a white residue on the surface that is hard to scrub off later.
Shea,
One more question 🙂 As my fixing and cleaning stains is almost finished I am left with all shades of gray and some faded stain marks which I do not think I can remove. I read about DeltaDye water based stain and would like to use it before the sealer. From what I understand it should work with cts cement rapid set newcrete? Can I still use PS104 once it dries?
Dorota
Hi Dorota. Concrete stains and dyes look dull and drab after they are applied. They require a topical film forming sealer in order to make the color pop and the stain glossy. Examples would be a clear epoxy or polyurea. MMA acrylics is another. A penetrating sealer is not film forming. Once applied, the sealers penetrate into the concrete, thus leaving the stain on the concrete looking dull and drab. That is why penetrating sealers do not change the look of concrete.
Hi Shea, great site!
Quick question similar to Dorota’s, would the use of an epoxy crack repair compound such as Simpson Strong-tie’s Crack Pak accept a densifier with siliconate sealer and match existing concrete visually? Obviously won’t be a perfect match, but any idea if it would be close. We are repairing a prominent 3/8″ wide crack that runs the length of our garage (soon to be music studio) floor and the like the raw concrete appearance of the identifier/silicate sealer.
Hello JD. Epoxy, as well as other 2-part resinous repair products, act as sealers and liquids cannot penetrate the surface. Penetrating sealers will have no effect on the repairs, however, the repair in itself is already sealed. Repair products never match concrete. It’s going to be visible regardless. We always recommend mixing in silica sand for wider epoxy repairs since the sand will give the repair a more natural color and texture compared to epoxy. It also makes it stronger. The key is to lightly grind the repair afterwards to create a smooth transition that blends more. We also like this product here for such repairs.
I have fine cracks (can’t fit a business card in) on the garage floor. House built in 2014. There are darker areas along one of the cracks. Is this a sign of a crack through the slab? Thanks
Hello Frank. No, it’s not a sign that the crack goes all the way through the slab. Cracks that do that are generally fairly wide to begin with. There are many reasons why concrete can be darker in one area than another. Darker areas along a crack are generally caused from moisture that has gotten into the crack and then migrated to one side or another – often times both.
Shea,
I would like to apply Behr Granite Grip to a basement floor and want to first make some repairs to larger cracks and pits than Granite Grip can fill before applying. I contacted Behr to ask what products I might use that are compatible with their product. Their answer was to use products that are compatible??!! Can you recommend products or types of fill/patch products that are compatible with water-based floor coatings? If not, how might I find compatible products? There already was some polyurea (Xtreme Set 100) applied. I am wondering if a rough surface for a mechanical bond with Xtreme Set 100 might make up for the lower chemical bond.
Hello Zig. Yeah, sometimes the manufacturers of the big companies are not the best for help. The Behr Granite Grip can be applied to most any concrete repair products. That includes epoxy and polyurea as well as any cementitious patch repair products. It would just require roughing up the finish with some 80 grit sandpaper for Granite Grip to stick if you didn’t grind your repairs flush. What you do not want to use is a crack repair “sealant”. These don’t repair cracks, but instead just seal them. They are relatively soft (flexible) and some are non-paintable. SikaFlex is an example. Examples of actual crack repair products would be Xtreme Set 100, Rust-Oleum Concrete Patch and Repair, PC Products Epoxy crack repair, and etc. Basically anything mentioned in the article on this page would work just fine for you.
Hi, our garage floor has a crack that runs from one wall to the other. Snow and rain from our cars settles in and is making it wider. It is starting to heave. Do I fill the cracks and then sand as you mentioned above? Any advice is welcome as this will be my first time doing this type of repair. Thanks
Hello Jessica. Yes, you can repair the crack with one of the methods we discuss above. However, heave happens when soil under a concrete slab swells or expands due to moisture or freezing. This means that the slab is going to settle back as temps warm, which will result in the slab cracking again in the same spot or adjacent. We recommend using containment mats right now to catch the rain and snow from your cars in order to prevent further heave, and then repair the crack once the slab settles. The bigger question is what caused the crack all the away across the slab to begin with? Has it been there for a quite a while or is it new? If it’s new, then you may have something else going on under the slab (moisture, ground settling, etc) that will need further attention.
Hi there, we have a tiled garage floor and paving on the outside. The little space between the 2 is on the outside of the door. It keeps crumbling and breaking up. Our paver has filled it with a screed mix ( 3 times over 5 years) and it keeps breaking up. It is 4cm wide By 6mts long . What can be used to stop it doing this . He has cleaned it right out each time ? Many thanks
Glenda
Hello Glenda. There are a few problems here. The first is that the area being filled is relatively narrow and is actually a wide expansion gap between the garage and driveway. Also, a screed mix is relatively weak. When that mix is placed between the two, the expansion and contraction of the two different mediums (Garage floor and driveway) is placing too much pressure on the screed mix and causing it to break apart. What should be done in this case is to clean out the joint and place some foam backing rod approximately 1/2″ below the surface. You can then fill the remaining void with a self-leveling polyurethane sealant. The sealant will flex with the expansion and contraction of the two slabs. This video here demonstrates how it is applied.
Shea,
I’m looking to epoxy my floor. One of the things I’ve seen in some of the videos I’ve seen is contractors filling the larger beveled expansion joints with some material, not sure if it’s an epoxy on concrete mix, and then coming back with a circular saw later and putting in a “tighter” expansion joint cut. Any idea what I would use for the filler if I wanted to do something similar?
Thanks in advance.
(Edit)
After reading this link (https://allgaragefloors.com/can-i-fill-my-contraction-joints/) I realize I’m actually talking about contraction joints. I guess my question still applies. If I plan to recut a tighter contraction joint could I use a sand based concrete mix, while if I wanted to get rid of the contraction joint all together I use the Legacy Industrial or Garage Flooring 100% solids epoxy filler or polyurea filler? Over time you wouldn’t see the epoxy in those are deform ever so slightly?
Hello Andrew. I was going to point you to that article you linked. Is there a reason you want a tighter looking joint? Generally, you either fill them in with the proper material and grind them flush or you leave them be. You would need to use a polymer-modified repair cement to fill the joint if you wanted to saw cut it.
Honestly, just to make it harder for junk to get trapped in there. So I have two thoughts.
1) Use the contraction joint fillers you mention in that article. If I do that before profiling the floor with the floor sander, can i just use the floor sander to sand those joints flush with the rest of the garage, or will I need to hit it locally first? Using those 100% solids fillers will give the joints the best chance for not cracking?
2) Use the repair cement and recut the joints with a circular saw.
Any reason the kit you’ve pointed to in other articles for patching spalled areas wouldn’t work for the contraction joints given it’s also 100% solids? You mention in your final thoughts on the spalled concrete repair you wouldn’t use those products for contraction joint filling. (https://www.amazon.com/dp/B01KSYPCIC/ref=cm_sw_em_r_mt_dp_U_r.b8CbASAP478)
Thanks for bearing with me!
Andrew
If you want to fill the joints in order to coat over them and create a seamless look, you will need to use the type of joint fillers we mention in the article. The reason is that they have a higher elongation rate that will allow the filler to flex enough if the joint was to expand or contract much. The flexing under the coating will prevent the coating from cracking (most cases). If you use a standard 100% solids epoxy repair material (like the Rust-Oleum product) you will not get enough elongation. Epoxy in general is not flexible at all and has to be specially formulated to flex.
Also, the Rust-Oleum crack repair is not a high volume product and will require multiple kits to fill “V” shaped contraction joints. You would be better off with a 100% solids epoxy/sand slurry if you want fill the joints and then create saw cuts. Rust-Oleum Turbokrete is an example.