

Occasionally when you don’t have the time to make your mind up about something, the alternative can be a pleasant surprise. In fact, it can sometimes turn out to be what you may have desired all along. This is just what happened with Jon when he was deciding what to do about the concrete floor of his newly built garage.
For a little background, Jon and his wife purchased a home for their family in Durham, North Carolina (go Bulls!) based on the lot and location. The only problem was that the home didn’t have a garage for all of their stuff.
One never realizes how much Cruiser crap they have until one is forced to move all of it.
You see, Jon is an admitted addict to the older Toyota Land Cruisers. He has a 40 series he’s bringing back to life and he discovered that he had more stuff than he thought. To quote Jon; “One never realizes how much Cruiser crap they have until one is forced to move all of it.” Plus, he needs the space to work on other toys and projects.
The solution? Build a new garage of course!
The result is a 24’ wide by 32’ deep garage that he built in the back corner of his lot. With an 8” thick slab (yes, we said 8”), 12’ high insulated walls and vaulted ceiling, he has plenty of height for the BendPak 2 post lift he installed, plus room to move in all his stuff.
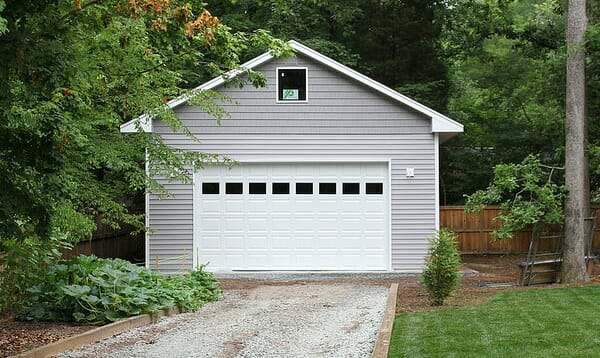
The garage has a separate electricity meter with a 200 amp breaker box, four 220/230V outlets and an excess of 110V outlets. With eighteen separate two bulb 4’ T8 light fixtures installed, he has enough light to think the sun never sets when in his garage.
Click here for more garage build pics
His big dilemma however turned out to be his garage floor. He was torn between applying an acid stain with sealer or just going with a clear acrylic sealer over the bare concrete.
His indecision became more of an obstacle when his garage started coming together quicker than he anticipated. He soon found that he had to get something down on the concrete fairly quick after the drywall work was done and before things like his compressor, lift, workbenches, and etc. started getting installed and moved in.
Because of the time constraint it didn’t leave him much time to apply either one of the flooring systems he was considering, so he decided to go with a stain guard sealer instead. His thought was he could at least protect the surface of his concrete, help reduce staining, and make cleanups easier until he had the time to apply the garage flooring option of his choice.
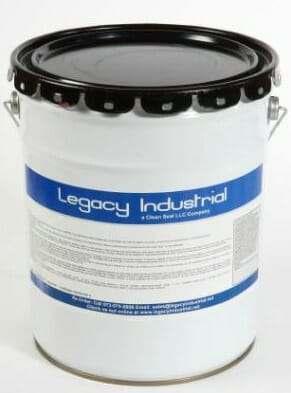 Since the concrete floor had a smooth finish from it being machine troweled, Jon decided upon Legacy Industrial’s HD40 Concrete StainGuard. It’s a silane/siloxane sealer that penetrates well into the small pores of smooth concrete in order to seal the concrete surface.
The additional benefit to the HD40 is that it has an added stainguard that leaves a very thin film to the surface of the concrete to help it better protect against stains. The biggest benefit to the stainguard sealer however, is that it also helps to provide a more polished look to concrete when it is burnished using a high speed floor buffer.
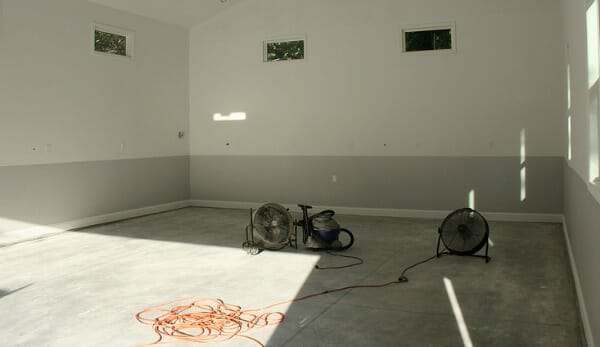
His floor prep was easy. The concrete was cleaned with a solution of Simple Green and scrubbed down with a short bristled deck brush. He then mopped up the dirty solution, rinsed it down with a hose, and then let it dry. Floor fans were used to facilitate the drying process.
Once dry, he applied the product with a pump up garden sprayer and then worked it in with a micro fiber applicator pad. Because HD40 requires multiple applications to achieve full penetration and performance, 3 thin coats were applied with a one hour wait between coats. He used a total of 2.5 gallons for the 768 ft² of floor.
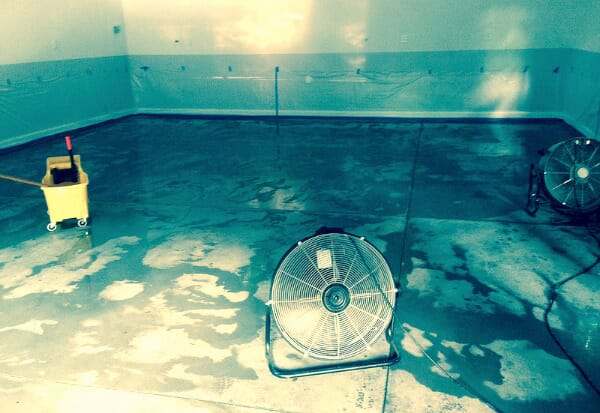
After the last coat dried, Jon then burnished the floor with a high speed buffing machine. A high speed buffer is required in order for the buffing pads to build up a minimum temperature of 90° at the pad surface. The higher temperature not only helps to create a more polished look, it also allows the treatment to bond and fuse with the concrete surface to improve the durability.
And this is where Jon’s decision to use a sealer such as this one turned out to be a nice alternative indeed.
He first used a 3M Natural Blend Tan Pad 3500. This pad starts the burnishing process and smooths out the finish. It took him about 2 hours to do the entire floor. It was then followed up with a 3M Natural Blend White Pad 3300, which adds more gloss to the floor. Since the first pad did most of the work, the white pad only took him 1 hour to complete.
As with anyone who uses a floor buffing machine for the first time, it took Jon a few minutes to figure out how to make the machine work for him instead of him working for the machine. As Jon stated; “The damn thing owned me at first, but I got the hang of it”.
Pads can only be purchased 5 at a time and Jon only used one of each color pad. It leaves him with plenty left over to maintain the floor. If the place where you rent the buffer does not have any, you can always get a good deal on them here from Amazon![]() .
.
One note we want to make; don’t confuse a high speed buffer with the slower RPM’s of a standard floor maintaining machine. These slower turning machines will not polish as well and will not build up the minimum temperature required to better bond the HD40 to the surface.
The final result is a glossy looking concrete floor that takes on a similar appearance to the concrete floors you typically see in your favorite home improvement center.


Click an image for a larger view
Jon is extremely happy with the way his floor has turned out. He feels that the HD40 has significantly improved the durability of his floor and it now has a smooth glossy sheen that he loves. He also likes that it did not change the color of his concrete and that it doesn’t scratch or leave scuff marks on the surface.
An additional benefit was the low VOC content of the HD40. Because it is water based, there were no fumes to worry about during application or after the drying process. His Labrador, who likes to lie on the floor, approves as well.
He admits that he left a footprint or two during the process and that there were a couple of areas where he didn’t keep a wet edge that he later noticed. It wasn’t that big of a deal to him however because of the fact that it’s just a garage floor.
Total cost for this garage floor project was $425. This included the HD40 StainGuard by Legacy Industrial, micro fiber applicator pads, an inexpensive pump-up garden sprayer, burnishing pads, and the high speed floor buffer rental.
For his efforts, he now has an extremely tough concrete surface that is easy to keep clean, will not scratch, and will do a much better job at resisting stains than bare concrete.
One thing we do want to point out is that a floor such as this will lose some of its luster in high traffic areas after a period of time. You can bring it back however with a light application of the HD40 followed up with burnishing again from the high speed buffer.
We asked Jon if he has any future plans for the floor. He said that he was originally interested in the cloudy look and color variations that you get with an acid floor. But since the HD40 has accentuated the natural look of the concrete, he may only apply a clear sealer sometime in the future in order to maintain a constant “wet look”.


Click an image for larger view
His only regret with the floor is that he had the concrete poured too soon during the spring pollen season. He ended up with a number of areas in the slab that had marks from tree droppings. That and the fact he feels he should have covered the floor during the build. He admits however that it isn’t someone’s living room so a few marks in a garage floor slab are not a big deal unless you are extremely meticulous.
We also want to mention that Jon is a member of the NC chapter of the Olde North State Cruisers and is also an avid member of the IH8MUD community. He’s also very passionate about the outdoors and sustainable habits. Jon says, “Even the smallest exercise in sustainability can create great results when performed by many!” We couldn’t agree more.
So if you are looking for a budget solution to your garage floor that will give you a glossier look, then a sealer with a stain guard may be your solution. Keep in mind that the surface of your concrete needs to be smooth with a hard troweled or machine troweled finish in order for it to polish up. A rougher finish or broom type finish will not work.
Floor looks great. Good job Jon!
How about sanding floor first and doing this?
Do you think it will work on new construction such as yours ?
Awesome experiment- I love it along with the old Rovers. 62 Skylark 215/V-8 Custom in Phoenix.
It works great for new construction Gary.
Can we get a long term update on this floor? I’m interested in doing something similar and would like to know how it’s working out a few years later.
Hello Steve. We emailed Jon this morning to ask for an update on how his floor was holding up overall and he got right back with us. He said for what he has been using it for that it has been holding up well enough. He did say that one area where he spilled acetone had taken some of the sheen away. He also said where he taped down plastic for a homemade paint booth that the tape took away some of the sheen as well. One thing he did point out is that he had never mopped the floor and all he does is sweep and/or vacuum it. He may check in here and leave an update himself in a couple of weeks when he gets time.
We do want to let people know that if the sheen is eventually lost, all it requires is a small reapplication and some burnishing to bring it right back.
Would it be ok to put a clear polyaspartic or polyurea coating on this finish to give it extra protection? I want my floor to look just like this, but with the durability of the polyaspartic. I’m afraid going with just the polyaspartic on bare concrete won’t achieve this type of polished finish.
Hi Chris. No, you can’t apply any type of coating to it. HD40 is a stain guard sealer and will prevent a coating from adhering. The only way to apply a coating once you put it down would be to grind the surface of the concrete to remove it.
Your reporting this is a silane/siloxane sealer that penetrates well into the small pores of smooth concrete in order to seal the concrete surface.
According to legacy industrial tech data, HD40™ is a co-polymer blend of lithium densifying solution and integral high gloss sealer.
Which is better for densifying a machine finished floor, silane or lithium, and are the chemical reactions the same?
Can this be used over top of a floor that already has a lithium densifier only, no top coat, to take advantage of the polishing effect?
Is it slippery once polished?
Hi Fred. HD40 uses a silane/siloxane mix as the primary sealing ingredients. In addition, the co-polymer blend of lithium and other ingredients allows for the gloss when buffing. The addition of lithium is very small and used primarily to prevent a whitening effect on the floor (reaction to carbon dioxide) if too much is applied and allowed to sit before buffing.
You have two main choices in concrete densifiers – Lithium or sodium (not silane). Lithium concrete densifiers are primarily used today for a variety of reasons, two of which is that they are easier to apply and require much less product than the sodium densifiers in order to get the same results. Sodium densifiers also require scrubbing of the product to work into the concrete whereas lithium does not.
Silane and siloxane are very small molecule sealers and work very well when applied on top of concrete that was treated with a densifier. This is why they are the main ingredient in HD40. HD40 is typically applied last in the final stages of polishing when other densifiers have already been applied during the process. Technically, silane and siloxane cause a reaction in the concrete that will make it slightly harder. However, it’s not nearly as effective as a true densifier. The silane/siloxane mix is why HD40 is only recommended for a machine finished floor. The machine troweling effectively creates very small pores that are harder to penetrate. If applied to a standard troweled floor, most of the product would penetrate too deep or require multiple applications to work effectively.
If your ultimate goal is to make your concrete surface harder, then you will want to treat it with a standard lithium densifier first. You can then apply the HD40 over that for further sealing protection and to buff to a shine if like. If you feel the concrete surface is plenty hard already, then just apply the HD40. I hope that clears things up and answers your questions.
What products or methods would you use for a standard hand troweled garage floor? If it requires multiple coatings and penetrates too deep (as in the answer above) would a white film start to show? How would one minimize this ?
Hi B. What you can do is apply a lithium densifier first as stated above. This will help to fill up some of the pores if the concrete is a bit porous. You then have to wait a week for the densifier to react. You can then apply the stain guard. Stain guards have to go on thin, not heavy. You don’t let product pool. As long as you follow the directions properly, you should not have any issue with a white powder effect.
Thanks for your reply, one more question. Is the burnishing done after the Densifier sets for a week? Then apply a stainguard? Thanks
No, the burnishing begins after application of the stain guard. If you contact Scotty at Legacy Industrial, he can walk you through the procedures, including what type of pads to use. Also, make sure that you use an actual floor burnisher and not a floor maintainer. Burnishers turn at a higher RPM which is required to get the intended results.