
DIY acid stained garage floors always seem to possess a bit of mystery. With one look at the vibrant colors amid the marbled and variegated appearance, it’s natural to assume that such an application can only be performed by decorative concrete professionals. Thus, most think it’s a difficult DIY project to tackle.
Well, that didn’t stop Joe from DIY’ing the above acid stained garage floor that we have featured here. In fact, he admits that; “It may appear rather involved and complicated in print, but it was actually quite easy.”
As a result of this self-discovery, Joe decided he would like to pass on what he had learned in order for others to avoid the mistakes he almost made, as well as the ones he did. Therefore, we took the opportunity to tell his story as an acid stained garage floor how-to project.
Just to put things in perspective, Joe is a 73-year-old retired automotive mechanic from Agawam, Massachusetts. He performed the entire application of this project on his own. Additionally, he plainly states that he has no artistic ability, skill, or talent.
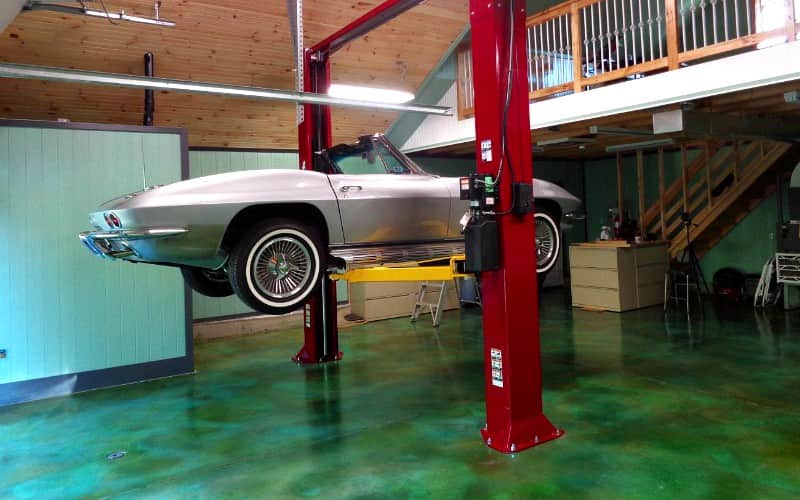
Despite his self-deprecating artistic shortcomings, it’s easy to see that he created a fantastic looking acid stained garage floor. And to understand why Joe chose acid stain over other garage flooring options, it’s important to learn a little bit about his garage build.
The Garage Build
He started his build in 2017. And to quote Joe; “I was determined that it not be the stereotypical build with the two-tone gray walls with a red stripe and checkerboard floor.”
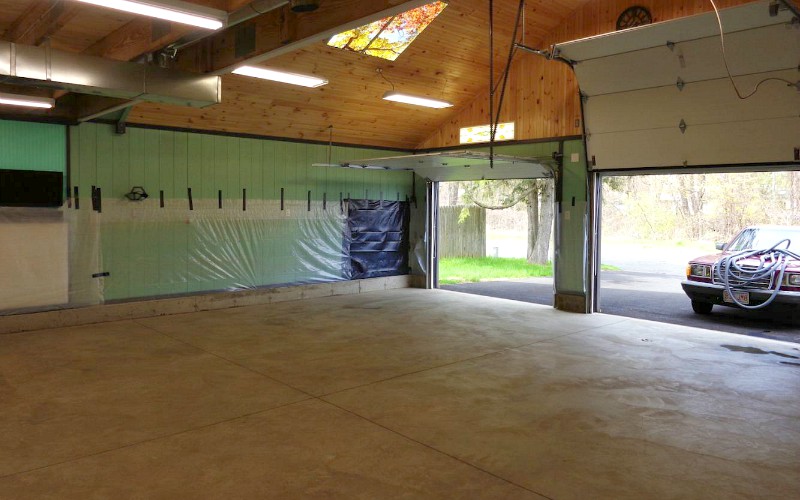
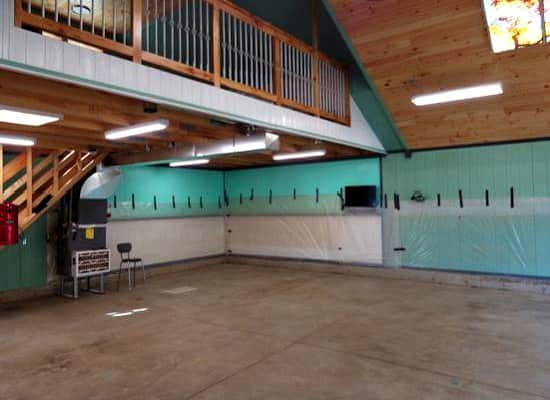
The foundation of his build is an 1100 ft² slab of 4500psi concrete that was power troweled to a smooth finish. For the interior walls, he used LP Smart-Side exterior siding with tongue and groove beaded pine on the ceiling.
In addition, he also chose to use raised panel wainscoting topped with beadboard in one corner of the garage. To be different, the trim and crown moldings were painted black instead of the traditional white.
American-made was the priority, with few exceptions. One exception was the Chinese-made granite vanity top in the bathroom and coach lights out front. The other is the German-made flood lights front and back since there was no American equivalent.
Because his garage was exceptional to most builds, it was important to him that the flooring be equally exceptional as well. He knew early on that acid stain was dramatic and unique, so he decided it would perfectly complement the quality finishes of his building.
This post may contain affiliate links. If you use these links to make a purchase, we may earn a small commission. As an Amazon Associate, All Garage Floors earns from qualifying purchases. You can read our full disclaimer here.
Concrete Acid Stain Materials
We weren’t kidding about the floor being six different colors of acid stain. Five of the colors are “artist grade” stains from Concrete Camouflage.
They are Turquoise, Bronze Green, Golden Sand, Sea Mist, and Sandstone. The sixth color is Jade from Eagle.
He chose these colors because he thought they would nicely complement the coloring of his ceiling, walls, and trim.
In order to protect the stain, it’s a requirement to apply a clear topical coating. The coating is what makes the stain colors pop with vibrancy and gloss. In addition, the coating seals and protects the concrete from chemicals, abrasion, staining, and wear.
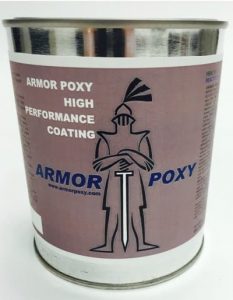
Joe chose to use a single-part polyurea by ArmorPoxy called SPGX clear. It is very easy to apply and provides outstanding protection for a garage floor. You can read more about SPGX here.
As we stated before, the complex look of acid stained floors makes one believe that the colors have to be applied in a very specific way. Though this can be partly true to some extent, there really are few hard and fast rules about the application.
Due to Joe’s uncertainty regarding this, he went about doing his own research on the subject. What he had to say about his findings was interesting and we decided to quote him below.
There’s a ton of information and pictures on the internet of beautiful acid stained floors done by both amateurs and professionals, but few if any get into color combinations and techniques to achieve the results.
Often times the information is contradictory, one pseudo expert advising against letting the stains puddle, while another advises puddling to achieve a mottling effect. The one absolute was, “you can always make it darker, but you can’t make it lighter.”
All of this led me to conclude, there’s really no way to do this wrong as long as you’re ready to live with the result.
His research and conclusion are actually quite insightful and that is why we wanted to include them here. So, with this newfound knowledge, Joe gathered all of the information that he felt was correct and decided to go for it.
How Joe Acid Stained his Garage Floor
An acid stained garage floor is broken down into five separate steps.
- Clean the concrete
- Apply the acid stain/s
- Neutralize and rinse
- Apply the proper clear coat
- Stand back and marvel at your garage floor
Of course, step 5 is a given… 🙂
Though these steps sound easy enough, it still requires a bit of planning to make sure you have your materials and supplies in order before you begin.
The first thing Joe did was protect the walls of the garage. Because he had already attached plastic sheeting to the studs before putting up the wall covering, he simply pulled these up and taped them to the walls to protect them from water and stain.
He then vacuumed the concrete with a shop vac and cleaned the garage floor with a solution of TSP. The process of cleaning the concrete created a concern for Joe in regards to how smooth the surface was.
Acid stain works by permanently imparting its color to the concrete. It does this when inorganic metallic salts that are dissolved in the acid solution, react with the free lime in and at the surface of the concrete.
Because Joe’s slab was power troweled to an unusually tight and smooth finish, he was worried that the stain would not penetrate the surface enough to react very well with the free lime. The result would be very weak coloring.
Furthermore, unlike water-based dyes and stains, the one thing you want to avoid is grinding or etching the concrete beforehand. Doing so will effectively remove too much of the free lime at the surface and result in the aforementioned weak coloring.
Joe’s solution was to go over the concrete with a 2000 PSI pressure washer. Pressure washers can be somewhat abrasive to concrete when using a small degree nozzle with enough pressure. Sure enough, this did the trick and allowed the acid stain to penetrate and react as it should.
Because pressure washers can drive water deep into the concrete, Joe opted to let the concrete dry for a full week since he was concerned that moisture in the slab could dilute some of the colorings.
The next step was to apply the acid stain. Because some stains can be diluted with water in ratios as high as 5 to 1, it’s important to plan out how you want your colors to look. Full strength will produce the boldest and most intense coloring and this is what Joe decided upon.
Acid stain is typically applied with a pump-up garden sprayer with a circular spray nozzle pattern. You work the nozzle in a circular motion, making sure to overlap as you go.
Don’t use a fan pattern nozzle! If you do, it can create lines of darker stain in the concrete due to the heavier concentration of stain at the edges of the spray pattern.
Unless you do this for a living, we recommend purchasing the inexpensive all-plastic garden sprayers. Don’t spend good money on acid-resistant sprayers since it’s easier to just dispose of the inexpensive sprayers when you are done. Joe purchased two all-plastic sprayers from Home Depot for $8 each.
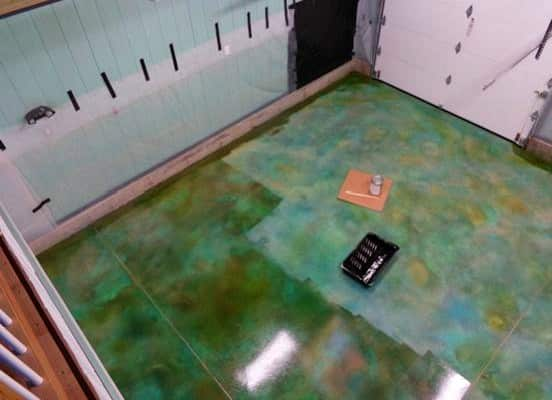
To start, he chose the lightest green for the base color. As he applied it, he deliberately left random bare areas all over the garage floor. These were filled with blue, tans, golds, and other colors. If he felt any one area could use more of a certain color after surveying his work, he would just go back and apply more.
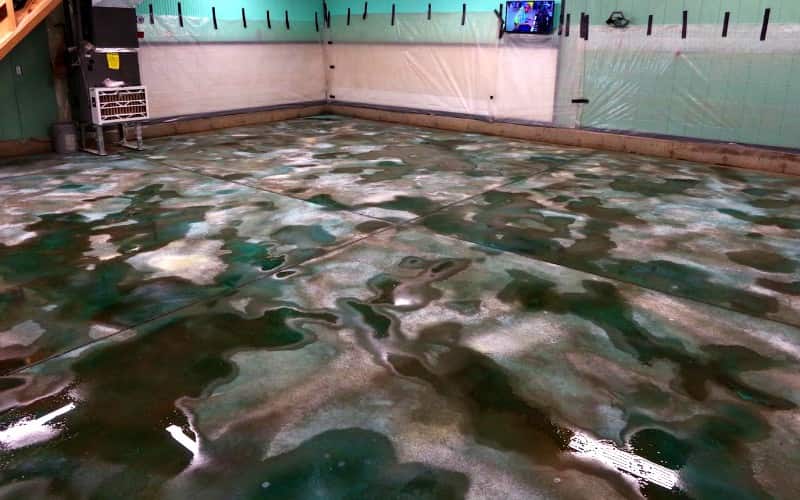
Stains have a minimum amount of time that they need to react depending on the color. The longer they are left to react, the deeper the color will be, up to the point that they quit reacting. As a result, Joe decided to leave the stains for 24 hours in order to get the deepest looking color.
The following day it was time to neutralize the stain and remove the residue. Joe chose to use an ammonia solution. A ratio of 8 ounces ammonia to 1 gallon of water works well. Just dump it out onto the floor and lightly work it in with a soft bristle broom or mop.
It’s not necessary to remove all the residue. In fact, doing so may require strong scrubbing and this will lighten the stain. Once it has been neutralized, rinsed, and dried, the stain will be permanent and cannot be scrubbed out.
Joe repeated this process two or three times while keeping the surface wet. He then let the concrete dry again for a full week. He opened the upper windows for air circulation but kept the doors shut to keep the floor clean.
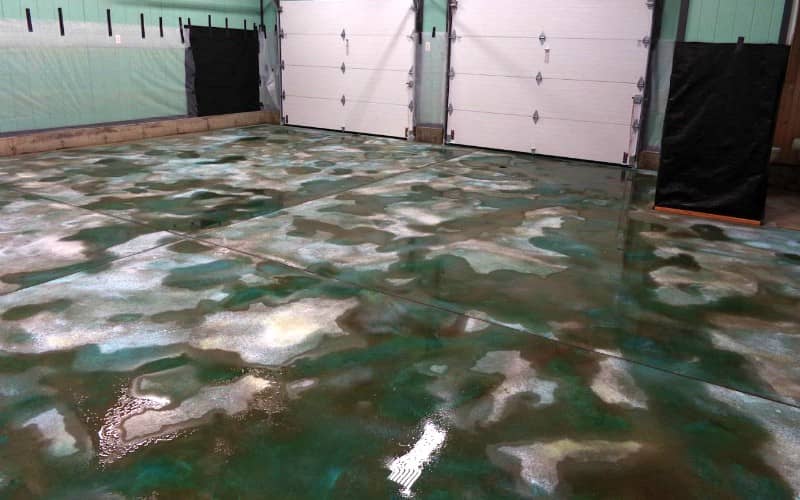
It was now time to apply the clear SPGX polyurea coating. In the pictures below you can see the difference that the clear coating makes. The stain looks dull and lifeless until the coating wets it out and makes the colors pop.


Joe chose to use an 18” Wooster EpoxyGlide roller cover with a 3/8” nap instead of the recommended 3/16” nap. Despite the high gloss of the SPGX, he felt that the 3/8” nap gave the surface a slight texture that eliminated the need to use an anti-slip additive. He states that the surface does not feel slippery, even when it gets wet.
Joe was happy to report that the SPGX polyurea went on beautifully and that he liked to watch as the concrete absorbed the coating and brought the colors of the acid stain life. He used approximately 3.5 gallons of SPGX for the entire 1100 square feet of the garage floor.

As you can see with the final results, the stain color deepened considerably and the floor now shines with gloss. We have to say that Joe did a great job of complimenting his garage colors and created a very unique-looking garage floor at the same time.
Final Thoughts
Joe said that applying the stain was by far the most fun part of the project. Working alone, it took him approximately 4 hours to apply the stain and 2.5 hours to apply the SPGX clear polyurea. Of course, he offered some thoughts on what he would do differently if he were to do it all over again.
The first thing he mentioned is that after seeing how the polyurea dramatically enhanced the colors, he would not have applied them at full strength and would have lightened up more on the application of green.
In addition, because he had to take the time to clean out the garden sprayers between colors, he could have saved a lot of time if he had purchased two more.
The total cost for the project including materials and application supplies worked out to approximately $1.10 per square foot. The SPGX clear coat was certainly the most expensive cost, but he did acquire it from ArmorPoxy at a sales discount.
We also want to point out that you don’t have to wait as long as Joe did between some of the steps. He had the luxury of a new garage that he could take his time with. Most people tackle an acid stained garage floor project on a long weekend.
Furthermore, one advantage of acid staining is that the stain actually etches the concrete. The resulting process usually will provide the proper profile required for a high-performance clear coating.
Water-based or solvent-based stains and dyes will not profile the concrete as acid stains do. You generally need to etch or grind the concrete first if you want to apply a high-performance clear coat like SPGX.
Hopefully, Joe’s acid stained garage floor will inspire those who may have been on the fence about doing such a project on their own. Though the appearance of the floor may look intimidating, it’s a DIY project that can easily be performed with a little bit of attention to detail and some planning.
I’m building a new garage and would like to acid stain and seal the floor with SPGX clearcoat before insulating and sheet rocking the interior. Will the clearcoat hold up to the residue and traffic created by this process?
Hi David. It will old up, but we always recommend doing the floor last for obvious reasons. It’s for the same reasons you don’t put flooring down in your home before you do the sheet rock and paint the walls. You never know what’s going to happen during construction. If you have to put it down first, we recommend covering up most of it if you can.
Where can I purchase the acid stain
Hi Oliveen. There are red links in the article to all the products he used. The stain is from Concrete Camouflage.
Question about using blue and green stains:. Most mfgs do not recommend using these colors in an outdoor space because they can darken significantly with sun exposure. Are these safe to use in a West facing garage that will be closed almost all the time? Are there any topcoats that will prevent darkening?
Hi Justin. It takes many months and sometimes even years in daily direct sunlight for the blue and green acid stains to darken. For a garage that will have the door closed most of the time, it will not be an issue to worry about. In terms of clear topcoats, there are many that are U.V. stable and will not amber (yellow tint) from sun exposure. Polyurea, polyaspartics, polyurethane, acrlics, etc, (not epoxy). However, there is not a topcoat made that acts as a sunscreen, so to speak. They will still allow U.V. rays to pass through the clear coating to the substrate underneath.
You again deliver a wealth of knowledge on garage floors! Thank you.
You’re welcome, Justin!
Also, awesome job, Joe! Looks beautiful. I was inspired by your work and dug into this further. I’m going to attempt an ebony, turquoise combination using the technique you outlined. Two sprayers of course.
I am planning to acid stain the concrete in the living room and fireplace room. Can I use Rock Solid polycuramine clear coat or should I use SPGX Polyurea?
Hi Tanya. Yes, you can use RockSolid clear if you like. However, SPGX is more abrasion resistant, meaning it’s harder to scratch, and it’s also U.V. stable. RockSolid is not U.V. stable and will eventually amber (yellow tint) if you have any areas of the floor that receives direct sunlight. Unlike SPGX though, RockSolid has very little odor to dissipate when it is applied.
Thank you Shea. I don’t have direct sunlight where I am applying the product but I believe I will go with the SPGX. I have 3 German Shepherds that killed my Livingroom floors I need something real durable.
Ahh… that’s a good choice then. SPGX will endure the dogs much better than the polycuramine.
I want to paint my garage floor that is used as a garage with a product that 1) will hide repaired large cracks and 2) is durable enough to drive vehicles on without the finish peeling. I don’t want just a stained looked. I want a painted solid look because of the repaired crack visibility. What product/s do you recommend.
Hi John. You definitely do not want to use a stain if that is your goal. What you require is a high-build epoxy coating system. You are only going to find that with commercial quality coating products and not from coating products available at your local home improvement center. A typical system includes an epoxy primer and a high solids (>90%) to 100% solids epoxy coating. An optional high-performance clear coat would increase the wear durability. Also, proper concrete prep for adhesion and grinding flush all concrete repairs to avoid them telegraphing through the coating are very important. This vendor here is an example that sells high quality kits. You would just opt out of using the color flakes. This article here explain more about choosing the right coatings and this article here details how a 100% solids epoxy floor was done.