
What do you do when you want a commercial quality, high-performance garage floor coating, but don’t want to spend the additional money to have a professional company install it? Well, if you are like Tony and his wife Karen, you do it yourself!
After reading up on the best type of floor coatings for a garage, Tony came to the conclusion that if he wanted something that would last for years in his New Jersey neighborhood, then he would need to apply a high-performance floor coating system.
He also learned that this coating system needed to consist of commercial quality products. The DIY coatings found at home improvement centers don’t even come close in this regard.
Lastly, after doing some research, he found that high quality coatings are typically purchased from vendors that specialize in garage flooring, concrete coatings, and sealers. After reviewing the many vender options available, he decided to give Scotty at Legacy Industrial a call.
After Scotty took the time to explain the various coating options, Tony decided to purchase their Nohr-S® Polyurea Full Flake Garage Kit.
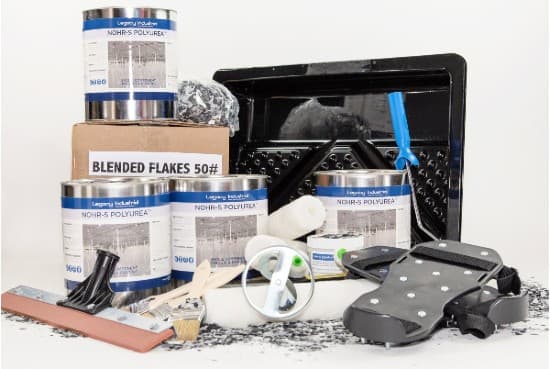
What is the Nohr-S® Polyurea Full Flake Garage Kit?
This kit by Legacy Industrial consists of a high solids epoxy base coat, full coverage color flakes, two coats of a high performance polyurea clear coat, and a small host of application tools.
This is a similar type of system that is installed by many garage floor coating contractors.
An epoxy primer is not included with this kit since the full color flakes will cover up any cosmetic issues that high solids epoxy might develop from not using one. However, you can purchase an epoxy primer from Legacy Industrial if you opt to use one.
The HD epoxy is a 100% solids part-A epoxy resin with a part-B hardener that has a small amount of solvent added to make the epoxy easier to work with for DIY applications. This thick epoxy coating provides a good base to accept the heavy amount of color flakes.
Speaking of the color flakes, you get to choose your own custom blend of decorative flakes to create any look you want – just as you would with a professionally installed coating.
Lastly, the flakes receive two coats of clear Nohr-S single-part polyurea. Nohr-S is a high-performance polyurea that does not require mixing of two components and is easy to apply. It’s thicker than polyurethane and provides for better coverage of the color flakes.
You can view everything you get with the Nohr-S® Polyurea Full Flake Garage Kit here.
Application Process
Tony’s garage floor is 625 ft². Knowing that proper preparation of the concrete surface is the most important part for a successful coating, he decided that he would grind the concrete in order to provide the best surface profile.
He first purchased a 7” angle grinder with a dust shroud and corresponding 7” concrete turbo cup wheel. He then purchased an inexpensive shop vac from Harbor Freight.

This combination can make quick work of a concrete surface and provides for an excellent profile, but it does require that you work from your knees. You can get more information about grinding a garage floor here.
After having a difficult time trying to get a proper connection of the shop vac hose to the dust shroud, Tony came up with a great idea.
Being a retired plumber (Oh, did we forget to mention that Tony is 68 years old?), he went to his local Home Depot and purchased a Fernco coupling from the plumbing isle. These couplings come with hose clamps and allowed him to get the tight seal needed for the best suction.
Tony said that the flexible Fernco coupler worked well and that the vacuum and dust shroud did a great job of keeping the concrete dust to a minimum.
Important: Silica concrete dust is a lung hazard. Always wear an N95 mask or respirator when grinding.
Once done with the grinding, he blew the surface down with his leaf blower to remove the dust on the surface. Blowing the surface or vacuuming with a shop vac will be sufficient in most cases. It’s not unusual to have a little bit of dust remaining.
However, Tony took it a step further and mopped the surface down with Simple Green Pro HD Cleaner. He then mopped the floor one more time with hot water to make sure all the residue was gone.
Because water was introduced after the grinding, Tony needed to wait a couple of days for the concrete to dry completely. It’s not just the surface that needs to dry. The moisture that is still within the concrete needs to dry as well.
This is why you don’t want to introduce water to the concrete after grinding if you are on a time schedule. If you feel that there is more dust to be removed, just wipe the surface down with denatured alcohol or equivalent, applied liberally to a microfiber mop pad.
Once the floor was dry, Tony and Karen put together their application plan. This is something that we always recommend. When you plan your steps, the application process goes much more smoothly and you are not caught off guard with surprises.
With over 100 lbs. of color flakes to broadcast, Karen divided them up into five separate 5-gallon buckets. She was also in charge of mixing each batch of epoxy and trimming the borders.
This allowed Tony to keep a wet edge going. Each batch was poured out completely onto the floor in ribbons, then he would roll to spread it out and then back roll. We have more information about application in our article how to apply epoxy coatings.
Tony says that working in this manner allowed them to work quickly yet efficiently. High solids epoxy such as Legacy HD, allows for an approximate working time of approximately 30 minutes, so quick and efficient work pays off.
After the epoxy was applied, he and Karen each grabbed a bucket and began tossing all the flakes onto the floor. You keep tossing flakes until you can’t see any of the coating. If in doubt, toss more.
The next morning, Tony blew all the loose flakes off the floor with his leaf blower. He and Karen then began the process of scrapping and sanding the surface with pole sanders and 80 grit sandpaper.
This process is what removes all the high spots, prevents flakes from poking through the clear coat, and creates a flatter and even surface.
After the floor was sanded to their liking, Tony blew away and then vacuumed up the remaining loose flakes that were left behind.
The next step was to apply the first coat of clear Nohr-S polyurea. What’s nice about using a single-part polyurea like Nohr-S, is that you can pour it into a paint tray and work out of that with your roller. There is no rush to get it down.
The first coat went on with Karen cutting in the edges while Tony did the rolling. They waited 6 hours and then prepared for the second coat.
Since this was the final coat, they opted to mix into the remaining clear Nohr-S the supplied anti-slip media. Floor coatings can get slippery when wet, so the anti-slip media would provide Tony and Karen much better grip when it does.
Final Thoughts
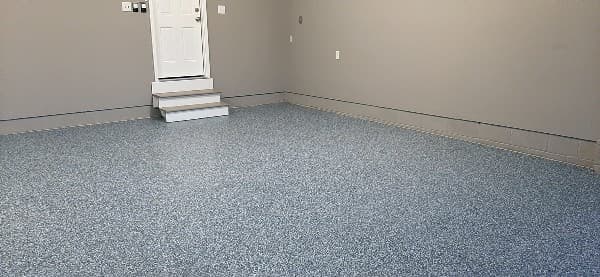
Tony’s photography skills are not quite as good as his coating skills, but we aren’t holding that against him. He and Karen did a great job where it counts.
The goal with this Reader’s Projects article is to show that it’s not as hard as you may think to DIY apply a commercial quality garage floor coating system for your own garage.
A professionally installed garage floor coating of this caliber and square footage with two coats of polyurea clear would cost approximately $3500 on average. It can run a little more or a little less depending on the competition for the area you live in.
Tony and Karen spent almost half that for the materials, not including the grinding equipment and any addition application supplies. That’s a substantial savings for a commercial quality garage floor coating.
In addition, they are extremely proud that they were able to do this project together. Tony commented that it got a little bit intense a couple of times, but they had a lot of fun doing it.
Even more rewarding, Tony says that anytime someone gets a look at their floor they are “amazed” at how nice it looks.
We can confirm that the occasional intense feeling for a first time DIY commercial coating like this is not unusual. However, with proper planning and the first coat under your belt, the confidence builds and it just gets easier from there.
See more reader’s projects
Tony also wants to point out that he is very thankful for Scotty’s help. He called him numerous times with questions, sometimes while in the middle of doing the project. It was Scotty’s help that made the project much easier.
This just goes to show that with the proper planning and a good garage floor coating vendor, you can install your own commercial quality coating at a significant savings – even if you are 68 years old. Good job Tony!
Leave a Reply