
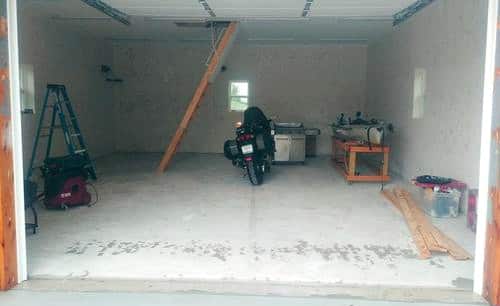
What do you do to protect, seal, and improve the looks of the garage floor for this working man’s newly built 24’x30’ detached garage/workshop? Well, according to Ralph from Oklahoma, you apply a high-performance single-part polyurea garage floor coating system by All Weather Floors.
Interesting to note is that a DIY single-part polyurea coating was not his first choice. He had previously applied a 100% solids epoxy system with full color flakes to his attached garage almost 6 years prior. With the exception of some areas of the epoxy ambering (yellow tint) in places, he has been very happy with the performance and was considering the same coating system.
However, Ralph had quite a bit of time to obsess and research coatings while the garage was being constructed. He conceded that though it was more expensive, quality DIY single-part polyurea had excellent performance specs after reading the data sheets from various suppliers of polyurea coatings.
Nonetheless, unlike 100% solids epoxy, he didn’t like the fact that some of the coating would evaporate and reduce the film thickness once applied. This is due to the solvents that are used as a carrying agent for the solids and are fairly common for most coatings. He felt that the effort put in should not result in some of the product evaporating.
His thoughts changed, however, while he was waiting the requisite 30 days for the 720 ft² of his concrete to cure. He discovered that Garage Flooring LLC had an excellent deal on 1000 ft² of their All Weather Floors polyurea.
You can learn why we recommend All Weather Floors Polyurea here.
After doing a quick check of the data sheets to make sure they met his performance specs, he calculated that he would have a thinner coating system of 21 mils vs 30 mils compared to the same 100% solids system he was planning to use. This did not account for the additional 5 mils that the full flake coverage would add to each of the coatings as well.
Factoring in supplies and the color flakes he would need, the total cost of the polyurea would be $200 less. With that much in savings and knowing that all the products came from the same vendor, he decided to purchase the AWF polyurea.
This post may contain affiliate links. If you use these links to make a purchase, we may earn a small commission. As an Amazon Associate, All Garage Floors earns from qualifying purchases. You can read our full disclaimer here.
Concrete Prep and Planning
This wasn’t Ralph’s first rodeo when it comes to applying a garage floor coating. As a result, he knew how important concrete prep is and how the installation goes so much smoother and with less stress when you plan all your steps, materials, and supplies in advance.
The first thing he did was grind his garage floor. He used an angle grinder with a 5” diamond cup wheel complete with a dust shroud and a HEPA shop vac. 720 ft² is a lot of concrete to cover with just a 5” wheel.
We’re nominating Ralph for the Tough Man award for this one. He later commented that he would not recommend using such a small grinder. Though he was using the HEPA vac with a dust shroud on the grinder, there was still a lot of dust to vacuum up and damp mop afterward.
The next step was to plan out the application process. Garage Flooring LLC recommends the application of All Weather Floors Polyurea at a coverage rate of 200 ft² per gallon. You can view AWF Polyurea specs here.
This provides for a thicker coating than competitors with similar products and is near the max application thickness per coat for single-part polyurea in general. This would require approximately 3.75 gallons of polyurea for a single coat of 720 ft².
Well, remember what we said about Ralph not liking the fact that some film thickness is lost due to solvent evaporation? He thought about the 3.75 gallons per coat for a little while and then decided to ignore Garage Flooring LLC’s recommendation (his words, not ours 😊).
Instead, he was going to apply it using a total of 5 gallons for one coat since he had enough polyurea for up to 1000 ft² per coat.
His thinking was that the additional polyurea would provide more coating thickness for all the color flakes to sink into. Plus, he had a serrated squeegee (AKA gauge rake) from his last floor coating job that he wanted to put to use to spread the coating and then back-roll. This would eliminate the “dip and roll” method out of a paint tray that is typically used for polyurea.
This type of application method is really pushing the limits for one coat of polyurea and can result in the possible formation of bubbles in the coating due to the amount of solvent that needs to evaporate through the thicker application. Ralph even mentions that he would not recommend doing it as he did and that you should always follow the advice of the coating vendors.
Now that he knew how much polyurea he was going to use per coat, he divided his garage floor up into five sections. This allowed for 1 gallon of polyurea and 26 lbs of color flakes for each section.

After that, it was time to assemble all the materials and supplies that would be needed.
Materials list
- 15 gallons of AWF single-part polyurea – 5 with gray tint
- 130 lbs of 1/8” color flakes – same color combo as the attached garage
- 2 pairs of spiked shoes
- 2 – 18” roller frames
- 2 – 18” roller covers
- 1 – 9” roller frame
- 1 – 9″ roller cover
- 24” serrated squeegee
- 3 extension poles for rollers and squeegee
- 4 – 3” chip brushes
- 1 gallon of Xylene
- Nitrile gloves
- Masking tape & Duct tape
- Measuring tape
- Contractors paper
- Rags for clean up
- 6 – 5 Gallon buckets
- 4 – 2 Gallon buckets
- 1 – quart-sized pail with lid
- Mixer
- Large pieces of cardboard for a mixing station and placing dirty items
- Helper to cut in and spread color flakes – Ralph’s “Old-man” friend, Jimmy
Day 1 – Color Coat and Color Flake Application
The windy weather of Oklahoma is not the best for leaving your garage doors open when doing a floor coating. Because Ralph’s roll-up door sits right on the end of the raised edge of the slab, he decided to apply some clear polyurea on the edge and then coat it with chips before Jimmy arrived. This would allow him to just crack open the garage door during the rest of the application process.
The fact that the polyurea was not tinted for this small area is not a factor given it’s covered in color flakes and on the edge of the slab. Ralph liked the fact that he did not have to mess with measuring out two components to mix together for this small area like you would with epoxy.
He then lowered the garage door to just above the freshly coated edge, opened all the windows, and started the exhaust fan. This would help with the dissipation of the fumes since the garage door was down.
Once Jimmy arrived, he was walked through the application plan. Ralph would be the one to pour the polyurea out in ribbons, spread it with the gauge rake, and then back-roll. Jimmy would cut in at the edges with the 9” roller and chip brushes and then apply the color flakes.
Once the initial plan was discussed, he began mixing in the colored tint to five gallons of the polyurea. He felt that mixing in the tint was just as much of a hassle as mixing epoxy. However, he did state that it was nice not having to worry about getting it immediately onto the floor once mixed like you are required with epoxy. Plus, it allowed him plenty of time to clean his mixing blade and get Jimmy a bourbon.
We have to admit that we like Ralph’s sense of humor.
1-gallon buckets of the tinted polyurea were placed at each section along with buckets of color flakes. He and Jimmy then put on the spiked shoes. These would enable them to walk on the coating during the process.
One note that Ralph wanted to make is that if you are an old man like him, be careful not to sit down on the floor with spiked shoes on as it makes it difficult to get up.
Once Ralph had Jimmy convinced that he was qualified for the job, he began the process of pouring out the polyurea in ribbons for the first section by the main garage door. He then used the squeegee to spread out the polyurea as Jimmy cut in the edges with the 9” roller and a chip brush. As soon as Ralph had a large enough area back rolled, Jimmy began tossing in the color flakes.
When doing a garage floor coating to full color flake refusal it takes quite a bit of color flakes to cover the coating. Jimmy was a bit hesitant about tossing so much flake down at first, but Ralph soon jumped in to help and demonstrate proper application since he had finished back-rolling the section well before all the color flakes were applied. Jimmy soon got the hang of it.
They then repeated this process for the remaining four sections while moving the mixing station, buckets, etc. They eventually worked their way out the man door in the rear of the garage as they went.
Ralph didn’t record the exact time they started, but Jimmy had arrived between 1 – 1:30 PM and was cleaned up and headed home by 2:45. That’s not bad for coating and color flaking 720 ft² of concrete.
At approximately 9:30 PM after allowing the coating to cure long enough, Ralph decided to start the process of cleaning up all the excess color chips off the coating. This entails scraping the surface first. A 10” drywall knife attached to an extension pole works great for this.
After scraping up the heavy stuff and removing it, you can then sweep or blow the finer flakes into a corner with a leaf blower. Ralph had a leaf blower and used that.
One note we want to make is that it’s best to use an electric leaf blower. Gas-powered blowers can drop oil, fuel, and fine exhaust particulates onto the color flakes which may lead to issues with fisheyes when the clear coat goes on.
Once that is done, it’s important to scrape the color flakes one more time to knock down high spots, loose flakes, and any flakes that are pointing up into the air. The idea is to get a nice even surface.
In Ralph’s case, he used 80 grit sandpaper on a pole sander. This can work very well with the smaller 1/8” color flakes that he used for his floor. 1/4” color flake is the standard size.
Day 2 – Clear Coat Application
After working with the polyurea, Ralph was having second thoughts about using the squeegee to spread it around again as he did with the base coat. From what he remembered working with 100% solids epoxy, the polyurea didn’t seem as fluid and easy to push around, as well as to self-level.
However, he ultimately decided that with 10 gallons of clear polyurea remaining, he would apply 4 gallons of clear with the squeegee and back roll method. This would leave him with 6 gallons that he could do the standard “dip and roll” method out of a paint tray.
In addition, he decided that other than needing an extra pair of eyes (this does help), he would do the clear application solo. It wasn’t worth the bourbon it would cost him for Jimmy to watch.
He got to work applying the clear coat at 8 AM. He learned from the application of the color coat that there was no need to rush the squeegee application and that the polyurea provided plenty of time to back roll. This allowed him to get the clear coat as level as possible.
Ralph returned at 3:30 PM to apply the second coat of clear. Instead of doing the “dip and roll” method as he had planned, he applied it with the squeegee and then back-rolled as he did before. However, he used 5 gallons of polyurea instead of the 6 that he had planned.
This is most likely because the polyurea was not being absorbed by all the nooks and crannies of the bare color chips as in the previous coat. This increases the coverage rate and as we stated earlier, you can only apply it so thick. Plus, as Ralph said, it would allow him 1 gallon extra for touch-ups or maybe coating a workbench.
While doing both of the clear coats, he cut in at the edges with only the 9” roller and didn’t use the chip brushes this time. He would squeegee the coating as close as he could and then follow up with bumping the 9” roller up against the wall.
This type of cut-in method will work fine if you are installing a coving or some other wall trim as Ralph did.
One thing he decided not to do was use an anti-slip additive in the final coat. He felt that the texture of the full flake coating was just right for him in terms of adding a little bit of slip resistance. Plus, he didn’t like how the polymer beads can tone down the high gloss.
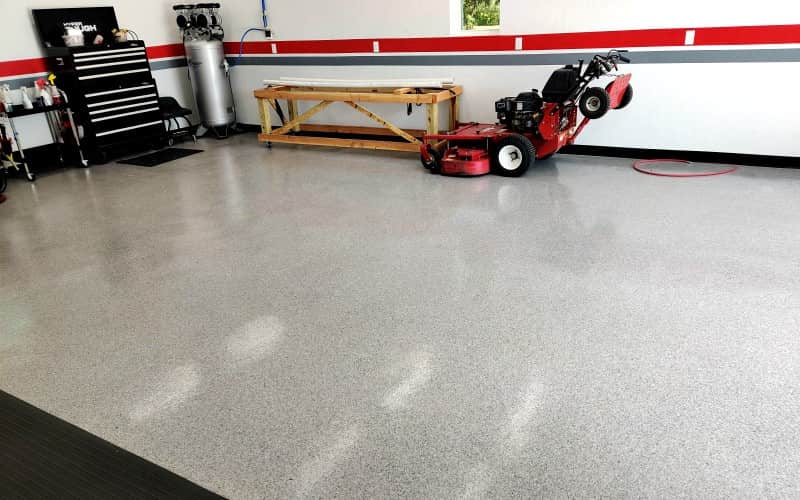
All Weather Floors Polyurea Results
As you can see, we think Ralph’s floor came out looking great. The smaller 1/8” color flakes create a very well-blended look and a slightly smoother texture than the standard 1/4” color flakes.
Ralph did have some small cosmetic issues though as a result of the installation process. The first was a 1/2″ high raised ridge of clear coat. He thinks he may have leaned a bit on his roller in the last section as he was transitioning out the back door and didn’t notice it.
Fortunately, he just cut it down and then touched it up with some clear. He says that you can’t even see it and that the clear polyurea worked well for touch-ups like this.
He also had some problems with fine bubbles in the clear coat in some areas. It doesn’t bother him since it’s hardly noticeable due to the full flake floor. However, this would stand out on a floor with fewer flakes.
These bubbles are most likely from the clear coat getting a bit too thick for the solvents to escape as we had mentioned when discussing the application process earlier.
Lastly, he had a small 4’x4’ area where the clear went on too thick and is a bit amber in color. He provided an image which you can view below.
We tried a little photo editing to display the amber coloring better, but it you just can’t see it very well due to the high gloss of the coating. Ralph said it didn’t bother him though.
Final Thoughts
During application, the only real concern Ralph had throughout the entire process was that he felt rushed to get the color flakes applied after back rolling. However, he realizes now that he had plenty of time to do this.
We think that some of this anxiety may have been due to his experience with 100% solids epoxy where the working pot life is short. Expedience and planning are the keys when using it.
Single-part polyurea such as All Weather Floors, on the other hand, affords you the time to cut in and add color flakes when doing an installation by yourself. This is a huge benefit for DIY installations and something that higher solids epoxy applications cannot provide.
Some tips that Ralph has to offer is to be prepared for things to happen. For example, he had a roller cover fall off the frame after it was loaded up with polyurea. Fortunately, he had an extra roller cover and some solvent ready. He says just take your time and things will work out.
He also mentions that the fumes were annoying, but not too overbearing. However, we recommend that you use a respirator during application as does Garage Flooring LLC.
Ralph said that after five days he can still smell some fumes. This is not uncommon, but thicker single-coat applications like this are going to result in more fumes. Most of the time the fumes are gone within a few days.
Speaking of the thicker application… We would not recommend applying single-part polyurea as Ralph did. It generally works best to apply via roller, particularly if you are not that experienced. Ralph has done coatings before in this manner so he was comfortable with what he was doing.
We want to point out that as long as you follow the stated coverage rates you will get the proper build thickness stated in the data sheets. As a result, the chances of encountering any cosmetic issues are very small. All Weather Floors Polyurea already provides one of the thickest coats compared to its competitors.
If you want a thicker build, it’s recommended that you apply a second color coat instead of trying to apply a thicker single coat. In fact, Garage Flooring LLC offers a kit just for that. You can price the AWF Polyurea kits here.
Ralph says that the floor did not come out perfect, but he believes the results are very good. He’s definitely pleased with the way it looks and commented that if it performs close to what his epoxy floor has, then he will be very happy.
Lastly, he said that he would recommend All Weather Floors Polyurea, particularly if it’s at a price that fits your budget. We have to agree with Ralph. All Weather Floors Polyurea is an excellent garage floor coating and one of the best you can purchase for a commercial-quality DIY installation.
How long is the working time for this product?
Hi Jon.
You have a few hours of working time. Keep the lid on the can and only pour out what you need into a tray as you go. There is no need to feel rushed like other commercial coatings. Just don’t take a lunch break or go run errands in the middle of the job 🙂