
One of the more common questions about garage floors is how to fill contraction and expansion joints. In particular, many want to know if you can fill the joints on the garage floor before applying an epoxy coating. Still, others want to know if you can fill the joints before or after a sealer is applied. What about sealing the expansion joint between the garage floor and the driveway?
We will answer all these questions and more, as well as discuss how to fill expansion and contraction joints in your garage floor. But first, you need to understand the difference between these two joints. It determines exactly which type of joint filling materials you can use and why.
Difference between expansion and contraction joints
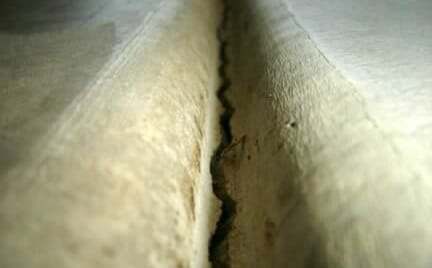
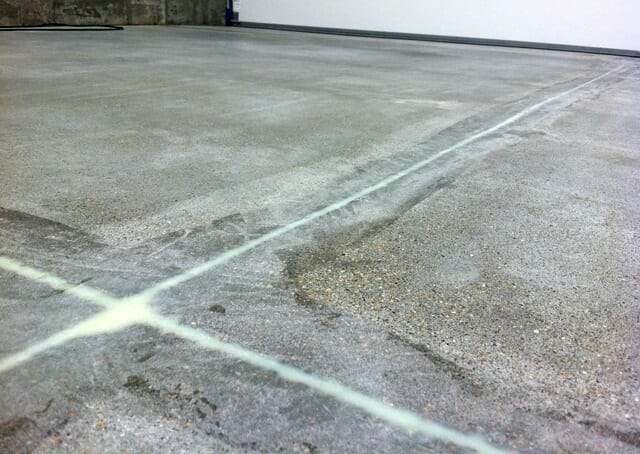
In a typical 2-car garage, contraction joints usually look like a big plus sign that divides your garage floor into what appears to be four separate slabs. These joints (sometimes called control joints) are the deep V-shaped grooves that run from one end of your garage floor to the other.
Some concrete floors may have saw cuts as a contraction joint instead. Saw cuts are usually a minimum of 3/16” wide and 1” deep.
Because concrete slabs will crack with expansion and contraction, these joints create a weakened line in the concrete that encourages cracks to follow the line within the joint. This helps by discouraging cracks from following a more resistant line across the surface of your garage floor.
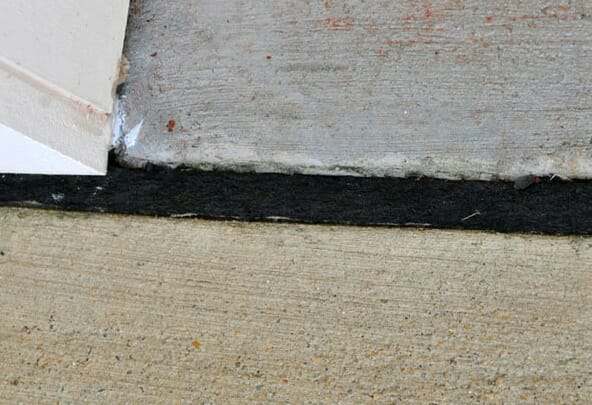
Expansion joints (sometimes called isolation joints) are joints that separate one slab of concrete from another. They are typically a minimum of 1/2” in width.
In simple terms, expansion joints help prevent adjoining slabs from damaging each other when they expand and contract.
They are commonly filled with compressible fiberboard or similar material. The joint between your garage floor and driveway is a good example of an expansion joint.
Garage floors are typically poured independently of the home foundation. When this is done, there is an expansion joint that will run at the perimeter of where the garage floor meets the house foundation.
Filling contraction joints before epoxy coatings
When the time comes to paint or epoxy coat the garage floor, many people want to fill their contraction joints in order to have a seamless-looking floor. So, is this advisable to do? Well, the answer depends on what material you use.
When your garage floor expands and contracts with temperature changes, it can create movement (very slight) within the contraction joint. This is why there are cracks within the joint in the first place.
If the joint is filled with a solid material that does not flex and is then covered with a coating, you have just created the potential for the crack to telegraph up through the material and the coating.
If you want to fill your contraction joints, the key is to use the proper joint filler.
This happens because you have a solid seamless coating that does not flex (epoxy) and is bonded to both sides of a surface joint that can move. As a result, you can create a break in the surface of the epoxy right above these joints if they are filled.
Though the chance of this happening is not great, many professional contractors will not warranty an epoxy coating for cracks where the owner has asked to have the joints filled. Most contractors will fill the joints if asked, but they will warn you about the possible problems.
The best material to use is a 100% solids epoxy or polyurea filler with an elongation rate (flex %) that is higher than that of the coating you are using. It will cure to a hard solid that is sandable, yet will flex slightly (relative to the concrete) underneath your epoxy coating to prevent cracking.
This flexibility also prevents the filler from pulling away from the concrete as the floor expands and contracts. These qualities help tremendously to keep the paint or epoxy coating in one piece and not crack.
This post may contain affiliate links. If you use these links to make a purchase, we may earn a small commission. As an Amazon Associate, All Garage Floors earns from qualifying purchases. You can read our full disclaimer here.
product recommendations
Many of these special joint filling compounds can be found online from concrete floor coating vendors Home improvement centers do not carry them. They work well, but they are not inexpensive like a typical crack filler. There are a few different products we can recommend.
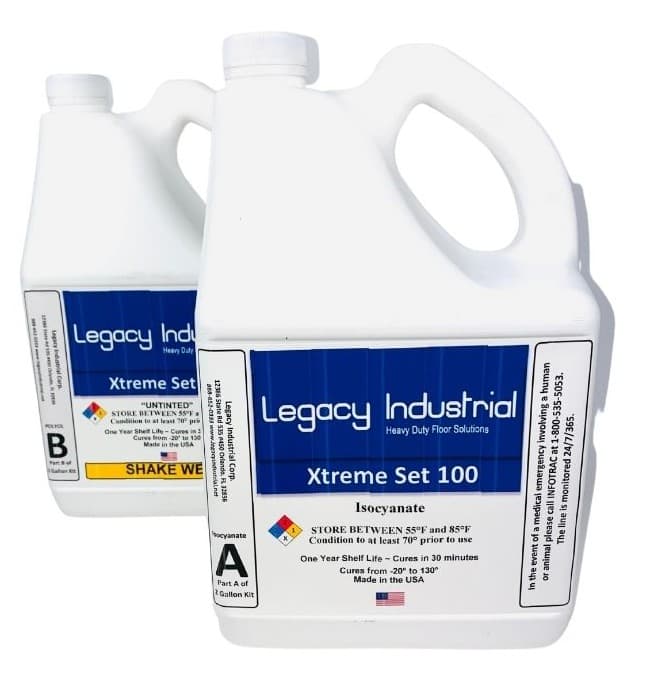
The first is a fast setting, 2-part 100% solids polyurea gel called Xtreme-Set 100 by Legacy Industrial. You can read our review here.
It works very well for filling contraction joints as well as filling cracks.
The big benefit of Xtreme Set 100 is how fast it works. You can fill the joint and grind it flush 20 minutes later. You can purchase Xtreme-Set 100 here.
Another good source is Garage Flooring LLC. They have two different 100% solids products that will work well. The first is TL-821 epoxy gel. The second is their new TL-831 pourable joint filler. You can find them here.
An epoxy gel like this is less expensive than some other contraction joint fillers and works well. It’s a better value if you don’t need a fast-setting product. Just be aware that you will need to wait a minimum of 8 hours before grinding it flush.
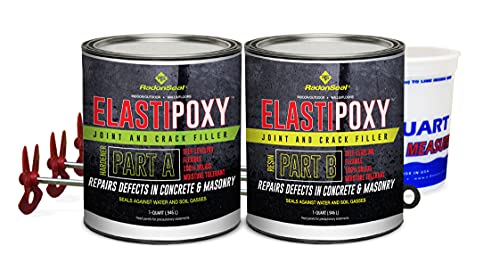
ElastiPoxy is yet another product that works well for filling joints. Because the epoxy has a less viscous consistency, it helps to mix a little bit of clean sand to stiffen it up and increase the coverage.
You can price the 2-quart version here at Amazon. Make sure to estimate the correct amount. Many have found that they needed the larger 2-Gallon kit instead.
Application of these joint fillers is not hard and requires little preparation of the joint other than making sure it is clean.
If you have saw cut contraction joints, we recommend that you fill them first with a foam backer rod or silica sand so you don’t use as much filler. You want to leave approximately 3/8″-1/2″ from the surface.
If you have “V” shaped contraction joints, the foam backer rod will not work well. Silica sand is a better choice.
Both the silica sand and foam backer rods can usually be purchased from your local home improvement center.
When using a foam backer rod, make sure it’s approximately 1/8” wider than the joint. If you choose to use sand, it will prevent the filler from slowly sinking into the cracks at the bottom of the joint and creating low spots as it cures.
Once the joint is prepped, follow the instructions of your product of choice and fill the joints. Make sure you don’t have any low spots or you will have to go over them again. It helps to use a putty knife to force out air pockets and to remove excess material.
Once the joint filler has cured, you will need to grind the joint flush to create a seamless surface to paint or epoxy coat over.
The grinding of the joint is important. If you apply the filler but don’t grind it flush with the surrounding surface, your joints will telegraph through the coating and become visible due to the irregular shape.
It’s not unusual for garage floor surfaces with the troweled “V” groove to be lifted slightly at the edges of the joint. This happens as the surface of the slab cures and contracts quicker than the rest of the concrete, thus slightly pulling the rounded edges up.
Use a level or straight edge to check for this. It may require a bit more grinding to get the floor flush so that you don’t have a visible hump.
Contrary to what you may have read somewhere, do not use latex caulk or self-leveling joint sealers if you plan to coat over the joint.
Caulk and self-leveling joint sealers cannot be ground flush. In addition, they are too soft and will flex under weight causing the coating to crack.
Furthermore, caulk will slowly shrink. As a result, you will end up with slight depressions that outline where your contraction joints are.
Filling contraction and expansion joints after epoxy coatings or sealers
Sometimes the contraction joints in a garage floor and the expansion joints around the perimeter of the floor can be very wide and collect a lot of dirt and debris.
This can create an eyesore for some people plus make it more difficult to clean them out. The same can be said for the expansion joint between the driveway and garage floor.
You can always fill these joints in your garage floor after an epoxy coating is applied. It can also be done after clear sealers, stains, or other floor treatments are applied as well. Not before.
DO NOT fill expansion joints with the same products used for contraction joints. Epoxy and polyurea are stronger than concrete once cured and will not flex nearly enough. This can cause crumbling and cracking of the slab edges.
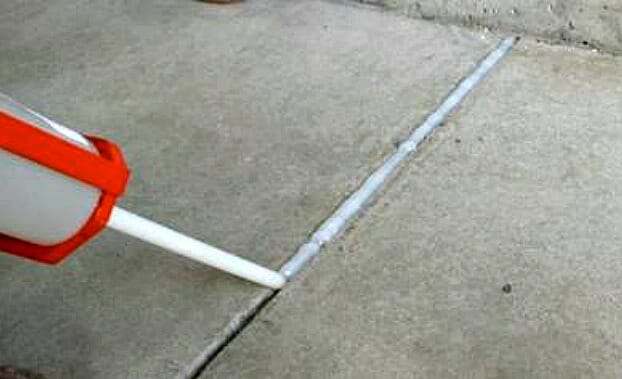
The easiest solution is to fill these joints with a self-leveling polyurethane joint sealer/filler. Most are 100% solids polyurethane. This means that it will not shrink as it cures. They are gray in color and applied with a calking gun.
These types of joint fillers are inexpensive and can last for years. They also do an excellent job of sealing the joint from moisture. The material is flexible and feels somewhat spongy under pressure, yet is strong enough to drive vehicles over. Most are not paintable.
We personally like SikaFlex SL for these types of projects. You can find it at your local home improvement centers for less than $20 for a 10 oz. tube.

The best deal is the 29 oz. tube, but you will need to purchase the larger caulking gun to use it. If a home improvement center isn’t nearby, you can also find SikaFlex here from Amazon.
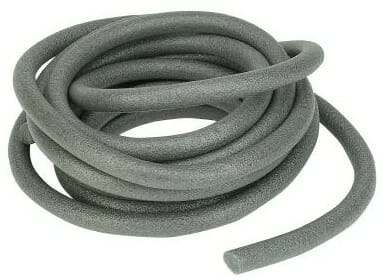
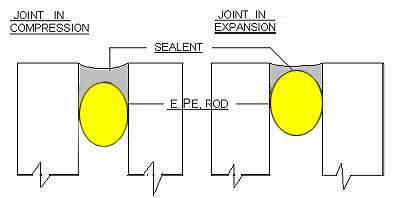
This is a good example of how to fill an expansion joint when using a foam backer rod
Prep of the joint is the same as before, however, do not use sand to fill up an expansion joint. Expansion joints need the material within the joint to be compressible and sand is not.
One exception is if you are applying a thin layer of sand over old fiberboard to prevent sealant from leaking through.
It is also extremely important that the concrete is bone dry before application. If not, it will not adhere well. For expansion joints, it’s important to remove any old filler using a utility knife or grinding wheel.
If the joint is filled with fiberboard or felt, be sure to remove any of the material in the joint that is protruding past the surface of the concrete.
If the fiberboard in an expansion joint is missing or deteriorated, you will want to clean out the joint and use a backer rod within the joint before you apply the joint sealer. Do not place it more than 1/2″ deep from the surface.
Because these joint fillers are self-leveling, the viscosity is similar to honey. As a result, they will seek out any low spots along the joint. So be prepared ahead of time for any areas where the filler may want to run out of the joint.
Once applied, it skins over in an hour or two and completely cures within 3 to 5 days. You need to wait at least 24 hours before driving over a freshly filled joint.
Final points
Sealing and filling your contraction and expansion joints for a garage floor is not difficult. The key is to use the proper sealer or filler depending on the intended purpose and what type of joint it is.
Just remember that expansion joints should always be sealed and filled with a flexible joint sealer and never epoxied or coated over. Contraction joints can be filled in the same manner after a coating or sealer is applied if you desire.
If you want a seamless-looking epoxy or garage floor coating, contraction joints must be filled with a specialized epoxy or polyurea joint filler that cures hard and with a higher elongation rate than the coating. This provides the required flexibility to help prevent the garage floor coating from cracking at the joints.
We have a 2×4 expansion joint in the middle of a garage with a finished game room under it (the house is on a hill). When snowy cars are parked in the garage the melted snow leaks through the cracks into the ceiling of the room with obvious damage to the sheetrock. Right now it has silicon on it from our failed attempt to waterproof it last winter. Any suggestions how to waterproof it? Should the other small cracks in the cement floor be patched as well?
Hello Sandy. Silicone is not a good sealant for concrete. Also, the water can potentially be coming from a variety of places including the cracks. We recommend removing it and fill the joint with a polyurethane self-leveling sealant such as SikaFlex. After that you will want to repair the other cracks in the slab and then seal the concrete with a penetrating sealer. Siliconate penetrating sealer would be a good choice for this.
Thanks! The silicone is primarily on the wood so once it is removed would the polyurethane work on the wood expansion joint as well? How should we prep the concrete for the siliconate sealer?
It’s important that the wood in the joint be at least a 1/4″ lower than the floor surface Sandy. The SikaFlex (or equivalent) sealant needs to cover both the wood and uppers sides of the joint in order to seal it properly. In terms of the concrete, it just needs to be cleaned real well before application of a siliconate sealer.
Question: Grind/Etch before after filling joints with ElastiProxy before Painting floor.
If I am going to fill my expansion joints with ElastiProxy joint Sealant after I have prepared the surface with an etch and de-greaser do I need this if I am going to grind afterwards anyway? Seems to make more sense to fill the joints and cracks and grind the entire surface and then paint the floor
Seems odd t etch and de-grease first if i have to grind the joints anyway..
Any help would be much appreciated.
Assumption – the ElastiPoxy joint sealer will work well with Colorado and cold weather.
It’s always easiest to do all your crack repairs and joint filling first before anything else Darren. The ElastiPoxy will work well for cold weather. However, remember that many joint fillers as well as epoxy coatings have minimum temperatures in which they can first be applied. Make sure you are not below those temps before you start your project. Once the cracks and joints are filled, you can then grind the joints and crack repairs flush. After that you can etch the concrete or continue grinding the rest of the floor. If you grind the entire floor you do not need to etch.
Hi. I recently sealed a crack with a self leveling type of material. It is soft to the touch. How do I remove that before I seal it properly in prep for a new epoxy coating?
Hello Billy. The easiest way to remove polyurethane self-leveling sealant is with a crack chasing blade. Once you do that, fill the crack with the appropriate crack repair product before applying an epoxy coating. This one from Amazon is inexpensive and works very well. Home improvement centers charge $45 or more if they carry them.
Interested in finding a “metallic looking” joint sealeant for use on a high traffic (pedestrian only) building.
Could you suggest a source?
Hello Jose. We are not aware of anyone who offers such a product. You may be able to create your own, however, by purchasing metallic pigment separately to apply to the right sealant. Torginol for example, is one of many companies that sells metallic pigments. The issue will be trying to finding the right sealant. It needs to be 100% epoxy, it needs to be clear, and depending on the joints, it will need to have a high elongation rate (flexible). Epoxy in general is not flexible and most epoxy joint sealants that are flexible have a more cloudy look. We suggest contacting Torginol an tell them what you are trying to accomplish. If you search “metallic epoxy pigments” you will find a variety of other vendors you can contact as well to see if you can find a solution.
Legacy industrial has a product called xtreme set 100, that is advertised for filling cracks and joints. They say it stays flexible and is very quick to cure – 20 min, however not much tech data is available to make a comparison with the gel crack filler that you mentioned in your very informative article. Do you have any experience with this product, and if so would you recommend it for filling contraction joints before epoxy? Or is the gel crack filler better? Thank you.
Here is the product I’m referring to:
http://www.legacyindustrial.net/products/polyaspartic-polyurea-coatings/xtreme-set-100-crack-joint-filler.html
Hello Levi. The Extreme Set 100 is flexible (relatively speaking) with an elongation rate of about half that of the gel crack filler. Legacy Industrial uses it to fill contraction joints with their commercial operations (garage floor coatings) since it cures so quickly. If time is not an issue, then the gel crack filler would be better. If you don’t have much movement in your slab or very few cracks within the bottom of the joint, then the Extreme Set would work fine. Just know that regardless what product you use, if you get extreme movement the cracks will still telegraph through the coating causing it to crack.
FYI, we have had a chance to work with the Extreme Set 100 and will be doing an article on it soon. It is really easy to work with and does cure fast which means you can easily do all crack repairs and grinding in the same day.
I have the same question as Levi, and I note that the Legacy Gel Crack Filler details say:
“This product is designed for use with cracks <= 3/8" wide. Use Xtreme-Set 100 for wider voids."
Given that I have 'V'-shaped contraction joints, can I be confident that the Extreme Set 100 over silica sand would be the right choice for me?
Many thanks,
Bart
Yes, Bart, the Xtreme Set 100 will work great with “V” troweled joints. Just remember to grind the joints flush after it has cured (20 minutes or so). Troweled joints tend to curl at the edges and will be noticeable unless they are ground down flush with the rest of the floor.
Fantastic! Thanks 😀
I have a question regarding the edge where my concrete floor meets the wood frame of my pole barn. Is there a product to seal that joint or seam to stop water from seeping in the garage through that seam?
Hello Tommy. MasterSeal NP-1 is a great product for that. We’ve used it before and it bonds extremely well to both concrete and wood. You can get more info on it here.
I have applied Rock solid on my garage floor. I brushed it into the expansion joints. Is it necessary to rough the surface of the joint before I fill with Sica joint filler?
If you are referring to the SikaFlex joint filler, Joe, you will be fine without sanding the inside of the joint.
Hello,
I am planning to do epoxy coating on my 3 door garage floor and how to prevent the paint from flowing into to the contraction or expansion joints? I prefer to seal the contraction joints with self leveling sealer after epoxy coating as you have mentioned in your writeup. There are cracks in the contraction joints and not sure if there would be any issue if epoxy flows into it.
Thanks,
Suresh
There is no issue if the epoxy flows into the joints Suresh. Just have a paint brush with you to push out any heavy amounts of epoxy that may flow into the joints.
What If heavy amounts of epoxy base coat and poly clear coat settled and cured at the bottom of a V shaped contraction joint?
It’s common for excess to run down into the joint, Nico. After all, you don’t want the bottom of the joint bare. If the joint continues to crack at the bottom you won’t notice it much due to the coating materials being down at the bottom. What you don’t want to do though is try to fill the joint with the coating materials in order to level it out. If the joint does crack more, it will crack right up through the coating and be obvious.
Hello Shea,
Thanks for the very informative website. About two months ago, we got a new one-car garage built with a new concrete pad and driveway. In the garage, there are cracks that follow the entire contraction joint, which is expected as I understand it. The average width of the cracks is about a width of a quarter. I’ll take care of them as you have outlined.
I’m more concerned about the cracks in the driveway along the contraction joint (also about the width of a quarter). We have harsh winters and I’m afraid that water will enter the cracks, freeze, and do more damage. How would you recommend taking care of that?
One last question: do you think this is something that our contractor should be responsible for? We still have not paid them the final installment and they are still finishing up some details on the garage. It seems to me that they should take care of it but I could be wrong.
Thank you for the advice!
Cheers,
Eric
Hi Eric. Concrete cracks – period. The question is not if it will crack, but where it will crack. If you are just getting the cracking along the control joints of your driveway that is perfectly normal and expected. It an excellent sign the contractor did a good job. If you had multiple cracks forming across the surface, then that is the time to talk to your contractor about the quality of their work. Hopefully rebar was used. The rebar ties in the control joints and prevents individual sections of the driveway from shifting up or down next to each other.
You have a couple of choices for sealing the joints to prevent water intrusion. The first would be to fill the control joints with self-leveling polyurethane sealant such as SikaFlex. It’s the least expensive method, but some people don’t care for the look. Another option would be to use a 2-part epoxy or polyurea sealer that allows for some flexing. These are much thinner and can be used to fill the actual crack and not the joint. This makes for an almost invisible crack seal that blends right in. The key to using these is to fill just the crack (not the joint) with clean sand and then soak the crack with sealer. We just did a review of Xtreme Set 100 by Legacy Industrial which would work real well for this purpose.
After you make your repairs, we would highly suggest that you seal the entire driveway as well. This will help to prevent any freeze thaw damage and spalling that can occur from harsh winter climates. A siliconate sealer like this is and excellent choice and inexpensive. Choose one for rough or broom finished concrete, not smooth concrete.
A painter suggested that i could use the NP1 elastomatic polyureathane filler to fill the expansion gaps an expoxy over it. Would you please let me know if that will work?
No, you can’t use NP-1 for that Premnath. It’s too flexible and is not recommended by the manufacture to paint over or apply a coating over as well. You can find that information in the technical data sheets for Np-1. You do not want to use flexible sealant for filling joints under a coating anyways. The reason is that weight applied over the joint will cause the coating to crack as the sealant flexes.
Thank you.. So it better to expoxy first and fill the contract joint withe NP1 or sikaflex or vulkem? also i have cracks along the garage floor where the floor meets the wall.. do i need to fill them before expoxying?
Yes, if you are going to use NP-1 or SikaFlex you need to epoxy the garage floor first. The area where the floor meets the wall is actually a control joint as well. The slab and wall are two separate sections. Fill the open area between the slab and wall after you epoxy.
Thanks for the help. do you have the link for 2-Part epoxy polyurethane hybrid by EpoxyMaster?
You’re welcome. You can find the link here.
Hi – I just purchased some Sika Self leveling Caulk, a few bags of play sand, and some backer rod (3/4ths inch thick) – as I am wanting to replace the old concrete expansion board (cardboard type that heaves). I have not started the project yet – but I am very concerned – I believe I read in your post that the backer rod will float if the crack is not narrower than the backer rod. Our expansion crack where the driveway meets the garage is approximately 1.5 inches (the backer rod is only 3/4ths of an inch) – so it would not be a tight fit and I am afraid that it would float. I thought about just filling the joint with the play sand, and then skipping the backer rod, and putting the Sika Self Leveling Caulk over just those – would that work ? I think I also read that you should not just put the caulk over just sand. I am totally at a loss – could you please help ? I don’t want to just put the old style (cardboard like) expansion boards back in with new ones. I have also seen foam expansion boards – so thought of using those instead. How would you recommend repairing these expansion joints ? Thank you for your help and great website ! Jerry
Hello Jerry. Yes, backer rod will float if it’s not wedged in. Best Materials sells backer rod in the sizes that you would need. Remember to go one size larger than the width of your gap. Also, remember that you need the depth in the joint to accommodate the depth of the rod, including leaving enough room to fill with the SikaFlex. You can place the SikaFlex over sand if you need to. Just keep in mind that if you live in a climate where you experience large changes in temperature, sand in a joint that large can interfere with how well it will allow for concrete expansion.
Hi Shea
Thank you for the information and your help ! I have one more question. Would it work to put down some sand, then put in the backer rod, and then pour sand on top of the backer rod, and then put down the self leveling caulk ? (IE. sandwich the backer rod i the middle between a bottom and top layer of sand). We are in Omaha NE, and we do get a lot of fluctuation in our temps (25 below zero windchills in the winter and up to 105 in the summer) which is why I believe the concrete expansion joints move so much. I just am concerned with the backer rod eventually heaving up. Thanks again for all your help !
No Jerry. If you have the right size backer rod, then the ideal solution is to wedge the backer rod so that the top is 3/8″-1/2″ below the surface and then apply the self-leveling sealant. The backer rod does not move since it is wedged in and it prevents the sealant from leaking below while it cures. The main strength comes from the sealant bonding to the sides of the concrete (make sure it is clean). When you get expansion and contraction of the slabs, the sealant will flex (elongate or compress) as the slabs move while keeping all moisture from above out of the joint.
Hi Shea,
My question follows this line, as I’m needing to fill the long central joints between the large slabs on the driveway in front of the garage. Someone had previously filled these joints with concrete, which of course, cracked and fell apart and I just finished chiseling most of the rest off, which has led me to see the crack is even bigger than I thought – roughly 2- 2 1/2″ the entire length of it with some irregular edges now (although, I’ve tried to make it as even as possible, taking it down to the original slabs) What concerns me is, the width of the crack, as well as the depth, which is definitely up to 4″ in most areas, but again all irregular, (with some chippings/debris difficult to remove.) My questions are: Do I need to fill up all the depth with backer coil-is there nothing else I can use under the coil to help fill in the irregular spaces? It is difficult to clean out the bottom of the joints as well. I’m going to clean the top of the sides well so the Sikaflex will adhere – I’m just also concerned with the crack being too wide and any pressure on the area causing sag or failure.
How would you go about filling this long, deep, irregular joint? Would you still just use backer coil, but lots of it? (Incidentally, all I can find at Lowe’s or HD is 3/4″- not sure why they only carry one size!) And finally, is there no other central support that is used when the crack is that wide? Thanks for any answers.
Donna
Hi Donna. You can purchase backer rod from these guys here. It is available in widths up to 6″. Just read the chart to determine what width you need. I’m a bit confused though, you state that the joint is 2-2.5″ all the way across. Then you say it’s 4″ across in most areas. The backer rod is stuffed into the opening approximately 3/8″ to 1/2″ below the surface. You can fill any space below the rod with sand. However, if you have areas that are 4″ across, it’s going to use up an awful lot SikaFlex and it will not support vehicle traffic well. You may need to hire a contractor to fix the joint. Generally a fiberboard will be placed along the middle and polymer-modified repair cement (stronger than regular concrete) is poured on both sides of the board and then finished.
Great website! Large DIY project for 4 car garage so want to be sure to get it right the 1st time. What I’m not understanding is even if you use the proper 100% epoxy filler for contraction joints and it still allows some degree of flexibility, if the epoxy floor coat on top does not flex, how the does the epoxy floor coating not crack when the material below flexes?
I don’t plan to entirely fill the V contraction joints for that seemless look but do want to fill the existing cracks on the joints. Is it best to fill the cracks only with the 100% epoxy method before applying the epoxy floor coat or use the 100% polyurethane method after? The desired end result is no more cracks to collect debris and water.
Hi Gary. Because the gap between the actual cracks within the joint and the bottom of the epoxy floor is filled with a hard material that will allow some flexion, slight movement between the two sides will not immediately telegraph to the epoxy and cause it to crack like it would if epoxy was laid directly atop a crack on the surface that moves. The proper joint material does not guarantee it won’t crack, but it does greatly reduce the chances with slight movement (which is normal).
In your case, filling cracks at the bottom of a contraction joint that you do not intend to fill flush is not necessary unless the cracks are quite large. The color flakes and epoxy effectively cover or camouflage the cracks that are deep within the joint. If you are doing a solid color floor without flakes and you have wide contraction joints, then we could see the need to fill the cracks at the bottom. If that is the case, then the proper flexible joint filler would be the correct choice.
how much movement will be possible after filling of expansion joint?
The movement possible is determined by the elongation rate of the filler you are using and the width of the joint. For example, if you use a filler with a 20% elongation rate, it will allow a 5 millimeter joint to expand or contract 1 millimeter.
I have a 1/8″ gap running along the length of my garage where the concrete floor meets the stem wall. If I am planning to apply an epoxy coat, can I use an epoxy gel crack filler to fill this gap? Or should I use a patching compound like HD-110 instead? Thanks!
Hello Gary. That gap is actually an expansion joint along the stem wall and not a contraction joint. The slab of your garage floor was poured separate from the rest of the foundation. As a result, you will get more expansion and contraction along that joint than you do with a contraction joint. Most people leave the joint alone and then fill it afterwards with flexible sealant. However, it won’t do any harm to try filling it will a gel crack filler that allows some elongation. It may or may not form a crack depending on how much movement you get. Do not use a product like HD-110. It is designed for floor repairs and will not flex.
Can I use PC-Concrete Epoxy Crack Repair to fill in the expansion joint along the foundation or should I use something else? Also, do you have recommendations on flexible sealants I could use if I decide to fill it after laying down the epoxy coat? Thanks!
Hi Gary. No, you don’t want to use an epoxy filler for the expansion joints. It will not flex nearly enough for the movement you get in those joints. After you have coated or sealed your garage floor, fill the expansion joints with a flexible polyurethane sealant such as SikaFlex or something similar. If the joints are deep, you will want to place foam backing rod about 3/8″-1/2″ deep into the joint first.
Can I use sika flex self leveling in the contraction joints before the epoxy application and then epoxy over the top of the sika?
No, you can’t Jason. There are two reasons for this. The first is that SikaFlex cannot be sanded, painted, or coated over. The second and more important reason, is that SikaFlex is too flexible and will cause the coating to crack if pressure or weight is applied over the joint. Coatings are extremely tough, but they are applied to a solid base. When that base flexes too much, then the coating will crack.
My desire is to have as close as possible to a smooth epoxy garage floor as I will be rolling things around on it(table saw, etc.) and I am afraid the wheels will get stuck in the current control joints if unfilled. The control joints are your typical large tooled in joints. I was wondering would it be appropriate to do a silica sand and epoxy fill and then do a saw cut (i.e. now control joint is only the width of the saw blade ~1/8 in). My contractor is indicating they will not warranty the work if I want the control joints filled and I was wondering if this is a good compromise that may still get me the warranty and allow for “mostly” smooth floor that the wheels will not get stuck in?
Hello John. It’s not uncommon at all for floor coating contractors not to warranty their work for cracks over control joints if they are filled. After all, the joints are there for a reason. However, filling the joints as you stated and then saw cutting all the way down to the concrete (center of joint) will highly reduce any chances of the coating cracking over the joint. Whether or not the contractor will warranty that is something you will need to talk with them about.
Hello Shea.. What about using the Sherwin William Micracle bond polyurea filler? thats the only one available near me
Hello Prem. It can be used as a flexible joint sealer – just as SikaFlex is used. However, it cannot be used to fill joints and then epoxy over. It’s too soft and non-paintable for that.
Its not a polyurethane like Sika flex and the store guy told me its a polyurea filler with 80% elongation which dries hard overnight. So just want to make sure you are not talking about their polyurethane caulk. Its called the CRACKBOND® JF-311.
thanks
OK, this is different than the Miracle Bond you mentioned earlier. We found the data sheets for the CrackBond. This will work for filling, grinding, and then coating over saw cut joints. It’s still a bit soft with a Shore A Hardness rating of 75-80, but it will work fine for saw cuts. If you are filling wide (3/4″) contraction joints then you would want something harder.
Was there a recommendation for Epoxymaster’s flexible joint filler?
Yes there was, DD. They changed some of their links and ours no longer worked. We suggest giving them a call to ask them about their joint filler. Their customer service is great. You can contact them here.
Thank you for all of this great information! … This maybe a bad idea, but figured I would get your thoughts … I am planning on doing my garage floor with a grey epoxy and decorative color chips. As you explained here, after the epoxy I plan to use grey self-leveling polyurethane joint sealer/filler to fill the expansion joint. Would it be possible to apply the same decorative color chips used in the epoxy coat to the joint sealer in order to give the floor a more uniform look?
Hi Brock. Yeah, it’s not the best of ideas…lol. The joint sealant is too thick and viscous for the color flakes to sink into and adhere. Plus, it would look odd because you will still see where the joints are because self-leveling sealant is not going to make the slab blend together smooth. Having a nice clean division between the slabs using the self-leveling sealant looks nicer than you think. It provides a nice contrasting line that many tend to like. As a tip, don’t fill the joint completely to the top. Tires can leave black marks that are hard to clean.
Xtreme Set 100 by Legacy will work great to fill contraction joints AND repair cracks?
I don’t need a separate product for the separate jobs?
Also, I plan to grind my garage floor following the instructions you laid out in another article using a grinder from HD. Just to confirm, I grind the floor first, repair cracks, fill contraction joints, and then regrind the repairs and contraction joints using an angle grinder w/ diamond grinding cut wheel to insure a level finish.
Hello Jeff. That is correct. You can use Xtreme Set 100 for both. Since you are grinding and not etching, it’s easier to do the repairs and contraction joints first then grind.
Shea let me say I’m finding your advice and blog absolutely invaluable and if you accept donations let me know.
We just closed on our home today and I had another look at the garage floor. Turns out I have all three: cracks, expansions joints, and contraction joints. It’s a three car garage and the expansion joint separates the 3rd carport from the main one.
I got three questions now:
1) If I’m reading this post and another post correctly, expansions joints should never be filled prior to an epoxy coating. Further, they should not be epoxied over either. Meaning I should tape the expansion joint off when I do my primer, base, and top coats. After the job is 100% done, I can go back and fill the expansion joint with something like Sika Flex Xl? is that correct?
2) Any merit to to acid etching first and then grinding second or vice versa? Or is that just a waste of time because there is nothing I won’t accomplish acid etching that I will when I grind.
3) After joints are filled and the the grind is done, is there a window with which to lay down my primer coat? Aside from keeping it clean, dry and free of dust, can I come back a week later to do the epoxy job?
Thanks again for everything
Hi Jeff and thanks for the kudos! You haven’t been the first to ask, but no, we don’t have anything set up to accept donations. As far as your questions go;
1) You are correct.
2) If you grind there is no need to acid etch. Grinding is preferred and acid etching just introduces water to the concrete that has to dry out before application of a coating.
3) Just keep it clean and you can come back anytime to apply your coating.
Hi Shea,
Just wanted to know your thoughts on this process. I have already applied the epoxy and would like to do step 2 and 3 if possible. Thanks…
1. Epoxy concrete basement floor
2. Fill control joints with self-leveling polyurethane joint filler
3. Clear urethane top coat over the entire floor
Hi Nick. You need to apply the polyurethane top coat first before filling the joints with a self-leveling sealer. Also, if you are outside your epoxy recoat window it will require roughing up the surface with 120 grit sandpaper before applying the polyurethane. Lastly, make sure you do not purchase polyurethane for wood floors and furniture.
Good to know. Thanks for the info as always!
I recently rented a floor grinder and sanded my garage floor to get ready for epoxy. I bought the Sherwin Williams ArmorSeal 1000HS for 2 coats and a clear. I wanted to seal my saw cuts so it would be smooth. Sherwin Williams recommended Concrete & Masonry Patches and Sealants. Is says it contains Acrylic Polymer. I have put it in the saw cuts and having second thoughts if this is right. Do I need to rip it out and start over? I would think the SW salesperson would know about this.
Hello Mike. We looked at the data sheets and they state that the repair product flexes with movement and can have a coating applied over it. However, it does not say anything about being sandable. Once applied, if the material cures hard to the touch and you can grind it flush then it will work. However, if it feels spongy and/or soft or it wants to chunk when sanding, then this is not the material to use if you are looking for a seamless look to your coating.
Hi, we are putting in a sports court in our backyard. The concrete slab is already there. I would love to fill in the expansion cuts so that I have a very flush surface before applying the specific thick acrylic sports court paint on top.
Any advice on this type of application vs the garage floor epoxy?
Thanks!
Hi Selina. The acrylic sports court surfaces are designed to be used outdoors (not for vehicle traffic). Acrylics will not yellow when exposed to U.V. light and they allow the concrete to breath (important for moisture outdoors). Epoxy will amber (get a yellow tint) and even begin to turn chalky. It is an indoor coating only and will not breath to allow moisture vapor from under the concrete to escape.
Can I use Rust-Oleam Epoxy filler to fill saw cuts in my garage before applying 100% solid epoxy?
Hi Dan. The Rust-Oleum crack repair filler is not recommended to fill contraction joints (saw cuts). The reason for this is that it’s an epoxy that does not have any elongation to it. Any movement within the joint will cause a crack to telegraph right through to the coating.
Thanks Shea. What about Sika Powerset?
According to the data sheets, Dan, it has almost zero elongation (flexibility) after it cures (.12%). Also, Sika does not recommend painting or coating over the surface. We have links above for products that we know will work well. Unfortunately, the correct product for filling contraction joints for a coating is not going to be cheap. The materials that meet such requirements are more expensive.
I have two 14′ long expansion/contraction joints on a patio that I’d like to make disappear. They were placed in a cock-eyed fashion by the contractor and look bad. I’ve read through your information on this subject. I would like to know if any of the aforementioned products will absorb concrete stain and blend well with the surrounding concrete surfaces. Or would using an epoxy coating be a better option to obtain a consistent appearance. My concern would be that using a stain rather than an epoxy coating would allow what were once grooves to be smoothed out ribbons. Thank you in advance for your reply.
Hello Joseph. No, the proper filler for a contraction joint is non-porous and will not absorb stain, nor will it blend in with the rest of the concrete if left untreated. Standard epoxy coatings are not U.V. stable and cannot be used outdoors either. Only acrylic epoxy can be. However, there are special coatings that can be installed outdoors without issue. If you did that, you could fill the joints with the proper filler, grind it flush with the rest of the concrete, and then coat over it for a seamless surface. ArmorPoxy would be the company to contact regarding outdoor coatings.