

One trend that we have begun to see more of is complaints about very rough-textured surfaces of newly installed garage floor coatings. This concern is more prevalent among homeowners who have paid for professional installations. However, it does happen occasionally with DIY applications as well.
These complaints may involve color flakes (paint chips) that feel sharp or are sticking out of the coating. Most often though, it’s the unusually coarse surface texture of the entire coating that people don’t like.
As a result, we want to discuss how to fix the problem of a garage floor coating that feels far too rough. We will also include helpful information on how to prevent it from happening in the first place.
Color Flakes or Paint Chips Create a Rough Coating
The one common factor for rough textured complaints is floor coatings that have a full color flake application.
Also known as flakes broadcast to rejection, this is when color flakes are tossed heavily into a freshly applied epoxy or polyurea base coating until it is completely covered. The excess color flakes that did not adhere or adhere very well are scraped and removed from the surface. The remaining are then coated with one or more high-performance clear coats.
This optional yet highly popular application of color flakes allows for custom color blends and a thicker overall coating system. When done properly, it should feel like semi-smooth small bumps across the entire coating surface.
When done incorrectly, the coating can look and feel very rough. Some even complain that it feels sharp to the touch.
There are a couple of reasons why a full color flake coating may have a rough or sharp texture to it. Occasionally it’s a combination of the two.
Clear coats over full color flakes are too thin
The first and most predominant reason for a rough finish to garage floor coatings is insufficient clear coating material being used.
A properly prepared layer of full color flakes is approximately 5 – 6 mils thick. It has an untold number of nooks, crannies, and small bumps throughout the entire surface. In other words, it is very porous and rough.
When a clear coating is applied it needs to fill all these nooks and crannies. This alone uses much material. In addition, the clear coat needs to be thick enough to properly cover all the edges of the flakes and provide a minimum of 2 mils thickness for suitable protection.
How well this is done depends upon the type of clear coat utilized, the coverage rate it is applied at, and the number of coats used. And this is where the root of the problem lies.
Too rough a texture was rarely a problem in years past. However, garage floor coatings have slowly become very popular over the last ten years or so. It is often the first thing people want to apply to their garage when they purchase a home.
As a result, the number of garage floor coating contractors has increased to meet demand. And this has created competition.
To keep pricing competitive, these contractors try to reduce costs. And unfortunately, one of the first places they typically do this is with materials.
High solids polyurea and polyaspartic clear coats have become the favorite to use in the industry. One of the reasons why is that they typically provide a 6 – 8 mils dry film thickness depending on the solids content.
With the proper amount of material, this is enough thickness to properly fill and cover a full color flake application in a single coat. This saves time and labor from having to apply a second coat.
For comparison, polyurethane is only 2 – 2.5 mils dry film thickness. It requires an absolute minimum of two clear coats and preferably three for a full color flake floor.
Polyurea and polyaspartic coating materials are expensive. To save money, some contractors have begun to apply these clear coats at a higher coverage rate to save on material. This results in a coating that is ultimately too thin with a rough texture.
This happens occasionally with DIY applications. Though most vendors list a recommended amount of material depending upon the amount of color flakes used, people will still try and save money. They are not aware of the ramifications of using less material on a full flake garage floor coating.
It is not a mistake though when garage floor coating contractors do this. They know better and are fully aware that full color flake garage floors require much more clear coating material compared to coatings with light to medium flake coverage.
The floor coating contractors who do this are taking a calculated risk that the consumer does not know any better. They often state that the finished result is the industry standard. Some even claim it’s an added benefit to aid with wet traction to reduce customer concerns when the issue arises.
Color flakes are not prepared properly for a clear coat
The second reason for a rough texture to full color flake garage floor coatings is improperly prepping the color flakes before application of the clear coat/s.
Removing all the loose flakes that did not adhere to the coating is not enough. Prepping the surface properly requires scraping the flakes with a metal floor scraper to knock down any flakes that are sticking up. It also removes flakes that have not adhered well enough.
Some floor coating contractors rush this process to save time. This results in a rougher color flake surface that has not been prepped as well as it should. There can even be areas where flakes are sticking up out of the surface creating sharp points when the clear coat is applied.
Going over the surface a second time in a direction 90 degrees from the first will catch errors and smooth the texture out more. It can make a big difference. However, it requires additional time they don’t want to take. Sometimes these contractors are doing two floors a day.
One trick of the trade that some of the good floor coating contractors will do is run a floor maintainer with a sanding screen or scrubbing pad over the color flakes after prepping them. This makes the floor less rough and creates a nice finish when clear coated.
How to Fix a Rough Garage Floor Coating Surface
Fortunately, fixing the rough surface texture of a full color flake garage floor coating usually is not difficult. If the color flake surface was prepped sufficiently and just lacks enough clear coat material, then applying a second coat of clear typically solves the problem and smooths things out.
If this was a DIY application, it will require that you first degloss the surface before applying an additional clear coat. This is assuming that you are past the recoat window.
Deglossing can be done with 120-grit sandpaper on a pole sander. The goal is to degloss the surface, not remove it. A quicker and easier method is to use a floor maintainer with a green scrub pad (dry).
Once the deglossing is completed, sweep the surface and then do a chemical wipe down with denatured alcohol or equivalent applied liberally to a microfiber mop pad. The surface is now ready for the clear coat.
If the color flake surface was not prepped well enough and has high spots and color flakes that are sticking up at odd angles, then it will require a more aggressive sanding method. We recommend using a floor maintainer with a 60-grit sanding screen. You will need a few screens for a standard 2-car garage.
This procedure works well to smooth out the color-flaked surface. Do not hold back on material for the second clear coat. There will areas where the sanding completely removed the first coat of clear to knock down high spots. You need to make sure that these areas get coated properly.
How to Ensure a Smoother Clear Coated Color Flake Surface
If you are applying a full color flake garage floor coating yourself, then all that is required is to make sure that you don’t do any of the things we previously listed. Prep the color flake surface properly and use sufficient clearcoat materials.
If you are going to have your coating installed professionally, then we first recommend that you read our article on how to choose a garage floor coating contractor. Finding one that charges the least amount of money is not the goal and may lead to frustration. The cheapest is rarely the best value.
Also, make sure you impress upon them the type of finish you desire. Ask for board samples of a full color flake application. All the good contractors have such samples available. If they can’t provide a sample or say something like “we never get complaints” or “everyone always likes it”, then we suggest moving along to the next one.
Some may state that a second clear coat will be required. If so, ask why it can’t be accomplished with a single coat. They may or may not have a valid reason.
Something we want to point out is that it can be very costly if you want to achieve an almost level or glass-like finished surface. This type of surface for garage floor coating is not common, but it can be done.
It requires using one to two coats of a 100% solids polyaspartic or polyurea to create a thick enough build coat that fills in. The final coat is then applied over that.
100% solids epoxy works well as a build/leveling coat also. However, we do not recommend it if the floor will see direct sunlight. Unlike polyaspartic or polyurea coatings, epoxy can amber (yellow tint) over time and change the color tone of the coating.
We hope that you have read this article to learn how to get the proper surface texture for a full color flake garage floor coating application. However, if you are here because you are unhappy with the surface texture of your current coating, you can rest assured that the remedies above will fix the issue and ensure a smoother coating surface.
Unfortunately I am in the position of this very issue. They did apply the same application to the verticals in my garage, but the flake is super sharp and flakes fall right off just by rubbing your bare hands over it. He is telling me that is normal and industry standard for verticals. Is he correct or should I expect the same sort of texture as the floor? Thanks
Hi Kevin. It sounds like the verticals (stem wall) did not have a clear coat applied. Was a clear coat applied to the floor? If so, it should be to the verticals as well. There is no industry standard for not treating the verticals the same as the floor unless it is stipulated in the contract.
Hi Shea, thanks for this article/website, it’s tremendously helpful.
We just had a professional install in our basement. Day 1 was grind, minor concrete repairs, polyurea prime, full broadcast flakes. Day 2 was the polyaspartic topcoat.
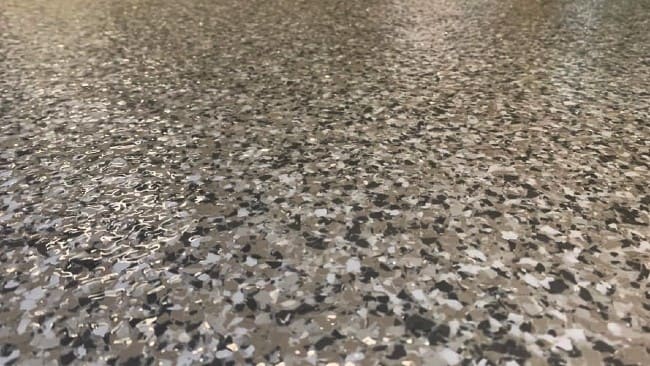
The floor looks lovely, but the final rough texture indicates insufficient topcoat was applied. To our eye, it is not egregious, but it does resemble the photo you posted, whereby you can see the contours of the flakes, and sometimes catch a sharp edge.
Our question: Is this simply an aesthetic issue, or is there a functional/durability issue to consider. Since it is winter here, we are reluctant to degloss and apply another layer of polyaspartic topcoat, simply because the the initial application required airing out the entire house for about 48 hours.
Thanks in advance
Hi DT. The actual coating should feel smooth to the touch, yet have a slightly bumpy appearance and texture. If you feel any sharp edges from flakes sticking through or it resembles the image we posted, then not enough coating material was applied or the flakes were not scraped sufficiently – sometimes both. It’s mostly an aesthetic issue if you only feel the occasional sharp edge. You can always wait till it warms up to have another coat applied.
Thanks Shea, that is reassuring.
We’re leaning towards requesting an additional application of topcoat so we can “get it over with”. Given the floor is only a week old (likely 10 days by the time we can schedule the re-coat), is a degloss/sanding essential, or can the installer simply vacuum and clean with alcohol?
Thanks again!
Hi DT. Yes, roughing up and deglossing are essential. If this is not performed, the new coat will not adhere properly and begin peeling up at a later date.
Terrific, thanks again!
Hi,
You explained that when applying the clear coat over the flakes more epoxy will be required given the uneven surface, assuming my flakes will be 100% coverage, how much sq ft will I get per gallon of clear epoxy?
Thanks!
Hello Jo. What epoxy exactly do you plan to use? Determining the coverage depends on the solids content of the epoxy.
Hi!
Great info. Thanks! Clarified a lot what happened with my contractor… He only did one clear coat of polyurea. I have sharp edges of flakes, rough patches, some debris (small wood chips) glued in the floor close to the doors that were left partly opened and an uneven floor where some water pools…
– Can I add two clear coats on top of the first one? Can I do it without deglossing, after peeling off the debris, since the first coat was done 2 weeks ago? Or do I need to degloss?
– Will the coats auto level the dips in the floor (approx 1/16 of an inch) where water pools?
– Do you recommend a faster curing polyurea for the baseboards where they also scattered flakes (the baseboards are even rougher than the floor, the flakes are barely covered by a clear coat), since the poly will drip?
Thanks a lot!
Hi Alex. You will need to degloss the surface before applying any more coating. The recoat window on polyurea typically closes within a few hours or so, not days. You can use a pole sander and 120-grit sandpaper to do it. A quicker way is to use a floor maintainer with 100 grit sanding screens. Either way, the deglossing will knock down all the sharp edges and flakes that are still sticking up. Two clear coats should be plenty. 1/16″ of an inch equals 62 mils. One polyurea coat is typically 4-6 mils depending on the solids content. You are not going to successfully fill a low spot like that with just coating material. Hit the stem walls with the pole sander or orbital sander as well. Just apply the polyurea in a couple of thin coats and it should turn out nice. Just don’t go thick or it will slump.
Thanks for the quick reply! Really appreciate it. I’ll try what you recommended. And I’ll try to live with the low spots…
Thank you for this great article.
I’m having the same problem with an epoxy floor being installed in my basement.
I had to call the contractor back because the “finished” floor had exposed flake edges that tore up socks, and could make scrapes on bare feet.
After reactivation and reapplication of a second topcoat, the roughness is gone, but there is still a pronounced texture from the underlying flake. I was expecting a much smoother finish.
However, my biggest concern is that this is evidence that the contractor didn’t come close to meeting the dry film thickness targets of the contract.
Because of basement water concerns, the contract required 20 mil of 100% epoxy basecoat, full flake broadcast, and 10 mil of 100% epoxy topcoat.
I can’t imagine how a 10 mil topcoat couldn’t have completely covered the flake.
How can I determine what DFT’s the contractor actually applied?
Hi Doug. That’s too bad. Some installers don’t take the little bit of extra time required to properly scrape and clean up the flakes before applying the clear coat/s. The real good installers will run a pole sander or floor maintainer over the flakes after they are scraped up to ensure every bit of flake popping up is knocked down. Something to consider is that epoxy applied at a 10 mil coverage rate over a full broadcast floor will not result in a 10 mil thickness. All the nooks and air pockets soak up a lot of the coating. Were you given a total dry film thickness for the coating system or specs for the rates it would be applied at?
There are special gauges for measuring the thickness of coatings over concrete. However, they are expensive and cost between $250 -$500. Here is an example. Don’t get a coating measurement gauge confused with paint measure gauges which can be purchased much cheaper.
Thanks for your reply.
After the second topcoat there are still a few areas where something sharp spots (presumably flake edges) that snag at my socks.
I’m having the contractor come back for another go at it. What else can I do?
It seems to me the contractor totally botched removing the excess flake. He claims that he scraped from multiple directions, but assuming he did, it must have been with no force and a very dull blade. I mentioned sanding, and he said no one sands.
The contract called for applying the topcoat to a 10-mil DFT (not including the flake). I’ve examined the flake in my hand and it appeared to be about 5 mils thick at most. I can’t for the life of me see how 10 mils can’t completely cover them flakes. Unless of course the flake removal left behind flake angled up in a jangled mess.
Here’s a comical example of the roughness after the second topcoat. When I role a golf ball on the unfinished concrete in the basement the ball rolls true, with a few barely noticeable bounces. When it rolls over the epoxy floor that was “finished”, and then sanded and re-topcoated it bounces erratically with some bounces almost an inch high.
Thank God I only paid 50% up front.
Ugh… that’s too bad. The contractor responding with the statement “no one sands” is sad to hear. This person/company is either ignorant of the various coating methods, lazy, or both. The fact that your socks are snagging indicates that he did a poor job of prepping for the second topcoat. What did he do to prep the surface before applying the second coat? He was far past the 24 recoat window. As we state in the article, full color flake coatings are not going to be a glass smooth finish. They are going to have some texture and bumpiness. Our recommendation for a proper fix is to sand the surface using a floor maintainer with an 80-grit sanding screen. Use a pole sander or orbital to reach the edges and corners that the floor maintainer cannot reach. Sweep/vac and solvent wipe with denatured alcohol or equivalent. Then apply another clear coat. It should be much smoother and your socks should not be snagging anything.