
Learning how to grind a garage floor for an epoxy coating or paint hasn’t always been the easiest or most straight forward of projects for the average homeowner. It frequently raises more questions than answers and can lead to frustration when trying to figure out the best way to do it. Many of these questions relate to what type of grinding equipment to use.
While it is not the most difficult thing to do, trying to figure out the right tools to rent or buy can be daunting. Plus, dust control can be an issue unless you spend more money for the proper vacuum equipment. With so many choices, it can get plain confusing and even expensive.
Our objective here is to present to you an easier and more economical way to grind your garage floor. It can typically be accomplished in less than a day for most standard 2-3 car garages.
Besides helping to eliminate the confusion and questions that arise, it will also instruct you how to provide a nice profile for your coating of choice. It’s just one less thing to worry about when learning how to epoxy coat your own garage floor.
Diamabrush Concrete Grinding Tool
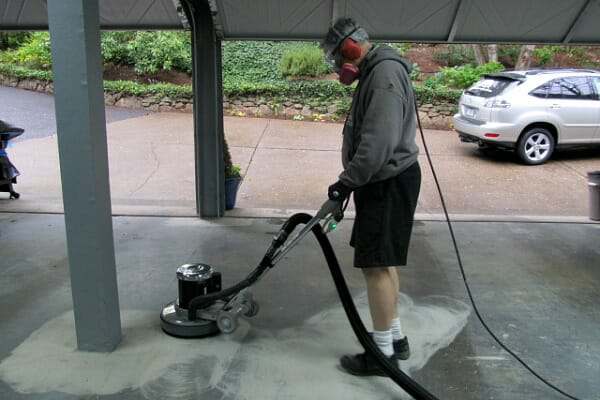
Fortunately, a company called Diamabrush has introduced a concrete prep tool that attaches to the bottom of a floor maintainer. It is available for use from a large assortment of rental companies. The Diamabrush is a great choice for garage floors that are in relatively good shape to begin with.
The Diamabrush consists of a series of diamond coated blades that are attached to a buffing wheel.
These blades abrade the surface of the concrete to provide the proper profile for an epoxy coating.
This process of grinding your garage floor is much easier to manage than the traditional 7″ angle grinder with a concrete turbo cup wheel. Plus, it keeps you off your knees.
In addition, the large size of the tool covers more area. Furthermore, the flexible blades prevent grooving or kiss marks that can happen when a turbo cup wheel is not held flat and goes up on edge.

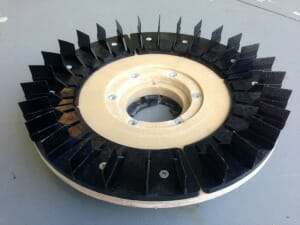
Diamabrush also offers a separate removal tool that is used for removing old paint, thinset, mastic, or even thin epoxy coatings.
You can identify it by the smaller number of diamond blades compared to the prep tool.
If you use this tool to remove old paint or a thin coating down to bare concrete, it will prep the concrete surface at the same time. You will not require grinding with the prep tool afterward. Diamabrush does not recommend the prep tool for removing old paint and thin coatings.
The nice feature about both of these is that they can be used either on a wet surface to avoid concrete dust or you can attach a dust shroud with a shop vacuum to grind dry. Dry grinding with the proper attachments prevents the heavy concrete dust or messy cleanup of a wet slurry.
Note: The Diamabrush is not an aggressive concrete grinding tool that can remove heavy layers of concrete. For example, it will not level high spots or smooth out heavily repaired areas of concrete. You will need to use a turbo cup grinding wheel or a more aggressive grinding machine for that type of work.
This post may contain affiliate links. If you use these links to make a purchase, we may earn a small commission. As an Amazon Associate, All Garage Floors earns from qualifying purchases. You can read our full disclaimer here.
tools for grinding your garage floor
These are the basic tools that you will need to acquire before you start grinding your garage floor. It’s a bonus if you already have some of these or know of someone who can lend them to you. You can apply the cost savings to your garage project.
Harbor Freight has cheap angle grinders for under $20. Unless you plan on using it for other projects, we don’t recommend spending more money on a better grinder.
The dust shroud for the angle grinder is optional but highly recommended. These small grinders will eat up concrete and create a small dust storm. It will need to be attached to a shop vacuum in order to use it. Keep in mind that pricing may vary depending on your area.
- 4 ½” angle grinder – Harbor Freight Tools – $16.00
- 4″ diamond turbo cup wheel – Amazon
- Optional dust shroud for the angle grinder – Amazon
- Floor maintainer rental – Home Depot
- Diamabrush concrete prep tool rental – Home Depot
Some Home Depot stores carry the optional dust shroud attachment and some don’t. Make sure to ask for it. If they don’t have it, you will need to grind the floor wet if you want to avoid the dust. If you find a rental with the dust shroud attachment, you will need to rent a shop vacuum to go with it or use your own.
The small angle grinder and turbo cup wheel work well for grinding flush any garage floor repairs or crack repairs. In addition, it will cover the areas near walls, corners, and other objects that the Diamabrush attachment cannot reach.
The small grinder is also good for smoothing out the raised edges and materials if you are filling contraction joints for a seamless floor appearance. They also work well to grind down any unusual high spots.
If you will be grinding dry with your own shop vacuum, then one other tool we can highly recommend is a Dust Deputy. Concrete dust is very fine and will clog up the filtration system of a standard shop vacuum fairly quickly. It requires frequent stops to clean them out.
The Dust Deputy works by creating its own dust collection system that keeps the filters of the vacuum virtually dust free. You can find the Dust Deputy here at Amazon![]() .
.
Heavier Duty Concrete Grinding Equipment
As we stated earlier, the Diamabrush is a good choice for grinding and prepping garage floor concrete that is in fairly good shape to begin. However, it is not aggressive enough for anything more than that.
If you have high spots to take down, multiple concrete repairs that need to be ground flush, broom finished concrete, or some other type of rough surface, then a heavier duty grinder will need to be used.
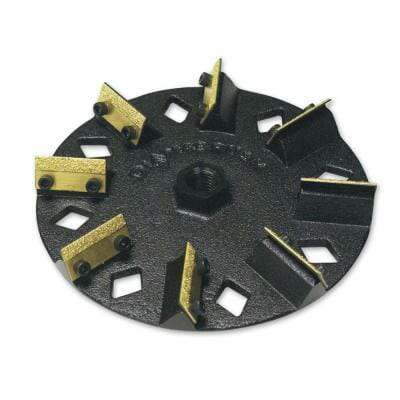
A good choice for that is the Edco 10” Concrete Grinder. It is a heavy machine (152lbs) that uses a 10” diamond impregnated grinding disc.
It can be plugged into a standard 110V outlet and has a vacuum attachment to keep down the dust.
We prefer a grinder such as this over the Diamabrush for removal of old paint and concrete coatings as well. It works much faster and does an excellent job at providing the correct surface profile for coatings.
These are fairly common and can be found at your local Home Depot and equipment rental centers. The rental costs vary from $150 – $175 per day. Be sure to check if there is an additional charge for the 10” diamond disc.
Grinding the Garage Floor
The first thing that needs to be done is to make any necessary repairs to your garage floor such as cracks, pitting, and other defects. It’s best to tackle these first before you rent any equipment. You don’t want to be making repairs while rental equipment sits.
After your repairs are complete, sweep the garage floor and clean any oil or grease spots from the surface. Grinding alone will not remove heavy oil stains and is why these need to be tackled first.
Next, if you have elected not to use a dust shroud and vacuum, prep yourself and the garage for the dust that will follow. While the Diamabrush does not create as much dust as a typical turbo cup concrete wheel, you will still have a small cloud of dust that will coat everything in your garage.
When dry grinding, make sure you wear an N95 dust mask or respirator approved for concrete dust. Concrete dust (crystalline silica) is considered a human lung carcinogen. Safety glasses and ear plugs are highly recommended for your own safety.
If grinding wet, start by wetting the surface of the concrete that you are going to grind. It’s best to work in sections when you do this. Using the floor maintainer with the Diamabrush attachment, start by slowly working the machine side by side and then a circular motion. It will only take a few minutes to figure out how long to work an area before you need to move on.
When grinding with the wet method, do not let the wet slurry dry out. It is a bear to clean out of the concrete properly if it dries. It can lead to a coating failure if it isn’t completely removed. Each time you finish a section, use your hose to blast the area clean while it’s still wet, and then move on to your next section.
To check your work, use the hose with a pressure nozzle to spray the area clean and then run your fingers across the surface. It should feel like fine to medium grit sandpaper and have a more granular look. Continue this way, grinding the garage floor one section at a time until you are done. Make sure to work the machine all the way up against the walls of the garage floor.
Because wet grinding can create quite the slurry, we recommend that before you blast a section clean, use a wet vac to suck up the majority of the slurry. This helps tremendously with keeping the amount of slurry that you hose out of your driveway down to a minimum.
Not counting the edge work or other hard to reach places, most people can grind a standard 2-car garage floor (approximately 400 ft²) in just over two hours or so when using this method.
Once done, this will leave a strip about 2″-3″ wide around the perimeter of the walls that the Diamabrush could not reach. There will be more in the corners. Use the small 4 ½” grinder with the diamond cup wheel to remove this remaining strip of concrete and the larger areas in the corners.
Be careful to keep the turbo cup wheel flat on the garage floor when grinding. If you apply too much pressure or angle it too much on the surface, it will leave “kiss marks”. These are small half-moon divots that can potentially show through your coating.
The concrete needs to be fairly dry or just damp when grinding with the turbo cup wheel. If it’s wet, you will need to use a ground fault circuit interrupter to prevent electrocuting yourself with the angle grinder. You can purchase these for about $25. Many times you can use the power cord extension that comes with the floor maintainers if you still have time on the rental. They usually have a GFCI built into the cord.
The other option which we prefer is to grind the edges first then follow up with the diamabrush. Just remember that if you are using a dust shroud on your grinder, a standard shop vacuum is not made to handle such fine dust and will clog up fast.
You may need to clean out the filter quite a few times while grinding the edges. Though you are not grinding a lot of concrete, if you elect not to use the shroud be prepared for the amount of dust this small grinder will put out.
Another Concrete Grinding Option
Another option for grinding your garage floor that is being used quite successfully is the 7” Diamabrush hand tool. This one is made to fit a 7” angle grinder and works fairly quick as well. You will need a dust shroud when using this tool and it works best with a variable speed grinder.
You can’t rent these, however. You will need to purchase them outright. Home Depot sells the 7″ version. You can also find them here on Amazon![]() .
.
Diamabrush says that slower RPM’s are better. The high-speed grinders have a tendency of heating up and clogging the blades. If your only option is a single speed grinder, don’t use one that spins any faster than 6000 rpm’s. If you are worried about the speed, Diamabrush says grinding wet will keep the blades cool and prevent clogging or glazing.
Another tip is to keep it flat and do not lean into it in an effort to make it work harder. The weight of the grinder is enough to do the work.
Depending on how much suction your shop vacuum creates, you may need to shim the tool with a washer to raise the shroud off the floor to avoid suction lock. Some shrouds have a vent to adjust for this as well. Either way, these tools make quick work of the concrete.
Best Shop Vac for grinding concrete
If you are thinking of purchasing a new shop vac, we highly recommend that you look at this Dustless Wet/Dry shop vacuum at Amazon by Dustless Technologies. These are excellent vacuums that work extremely well when vacuuming up concrete dust, drywall dust, and variety of other fine dust particulates.
Professional installers are using these more and more as a backup or even as a replacement to the much higher priced specialized concrete dust vacuums. You can read the great reviews on these and find them here at Amazon![]() .
.
They also offer an optional 25′ vacuum hose at Amazon![]() that can reach twice as far as the original.
that can reach twice as far as the original.
Final Cleaning
Once the grinding is done, it’s time to make sure the garage floor is clean of all the dust. If you ground the floor wet, then chances are the floor is clean.
To check, run your fingers across the surface when it has dried. If your fingers don’t have a lot of white residue on them, then you are good to go.
Another test is to press a strip of duct tape to the concrete and then pull it up. It should stick fairly well and come up fairly clean without too much dust. The floor will never be completely free of concrete dust, so don’t fret over small amounts on your fingers.
If you have a lot of white residue after a wet grind, then this is excess concrete dust that did not get hosed out well and will need to be cleaned. The best way to remove it is to mix up a solution of TSP (Trisodium phosphate) in a bucket, spread it out on the floor and lightly scrub it with a push broom or long handled scrub brush.
Using your high pressure nozzle, rinse the concrete real well making sure there is no more solution left behind. Work in sections if you need to so that the solution will not dry before you rinse it out. This will help lift any remaining slurry and dust that is in the pores of the concrete when you rinse.
If you did a dry grind, the easiest way to insure the concrete is clean and ready is to use the wide mouth attachment on your shop vacuum and just vacuum all the dust up. What’s nice about this method is you can start right away with applying your floor coating since there is no water on the floor that needs to fully dry.
Once the floor is done, test different areas by sprinkling water drops on the surface, paying particular attention to any areas that were coated in oil or grease or where you may have used a tire dressing that dripped onto your concrete. It should turn the concrete darker and absorb the water fairly quickly. If it just sits on the surface, then you may need to regrind and/or re-clean that spot before you apply your coating.
Grinding a garage floor with one of these easy methods will ensure the best profile for your garage floor coating to adhere to. It can be done in less than a day and is safer than using an acid etch.
Is it OK to do any patch work before grinding the concrete or is it better to grind it first?
Good question Mooney. It’s actually best to do all your repair work first before you grind. Any overlays or polymer cement patchwork still needs to be grinded like the floor. It also helps to blend in the patchwork so that it doesn’t show through on the floor coating.
Why do you need to grind polymer cement patchwork before adding epoxy? Since the patchwork is new, clean cement, isn’t the acid etching all that is needed before adding epoxy?
Hi Gerry, this is actually a fairly common question. The acid etching is fine to provide a good bond. However, you need to make sure that you have a seamless smooth transition from the patch repair to the existing concrete to insure that the repair does not telegraph through the coating. Think of it like patching a dent in a fender. If the sanding on the patch and surrounding fender is not done well, you can see where the dent was when you paint over it. A coating on concrete reacts in the same manner. If you are doing a full color chip floor it’s much harder to see (which is one of the advantages to a full chip coverage), but a bad patch transition will still show through.
Excellent article! This would surely help many individuals with their garage floors. Thanks a lot for sharing this useful information.
How long would it take to grind paint off of about 300 square feet using this method?
Hey Andrew, thanks for visiting our website. It’s hard to calculate how long it would take exactly without knowing what kind of paint is on your floor and the shape it is in. If it’s not epoxy paint, you should be able to remove it within 3 to 4 hours for 300 square feet, even less time if the paint is worn and peeling already. I would double that time if it’s an epoxy paint or coating that you are removing.
Would you use this tool on a concrete basement floor with peeling paint? I painted a small area where a “patch of old paint” is still intact to the floor. But after painting over the section, I can still see the outline of the old paint under the new paint. Should I use the Diamabrush? Or something less abrasive on the peeling paint?
Hello Dave, the Diamabrush is an excellent choice for removing paint and preps the floor for better adhesion at the same time. It will kick up some concrete dust in your basement though so a respirator is highly recommended. If that isn’t an option, you can go the chemical route and use a paint stripper, but it won’t prep the floor for better adhesion.
Great, thank you for your quick response and insight. I will have to rent the sander and diamabrush this weekend at Home Depot!
Dave
I just purchased my home and it has a 3 car garage. It has paint on it that is peeling all over the concrete floor. It doesn’t seem to be loose however would like to remove it all to do the job right. I have a 12 inch buffer and wondering if I purchase a diamond brush if it will do the job. I am sure it will be very labor intensive.
Thanks
Eddie
Hello Eddie. The Diamabrush will work just fine for removing paint from your garage floor, especially if some of it is already peeling up. For a 3 car garage it may take you 5 or 6 hours, but it’s not too difficult once you get used to working the machine. It’s a lot easier than getting on your hands and knees with a 7″ angle grinder.
Question, while the dimound brush as you state is good for removing paint, what about grinding/ polishing the concrete instead of putting an epoxy? And does home depot or anyone make the finer grits to do the poloshing using the home depot buffer?
Polishing concrete is a far different animal compared to grinding. Polishing involves a series of 5 to 8 different grits progressing to a very fine grit. Diamabrush does offer the various grit blades that are required for polishing, but it is expensive to purchase initially and also involves using a densifier during the polishing process and a high speed burnish to finish it off. Because of the equipment required, it is not a very feasible DIY garage floor solution.
Hey guys we have just used the grinder on the floor but we now have a large amount of dust left behind what is the best method to get this off??? Just a foot note we are doing a large bar with it not a garage.
If you have not introduced water to the floor then the best method is to vacuum it up with a shop vac with the wide nozzle attachment. Be sure to check the filter often because concrete dust can clog it fairly quickly. If you have problems with the larger volumes of dust, then you might want to purchase the Dust Deputy. These work great with a standard shop vac.
If the vacuum is not an option then you will have to sweep it up real well and then lightly scrub the floor with a mild cleaner to emulsify the remaining dust and then rinse real well with a high pressure nozzle on your hose.
Rented floor grinder for my garage floor from home Depot
the machine burned the paint plugged up the diamond
blade home depot still charged me for the rent.
if this ad is right they rented me the wrong thing
but they still charged me
not to happy with home depot.
It’s hard to tell what you may have rented Larry. Diamond blades don’t plug up but they can get glazed if the previous person used it incorrectly on extremely hard concrete. Home improvement centers are not always the best place to get info and service. It’s only as good as the person giving it. Sometimes it’s best to go to a regular tool rental company.
I just wanted to say that I rented the Diamabrush combo from my local tool rental shop over the weekend. I have a 2 car garage and I really expected to be doing this all weekend. I was really surprised when I finished in just over 4 hours! At least the main part anyway. I tried it dry, but man the dust was too much! Plus I didn’t have a mask. I recommend using a tool with the vacuum attachment if you grind dry. I had to go over the edges and some corners with a small hand grinder but my garage floor was done in just less than a day. As a tip, I recommend wetting the driveway down first before you hose out the wet concrete sludge that you grind off your floor.
I have a garage floor with garage floor paint and also has some rough areas on it.. Which tool should I rent. The removal tool or the concrete prep tool?
Chris, if it’s just latex acrylic paint on the floor, the prep tool will work just fine for removing the paint and will also take care of the rough areas as well.
Can I use this tool for a basement floor as well? I understand that this would not give me the polish that I’m aiming for, however I wonder if that would be a good solution for a basement. I’m thinking maybe I would grind down the basement on my own, and then hire a service to come in and do the polishing. Does that make any sense or should I consider abandoning the entire idea?
Hello Ish. Yes, you can use the Diamabrush in the basement. The Diamabrush can be used for polishing but you would need a minimum of 4 different grits for the brushes plus the addition of densifier sealers and burnishers. Your best bet is to hire a polishing contractor unless there is real rough stuff you want to remove first. We are assuming your basement has been tested for moisture and is bone dry? Polished concrete is not a good choice if you have any moisture issues.
My Garage Floor is very coarse from the salt and snow. How deep will a diamond grinder actual go? I would like 3/8 deep as this will also control snow melt keeping it in the center of the garage so as to shopvac it up. Can I plow out canals to direct water to a central area?
Hey Chris, taking 3/8″ of concrete off the top of a slab is a lot of work. It would require a large industrial grinder and take a lot of hours and dollars to accomplish. You can use a 4″ or 7″ angle grinder with a V-shaped crack chasing blade to cut grooves into the surface to channel water however.
Hi Shea,
Quick follow-up question…can the Diamabrush take about a 1/4 inch off the slab? I have some minor lippage I’m trying to fix.
Thanks!
Nick
Hey Nick. No, the Diamabrush is not the best for that. 1/4″ is a lot of concrete to remove. You will want to use a regular diamond cup wheel on a grinder for that.
Thank you very much for the quick response! What do you think the upper limit is for the Diamabrush concrete removal wise?
Thanks again!!
Nick
It depends on the density of the concrete. Generally no more than 2 mils or so, that is all that is required to prep the concrete correctly. After that, it takes quite a bit of time as well as new blades to remove more.
Gotcha…very helpful response.
Thank you!!
Nick
May 4, 2014
Hi Shea, I am planning on grinding my garage floor in a couple of weeks and I will be renting my equipment from a professional rental company, After I am finished I plan to use a clear sealer for the floor, what would you recomend? Also, do sealers come in colors?
Thank you for your time.
Hello Jobe. Since you are grinding your floor, epoxy would be a great choice as a topical sealer for your floor. You can put it down in clear or in color as a single coat or multiple coats using a clear over a color base. Some acrylic sealers are available in a translucent color tint as well, but they will not have the same durability and resistance to chemicals as epoxy.
I have a pretty large garage 2000 feet. I previously used an epoxy application and we have enclosed the garage to utilize as a great room. We want to install travertine tile. We did a test to see if a regular thin set would adhere to it. The result is not good. Can you recommend what we need to do to the floor and is there a certain type of thin set we should use? We could really use some advice in Arizona! Thanks!!
Hello Jay. Unfortunately, about the only thing you can do is grind the epoxy off the floor. As you found out, thinset doesn’t stick well to epoxy, even if you rough it up. Laticrete does make a 3-part epoxy thinset adhesive, but it is expensive. Since epoxy bonds well to epoxy when it’s prepped correctly, we tried contacting their tech line to ask about your situation but they were closed. You can find the info here. Keep in mind however that if it will work, the bond is only as good as the weakest link. In other words, if your epoxy flooring is not adhering as well as you like, neither would your tile since it would be adhering to the epoxy floor and not the concrete underneath.
I have a bare concrete basement floor that I want to stain with a water based product and the seal with a wet look sealer. I have a friend that finishes wood floors who is going to bring his buffer to grind the floor to prep for staining. We didn’t have any idea what grit screen to use so in doing some research, I discovered this article. Will the Diamabrush be a good solution for our dilemma? I believe he said the buffer uses a 16” screen, will the Diamabrush fit that? Should we wet a small section at a time to minimize dust as the article suggests? Any other tips? Thanks!
Hi Marco. If your basement floor doesn’t have any glue, paint, or other previous flooring materials on the concrete, an 80 grit sanding screen would work well for a water based stain. Just do a small section at a time with water and then wet vac it up before the slurry dries. If you do have paint or other material that needs to be removed, then the Diamabrush will do a better job for you. Most rentals are 16″ and will fit your buffer.
Thanks so much for the quick reply!
Good morning Shea
Thank you for the informative article. I have a three bay garage that I epoxied when new 9 years ago. I am afraid I used a lesser quality product and it is in need of redoing. Two questions. Along the edges the epoxy is adhered very well, and attempts to scrape and even chemically strip have not worked. As it is so well bonded, can I leave it alone in there and coat over it? The rest of the area will be diamond brushed. Second, do you recommend an epoxy primer coat or is that necessary? Thanks!
Hi Steve. Yes, you can coat over epoxy that is still adhered well to the concrete. It just needs to be roughed up first by sanding or running over it lightly with the grinder. Just make sure it is feathered well or it will telegraph through your new coating. If your grinder removes it fairly quickly it would be the best way to deal with it instead of feathering it in. We always recommend a primer if it’s in the budget. It can alleviate many possible problems, but it is not a requirement for an epoxy coated floor.
Hi Shea!
Thank you for your response and I have a follow up question regarding timing. I intend to prepare the floor using a grinder as you have outlined then follow with a premium multi coat 100% epoxy system of primer, epoxy and top coat. My battle is with available time. I believe I can do all of my prep work and get the primer down in consecutive days (I would think the primer needs to be applied shortly after grinding to get proper bond and prevent dirt and other contaminants from working back into the concrete?). Unfortunately after that I will probably need to move cars and equipment back into the garage and apply other coats in subsequent weekends. I also envision completing only a bay at a time over a several week period. Can you please offer the your advise on this plan? Will the primer be compromised with time and use? What are the challenges if the work is done in sections over an extended period of time? Thanks in advance for the assistance!
Steve
You’re welcome Steve. How well the primer bonds is not related to how quickly you apply it to freshly ground concrete. Just don’t let the floor get dirty if you have to wait. If it gets dusty from waiting a few days, re-vacuum and wipe down with a wet rag of denatured alcohol.
As far as time between coats – if you have to wait longer than 24 hours you will need to scuff up the surface, vacuum, then wipe it down with denatured alcohol before applying the next coat. You can use 80-100 grit sandpaper on the end of a block pole sander for this. Remember however that you have to wait a minimum of 72 hours before driving on the primer or other coatings. You can walk on it after 24 hours and move things onto it after 48. Doing it in stages can be done, but you have to take the above requirements into consideration when formulating your plan. Send us an e-mail if you like and we would be happy to answer your questions further.
Hi Shea. I do have a double garage and it has holes about 1cm deep.I would like to grind the whole garage so I can eleminate those holes .What would you recomend me to do.Thnx.
Hi Alex. It sounds like you have some pitting or spalling going on with your garage floor. Your talking about grinding 3/8″ of concrete to bring it level and that’s just not feasible. What you need to do is repair the surface of your garage floor by applying an epoxy/sand slurry to the surface that will fill the holes. You can also apply a polymer topping instead that will fill the holes and create a fresh surface.
Hi, I have a 1600 sf basement that has some sort of hard, clear sealer on it. Not sure whether it’s acrylic, urethane, etc. Will the Diamabrush removal tool cut through that and leave me a good profile to acid-stain and seal? Thanks for your informative site!
Mike, the removal tool will remove epoxy and polyurethane as long as it is thin mil and not too thick. Acrylic is no problem. Just keep in mind that it will take longer. If you have a thick mil build up of epoxy you may need to resort to a diamond cup wheel and grinder or more industrial set up like an Edco machine. Take note however, grinding the sealer off will also remove all the free lime and laitance that an acid stain reacts with in order to give you color. You will most likely have to stain with an acetone dye or water based stain instead.
Hi,
One of my professional bids stated they would prep the floor by blasting(steel shot media blasting I believe) as he feels it does a better job than grinding because it can get into contours, corners and such better. The others stated regular grinding.
I did not see much info on your site about blasting. Is it an acceptable method? Is one really preferred over the other?
Regards,
Nick
Hey Nick, I guess you have been busy with questions – no worries! We mention shot blasting at the end of the article. It is a very acceptable method and in fact does even better than grinding when a quality multi-coat system is applied to the concrete. We don’t discuss it much because it’s beyond the skill levels for most DIY installers and they are expensive to rent. It’s not unusual for good commercial applicators to use them.
Hi,
For acid method, I tried but I obtained a bad result because 11 years ago I applied a silicon sealer on my garage. Acid muriatic refuse to work with my silicon sealer! I have 700 square ft to covering !
I just tested a little part on my floor with a HighPressure Industrial washing machine at 3500PSI (24,000kPa). I successfully obtained finish as a sanding paper grade#20. Erlier was polished as Arborite. Is it a good idea to use an Industrial washing machine at 3500PSI (24,000kPa) to prepare my floor instead acid or grinding?
Hello Norm. As you found out, an acid etch will not work on concrete that has been previously sealed. The acid reacts with free lime in the concrete and cannot work if the surface has been coated.
As far as using a pressure washer to profile your floor, 3500 PSI is not strong enough to profile concrete properly. You need at least double that. It might work for some weak areas of the floor surface but not others because the density of the concrete at the surface can vary depending on how it was finished. Grinding is the best answer since your floor has been previously coated with a sealer.
I am in the process of refinishing a concrete floor that used to be a garage. Now it is a living room opened up to the kitchen and dining room. I ripped the carpet out and we want to finish the concrete with paint, with a design. I have spent quite a few hours already scraping the old carpet glue and fuzz off. Is grinding an option here? I have a tight budget and am looking for the best path forward.
Hello Jason. Grinding is not a problem and will do a good job of removing the glue and prepping your floor at the same time. Diamabrush has a mastic removal tool that works well for a situation like yours. You should be able to find them to rent from your local Home Depot or rental center.
Hey! I was reading through this trying to figure out if the mastic tool on the diamabrush would leave swirls on the concrete. I’m staining my floors throughout my house but need to remove the sticky glue. The Home Depot employee said that it would not be smooth enough to use alone. I’m not really looking for smooth all over-perfect concrete but don’t want a consistent swirl pattern all over either. Thanks for your help!
Hi Carey. All grinders are going to leave some sort of swirl marks, some worse than others. The mastic tool isn’t bad at leaving marks, but you can always go over it with the prep tool afterwards to reduce some of the marks. Running the floor machine in irregular patterns as you finish helps to alleviate this. The Diamabrush is the least offensive of the different grinding products out there for leaving swirl marks.
Thanks so much!
Shea,
Just rented the Dimabrush prep tool today and ground the garage floor wet to keep the dust down, and it did a really good job. I read in the text above that the fine dust could be lifted with TSP, well I didn’t have that. So, I used a cleaner and stiff bristle brush to scrub, I then rinsed good, and pressure washed 4 or 5 times, and squeegeed the standing water off. After drying for a couple of hours, I run my hand over the surface and I pick up a small amount (barely noticeable) of very, very fine dust. My question is, is there an acceptable level of this very fine dust that will not affect the adhesion of the epoxy? And if this is not acceptable would you recommend the shop vac with wide nozzle as you have recommended in other responses as it’s now dry, or would you wet again and use TSP?
Thanks in advance for the know-how knowledge!
Hello Joe. If the rest of your floor is done with the same attention to detail as your floor prep, you should end up with one fine coating! Based on your description of the dust you are picking up on your hand, your concrete surface sounds good. White residue on finger tips or debris and dust embedded in a tape strip placed on the concrete and pulled back up would indicate that it wasn’t clean enough. Just a note – Unless you are using a primer that works with moist concrete, be sure to give your concrete enough time to dry with all the pressure washing you did. It can sometimes take a few days for the moisture to work its way out. If it doesn’t you run the chance of experiencing outgassing issues in the first coat which can create small little bubbles and volcano looking craters.
Great info. I am going to rent the grinder at HD. My question is, can a oscillating sander with a heavy grit be used instead of a grinder for the edges?
Hi James. If it’s just bare concrete and you are not removing a sealer or coating, then you can most likely get the edges with a sander. It’s a slower process when doing it this way however and will eat up some sandpaper. Use 40 grit paper or less and be sure to test for porosity before you apply your coating.
If I use the removal tool across the entire floor, should I still need to use the prep tool afterwards?
No, the removal tool preps as well. It just takes longer using the removal tool due to its design and time for removing the material from the concrete.
Awesome! Thanks for the quick reply!!!