
Learning how to grind a garage floor for an epoxy coating or paint hasn’t always been the easiest or most straight forward of projects for the average homeowner. It frequently raises more questions than answers and can lead to frustration when trying to figure out the best way to do it. Many of these questions relate to what type of grinding equipment to use.
While it is not the most difficult thing to do, trying to figure out the right tools to rent or buy can be daunting. Plus, dust control can be an issue unless you spend more money for the proper vacuum equipment. With so many choices, it can get plain confusing and even expensive.
Our objective here is to present to you an easier and more economical way to grind your garage floor. It can typically be accomplished in less than a day for most standard 2-3 car garages.
Besides helping to eliminate the confusion and questions that arise, it will also instruct you how to provide a nice profile for your coating of choice. It’s just one less thing to worry about when learning how to epoxy coat your own garage floor.
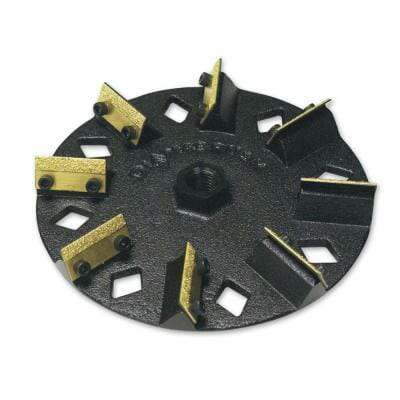
Diamabrush Concrete Grinding Tool
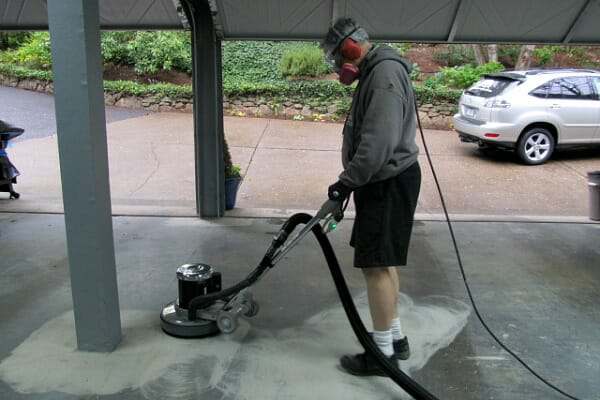
Fortunately, a company called Diamabrush has introduced a concrete prep tool that attaches to the bottom of a floor maintainer. It is available for use from a large assortment of rental companies. The Diamabrush is a great choice for garage floors that are in relatively good shape to begin with.
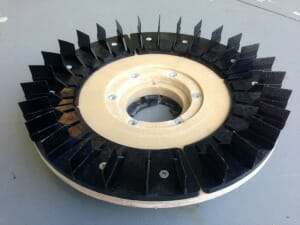
The Diamabrush consists of a series of diamond coated blades that are attached to a buffing wheel.
These blades abrade the surface of the concrete to provide the proper profile for an epoxy coating.
This process of grinding your garage floor is much easier to manage than the traditional 7″ angle grinder with a concrete turbo cup wheel. Plus, it keeps you off your knees.
In addition, the large size of the tool covers more area. Furthermore, the flexible blades prevent grooving or kiss marks that can happen when a turbo cup wheel is not held flat and goes up on edge.
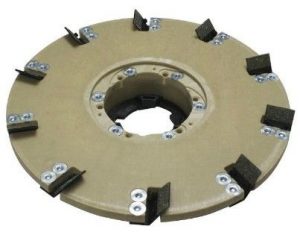
Diamabrush also offers a separate removal tool that is used for removing old paint, thinset, mastic, or even thin epoxy coatings.
You can identify it by the smaller number of diamond blades compared to the prep tool.
If you use this tool to remove old paint or a thin coating down to bare concrete, it will prep the concrete surface at the same time. You will not require grinding with the prep tool afterward. Diamabrush does not recommend the prep tool for removing old paint and thin coatings.
The nice feature about both of these is that they can be used either on a wet surface to avoid concrete dust or you can attach a dust shroud with a shop vacuum to grind dry. Dry grinding with the proper attachments prevents the heavy concrete dust or messy cleanup of a wet slurry.
Note: The Diamabrush is not an aggressive concrete grinding tool that can remove heavy layers of concrete. For example, it will not level high spots or smooth out heavily repaired areas of concrete. You will need to use a turbo cup grinding wheel or a more aggressive grinding machine for that type of work.
This post may contain affiliate links. If you use these links to make a purchase, we may earn a small commission. As an Amazon Associate, All Garage Floors earns from qualifying purchases. You can read our full disclaimer here.
tools for grinding your garage floor
These are the basic tools that you will need to acquire before you start grinding your garage floor. It’s a bonus if you already have some of these or know of someone who can lend them to you. You can apply the cost savings to your garage project.
Harbor Freight has cheap angle grinders for under $20. Unless you plan on using it for other projects, we don’t recommend spending more money on a better grinder.
The dust shroud for the angle grinder is optional but highly recommended. These small grinders will eat up concrete and create a small dust storm. It will need to be attached to a shop vacuum in order to use it. Keep in mind that pricing may vary depending on your area.
- 4 ½” angle grinder – Harbor Freight Tools – $16.00
- 4″ diamond turbo cup wheel – Amazon
- Optional dust shroud for the angle grinder – Amazon
- Floor maintainer rental – Home Depot
- Diamabrush concrete prep tool rental – Home Depot
Some Home Depot stores carry the optional dust shroud attachment and some don’t. Make sure to ask for it. If they don’t have it, you will need to grind the floor wet if you want to avoid the dust. If you find a rental with the dust shroud attachment, you will need to rent a shop vacuum to go with it or use your own.
The small angle grinder and turbo cup wheel work well for grinding flush any garage floor repairs or crack repairs. In addition, it will cover the areas near walls, corners, and other objects that the Diamabrush attachment cannot reach.
The small grinder is also good for smoothing out the raised edges and materials if you are filling contraction joints for a seamless floor appearance. They also work well to grind down any unusual high spots.
If you will be grinding dry with your own shop vacuum, then one other tool we can highly recommend is a Dust Deputy. Concrete dust is very fine and will clog up the filtration system of a standard shop vacuum fairly quickly. It requires frequent stops to clean them out.
The Dust Deputy works by creating its own dust collection system that keeps the filters of the vacuum virtually dust free. You can find the Dust Deputy here at Amazon.
Heavier Duty Concrete Grinding Equipment
As we stated earlier, the Diamabrush is a good choice for grinding and prepping garage floor concrete that is in fairly good shape to begin. However, it is not aggressive enough for anything more than that.
If you have high spots to take down, multiple concrete repairs that need to be ground flush, broom finished concrete, or some other type of rough surface, then a heavier duty grinder will need to be used.
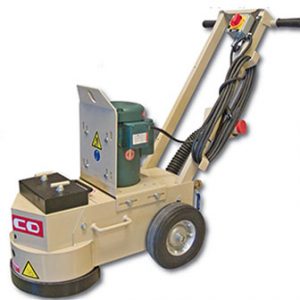
A good choice for that is the Edco 10” Concrete Grinder. It is a heavy machine (152lbs) that uses a 10” diamond impregnated grinding disc.
It can be plugged into a standard 110V outlet and has a vacuum attachment to keep down the dust.
We prefer a grinder such as this over the Diamabrush for removal of old paint and concrete coatings as well. It works much faster and does an excellent job at providing the correct surface profile for coatings.
These are fairly common and can be found at your local Home Depot and equipment rental centers. The rental costs vary from $150 – $175 per day. Be sure to check if there is an additional charge for the 10” diamond disc.
Grinding the Garage Floor
The first thing that needs to be done is to make any necessary repairs to your garage floor such as cracks, pitting, and other defects. It’s best to tackle these first before you rent any equipment. You don’t want to be making repairs while rental equipment sits.
After your repairs are complete, sweep the garage floor and clean any oil or grease spots from the surface. Grinding alone will not remove heavy oil stains and is why these need to be tackled first.
Next, if you have elected not to use a dust shroud and vacuum, prep yourself and the garage for the dust that will follow. While the Diamabrush does not create as much dust as a typical turbo cup concrete wheel, you will still have a small cloud of dust that will coat everything in your garage.
When dry grinding, make sure you wear an N95 dust mask or respirator approved for concrete dust. Concrete dust (crystalline silica) is considered a human lung carcinogen. Safety glasses and ear plugs are highly recommended for your own safety.
If grinding wet, start by wetting the surface of the concrete that you are going to grind. It’s best to work in sections when you do this. Using the floor maintainer with the Diamabrush attachment, start by slowly working the machine side by side and then a circular motion. It will only take a few minutes to figure out how long to work an area before you need to move on.
When grinding with the wet method, do not let the wet slurry dry out. It is a bear to clean out of the concrete properly if it dries. It can lead to a coating failure if it isn’t completely removed. Each time you finish a section, use your hose to blast the area clean while it’s still wet, and then move on to your next section.
To check your work, use the hose with a pressure nozzle to spray the area clean and then run your fingers across the surface. It should feel like fine to medium grit sandpaper and have a more granular look. Continue this way, grinding the garage floor one section at a time until you are done. Make sure to work the machine all the way up against the walls of the garage floor.
Because wet grinding can create quite the slurry, we recommend that before you blast a section clean, use a wet vac to suck up the majority of the slurry. This helps tremendously with keeping the amount of slurry that you hose out of your driveway down to a minimum.
Not counting the edge work or other hard to reach places, most people can grind a standard 2-car garage floor (approximately 400 ft²) in just over two hours or so when using this method.
Once done, this will leave a strip about 2″-3″ wide around the perimeter of the walls that the Diamabrush could not reach. There will be more in the corners. Use the small 4 ½” grinder with the diamond cup wheel to remove this remaining strip of concrete and the larger areas in the corners.
Be careful to keep the turbo cup wheel flat on the garage floor when grinding. If you apply too much pressure or angle it too much on the surface, it will leave “kiss marks”. These are small half-moon divots that can potentially show through your coating.
The concrete needs to be fairly dry or just damp when grinding with the turbo cup wheel. If it’s wet, you will need to use a ground fault circuit interrupter to prevent electrocuting yourself with the angle grinder. You can purchase these for about $25. Many times you can use the power cord extension that comes with the floor maintainers if you still have time on the rental. They usually have a GFCI built into the cord.
The other option which we prefer is to grind the edges first then follow up with the diamabrush. Just remember that if you are using a dust shroud on your grinder, a standard shop vacuum is not made to handle such fine dust and will clog up fast.
You may need to clean out the filter quite a few times while grinding the edges. Though you are not grinding a lot of concrete, if you elect not to use the shroud be prepared for the amount of dust this small grinder will put out.
Another Concrete Grinding Option
Another option for grinding your garage floor that is being used quite successfully is the 7” Diamabrush hand tool. This one is made to fit a 7” angle grinder and works fairly quick as well. You will need a dust shroud when using this tool and it works best with a variable speed grinder.
You can’t rent these, however. You will need to purchase them outright. Home Depot sells the 7″ version. You can also find them here on Amazon.
Diamabrush says that slower RPM’s are better. The high-speed grinders have a tendency of heating up and clogging the blades. If your only option is a single speed grinder, don’t use one that spins any faster than 6000 rpm’s. If you are worried about the speed, Diamabrush says grinding wet will keep the blades cool and prevent clogging or glazing.
Another tip is to keep it flat and do not lean into it in an effort to make it work harder. The weight of the grinder is enough to do the work.
Depending on how much suction your shop vacuum creates, you may need to shim the tool with a washer to raise the shroud off the floor to avoid suction lock. Some shrouds have a vent to adjust for this as well. Either way, these tools make quick work of the concrete.
Best Shop Vac for grinding concrete
If you are thinking of purchasing a new shop vac, we highly recommend that you look at this Dustless Wet/Dry shop vacuum at Amazon by Dustless Technologies. These are excellent vacuums that work extremely well when vacuuming up concrete dust, drywall dust, and variety of other fine dust particulates.

Professional installers are using these more and more as a backup or even as a replacement to the much higher priced specialized concrete dust vacuums. You can read the great reviews on these and find them here at Amazon.
They also offer an optional 25′ vacuum hose at Amazon that can reach twice as far as the original.
Final Cleaning
Once the grinding is done, it’s time to make sure the garage floor is clean of all the dust. If you ground the floor wet, then chances are the floor is clean.
To check, run your fingers across the surface when it has dried. If your fingers don’t have a lot of white residue on them, then you are good to go.
Another test is to press a strip of duct tape to the concrete and then pull it up. It should stick fairly well and come up fairly clean without too much dust. The floor will never be completely free of concrete dust, so don’t fret over small amounts on your fingers.
If you have a lot of white residue after a wet grind, then this is excess concrete dust that did not get hosed out well and will need to be cleaned. The best way to remove it is to mix up a solution of TSP (Trisodium phosphate) in a bucket, spread it out on the floor and lightly scrub it with a push broom or long handled scrub brush.
Using your high pressure nozzle, rinse the concrete real well making sure there is no more solution left behind. Work in sections if you need to so that the solution will not dry before you rinse it out. This will help lift any remaining slurry and dust that is in the pores of the concrete when you rinse.
If you did a dry grind, the easiest way to insure the concrete is clean and ready is to use the wide mouth attachment on your shop vacuum and just vacuum all the dust up. What’s nice about this method is you can start right away with applying your floor coating since there is no water on the floor that needs to fully dry.
Once the floor is done, test different areas by sprinkling water drops on the surface, paying particular attention to any areas that were coated in oil or grease or where you may have used a tire dressing that dripped onto your concrete. It should turn the concrete darker and absorb the water fairly quickly. If it just sits on the surface, then you may need to regrind and/or re-clean that spot before you apply your coating.
Grinding a garage floor with one of these easy methods will ensure the best profile for your garage floor coating to adhere to. It can be done in less than a day and is safer than using an acid etch.
Hi There fabulous site I am following your instructions carefully as I prep my floor for epoxy coating.
Question: I’m chasing the cracks (a lot of long ones) with a crack chase wheel. Works great but what depth should I go down ie. just enough to further expose the crack and give the crack repair something to attach to?
Also I have a few very fine cracks 1/32 to 1/16” I’m hestitant to grind them and wondering if the epoxy coating itself will take care of those ones so they aren’t seen?
Thanks very much!
Hello Rob. You just want to chase the crack deep enough to get a clean edge and remove any loose material within the crack. The rule of thumb for cracks is if you can stick the blade of a putty knife in the crack then it needs to be filled. Unless you are using 100% solids epoxy, the carrier agents that evaporate will cause the coating to shrink. This will cause the epoxy within the crack to slump, thus exposing the shape of the crack.
Hello, I have a few questions about grinding a concrete garage floor. I have a 7in angle grinder and i’m wondering what grit diamond turbo cup to buy. it’s bare concrete with a few stains and needs to be scuffed up for the epoxy I plan on putting down. should I buy a double row or single row diamond disc? what disc and dust shroud would work best together? hopefully you can answer these questions because i’m having a hard time pulling the trigger on buying them. i’m new at this and want everything to be perfect. thank you!!
Hello Nathan. Most concrete diamond cup wheels are 30 to 40 diamond grit. A two row segmented disk or a 1 row swirl disk both work fine. Don’t spend a lot of money on one. Same goes for a dust shroud. The cheaper models work OK, but they do sometimes require a lot of fiddling to get them working right. It’s not worth spending the money ($80 plus) for a good one if it’s for a one time project. We do recommend using a Dust Deputy with your shop vac. If not, your vac will clog up quick and you will be stopping every 5 minutes or so to unclog it.
I am doing my first garage floor. Is there any additional advice you can give beginners to to help with the best possible out come.
Hi Tim. Are you referring to grinding or the whole process of application? What product will you be using?
Hi Tim. Here in the Midwest contractors pour very hard concrete. We have tried dimabrush and edco products. None of them work the way I would like them to or leave a rough enough profile. Any suggestion?
Hello Benj. If the concrete will readily absorb water, then the profile is generally good. If you have extremely hard concrete, then you need to use softer diamond pads. They are available for Edco machines and other concrete grinders that you can rent from your local rental supply store. Just tell them you need the diamond inserts for very hard concrete.
I was wondering if you could give me some answers or help. In the past, I have applied epoxy paint to a concrete floor, apx. 1200 sq. ft.. Last time I did it, I rented a stone grinder, scraped any loose paint, grinded the rest, removing perhaps 50% of the paint. I then washed the floor, let it dry really good then applied a coat of epoxy paint. Three years later, the paint has chiped, peeled and come up in many areas. Seems like I’m not prepping the floor enough. So, do I rent a diamond grinder or try the stone grinder again but try to remove all the old paint first. It did not seem like I was going to remove much more paint when I used the stone grinder last time. Thanks for you help.
Hello Alec. If you are applying an actual epoxy over latex paint, then that is one of your problems. An epoxy coating is only as good as what it is adhered to. We suggest using a diamond grinder to remove all the old paint. This will properly prep the bare concrete for application of the epoxy as well. Also, the type of epoxy product you use makes a significant difference in how it holds up as well. If you are using the typical home improvement DIY epoxy kits then you can expect the type of performance you are currently getting. However, if you use a commercial quality epoxy system or one of the newer single-part polyurea coatings, then you will receive many years of excellent service if applied to properly prepared concrete.
Hello,
I have two questions.
1. What commercial grade epoxy floor covering do you recommend?
2. Can I apply the epoxy on my concrete stairs going into my house from the garage as well?
Thanks,
Hi Josh. Yes, you can apply epoxy to the stairs in the garage leading up into the house. However, we highly recommend treating that surface with an anti-slip aggregate to prevent any slip/falls from wet stairs. There are many commercial products and vendors to choose from. What you don’t want to do is purchase product from your local home improvement centers. They only carry residential grade product that is not designed to last years or stand up to heavier abuse. Most product is purchased from floor coating specialists online.
One type of product that we really like for DIY applications is the newer single-part polyurea coatings. These are excellent coatings and easy to apply. Also, you can find excellent product from some of your sponsors such as EpoxyMaster, ArmorPoxy, Legacy Industrial, and Garage Flooring LLC. You can click on their adds on the right side of our site to learn more.
Hello, I am hoping for help with a question.
I have a garage floor that I used the Rust-Oleum Epoxy shield on about 10 years ago. For the most part this has held up well but I’m ready to start over with a better product.
You mentioned “Another option for grinding your garage floor that is being used quite successfully is the 7” Diamabrush hand tool.”
I’m wondering if this tool can be used to remove the old paint and grinding the concrete at the same time (as the paint comes off)? Or do I need to use more than one tool?
Thanks!
Scott
Hello Scott. Unless the paint is coming off rather easily as is, we would recommend using a 7″ concrete turbo cup wheel instead. The 7″ Diamabrush removal tool will do the job, but the turbo cup wheel is more aggressive and will get it done quicker. If you were grinding mostly bare concrete, then the Diambrush would be a good choice.
1. Our local Home Depot does not carry the dust shroud so we have decided to use the wet method. Are there any disadvantages to wet grinding the garage floor other than allowing it time to dry before applying polyurea?
2. Legacy highly recommends using their primer. However Armor Poxy and Garage Floor LLC have stated their product is self priming. Does the use of a primer effect longevity?
Hello Peter. When wet grinding, make sure that you completely rinse each section as you go. A high pressure nozzle on your hose works best. Just be prepared for the slurry to clean up outside the garage.
The primer with Nohr-S increases the durability and thickness of the coating as well as the adhesion. What you get is a coating system that is even more durable than the other two choices, but it is also going to be more expensive. However, it does not affect the actual wear factor from normal traffic.
We just finished filling our contraction joints with xtreme set 100 from Legacy. Some of the liquid went on either side of the joints about an inch during application. Will I need to remove it completely for the epoxy to adhere to it? Also-We feel the joints are pretty flush as is and were able to scrap off any protrusions with a metal trowel and putty knife. Would you still recommend going over it with a grinder? If so, a handheld grinder with the turbo diamond brush the best way to do this? And how long do you grind it down for?
Hi Hayley. If you are filling your contraction joints it’s because (we are assuming) you want a seamless floor look. If that’s the case, then you need to treat all repairs and filled joints like you would if you were painting a repaired wall in your home, a dented fender on your car, or a divot in a piece of nice wood. They are all sanded and leveled to a smooth transition so that the repair can’t be seen once you paint over it. It’s the same with contraction joints. If you don’t grind the joints flush, they will stand out and telegraph through the coating. All that is required is to run the turbo cup wheel over them so that you don’t feel any obvious high or low spots.
Thank you for your quick response! I just finished up all the grinding and cleaned the floor again really well. I noticed there were a few spots that must’ve had the resin from the extreme set on top-it was very smooth and hard. Will the epoxy stick to this? I don’t want to have to grind, rinse and wait for the floor to dry again, but I don’t want to have any problems with adhension either. I tried to contact Legacy without any luck.
Hi Hayley. If you went over those spots with the grinder then you will be good to go. The polyurea resin feels smooth even when ground. If you missed them, then yes, you need to lightly grind those areas. Don’t worry about rinsing those areas afterwards, just vacuum well with a shop vac to get the dust.
Hi Shea, l have been told that car bondo used in autobody shops works well in un trafficked areas of the garage for small cement repairs. I am going to use the Legacy polyurea product with primer. Your thoughts and will it bond to this?
Thx Peter
Hi Peter and sorry for the late reply. Bondo is an old trick that painters and garage mechanics use for a variety of quick fixes. However, do not use bondo if applying a coating. Bondo does not always react well when applied thickly and can crack. Also, it does not make for a good structural repair like epoxy and polyurea concrete repair products do.
HEADS UP: if choosing the DIY/grinding option and renting a floor maintainer with a Diamabrush concrete prep tool – make sure you thoroughly inspect the wheel’s blades and compare against other blades if available.
Newer blades will yield better/quicker results vs a used blade. Used blades tend to lay at a 45 degree angle or less (should be close to 90). The used blade diamond grit tends to be much smoother vs a newer blade with a very rough grit. I estimate my job took took double the time. Unfortunately, I only realized my mistake after returning the equipment and comparing to other blade options.
You make and excellent point, Matt. Thanks for bringing it up.
I rented a floor polisher and diamond wheel from Home Depot to do my basement. For some reason, it just made the swirl marks and never really etched the concrete. Does that mean I very hard concrete and need something else?
Hi Paul. Basements aren’t known for their hard concrete, but it’s possible. Grinding does not etch. Etching is a different process that breaks down the surface of concrete chemically. Have you done a water test yet? Apply a teaspoon of water to a few different areas. If the concrete immediately turns dark and absorbs the water quickly (within 30 secs. or so), then the floor is good to go. If not, then you may need to go a more aggressive route. Home Depot has the 10″ Edco floor grinder that can handle just about any concrete.
Hi! That is for the great write up! I have a questions about wet grinding for interior concrete floors. You mention using a pressure washer and I worry all the water will get in under the drywall and cause water damage. Do you have any suggestions?
Thanks!
Hi Danny. Wet grinding on the interior of a home can be problematic. It requires using a heavy duty wet vac to suck up the slurry and rinse water as you go. It takes up much more time to do and you have to work in small 4’x4′ sections as you go. If the vac doesn’t get it all, slurry remnants (white powder) will dry up in the pores and make it harder to remove. A good dry vac system is a much better way to go about it.
Saw the diamabrush at Home Depot TR the other day and am curious. We need to remove several layers of old paint from our church’s gym floor. The concrete surface is very smooth (hard troweled) and looks like they may have used a cure compound. That might be why the paint didn’t stick. Anyway, will the Diamabrush “sand” through the cured layer? Can we top coat with some clear polyurethane? Looking for some economical recommendations. Thanks.
Hello Ivan. When removing multiple layers of paint on a hard concrete surface, your best bet would be the Edco 10″ grinding machine that Home Depot rents. It’s heavier and will provide a more aggressive grind. As it grinds through the last layer of paint, it will prep the concrete surface at the same time. If you have 1000 square feet or more (you mention it’s a gym floor), you might be better off to rent an Edco dual disc grinder from your local rental supply. It will cost more, but it may end up saving you money because it will get the job done faster.
For a coating, most polyurethanes for concrete do not adhere well to bare concrete and need a layer of epoxy applied first. One exception is the new Duragrade Concrete by Rust Bullet which we just featured here. A more economical solution, however, would most likely be a single-part polyurea. ArmorPoxy has a nice clear that you could get by with just one coat. We feature it in this article along with some links for pricing. If you give them a call, you may be able to purchase material at a cost of around .50 cents a square foot.
Shea: Getting ready to use the Roll on Rock epoxy w/ polyurea 2 stage finish. I prepped the concrete garage floor by using a degreaser/cleaner, used a prep tool/polisher from HD, filled cracks with Quikrete 2 part epoxy crack filler and grinded patch work down. Used my Shop vac to clean up dust but it still left some residue on floor. Should I do a final wash with TSP or can I get by with just using the rest of the degreaser/cleaner? Want to do it right.
Also, for a uniform look, any thoughts on using the roll on rock on a wooden 2 step stairway leading into house?
Your site is fantastic and very informative. Great job! Thank you!
Hello Ron. You want to try from getting water involved in the process if you can help it. Doing so will require waiting at least 24 hours for the concrete to thoroughly dry. If you wipe your fingers across the surface and get a little bit of dust on the tips then that is OK. If they are coated with dust then you have more work to do. Applying denatured alcohol to a lint free towel and wiping down the surface will remove any residual dust. It evaporates very quickly, so once you are done you can get right to the coating application.
Yes, you can apply the coating to your wood stairs providing you rough up the surface with 60 grit sandpaper. We highly recommend applying a good anti-slip grit to your final coat, however. If the stairs get wet, they can become a slip hazard if you don’t use anti-slip media.
Great article! One question I had is after using the Diamabrush coating removal tool would the concrete be ready to accept the new coating or would I still have to use the concrete prep tool afterwards? Thank you!
Hi Matt. Once the tool removes the paint and scuffs the concrete well, you will be good to go. There is no need to grind again afterwards with a different tool. Just do a few water drop tests to ensure that the concrete absorbs it quickly.
Thank you so much! Doing this process now and was really hoping to just have to use the one tool.
Matt, was the coating removal tool enough or did you need to also use the diamond cup tool with a second pass? Tackling this in two weeks and my floor has two layers of coating on it. This is my only uncertainty at this point because the coating removal tool looks to have less surface area contact with the floor than the diamond cup tool.
Fantastic website, thanks so much for posting! My question is around which tool (floor buffer vs. angle grinder) would you use for a rather small job, approximately 50 sq ft to remove paint/prep for putting an epoxy waterproofing system on? If I can save some $$ on renting the floor buffer I will but if you think it’s the key ingredient for a good job, I will consider. Thanks!
Hello Grant. A 7″ angle grinder with a turbo cup concrete grinding wheel or Diamabrush will make fast work of removing the old paint and prepping the concrete at the same time. Make sure to wear the proper respirator when you do. A dust shroud and shop vac are a must or you will kick up a lot of concrete dust.
I ended up using a 4.5 inch angle grinder with the Diamabrush attachment and it JUST got the job done. I could see a 7 inch being faster but the area was small. I also used a multi tool with a carbide attachment to clean up the contraction joints. I’m so thankful you posted all of this information on this site, it really made me successful!
I noticed some small hairline cracks on the concrete, in the contraction joints and a few corners. What’s you go-to product to seal them before an epoxy coat system?
Again, thanks so much for this priceless site and the responses!
We are glad it worked out well for you, Grant. For small cracks you can purchase the Rust-Oleum Concrete Patch and Repair. It’s a 2-part epoxy crack repair that works well. You can find it here from Amazon or sometimes at your local home improvement center. Cracks at the bottom of contraction joints are normal. It’s the reason that the joints exist. They encourage concrete to crack within the joints instead of across the top surface of the slab.
Great site and I’ve learned so much about proper floor coating procedures. I have a new home with a garage floor that the builder used cheap epoxy on. Had them put a second coat on after hot tires were causing the coating to lift, but they’ve done a poor job once again. Like most things nowadays, if you want it done right, you need to do it yourself or hire a well-vetted professional. Going the DIY route and assembling all the tools needed at the moment. My question is HD tool rental provides a few different Coating Removal & Surface Prep Wheels: (1) Coating Removal Tool, (2) Concrete Prep Tool, and (3) Hexpin Surface Prep Tool. Since my floor has two coats of epoxy and sealant, what would you recommend I use for stripping and prepping the floor? Can I go with option (2) alone to both remove and prep? This is listed on HD’s site for prepping bare concrete. See link below.
https://www.homedepot.com/c/floor_care_and_refinishing_equipment_rental#floor-strippers
Also, for the perimeter of my garage, can I get away with using the diamond cup wheel on a 4.5″ grinder to both remove the existing double layer of coating/sealant and prep the concrete? Everything else makes sense to me, but just want to make sure I have all the information before I dive into this. Thanks for your help in advance!
Hello Chris. You want to use the Diamabrush coating removal tool. It will simultaneously prep the concrete as it is removing the old coating. Make sure the blades are still in good shape before you take it home. If they have it available, our favorite to use when removing old coatings is the Edco 10″ concrete grinder. It is a heavier machine with a more aggressive grind that will work quicker at removing the coating and prepping the concrete. Yes, the 4″ angle grinder with the concrete turbo cup wheel works great for perimeters and other hard to reach areas. It’s also good for grinding any last minute crack repairs flush.
Thanks Shea! Your answer was my speculation and thanks for confirming. As for the Edco 10″ concrete grinder recommendation for old coatings, what would you constitute an old coating? The first coating was laid about 7 months ago and the secondary coating about 2 months ago. In any case, it seems like the Edco is the way to go for quicker work and my local HD has one in stock. Thanks a million for sharing your knowledge and helping out the community!
You are welcome, Chris. It doesn’t matter on the age of the coating as old coatings can be just as stubborn to remove as new. The Edco just works quicker at removing them.
Thank you for all the information,
My question is.. I have a relatively clean, very smooth 1000 sq/ft garage floor that had a basic sealer applied 10 years ago. I want to prep the floor for an epoxy coating and I believe I will need to grind. My local rental spot had the twin disk Edco, but I have a choice of disks, the standard blocks or the diamond disk, which more than doubles the rental price. Will the standard grind disk do the job?
Hi Garett. The twin disc Edco is a great machine. It can be more pricey due to the dual disc rental, but it does get the job done faster if you have a large area to grind. I’m not sure what the “standard discs” are that they supply it with. What you need is are 25 grit diamond discs in order to provide the proper profile. What they may be referring to is the bonding material that the diamonds are embedded in. If so, then standard is fine. Hard, dense concrete can produce a very fine dust when grinding that will clog the diamonds. It can cause the discs to get hot and even put a slight polish on the concrete. When this happens, a soft bonded diamond disc is required. The bonding material wears faster and keeps the diamonds exposed to grind the concrete. The converse is true of soft concrete. A hard bonded disc is required. Standard is fine for most concrete.
Hello, I am about to stain my garage floor. Right now the floor is very flat and has some paint on it. I don’t want to create a very porous surface where it feels like sandpaper. I want to keep the sheen look if you know what I mean. How can I take the paint off but keep the surface as flat as possible without any sandpaper feel to it? I’ve stained driveways before but they were very porous and sandpaper like. This one isn’t like that. So I’m not sure what to do.
Hi Gary. If it’s only paint, you can purchase a chemical paint stripper to remove it without having to sand or grind. Keep in mind that if the floor has a sheen to it, then it may not be porous enough for a stain. If water drops bead up or don’t absorb very quickly into the concrete, then it will not accept a stain either unless it is an acid stain.
Water does bead on it and I’m not using an acid stain. Is there anything I can use after I use a floor machine and stain it to give it that flat look again? Would that be a clear epoxy? Is there anything else?
If water beads on the surface, then you either have a very smooth finish or it has previously been sealed. If it was previously sealed you will need to grind the concrete before you can apply anything to it. If it has not been sealed, then you will need to etch the concrete (if you don’t grind) to open up the pores before you apply a stain or it will not take. When you say you want the flat look, are you referring to a smooth looking finish? If so, applying a coating such as a clear epoxy or polyurea will create the smooth finish. It will also make your stain color pop. If you don’t clear coat the stain, it will have a very dull and lifeless look.
Be aware that stain products in a paint can promoted and marketed as concrete stain that you just roll onto the surface really isn’t a stain at all. It is a very thin colored acrylic coating that can peel, especially in a garage. Behr Concrete Stain is one such example.
Hi Shea, I had asbestos tiles in my basement and when I got abatement done, there was black mastic left on the floor. I have removed most of the mastic with a mastic remover (and a lot of manual labor), but there’s some that hasn’t come off – mostly in the corners and along walls. I want to prep the floor for epoxy application and I am wondering whether the concrete prep tool will take care of the little mastic that’s left around or should I first use the mastic removal too and then use the concrete prep tool?
As long as you don’t have a lot of it, Aseem, using the concrete prep tool will be fine.
Any suggestions on how to dispose off the slurry after wet grinding and wet vacuuming?
Dump the wet slurry out onto the ground somewhere, let it dry, and then shovel the remaining into a bag for your trash.
Sir, I have a 400 square foot interior concrete floor I am about to stain. The floor was poured a year ago, hand troweled and water cured. There are some trowel lines and cream left on the surface. I would like to smooth out the surface prior to applying Deltadye and sealer. I am concerned that diamond grinder may be too aggresive. Are there any other options? Thanks in advance.
Hello Don. No, a diamond grinder would not be too aggressive. Remember, you are working with concrete and not wood :). The Diamabrush attachment on a floor maintainer would be a good application for your needs. It’s not as aggressive due to the flexible blades. It will do fine with removing leftover cream and will actually take a little bit of effort for removing the trowel lines.
Hi! I had concrete poured around a new swimming pool last year, and it was supposed to be given a broom finish. The first pour on day 1 came out perfectly, but the pour on day 2 was a catastrophe. For some reason, the contractor brought out a finishing machine, and once he was done, the concrete was slick as glass. It also looks completely different–it’s very black where he ran the machine and it just looks terrible. He tried brooming it after using the machine, but the slab was mostly dry and it did almost nothing. We’ve had several people fall on this section. Removal seems impossible as the second pour ties into the stone on our house and also goes over the edge of the pool (we did cantilevered coping around the pool).
I’m trying to find something to roughen up the concrete AND make it look uniform. From what I’ve read it seems a concrete sander might be a good tool to use to make the surface of both pours uniform, and can also leave a good, grippy texture. Is it true the machines leave a texture like 40-grit sandpaper? I don’t want to simply use an opaque coating with sand, etc., as I’m afraid the surfaces will still look very different from pour 1 and 2, and those coatings eventually begin to peel. I’m at my wit’s end–any advice would be greatly appreciated!!!
Hi Jonathan. Wow, it’s unfortunate that your contractor decided to finish the concrete differently with the second pour. Grinding the concrete will provide a profile that will be much less slippery than a power troweled surface when wet. However, grinding both pours is not going to even out the color of the concrete. It will lighten the colors and possibly provide less of a difference, but the second pour is still going to look darker. If you do grind, be sure to use a good penetrating sealer afterwards. It will not affect the surface grip, but it will help to seal the concrete.
Shea:
I am in the process of doing prep prior to priming and 100% solid epoxy coating a concrete floor. The floor has a cure and seal product and a sealer on it. Therefore I am using a 5″ grinder to prepare the floor for a calcium chloride moisture test. I used a DeWalt double row diamond cup wheel and it took the surface sealer off. However, the concrete surface it left was not that rough (not polished, but smooth) and it took about 10 minutes for water drops to absorb. Should I grind a bit more to go a a bit deeper? Also, would a turbo surface grinding wheel give a more aggressive surface? I’m using this to also help determine what type of wheel I should ask for when I rent an Edco surface grinder.
Hi Ken. Was the surface machine (power) troweled? Also, when you ground the test spots did the concrete turn a lighter color? Concrete grinding wheels for angle grinders are almost always 25 grit. However, the amount of segments can determine how aggressive they are. The less segments, the more aggressive the grind.
Shea:
It was not machine troweled. The ground concrete is decidedly a lighter gray than the surrounding concrete. The 4.5″ Dewalt double row diamond cup (DW4774) that I used has 8 exterior abrasive segments and 8 interior abrasive segments. I just want to make sure that the concrete is properly prepared to give me a good moisture test.
Thanks, Ken
If it took 10 minutes for the concrete to absorb the water drop, then you are going to need to grind a bit more for a coating. However, it will be enough for the calcium chloride test.