
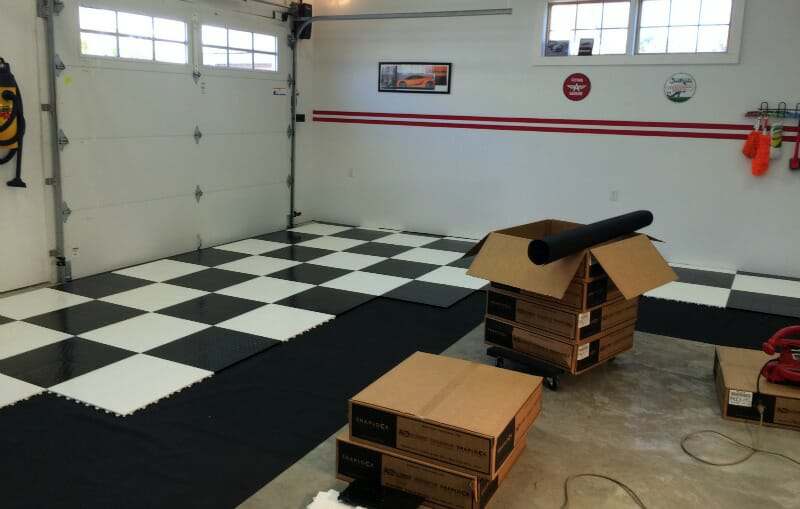
One of the benefits of interlocking garage tiles is that little preparation of the garage floor is generally required before installation. You can lay them right on top of your oily and dust-ridden concrete floor if you like and almost no one would be the wiser. But should you? Sweeping beforehand is a great start, but we want to give you a few recommended tips for prepping your garage floor before you install your garage tiles.
Keep in mind, some of these tips will depend on the current condition of your garage floor as well as the climate where you live. For some, all that may be needed is just sweeping the floor before you begin. For others, there can be big advantages to doing a little bit of concrete prep beforehand.
Please note that none of the following tips are required to install your interlocking tile. They are just our recommendations if you want to get the most out of your installation and protect the concrete from possible environmental damage from the elements.
This post may contain affiliate links. If you use these links to make a purchase, we may earn a small commission. As an Amazon Associate, All Garage Floors earns from qualifying purchases. You can read our full disclaimer here.
Clean the garage floor
OK, we know that this goes without saying. Nobody really wants to lay their new garage tile on a disgusting floor, but there is another reason for cleaning it. Cleaning beforehand will reveal any cracks that you may not have been aware. In addition, it will also make the floor ready for any of the other tips that we cover below.
Unless your concrete is already fairly clean or you have a brand-new floor, the easiest method is to use a concrete degreaser and scrub the floor down. Hose it out well and then let it dry. For more information, we cover how to clean a garage floor in depth here.
Seal cracks in the concrete
If you live in a snow belt then the last thing you want is watery road salts and deicing fluids finding their way deep into the concrete of your garage floor. Water can cause freeze-thaw damage and cracks can be the biggest contributor.
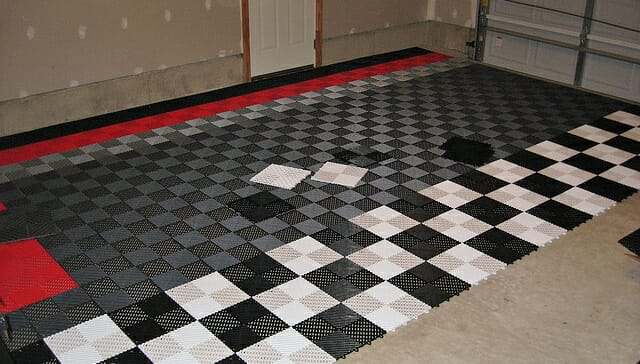
We admit that if you are installing a solid top interlocking tile then not a whole lot of water is going to get through to the concrete below. However, the free-flow, self-draining styles are great winter weather tiles. They are easier to keep clean and more slip-resistant since water does not pool on them.
They allow all that winter water and snowmelt to deposit onto the concrete underneath your tiles to keep the surface dry. If these are your tiles of choice, then sealing your cracks is more a necessity than an option.
Notice that we said, “seal the cracks.” Since you are not applying a coating or painting the floor, a strong structural repair that is ground flat with the concrete is not needed. You just need to seal the crack to prevent water intrusion.
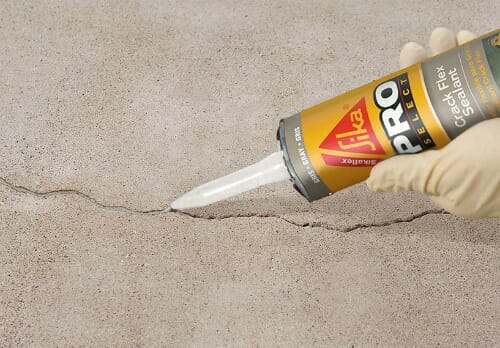
The easiest method is to just wire brush the cracks after cleaning the garage floor and then seal them up with a flexible polyurethane sealant. SikaFlex self-leveling sealant is our favorite. It’s inexpensive and easy to apply. You can find it at your local home improvement center or here on Amazon.
If you have larger cracks that are deep, fill them up first to within 3/8″ to 1/2″ from the top with clean sand before applying the sealant. This will allow your sealant to go farther and prevent it from sinking before it cures.
Seal the concrete before interlocking tile installation
What? OK, right now we know what you may be thinking. Why would you want to seal the concrete when you are planning to spend good money on a nice interlocking tiled garage floor?
The reason depends mostly on the climate where you live. If you experience snowy winters then you will be bringing road salts and deicing fluids into the garage. While these chemicals will not harm your interlocking tile, they are hard on your concrete.
Road salts will cause spalling and pitting. You may already have this problem with your garage floor and it could be one of the reasons why you are installing interlocking tiles in the first place. If you have a self-draining style of interlocking tile, then these chemicals will still get deposited right onto the concrete under the tile.
A good concrete penetrating sealer will protect your garage floor against road salts as well as repel liquids in general. They will also prevent further damage to your garage floor if you have this problem already. They can be purchased for less than $50 to cover a standard 2-car garage and are very easy to apply.

Our favorite for a job like this is PS104 Densifier and Siliconate Sealer by Concrete Sealers USA. It hardens the concrete and protects it from salts, freeze-thaw, and moisture-related issues that can damage concrete.
It’s also cheap insurance to protect the concrete of your garage floor in general, including limiting how badly it would stain if you had a major oil spill. You can read more about penetrating sealers here.
If your floor is clean, it will take less than an hour to apply the sealer. You can then begin installing your interlocking tiles a couple of hours after that.
Lay down landscape fabric
Because interlocking garage floor tiles are made of plastic and hollow underneath, they have their own unique sound when walking on them. Every once in a while, a particular tiled floor may make a clicky clack or hollow clunking sound when walking on them that some people do not care for.
The remedy to help lessen that sound is to lay synthetic landscape fabric down onto the concrete underneath the tile. The mesh design of the landscape fabric does a much better job of absorbing sound than concrete does.
In addition, it prevents noise from being amplified by bouncing back and forth in the small hollow between the concrete and the underside of the plastic tile. You can find it here on Amazon.
If you are one of those people that are concerned about your garage tiles making noise, then we recommend that you install the landscape fabric before you install your interlocking tile. It’s much easier than discovering you need to do it afterward.
We talk more about reducing noisy garage floor tile here.
Final Tips
As we said previously, there is little you have to do to prepare the garage floor before installing interlocking garage tiles. If you have a fairly new floor and don’t live in a snowy climate, then sweeping the floor may be all that you need to do.
Even if you have a poor concrete floor with cracks, pitting, and salt damage, you can install the interlocking tiles right on top without doing a thing to the concrete in your garage and it will not affect the tiles.
However, if noise is your biggest concern or you live in an area where your garage floor will encounter road salts and deicing fluids every winter, then you may want to follow some of these tips to protect the concrete in your garage before installation.
Can interlocking floor tiles be installed over vct tile that is already laid on basement laundry floor? If so, would it be advisable to lay the landscaping fabric first?
Sure it can Joena. Complaints of noise is very low, but the landscape fabric is very inexpensive so it’s not a big investment to lay it down first if you want. If the tiles make any noise at all it will be subdued compared to concrete since VCT is softer.
Hi do you have one for a driveway that water can drain underneath and won’t fade in sunlight? Thanks
Hello Eoin. Just to clear things up, we do not sell flooring. We recommend that you contact SwissTrax and talk to them as they have interlocking tile that can used outdoors. Keep in mind though that these are not intended for driveways. They are not surrounded by 3 walls to keep them from moving so you would have to anchor them down somehow and still allow room for the tiles to move due to expansion and contraction.
What about if someone is installing the interlocking garage floor tile in a basement, specifically RaceDeck Diamond?
I am assuming there would need to be very little floor prep before laying the tile in this scenario, since it will not be exposed to much water, salt, etc. like a garage floor could.
The only cracks I have are the expansion joints. Should I fill those in at the surface?
Should I seal the concrete first? As I do not expect any moisture beyond what the concrete might be creating.
Hi Shawn. You are correct, there is not much prep required. Filling in the expansion joints is not necessary. Being that it’s a basement, we would recommend applying a penetrating sealer first in order to prevent possible moisture intrusion that can create humidity issues at different times of the year, but that is entirely up to you.
Thanks Shea, sealer is installed.
Do these tiles need to be acclimated before install?
I left them out in the Garage last night. They will be installed in the basement.
If they need acclimization, how long? I’m itching to get them installed, but want to do it right.
Thanks!
You’re welcome Shawn. Yes, you want to acclimate them to the environment they are being installed in. Move them to the basement and give them 24 hours and you will be ready to go. If you unpack and separate them they will acclimate faster.
What About minor low spots in concrete? I get 2 spots in my garage where puddles like to develop near the rear tires of my car. Does the ground need to be completely level before installing tiles? I want to do solid tiles since I would have no way push the water away in the low spots with the drainage tiles.
No garage floor is perfectly flat Ben. Minor low spots are the norm and will be perfectly fine with interlocking tiles, so no worries there.
This is very helpful. There are vinyl tiles on my garage floor over the concrete.
Some of the vinyl tiles are cracked and there are many missing tiles revealing the bare concrete–areas up to 5′ x 6′. Is it necessary to remove all the vinyl tiles or smooth the floor with something to fill in for the missing tiles before installing interlocking tiles?
Hi Jan. It would be best to remove the vinyl tiles first if you can. It’s not too difficult with the right tools. A heavy duty scraper like this one works wonders on VCT. If the tiles are already coming up it may be easier than you think. Another option is to just fill the empty spaces with more vinyl tile. You can find peel and stick vinyl tiles as home improvement centers on sale for less than .50 per square foot sometimes. Don’t worry about lining them up perfectly or small gaps between the tiles. Just fill the space. You can lay interlocking tile over your existing floor, however, the tiles will move some (up and down) as you walk or drive over those areas and it may sound hollow when walking over those areas as well.
How do you move heavy rollaways onto this material?
Hi John. There are a variety of ways you can do this. Assuming you have the standard 1/2″ thick tiles, you can cut two strips of 1/4″ plywood with one strip being a few inches wider than the other. Stack the strips on top of each other against the tile edge with the wider strip of course being on the bottom. This will give you a good step-up ramp to the tile floor.
Where can I purchase edging tiles for Garagetrac Garage floor tiles? Thanks
Hello Sharon. Big Floors sells both GarageTrac and GarageDeck tiles. Scroll to the bottom of this page and you will find the edge ramps for their tiles.
Could rolls of cork underlayment be used instead of landscape fabric? I have a bunch left over from another project and suspect it would quiet the hard PVC tiles even more.
Hi Joan. No, the combination of the support braces in the back of the tile along with weight is going to act like a cookie cutter on the cork over time. Plus, once the tile begins to sink into the cork, it will not allow air transfer underneath the way they are designed to and can begin to develop mold and mildew.
I have some pitting a cracking in my floor, Do I need to resurface my floor before laying tiles? or just seal the cracks?
Hi Tony. Technically you don’t have to do either. However, it’s always a good idea to seal up cracks whenever you can.
Should the flooring or edging go up to garage door or under it ?
Hi Jeff. The edging should run approximately 1/4″ – 1/2″ from the edge of the door.
Hello, if I’m just making a parking pad in my garage, what can I do to keep the tiles from moving around? Out pad will be 8’x15″ with the edging tiles all the way around. We will be parking 1 car on this pad. Thank you for any advice.
Hi Brian. What you can do is use a thin rubber pad like this one here from Amazon. Cut it in half lengthwise and lay the two strips under the leading edge of the parking pad. Usually if a pad want to move, it’s when the car initially rolls up the ramp. Doing something like this does a good job of preventing that.
Does it really matter which side of the garage door I start from as long as the loops are on the side I am working toward?
No, it doesn’t really matter, Wade. Just don’t forget to plan about any other entrances where you may need to use the plastic ramps.
Hello – what prevents the tiles from moving / shifting with cars driving in and out of the garage please?
Thanks!
Hi Emad. The overall weight and resulting surface friction from the tiles is what keeps them from moving. This doesn’t take into consideration walls and other immovable objects that tiles are placed around or adjacent to.
Are there any tricks to minimizing the unlevel floor due to concrete pitch for a basement room application? I know it won’t be perfect, but I also don’t want to go through the steps of using any self-leveling compounds and having to prepare the concrete since the concrete is already epoxied and has no cracks. I’m just applying Garage Deck tiles for appearance and some benefit on feet/legs from the concrete as well as plenty of stains over the epoxy.
Hi TW. There aren’t any tricks necessarily. The tiles are free-floating and require a solid surface underneath for the majority of contact points of the tile. The only way to fix an unlevel floor is to use a self-leveling concrete compound. But that will require a bit of work as you mentioned.