
Don’t hold off any longer on your garage floor project just because of some required garage floor repairs. Repairing a pitted or spalled garage floor is only intimidating because most people don’t know what to use or how to start. It really isn’t that difficult and in most cases can be tackled by the average DIY handyman. Once you understand what to do and which products to use, you will find that it’s not as difficult as you may think.
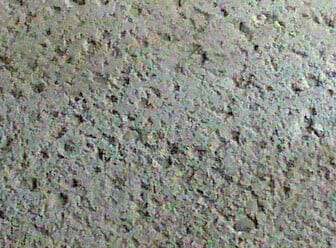
What is concrete pitting and spalling?
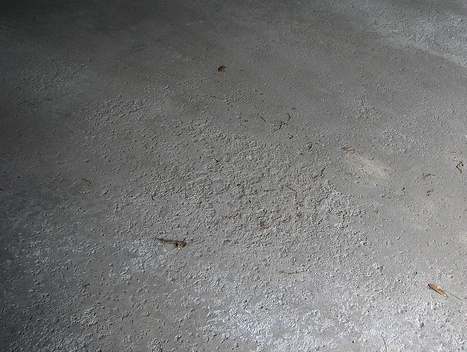
Pitting and spalling can sometimes look very similar to one another. Spalling will usually cause the surface of the floor to crumble or separate into thin layers. Pitting on the other hand can create smaller, deeper holes that have a more distinct cratered look.
Spalling is typically caused by cold winter climates that subject the concrete to freeze-thaw cycles. If water is deposited on the garage floor it can work its way into the capillaries of the upper surface of the concrete as it is absorbed. When the water freezes, it expands and causes microscopic damage to the surrounding concrete.
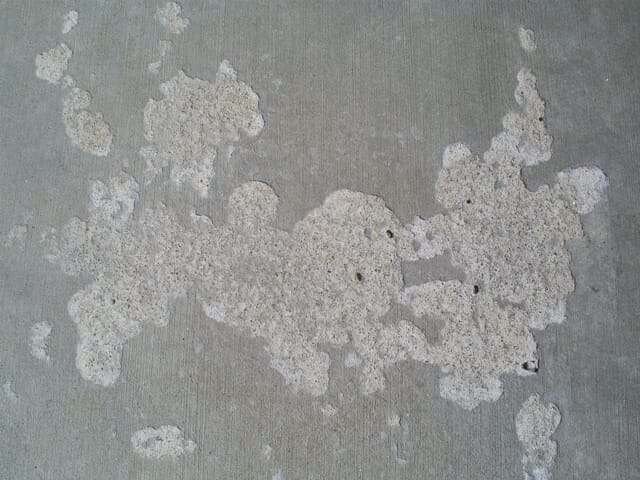
Over a few winters, this constant damage weakens the surface. As a result, the concrete starts to separate from the surface in sheets or crumbles.
Road salts and deicing fluids only contribute to making the problem worse. Salt is corrosive and will cause concrete to deteriorate. In addition, it lowers the freezing temperature of the water. This can allow the water more time to penetrate deeper into the concrete before it freezes.
Pitting, however, can be caused by improper finishing of the concrete, an inadequate concrete mix, improper use of an accelerator, or even old age. Pitting can sometimes cover large areas of the floor while spalling may be more localized.
Road salts and deicing fluids can cause localized pitting as well. It’s most common in areas where a parked car can deposit road salts and deicing fluid on the concrete.
Prepping the concrete for repair
Fortunately, the majority of pitting and spalling in a garage can easily be repaired. Typically, the depth of the damage is usually less than ¼” for spalling and ½” for some pitting. Many times it is less than that.
The first thing you need to do is clean the area to be repaired of any oil stains, wax, sealers, or anything that would be considered a bond breaker. Next, remove all broken and loose concrete with a hammer and chisel. It’s extremely important that you remove all loose or suspect material.
If you are repairing spalled concrete, we highly recommend firmly tapping the surrounding areas with a hammer and listening for a hollow sound.
Spalling starts damaging concrete from just underneath the surface. As a result, there may be surrounding areas of your garage floor that haven’t weakened enough to break free on their own and remain hidden.
Areas that sound hollow have deteriorated underneath and are weak. They should be hit hard with a heavy hammer to expose the damage for repair. This will eliminate the possibility of having to do any more repairs in the near future.
After you are done, sweep the area clean and then vacuum the remainder of the dust from the surface.
Many times instructions for concrete prep may state grinding or shot blasting of the concrete is recommended. If you are repairing smaller areas in which you have broken away all loose material with a hammer and chisel, then the surface profile of the concrete should be satisfactory.
Repair Procedures for pitting and spalling
There are a variety of product materials you can use. What you use will depend upon the size of the repair you are making, how deep it is, and in some cases, how you want it to look. In addition, considerations should be made if you plan on applying a garage floor coating.
The type of materials used is usually broken down into two categories. These include resinous repair materials such as epoxy and polymer-modified cement repair materials.
This post may contain affiliate links. If you use these links to make a purchase, we may earn a small commission. As an Amazon Associate, All Garage Floors earns from qualifying purchases. You can read our full disclaimer here.
Epoxy Concrete patch repair products
If you are going to be coating your garage floor with paint, or epoxy, or covering it with a garage floor mat, then we recommend using an epoxy-based product for most of these repairs. The exception to this is very large areas, which we will discuss shortly.
If you have just a few small holes from pitting, then we recommend using something like Rust-Oleum EpoxyShield Concrete Patch.
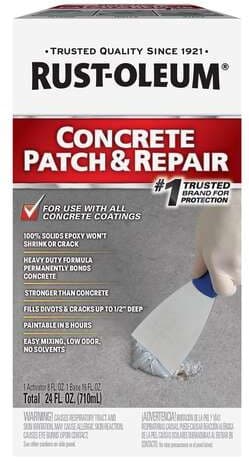
This is the same product that works well for crack repairs. If it’s not available from your local home improvement center, you can find it here at Amazon.
The EpoxyShield patch is a 2-part epoxy gel that you mix as you need it. Mix the Part-A and Part-B according to the directions. Apply it to the repair area making sure to work it in to push out any trapped air. Smooth it out as best you can with a putty knife or margin trowel. Within 8 hours the repair will be hard enough to grind or sand flush.
For larger areas of pitting and spalling, we recommend using a 100% epoxy concrete patch with a sand aggregate. The silica sand is mixed in with the epoxy to act as a filler. Legacy Industrial’s 5-Ton Epoxy Patch Kit is a good example of this.
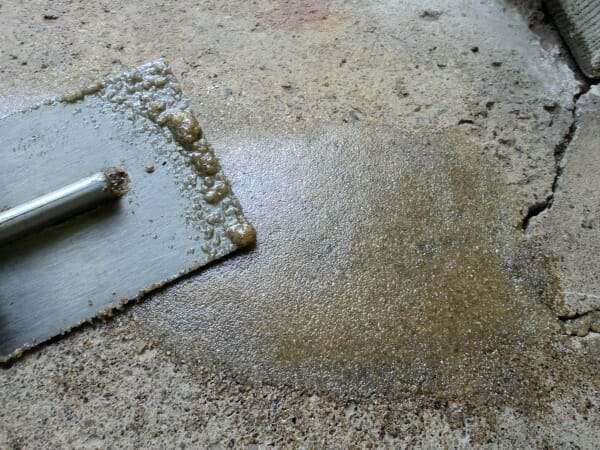
This type of repair works extremely well and is a popular method among floor coating contractors. Besides repairing pitting and palling, it does a good job of filling larger holes and cracks as well.
In addition, it can be trowelled out fairly smoothly. Once cured, these repairs are actually stronger than the concrete.
Depending on the size of their kit, you can cover from 7 – 16 sq. ft. at a depth of 1/4”, for pitting and spalling.
Rust-Oleum TurboKrete Concrete Patching Compound is a similar product. It uses a 100% solids epoxy resin as well. You can find the Rust-Oleum TurboKrete here at Amazon.
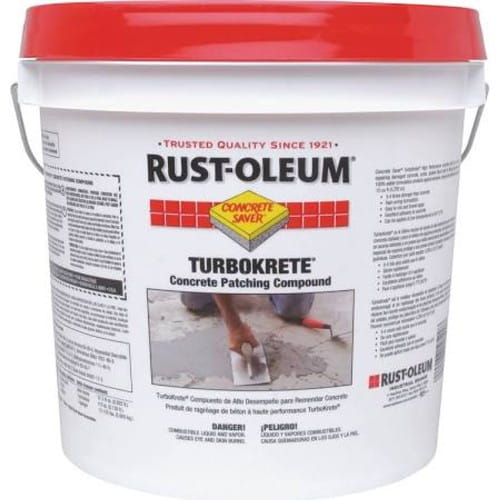
We’ve used this kit before and have found that the required mix of sand to epoxy is a bit too much. Reducing the amount of sand in the mix by 10-15% provides for a smoother finish and easier application.
After following the mix instructions from the manufacturer, you will want to trowel the epoxy patch onto your damaged area. Be sure to trowel it with some pressure. This forces the mix into the crevasses of the damaged area and works out any trapped air at the same time.
Once it’s trowelled in, you can smooth the mix with a cement float and feather it to the existing surface. One industry trick is to spray the float with a little Windex. This will keep the trowel from sticking and provide a nice surface.
Polymer-modified cement patches and toppings
Another product that works well is polymer-modified cement. These are a mixture of Portland cement, sand aggregate, and polymers. You just add water. They are used for patching concrete, overlays, and concrete resurfacing cement toppings.
The nice thing about polymer-modified cement products is that they are fairly easy to work with and adhere much better than standard concrete mix. Some can be mixed thicker or thinner depending on the depth of the damage that is being repaired.
Another nice feature is that many can be feathered to as little as 1/16” and can cure quickly. They can be ready for an epoxy coating, paint, or stain, sometimes within hours.
Pay close attention to what the manufacturer offers as some have special mixes for patches deeper than ½” and other mixes for overlays, shallow pitting, spalling, and complete resurfacing.
They may require prepping the area with a priming liquid before application so be sure to read the instructions carefully. Don’t worry, it’s a simple process.
Polymer-modified cement patches are a good choice for very large areas of pitting and spalling. This also includes broken concrete lips and edges, deep holes, and areas where the repair may need to be shaped. The edge of a concrete apron is one such example.
Ardex is a company that makes excellent polymer-modified concrete repair products. Ardex CP is their concrete patch and Ardex CD is used for resurfacing and shallow repair areas. You will need to call or use their website to find a dealer near you.
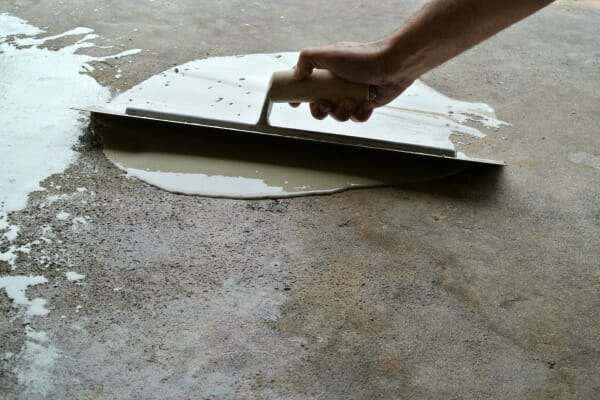
If you have large areas of shallow pitting and/or spalling, then a polymer-modified overlay or topping would be the best choice. These work well in areas where the damage is not much more than 1/8” to 1/4”, especially if you want to retain a standard grey color.
Mixed to a thinner consistency than a patching mix, a polymer-modified cement topping can be poured directly onto the area and spread using a hand trowel or metal-edged squeegee. If you have any spots that are deeper than 1/4″ within the area you want to cover, it’s best to mix a small, thicker batch first to patch over these spots.
In about an hour or so, you can rough these spots over with a mason’s stone, grinder, or a block of 60-grit sandpaper. Sweep and then apply the topping directly over it.
Because these products set up quickly, you should be able to tell fairly soon if you have any areas that have settled and created a low spot that needs a second application. Usually, within 4-6 hours you can rough up the area with 60 grit sandpaper and apply another coat.
Once you have finished and the repairs have cured, you may need to lightly grind any ridges or areas where the mix didn’t feather nicely into the existing concrete. This will help to create a nice smooth transition.
Do not use a polymer-modified self-leveling underlayment! This type of product is not engineered as a wear surface and is not approved for outdoors. Underlayments are only used indoors and require that they are covered with floorings such as carpet, tile, or linoleum. You cannot apply garage floor coatings over underlayments.
Final notes
Remember – If you are going to follow up with an epoxy coating or paint, these repaired areas will still need to be prepped by grinding. This provides the proper profile for coatings. You cannot etch polymer-modified concrete or epoxy patch repairs.
Also, always honor all contraction and expansion joints. Repair materials such as these are not designed for filling these joints up and will lead to surface cracks if you do.
When making repairs to your garage floor, be sure to pay close attention to the mixing instructions and any tips that come with the product. After all the repairs are made, be sure to protect the garage floor from further pitting or spalling by sealing the floor or applying a coating.
Like anything else, there is a bit of a learning curve to deal with depending on the product. Once you get started, however, you will find that doing most of these repairs on your garage floor is not as difficult as you may have thought.
Hi Shea! Thank you so much for all the great information!
I’m getting ready to refinish my rapidly deteriorating garage floor with Rust-Oleum 261845 EpoxyShield Garage Floor Coating. The areas of pitting are sizable, but in and around the pitting still has paint on it. I was thinking of using Ardex CD to fill the pitting, then renting a grinder to grind the entire floor down before doing the epoxy.
I guess my question is, do I need to grind around the pitting first in order to remove the paint? Or am I literally just troweling the Ardex flush with the existing painted floor, then grinding everything?
Or would it be best to grind the entire floor, then fill in the pitting, and regrind that to rough it up to prepare it for the epoxy?
It seems like it would be overkill to grind it all, ardex all to 1/16″ and then grind it again to prep it, right?
Thank you again for all the great info on your site!
Hello Nick and thanks for the kudos. Ardex, as well as other repair products, will not stick to paint. You will need to remove the paint best as possible from any areas where the Ardex will be applied. Little bits of paint here and there will not be a big deal, so no need to stress over that.
Fantastic information on this web site. I have a question:
What is a good product for repairing the lip/edge of the garage floor in prep for epoxy coating? I have a few spots on the edge that are worn down, the largest being maybe 3/4 inches wide/deep along a 3 inch length of the lip. I need something that can me molded into a corner shape and will bond strongly. I don’t have many options locally; mostly things like Quickrete quick set cement and Quickrete polymer modified structural repair. I can also get Sakrete stuff shipped to the stores. Ardex CP looks good, but I don’t need 40 lbs of material. I have some leftover Xtreme Set 100 and other epoxy repair stuff but I don’t know if its appropriate for an edge. I’d appreciate any suggestions, thank you.
Hello Joshua. The Quikrete Polymer Modified Structural Repair will work great for that. Get your self a concrete edge trowel like this to form your edge.
I am trying to repair areas of pitting/spalling on basement floor as a result of minor flooding during Hurricane Sandy…floor was painted…please advise
Hello Rene. As we state in the article, all loose debris and material (including any paint) must be removed first. The repaired areas should be clean with little concrete dust. For a basement we would recommend using a polymer-modified concrete repair material since these will breathe and allow water vapor to pass through. An epoxy slurry will not breathe and could cause problems if your basement has any moisture issues.
Thank You for the prompt response.
My garage is now empty of anything on the floor and there area areas of what I’d call spalling. They may be caused by alkali damage from the ’70s installation.
Can I use one of the products mentioned to repair this damage in preparation for an epoxy surface being laid or does akali require other remedies?
Looking forward to this seemingly huge job this spring when it warms up.
Hi Reggie. Alkali damage in concrete generally causes what is known as map cracking. It usually doesn’t cause spalling. Regardless, you can use any of those products for the repairs. Just make sure all the loose material is removed first. The key is to grind the repairs flush after they cure. This will ensure good adhesion of your coating and a seamless finish that will not show evidence of the repairs through the coating.
Hi Shea,
I really appreciate your detailed articles! What kind of square footage of repairs would you recommend switching from a few packs of Rust Oleum Patch and Repair to gallons of another material? Seems like the cost of a lot of the strong repair materials are all near $1/oz and I am not sure of the advantage other than buying a big pack.
Thanks!
What type of repairs and square footage are you attempting to accomplish, Matt?
2-car garage that is 400 sq ft total. 2 spots of 1-2 sqft of spalling under where each car was. 3-4 divots that are half a golf ball. 75ft of hairline crack (under 1/8) and maybe 10ft of crack that is 1/8 to 1/4. 50sq ft of light to medium pitting.
What you need, Matt, are two different products. I recommend you use one of the crack repair fillers that we highlight in our article on garage floor repair. For the spalling, you should use a either a polymer-modified concrete patch or a slurry of 100% solids epoxy that is mixed with sand, such as the TurboCrete we mention on this page. Make sure the concrete is clean and then trowel the mixture into the spalling. If you are applying a coating, make sure to grind all your crack repairs and spalling flush with the rest of the concrete.
I just wanted to say thank you, too, for the detailed information. My job sounds just like Matt’s above, and it’s been a bear to prepare the floor. BUT, with your articles, I’m confident the finished epoxy floor will be great!
Thank you Al. We appreciate it!
I see that the repaired spalled areas should be ground flush to the surrounding floor (right angle grinder with cup wheel). I then plan to use the Diamabrush concrete prep pad on the whole floor. My question is, Will the patched spalling areas finish differently using the Diamabrush? Just asking because it was mentioned some patch material is harder than the existing concrete.
Hi Dave. No, you will be fine. Though many of these quality patch repair products can cure harder than the concrete, they still grind the same.
Your website has been immensely helpful, guiding me through my garage restoration. I have a few questions I’m hopeful you can help me with. First some background: My garage floor was in awful shape and I spent 8 hours diamond grinding 3 layers of paint off the floor, and another night grinding the edges. I’m now left with a pretty clean floor, but there are a few spots of pitting from winter salt damage. There are two spots about 1 square foot of moderate pitting, and a few square feet of very mild pitting (maybe 1/32” deep). I plan to use the Nohr-S (grey pigment) system on the floor, with the included medium broadcast of chips.
Now the questions: Can I get away with just patching the two more significant areas with the Rust-Oleum epoxy patch kit and leave the other areas alone. I don’t care if the very mild pitting is somewhat visible when all is said and done.
Next, how can I get residual paint out of some of the pitting that survived the diamond grinding? I’ve tried the Rust-Oleum paint remover, wire brushing, scraping, digging with a screwdriver, and prayers for miracles all to little effect. My next attempt will be a dremel unless you have another suggestion.
Thank you
Hello Mark. We are glad our website has been beneficial for you. Make sure you grind smooth the two areas that you fill with the Rust-Oleum epoxy patch after it has cured. Once you do that it should not telegraph through the coating. The Nohr-S is not going to hide the area with the small pitting. Only a 100% epoxy applied with a gauge rake can do that. However, no worries if you are fine with it telegraphing through. I wouldn’t worry too much about the small amounts of paint in that area that the grinder could not reach. If it’s that hard to get out based on your attempts, then it’s not going to peel up with the coating. The only real way to tackle it would be with a more aggressive grind and then a patch of an epoxy sand slurry to fill the area and then grind flush.
Prepping my garage floor has really become a project. I patched some of the pitted areas and several small spot with the Rust-Oleum epoxy patch. I got the amazon turbo cup diamond wheel you recommend for the harbor freight angle grinder, but it seems too aggressive to remove the excess epoxy. It quickly gouges the cement even with my best attempt at keeping it level and moving. Will 60 grit sanding wheels or other angle grinder attachments work over the epoxy?
Hello Mark. 40 grit sandpaper can work on the epoxy, but it will get torn up pretty quick as it comes in contact with the cement. The key with the grinder is to hold it flat and not apply any additional weight. Just let the weight of the grinder do the work as you keep it moving.
My concrete carport has small and deep spalled areas and has a large transverse crack and would like to overlay. suggestions you may have.
Hello Phillip. Before you do the overlay, it will be important to repair the crack and any deep pitting. We have an article here about crack repairs and suggested products. For the overlay, Ardex CD is an excellent product. They also have instructions for how to use it to fill deep pitting first before doing the overlay. Ideally, you don’t want to do an overlay over pitting that is much deeper than 1/8″.
Hello,
I was wondering if you had any suggestions for filling the gap between where the wall meets the floor in the garage prior to epoxying the concrete? The gap in my garage is probably 1/16 around the perimeter. I was planning on trying to use SikaFlex SL, however, I just read on a previous article on your site that you should never Epoxy over that product (The manufacturer states you could). What else would be recommended?
Hello Todd. The gap between your slab and wall is an expansion joint and not a contraction joint. The reason it is an expansion joint is because the slab is completely separate from the wall. These type of joints see far too much movement (relative to contraction joints) for epoxy or other coatings and should never be filled with intention of coating over it. Filling the joint with SikaFlex after you epoxy is OK and commonly done. If you read the data sheets for SikaFlex under limitations, it states that water, oil, and rubber-based paints can be applied if proper testing for adhesion is done, but rigid coatings (epoxy) should not be applied or they will crack from too much flexibility.
The website has been quite knowledgeable. I have a question that I shouldn’t be asking. I had a shed built a couple weeks ago. The concrete pad was poured a little over three weeks. I have some pitting and low spots. What would your recommendation be to fill the pitting and anything for the low spots? The obvious answer would be to have contractor cut it out and replace it. I am looking for options before I seal and cure it.
Thanks
Harley
Hi Harley. What exactly do you mean when you state you want to cure the concrete? Concrete slowly cures on its own. Something to keep in mind is that products used to fix pitting and low spots do not allow penetrating sealers to work as well as they do since they lack some of the minerals that the sealers react to to form their barrier. A film forming coating works better. For low spots and pitting we recommend using a polymer-modified cement product such as the ones we list in the article.
Hi Shea,
As far as “cure” concrete, I was referring to TK products cure & seal. I obviously misunderstood the comment section & thought that I would be able to ask a question and get some guidance. I read the article. Just looking for your professional opinion.
Thanks for your time.
Cheers
Harley
Hi Harley. No worries, as you didn’t misunderstand. We have this section so that we can answer questions and help people out. However, we do sometimes require followup questions due to lack of information to answer the question completely/accurately or due to confusing verbiage when a reader is describing something.
A “cure and seal” product should be applied within a few hours after the pad has been troweled in order for it to be effective. It works by restricting moisture evaporation from the surface in order to obtain a cure that doesn’t dry out the surface too quickly causing shrinkage cracks and etc. Most of the moisture in the curing process is gone after 30 days which is why you need to wait that long before sealing or coating concrete, though chemical curing within can still continue for a few months. Since it’s been over three weeks, you will want to use a regular concrete sealer and not a “cure and seal” product. We would recommend either a densifier with sealer added or a siliconate sealer. You will want to use a polymer-modified overlay cement such as Ardex CD to fill low spots. This can be used to fill mild pitting as well. Keep in mind, however, that the patch work will look different from the rest of the floor and it will not accept a penetrating sealer as well as standard cement either.
Shea-
Thank you for your time and valuable answers!
At what size job is it advisable to get the jackhammer and remove rather than repair a pitted and spalled garage floor? Over half my 2-car garage floor is spalled and some places quite severely spalled – as in 1/2 to 3/4 inch deep!
Hello Chuck. There is always a gray area of when to do exactly that. If the slab is otherwise sound with no major cracking, heaving, or other soil issues, then it can be worth the effort for the repairs. However, if there are other issues going on other than the pitting, then breaking it out and addressing those issues for a new slab can be the best bet.
Hi,
I recently used the Epoxy-coat EPK-1000 Patch Kit to repair severe pitting in my garage, and will be applying the Epoxy-coat primer and epoxy over it. I used the EDCO 10″ concrete grinder to prep before I put the patch kit down and about 80% of the floor is covered with the patch kit. What’s the best way go about grinding/sanding this large area for the epoxy primer?
Thanks,
Ryan
Hello Ryan. Wow, that is a lot of area that needed attention. You will need to lightly grind the surface to create the proper profile for the epoxy primer to mechanically bond with. This will also allow you to smooth out the repaired areas and create a nice transition from those areas to the regular concrete surface. I would recommend using the Edco grinder again since 100% solids epoxy is very difficult to sand.
Thanks, that’s kind of what I thought but I was hoping I could get away with something less aggressive. Should I just clean the floor with water a couple days before I attempt to put the epoxy down over it?
All of the epoxy patch repair work needs to be ground to provide the surface profile necessary for the epoxy to bond to it, Ryan. The epoxy patch repair is not porous like concrete and will not absorb the coating to create a mechanical bond. If you don’t grind it, then the epoxy coating can peel. Just cleaning it will not work.
Thank you for all of the help!
thanks for the great replies, can I buy in Ontario Canada or have your product ship to Ontario?
Hi Terry. We don’t sell product. I’m sure you can find the same product or similar in Canada.
I really appreciate all the information, but the project is getting more complex and expensive every time I turn around! Anyway, I have a product I bought long ago called Quikrete Vinyl Concrete Patcher No 1133. It is a powder to be mixed with water. Are you familiar with this, and will it work to repair Spalled areas? I also have the Rustoleum concrete Patch and Repair which I will use for the cracks.
Hi Lance. Yes, the Quikrete product will work as long as you are not dealing with spalling much deeper than 1/4″. The Rust-Oleum Patch and Repair is great for the cracks.
Hello Shea,
I really wish I found this site earlier. This last summer I was planning to epoxy my garage floor and found that I first had to repair the spalled areas which was about the size of two cars. The damage is from the cold winters and road salt and chemicals in Calgary, Alberta.
Before I found this article/site it was really hard to get good advice on what I should be using to repair the spalling. I used advice from some YouTube videos and the workers at a big box store and used Quikrete bonded topping mix to cover the spalled areas. The result was areas that was a few mm higher than the rest of the floor and it was not smooth. Relatively large granules formed (or maybe I didn’t clean/prepare the surface well enough) and they streaked the new concrete when I troweled it. I also may not have mixed in enough water. Instead of stopping after a small area, I did this to the whole spalled area. When it hardened, it was obviously I could not epoxy over this as it was rough with high spots. The big box store guy recommended that I wait 28 days and then grind back down which I did (with a hand grinder). I was wet grinding and didn’t have a chance to clean it well until the next day. Some of the concrete dust had re-hardened. After I cleaned up the concrete dust I used a pressure washer to clean the floor and found that it was able to etch the new concrete, at least where it was thin. Where the water hit the floor with the most pressure (only an 1800psi washer) it could etch a clean streak that would go down to the original floor. After the wash, I found the floor was mostly smooth but some of the new concrete had come off so the spalling is apparent in small areas. I think the re-hardened concrete dust is slowly breaking down.
This was at the end of August. The weather was already too cold to apply the epoxy kit that I bought and the floor seems not quite ready. I’m finding that driving and walking on the surface is creating more concrete dust.
It’s already snowing here so the epoxy (or whatever I might change it to) will have to wait til next summer. My question is what should I do prep the surface before then? Do I need to completely grind out the new concrete or should it be strong enough ? Should I diamond grind the floor to prep it and use something like Quikrete vinyl concrete patcher to patch up the uneven areas? Will the diamond grind chip/remove that new concrete layer? Can I use the vinyl patcher before the diamond grind?
This project pretty much used up my summer and there’s nothing to show for it; might even be worse than before I started. Any advice would be greatly appreciated! Thanks.
Hello Stan. Yikes, yes it’s going take some work on your end to fix. If the pressure washer is removing it, then it did not bond as it should have and needs to be removed. I would suggest grinding to remove it and then apply an epoxy sand slurry for the repairs like we describe in the article. Use the pressure washer to clean up after grinding, let it dry for 48 hours, and then apply the epoxy sand slurry. After it has cured, it will require grinding the surface again to smooth out the repairs and create a smooth transition from the repaired areas to the undamaged concrete surface. I would not use a hand grinder for that. I suggest a larger 10″ grinder on wheels which you should be able to find from a local equipment supply rental in your area. Keep the grinder moving back and forth so that you can create a level surface.
Can I use Rust-Oleum’s EpoxyShield Concrete Patch on slate tile?
Hi Alba. The Rust-Oleum Concrete Patch is designed to repair concrete. While it may adhere to slate tile, it is not intended to act as a repair for it.
Hi Shea,
I’m glad I found this site. Garage floor repair is now on the endless house repair list. Before that job, we need to repair pitting and spalling on our stamped concrete patio. It’s 4-5 yrs old and we “sealed” it again last year as advised by the contractor that poured the slab. (Sadly he is now deceased).
We power washed, which left permanent marks, then sealed with Super Diamond concrete curing compound. It is pitting and spalling badly and looks awful.
Please, any advice would be appreciated.
Thanks, Joann
Hello Joann. Are you saying that the concrete has pitted more since the application of the sealer last year?
Yes. It looks worse now. Some of the nickle-size pits are crumbling. We are using the sealant recommended by the contractor.
Should be “acid wash” the surface and start over?
Hmm… that is not good news. The sealer you used was a topical sealer which should have not have let any moisture into the surface of the patio in order to cause the spalling and pitting (freeze thaw). Providing you applied the sealer correctly, that would mean that you have moisture coming up from below the concrete patio. This moisture migrates to the surface under the coating and when it freezes, it causes the pitting and spalling damage. Is the drainage good around the slab? Does water pool up anywhere against it? Is it up against a dirt bank? Is the current sealer still present on the concrete?
The patio is the high spot in the yard. No problems with drainage. In some areas the sealer is still present. My guess is operator error. Should we power wash again before sealing it ? I think we will take out time and be more certain with coverage. Thanks again Shea. If the problem persists, I’ll reach out to you again.
Have a good summer, stay well.
OK, operator error with the application may have been the issue then :). The good news is that the product you used is solvent-based. If you use the same product again, the solvents in the new application will reactivate the old sealer still remaining and it will all blend together well. Just make sure the concrete is cleaned first. Let thoroughly dry for a minimum of 24 hours if the weather is good and humidity is down. If it’s humid, let it dry for another day. You need to apply two coats of the sealer. Each coat needs to be applied thin – thin to win – not thick. One thick coat is not good and will create issues.
Hi,
I wish I had found this site earlier. My garage floor was bare concrete, pitted due to snow and salt. I was looking forward to a smooth epoxy flooring. I cleaned, pressure washed the floor, etched and filled up cracks with just concrete. Once cured, I applied Behr epoxy floor prime and paint. The results are bad and the paint strips off. I should have prepped the floor better by applying a coat of concrete. Is there anyway I can apply Rustoleum epoxy over the existing one? Or should I strip the existing epoxy and treat the floor again
Hello Sonal. Unfortunately, using plain concrete for repairs is not a good choice. It does not adhere well, it does not like to be applied thin, and it typically will begin cracking and lifting after a while. As you found out, 1-part epoxy paint is not very durable either. The last thing you want to do is try to apply a better coating over one that is already peeling. The new coating will peel right up with the old paint.
If you want to create a nice even finish, it’s going to require that you properly grind the slab in order to provide a good surface for a proper coating system (not Rust-Oleum). The grinding will remove the paint and primer and prep the concrete surface. We would recommend using the Edco 10″ concrete grinder that you can rent from Home Depot and other equipment rental outlets. You may want to test the areas where you applied standard concrete as well. Using a heavy hammer, pound those areas to see if they crack or want to pop up. If so, the you will want to try and remove as much as you can and then apply a polymer-modified concrete patch repair or a 100% solids epoxy sand slurry. Both of these products adhere extremely well and cure stronger than standard concrete. Of course, it will require grinding the repairs flush and even before applying the coating system.
Hi Shea,
I repaired quite a few cracks with PC Products PC-Masonry Epoxy Adhesive Paste, Two-Part Repair, 32 oz in Two Jars, Gray 73209 and PC Products 72561 PC-Concrete Two-Part Epoxy Adhesive Paste. I still need to take care of pitted areas, and then want to (probably) paint the floor. What i am wondering is , which products you recommend that best stick to the epoxy repair patches and which not. E.g. will Ardex CP work on floors that have large patches repaired with Epoxy?
Hi Norb. Any of the polymer-modifed patch repair products will work well providing that the epoxy is roughed up good, preferably with a grinder and concrete turbo cup wheel. Pay attention to the instructional data sheets on the product you purchase. Some will have recommendations for creating a type of primer layer with their product first before a full application if adhesion may be in question.
Hi
Im planning to level 3’x3′ area in corner of my garage. I will be using Quikrete ReCap Concrete Resurfacer which is Polymer Modified Repair Product.
Can you tell me how long should I wait before grinding and applying rocksolid epoxy. Thank you.
Hi Mirel. Just as an FYI in case you did not know, this product can only be applied at a thickness of up to 1/4″ at a time. You can read the data sheets here. You should wait 7 days before grinding and applying a coating.
Hi Shea,
I don’t think we will be able to work on our garage ourselves. It’s in bad shape and we don’t have the time. Can you recommend a vendor who can do it for us? We’re flexible with time. Just need to get a company who really knows what they’re doing. We’re located in Hudson, NY. Our garage is approx 560 sq ft.
Thanks,
Kathleen
Hi Kathleen. What you need to find is a reputable garage floor coating company that is qualified for making such repairs. Unfortunately, we are not familiar with the thousands of companies throughout the U.S. that do this. I recommend reading this article here about choosing a floor coating company. Even if you don’t want a full coating system, the concrete will need to be minimally protected in order to prevent it from happening again. Do an internet search for your area using terms such as “garage floor concrete repair” or “garage floor coatings”. Give a few of them a call and have them come and give you a free estimate. It should include how they plan to make the repairs and what materials they will use.
Hi Shea,
Are the polymer-modifed patch repair products at the box stores as good as the Ardex products? I am trying to find the Ardex K 301 ($50) to fix some low spots. The local product is Quikrete self-leveling floor resurfacer ($32). What about the old you get what you pay for? I need a patch / resurfacing product and a floor leveling product.
I am planning on a polyurea surface. I have been considering Legacy’s kit as I like the idea of the colored primer coat. But I was also reading about Garage Floorings thicker polyurea system but it has no primer.
I have filled the cracks with the Rust-Oleum EpoxyShield patch then rented the concrete surface prep tool from Home Depot. This is where things went wrong. I had a relatively decent smooth floor with repaired cracks and some pitting is a few areas. I now have a damaged floor is many areas that is no longer smooth. The disc that HD rents is made for them and is not a Diamabrush disc. The one that they rented me had all the blades bent at about a 45 deg angle. I was planning to grind dry but they told me I need to use it wet. They also had no dust shields.
I tried it dry just to get the feel of it and realized it would be a very dusty job. So I wetted an area and started again. In a very short time it went through the top layer and started to show the aggregate inside. The machine was kept moving but seemed hard to control – it was hard to find the sweet spot to let it float. So to try and avoid this I had an assistant rinse the area as I was working it so I could see the surface better. This seemed to make it worse. The best results I had were later in a different area that had been ground rinsed and pressure washed to remove the slurry. That area was uniformly damp but not wet. I could grind leaving a powder that did not create dust. I was very disappointed with the grinding. I have read in many places that this system is so non-aggressive. I am in central Florida with a floor that is 20 years old. It did not look that bad before starting this process.
So I now have large areas that have very uneven surfaces that need resurfacing and two corners that need leveling. My concern is most of these topping products use a bonding primer. Will a polyurea color coat or a polyurea primer stick to bonding primer if there is some left on areas of the floor. I am not planning on resurfacing the entire floor – just the bad areas. But there is no way to only limit the bonding primer to the exact areas of the repairs. I know all these areas will need to be ground again – I am planning to do it by hand this time. I don’t know if this was a machine / disc issue or a very poor concrete job 20 ys ago.
Any thoughts would be great. I am a very competent handyman but this has thrown me for a loop. I have never had an “improvement” create so much extra work.
Hello Scott. No, do not use the Quikrete Self-Leveling Floor Resurfacer. It is an underlayment and not a wear surface. It’s designed to have carpet, tile, and wood flooring installed over it and will not take a coating. Bonding primer is not an issue with the products that require them. The reason is that once cured, you still need to grind the repaired areas flush. This preps the surface for a coating as well. You cannot etch concrete repair products. Once example of a resurfacer would be Sakrete Flo-Coat. Something to keep in mind about resurfacers is that many require a few weeks to cure properly before you can apply a coating over them unless you purchase a fast setting product.
In terms of the grinding, did you use the Diamabrush concrete prep tool? If so, it’s very difficult to damage the concrete. If not, what type of tool was it exactly? Was it something like this here? If so, that is the wrong tool and will play havoc with concrete that is being prepped for a coating.
hi. me again. for the record, there is no “Rust-Oleum’s EpoxyShield Concrete Patch” at Amazon. there is a “Rust-Oleum Epoxy Shield Blacktop Patch,” which, unsurprisingly, is black. not ideal. i ordered their two-part, 24 oz., Concrete Patch, am hoping that will work. thanks again. you’ve been very helpful.
Hi John. Yes, Rust-Oleum has changed the name of this product more than once. It’s now called Rust-Oleum Concrete Patch & Repair. Sometimes it’s hard to keep up. It’s the correct product that we display in our link above. It can be purchased here at Amazon or found at your local home improvement center.
Hi Shea,
I want to repair a 45 year old concrete garage floor. It has a lot of little areas of spalling but it also has a large area (about 5 feet x 3 feet but there is an expansion joint down the middle making it two 2.5 foot x 2-3 foot sections). The spalling is mostly up to 1/2 inch deep but there are some spots (where a stone came out) that are up to 0.7 inch. Can Quikrete Polymer Modified Structural Concrete Repair be used for this? Will the repairs last longer if I coat the floor? I’m trying to reduce the possibility of a tripping hazard for some older relatives, but I don’t want to replace it with a slipping hazard.
Thanks,
Barb
Hello Barb. For a repair like that, particularly if you plan on applying a coating, we would recommend an epoxy sand slurry. It’s going to be a stronger repair and will actually adhere better. Apply the slurry over the entire area, trowel it smooth, and then use a grooving trowel to create a joint right over the old one. Here is an example of an epoxy sand slurry repair kit.
Hi Shea,
What kind of top coating would you recommend? I’ve never used one, but my neighbor does and he re-coats it every year. That is not something I want to do because I will be putting shelving in the garage. I know in the article above it says they help prevent further damage but do the also protect the patches? Are the coatings strong enough that they won’t get scratched up if you drag a heavy wooden workbench over them?
The recommended patch product says it is slippery when wet. I think I read somewhere that the way to make a coating non-skid was to broom it lightly. Any suggestions on that?
Thanks,
Barb
If you don’t apply a coating over it, then just rough up the surface with 60 grit sandpaper. A top coat is the last coat of a coating system or series of coats. Are you just interested in a single coat that will protect the concrete and stand up to abuse?
Sorry, I just watched a video and realized there were multiple coats involved. I’m interested in something that will last a long time (10-20 years?), protect the concrete, stand up to abuse and not be slippery.
I’m also trying to understand what kind of maintenance is required (if any).
Hi Barb. If you are going to apply it yourself, then we recommend a single-part polyurea coating system. You can read about it here. These systems are little more expensive than epoxy, however, they are much easier to apply. You can expect them to last 10-15-20 years depending on how they are used. To create an a surface that is not slippery, you will want to add an anti-slip additive to the final coat. All of the vendors we mention in the article have excellent product. We get many positive comments about this one here in terms of helping customers with application questions.
Maintenance is very easy. Just sweep or use a dust mop to keep clean. When things get real dirty, you can mop with a solution of ammonia if necessary. Dirt does not like to stick. We have an article here about cleaning garage floor coatings.
Hi Shea,
I will be applying a single-part polyurea coating (colored base coat, colored 2nd coat with heavy flake, clear coat with anti-slip). Will applying two clear coats improve the durability of the coating?
Also, is the top polyurea coat supposed to be smooth? A neighbor showed me his recently coated garage floor yesterday and I was surprised to see it was bumpy. It is hard to tell from pictures, but many of the floors I see online look like glass. This is what I was expecting, but my neighbor’s floor was rough and it appeared that you could feel the paint flakes. I wasn’t feeling the anti-slip, the roughness was much larger. This floor was professionally installed and my neighbor wasn’t sure if it was epoxy or polyurea. Does it require an extra clear coating to get the smooth, glass-like appearance?
Thanks,
Barb
Hi Barb. A full color flaked floor is almost always going to have some texture to it. How much texture it has is dependent upon how well the flakes are scraped, how many clear coats are applied, and the thickness of those coat/s. You need to remember that when the flakes are tossed into the coating, some are laying flat and others are sticking up at odd angles. This is why it’s important to scrape the flakes well after they have settled and adhered to the coating base. Good installers will then go back over the flakes with a pole sander and 100 grit sandpaper to smooth out the surface a bit more and make sure all high spots are knocked down. Some even go as far as running a floor maintainer over the flakes using a sanding screen. Even after that, there are still thousands of nooks and crannies for the clear top coat to fill. If only one clear coat is applied it will cover all the flakes with the coating, but it does not fill in all those nooks and crannies very well. We always recommend a minimum of two clear coats for a full flake floor when using polyurea. Even then, it’s not going to be glass smooth.
To achieve a glass smooth floor with full color flakes, it would require a clear fill coat of 100% solids epoxy first. But because epoxy can amber, installers usually like to use a 100% solids polyaspartic or polyurea instead. These type of coatings require two people to apply because the pot life is only 15-20 minutes due to how fast they cure. They then apply the final clear coat (wear coat) over the fill coat. These types of coatings get expensive though due the amount of materials required.
Hi Shea,
Thanks for all your help. My garage floor looks great.
I have a new question. While doing my garage floor, I also ground my front porch. It was also spalled/pitted but 15-20 years ago I applied a resurfacing compound (something I got from Lowes or Home Depot). Since then, the resurfacer has been cracking off and looks terrible. So I ground the porch to get rid of most of it.
I would like to fix the porch and prevent further deterioration however I live in the Northeast so the porch will be getting shoveled during the winter. It will also be exposed to deicing compounds (the granular stuff). It has some pits and one hairline crack on the bottom level that I would like to repair. I don’t want to make the porch slippery or scrape a coating off when shoveling. I want to keep it the natural color (I think it looks more white than gray). What would you recommend?
Thanks,
Barb
Hi Barb. We would recommend Ardex CD. It’s a polymer-modified overlay that will give you the color you want. Applying a broom finish to it will provide traction as well. Polymer-modified products like this resist salts and deicing fluids better than standard concrete. There are a few YouTube videos out there showing how it works as well. If you have any pitting deeper than 1/8″, we would recommend patching with the Ardex CP Prep or just use a 100% solids epoxy patch. Rust-Oleum Concrete Patch is good if you don’t have a lot of pitting. It will work for the crack repair as well. Once it has cured about 6-8 hours, rough up the repair with 60 grit sandpaper.