
Don’t hold off any longer on your garage floor project just because of some required garage floor repairs. Repairing a pitted or spalled garage floor is only intimidating because most people don’t know what to use or how to start. It really isn’t that difficult and, in most cases, can be tackled by the average DIY handyman. Once you understand what to do and which products to use, you will find that it’s not as difficult as you may think.
What is concrete pitting and spalling?
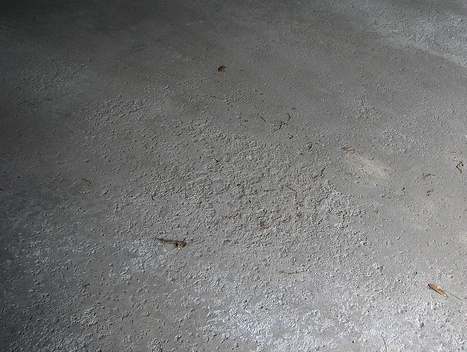
Pitting and spalling can sometimes look very similar. Spalling will usually cause the floor surface to crumble or separate into thin layers. Pitting, on the other hand, can create smaller, deeper holes with a more distinct cratered appearance.
Spalling is typically caused by cold winter climates, which subject concrete to freeze-thaw cycles. If water is deposited on the garage floor, it can work its way into the capillaries of the concrete’s upper surface as it is absorbed. When water freezes, it expands, causing microscopic damage to the surrounding concrete.
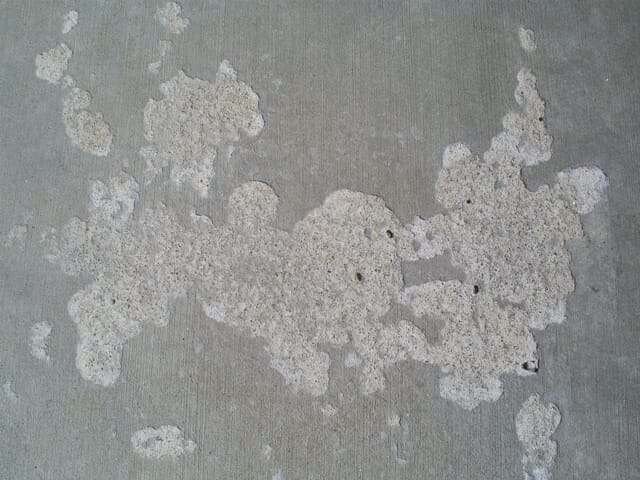
Over a few winters, this constant damage weakens the surface. As a result, the concrete starts to separate from the surface in sheets or crumbles.
Road salts and deicing fluids only make the problem worse. Salt is corrosive and will cause concrete to deteriorate. In addition, it lowers the freezing temperature of the water. This can allow the water more time to penetrate deeper into the concrete before it freezes.
Pitting, however, can be caused by improper finishing of the concrete, an inadequate concrete mix, improper use of an accelerator, or even old age. Pitting can sometimes cover large areas of the floor while spalling may be more localized.
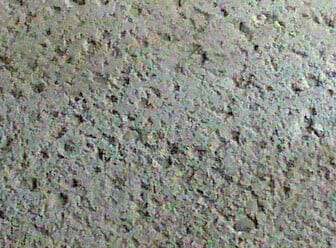
Road salts and deicing fluids can also cause localized pitting. It’s most common in areas where a parked car can deposit road salts and deicing fluid on the concrete.
Prepping the concrete for repair
Fortunately, the majority of pitting and spalling in a garage can easily be repaired. Typically, the depth of the damage is usually less than ¼” for spalling and ½” for some pitting. Many times it is less than that.
The first thing you need to do is clean the area to be repaired of any oil stains, wax, sealers, or anything that would be considered a bond breaker. Next, remove all broken and loose concrete with a hammer and chisel. It’s extremely important that you remove all loose or suspect material.
If you are repairing spalled concrete, we highly recommend firmly tapping the surrounding areas with a hammer and listening for a hollow sound.
Spalling starts damaging concrete from just underneath the surface. As a result, there may be surrounding areas of your garage floor that haven’t weakened enough to break free on their own and remain hidden.
Areas that sound hollow have deteriorated underneath and are weak. They should be hit hard with a heavy hammer to expose the damage for repair. This will eliminate the need for any further repairs in the near future.
After you are done, sweep the area clean and then vacuum the remainder of the dust from the surface.
Often, instructions for concrete prep state that grinding or shot blasting is recommended. If you are repairing smaller areas in which you have broken away all loose material with a hammer and chisel, then the surface profile of the concrete should be satisfactory.
Repair Procedures for pitting and spalling
There are a variety of product materials you can use. What you use will depend upon the size of the repair you are making, how deep it is, and in some cases, how you want it to look. In addition, considerations should be made if you plan on applying a garage floor coating.
The materials used are usually divided into two categories. These include resinous repair materials such as epoxy and polymer-modified cement repair materials.
This post may contain affiliate links. If you use these links to make a purchase, we may earn a small commission. As an Amazon Associate, All Garage Floors earns from qualifying purchases. You can read our full disclaimer here.
Epoxy Concrete patch repair products
If you are going to coat your garage floor with paint or epoxy, or cover it with a garage floor mat, we recommend using an epoxy-based product for most of these repairs. The exception to this is very large areas, which we will discuss shortly.
If you have just a few small holes from pitting, then we recommend using something like Rust-Oleum EpoxyShield Concrete Patch.

This is the same product that works well for crack repairs. If it’s not available from your local home improvement center, you can find it here at Amazon![]() .
.
The EpoxyShield patch is a 2-part epoxy gel that you mix as needed. Mix Part A and Part B according to the directions. Apply it to the repair area, making sure to work it in to push out any trapped air. Smooth it out as best you can with a putty knife or margin trowel. Within 8 hours, the repair will be hard enough to grind or sand flush.
For larger areas of pitting and spalling, we recommend using a 100% epoxy concrete patch with a sand aggregate. The silica sand is mixed in with the epoxy to act as a filler. Legacy Industrial’s 5-Ton Epoxy Patch Kit is a good example of this.
This type of repair works extremely well and is a popular method among floor coating contractors. Besides repairing pitting and palling, it also does a good job of filling larger holes and cracks.
In addition, it can be trowelled out fairly smoothly. Once cured, these repairs are actually stronger than the concrete.
Depending on the size of their kit, you can cover from 7 – 16 sq. ft. at a depth of 1/4”, for pitting and spalling.
Rust-Oleum TurboKrete Concrete Patching Compound is a similar product. It uses a 100% solids epoxy resin as well. You can find the Rust-Oleum TurboKrete here at Amazon.
We’ve used this kit before and have found that the required mix of sand to epoxy is a bit too much. Reducing the amount of sand in the mix by 10-15% provides for a smoother finish and easier application.
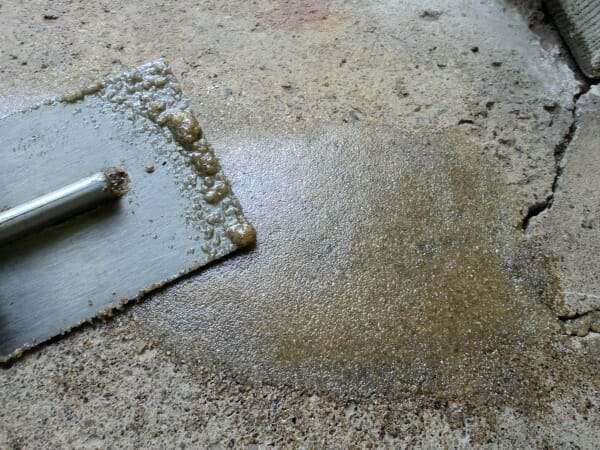
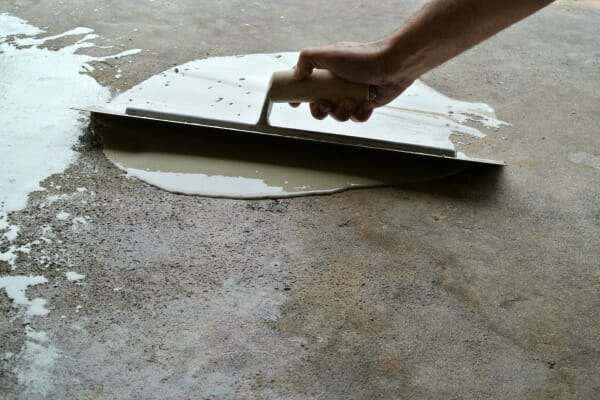
After following the manufacturer’s mixing instructions, you will want to trowel the epoxy patch onto your damaged area. Be sure to trowel it with some pressure. This forces the mix into the crevices of the damaged area and removes any trapped air at the same time.
Once it’s trowelled in, you can smooth the mix with a cement float and feather it to the existing surface. One industry trick is to spray the float with a little Windex. This will keep the trowel from sticking and provide a nice surface.
Polymer-modified cement patches and toppings
Another product that works well is polymer-modified cement. These are a mixture of Portland cement, sand aggregate, and polymers. You just add water. They are used for patching concrete, overlays, and concrete resurfacing cement toppings.
The nice thing about polymer-modified cement products is that they are fairly easy to work with and adhere much better than a standard concrete mix. Some can be mixed thicker or thinner, depending on the depth of the damage that is being repaired.
Another nice feature is that many can be feathered to as little as 1/16” and can cure quickly. They can be ready for an epoxy coating, paint, or stain, sometimes within hours.
Pay close attention to what the manufacturer offers as some have special mixes for patches deeper than ½” and other mixes for overlays, shallow pitting, spalling, and complete resurfacing.
They may require prepping the area with a priming liquid before application so be sure to read the instructions carefully. Don’t worry, it’s a simple process.
Polymer-modified cement patches are a good choice for very large areas of pitting and spalling. This also includes broken concrete lips and edges, deep holes, and areas where the repair may need to be shaped. The edge of a concrete apron is one such example.
Ardex is a company that makes excellent polymer-modified concrete repair products. Ardex CP is their concrete patch and Ardex CD is used for resurfacing and shallow repair areas. You will need to call or use their website to find a dealer near you.
If you have large areas of shallow pitting and/or spalling, then a polymer-modified overlay or topping would be the best choice. These work well in areas where the damage is not much more than 1/8” to 1/4”, especially if you want to retain a standard grey color.
Mixed to a thinner consistency than a patching mix, a polymer-modified cement topping can be poured directly onto the area and spread using a hand trowel or metal-edged squeegee. If you have any spots that are deeper than 1/4″ within the area you want to cover, it’s best to mix a small, thicker batch first to patch over these spots.
In about an hour or so, you can rough these spots over with a mason’s stone, grinder, or a block of 60-grit sandpaper. Sweep and then apply the topping directly over it.
Because these products set up quickly, you should be able to tell fairly soon if any areas have settled and created a low spot that needs a second application. Usually, within 4-6 hours, you can rough up the area with 60-grit sandpaper and apply another coat.
Once you have finished and the repairs have cured, you may need to lightly grind any ridges or areas where the mix didn’t feather nicely into the existing concrete. This will help to create a nice, smooth transition.
Do not use a polymer-modified self-leveling underlayment! This type of product is not engineered as a wear surface and is not approved for outdoors. Underlayments are only used indoors and must be covered with floorings such as carpet, tile, or linoleum. You cannot apply garage floor coatings over underlayments.
Final notes
Remember – If you are going to follow up with an epoxy coating or paint, these repaired areas will still need to be prepped by grinding. This provides the proper coating profile. You cannot etch polymer-modified concrete or epoxy patch repairs.
Also, always honor all contraction and expansion joints. Repair materials such as these are not designed for filling these joints up and will lead to surface cracks if you do.
When making repairs to your garage floor, be sure to pay close attention to the mixing instructions and any tips that come with the product. After all repairs are complete, be sure to protect the garage floor from further pitting or spalling by sealing it or applying a coating.
Like anything else, there is a bit of a learning curve, depending on the product. Once you get started, however, you will find that doing most of these repairs on your garage floor is not as difficult as you might think.
Hi Shea,
I just had someone polish my concrete floors that are on the 3rd floor of an industrial style condo building. I discovered this was always meant to be a subfloor as they used a lighter weight concrete with a porous stone like vermiculite in the mix. The guy who polished it had no idea how to treat the floor so $11K later it’s polished, but around 20% of it appears pitted as the porous aggregate didn’t polish and lots of it crumbled away. I’m now trying to find out if there is a product I can essentially squeegee on to fill all these small holes without ruining the polish. I cannot grind or sand anymore as the place is now finished otherwise. Please let me know if you have any thoughts. Thank you so much for your time and consideration.
Best,
Devin
Hello Devin. Unfortunately, lightweight concrete is not the best for polishing. When it’s done, it requires less initial aggressive grinding (standard for traditional slabs) so as not to expose the much more porous aggregate. Even then, there is no guarantee it will be successful. I know it doesn’t help you now, but this article explains in more detail why it’s generally not a good idea. We are not aware of any material that can be used to fill the small holes and not change the look and finish. However, you may want to reach out to ArmorPoxy. They have a floor polishing division and may be able to shed any light on what can be done, if anything. We wish you luck.
I’d like to put an epoxy finish on my garage floor, but I have a large area of spalling and some pitting as well (the garage is original to the house which was built in 1969). Just so I have the steps right, would I: a) Clean the garage floor (it has oil from where the car dripped and also the previous owner did a poor paint job just to hide the defects) b) Ardex CP for the pitting; c) Ardex CD for the spalling c) Grind the whole garage floor and then epoxy?
Also, the garage has 2 contraction/expansion seams that run through the floor. Both seams have cracks. Would I put the epoxy over the expansion seams?
Thank you! Great website!
Hello Deb. You have the steps correct. We can’t tell you exactly which repair materials to use though without physically inspecting the floor. Removing the oil is very important. We have an article here that discusses how to do that. Contraction joints are purposely placed in concrete slabs to create a weakened line at the surface to encourage cracking within the joint instead of across the surface. Cracks in those joints are normal. Just run a chip brush through the joint to coat the inside of the joint when you epoxy. The cracks will still be there, but they will not be very noticeable, particularly if a few color flakes fall into the joints.
Awesome thank you!!!!
Can I use one of these methods if applying a penetrating sealer like PS210
Hello Jay. Are you referring to TS210 by Concrete Sealers USA? It is actually a thin coating and not a penetrating sealer. If so, then you can use it over these repairs as long as you rough up the surface of the repair with 120 grit sandpaper.
Sorry I meant PS100 by concrete sealers. I already purchased it as per one of your articles on penetrating sealers. I have some hairline cracks, pitting and spalling on some areas of the garage. Thought I could use a concrete patch and crack filler on but looks like I cannot since the sealers will not penetrate in those areas. Is that correct? Is my only option grinding those areas out?
thanks for your help!
Hi Jay. Yes, PS100 is much different. It’s definitely a penetrating sealer. Penetrating sealers in general do not perform as well when applied to a polymer-modified cement patch repair. The reason for this is that these repairs lack some of the natural minerals found in standard concrete that penetrating sealers react with to form a barrier at the subsurface. They have no effect if applied to resinous repairs such as epoxy or polyurea. However, liquids cannot penetrate resinous repairs and do a good job of resisting staining as is. PS100 is a bit different than other penetrating sealers and does not use some of the ingredients that react with concrete. We would recommend contacting Concrete Sealers USA to ask about performance when applied to a polymer-modified patch repair.
Are there any recommendations for compatible winter protection products (no mats) where the first product is cheap and easy on short notice and the second (likely an epoxy) can be used directly on top of the first? Or an easily removable first product (again, no mats)?
Hi Steve. We can appreciate where you are coming from with this, but you are essentially looking for a pink elephant. If mats are out of the question, there isn’t anything you can apply or fill those areas with that can easily be removed. Products designed to fill and repair such concrete are permanent. Depending on the extent of the repairs needed, either a 100% solids epoxy slurry is used (stronger than concrete) or a polymer-modified cement repair product. Once properly completed, a floor coating or any other garage flooring option can be applied over it.
Will a 100% Solids epoxy fill small pop-outs <1/4" deep without pre-patching?
Technically, it can. However, you would have to use a gauge rake to apply it thickly and at very low coverage rate which gets expensive fast. It’s much more economical to properly make repairs first. That is how the pros do it as well. If you try to take short cuts, it ends up costing money or not looking right. Sometimes both.
Can I just fill in the pitting with sand or fine gravel? I can’t afford a professional repair or do the kind of DIY like this article suggests.
Hi Peace. Fill in the pitting with sand or gravel and do what? It will easily get displaced when driven on or walked on. I don’t think I understand what you are asking.
I have a 37 year old 3 car garage that is solid but badly pitted from road salt. The areas that have not been affected are very good but the majority is not good, I just did a small section with Sakrete Top n Bond as a test area. The product claims to be able to feather out completely and be suitable for the depth of my pitting. I used about 15 lbs for a 55 sq ft area. I plan to wait more than the recommended 72 hours before driving over it, probably a week just to be sure it’s cured better. I applied it by mixing small batches at a time, about 5 lbs each so I’m not sure if it will cure at the same exact shade. I was careful about the ratio of water to product but it was only done yesterday and not at the final color due to keeping it moist. I want to know if you offer a tinted sealer in case the shading is off a little. I would like to finish one garage bay and see how it holds up after the winter before doing the other 2 bays.
Hi Rick. Penetrating sealers can’t be tinted to change concrete color. In addition, polymer-modified concrete repair materials won’t accept sealers. The good news though, is that polymer-modified cement is not nearly as susceptible to pitting from the elements as standard concrete is. If you want the garage floor to have a uniform look, it would require applying a colored coating to the surface.