
Learning how to grind a garage floor for an epoxy coating or paint hasn’t always been the easiest or most straight forward of projects for the average homeowner. It frequently raises more questions than answers and can lead to frustration when trying to figure out the best way to do it. Many of these questions relate to what type of grinding equipment to use.
While it is not the most difficult thing to do, trying to figure out the right tools to rent or buy can be daunting. Plus, dust control can be an issue unless you spend more money for the proper vacuum equipment. With so many choices, it can get plain confusing and even expensive.
Our objective here is to present to you an easier and more economical way to grind your garage floor. It can typically be accomplished in less than a day for most standard 2-3 car garages.
Besides helping to eliminate the confusion and questions that arise, it will also instruct you how to provide a nice profile for your coating of choice. It’s just one less thing to worry about when learning how to epoxy coat your own garage floor.
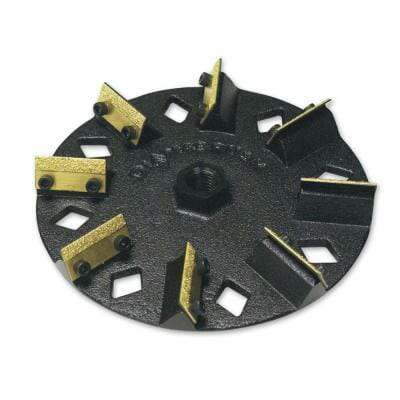
Diamabrush Concrete Grinding Tool
Fortunately, a company called Diamabrush has introduced a concrete prep tool that attaches to the bottom of a floor maintainer. It is available for use from a large assortment of rental companies. The Diamabrush is a great choice for garage floors that are in relatively good shape to begin with.
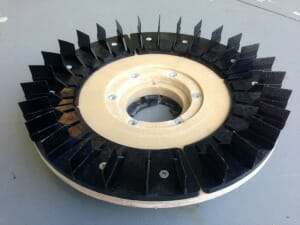
The Diamabrush consists of a series of diamond coated blades that are attached to a buffing wheel.
These blades abrade the surface of the concrete to provide the proper profile for an epoxy coating.
This process of grinding your garage floor is much easier to manage than the traditional 7″ angle grinder with a concrete turbo cup wheel. Plus, it keeps you off your knees.
In addition, the large size of the tool covers more area. Furthermore, the flexible blades prevent grooving or kiss marks that can happen when a turbo cup wheel is not held flat and goes up on edge.
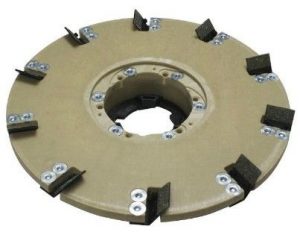
Diamabrush also offers a separate removal tool that is used for removing old paint, thinset, mastic, or even thin epoxy coatings.
You can identify it by the smaller number of diamond blades compared to the prep tool.
If you use this tool to remove old paint or a thin coating down to bare concrete, it will prep the concrete surface at the same time. You will not require grinding with the prep tool afterward. Diamabrush does not recommend the prep tool for removing old paint and thin coatings.
The nice feature about both of these is that they can be used either on a wet surface to avoid concrete dust or you can attach a dust shroud with a shop vacuum to grind dry. Dry grinding with the proper attachments prevents the heavy concrete dust or messy cleanup of a wet slurry.
Note: The Diamabrush is not an aggressive concrete grinding tool that can remove heavy layers of concrete. For example, it will not level high spots or smooth out heavily repaired areas of concrete. You will need to use a turbo cup grinding wheel or a more aggressive grinding machine for that type of work.
This post may contain affiliate links. If you use these links to make a purchase, we may earn a small commission. As an Amazon Associate, All Garage Floors earns from qualifying purchases. You can read our full disclaimer here.
tools for grinding your garage floor
These are the basic tools that you will need to acquire before you start grinding your garage floor. It’s a bonus if you already have some of these or know of someone who can lend them to you. You can apply the cost savings to your garage project.
Harbor Freight has cheap angle grinders for under $20. Unless you plan on using it for other projects, we don’t recommend spending more money on a better grinder.
The dust shroud for the angle grinder is optional but highly recommended. These small grinders will eat up concrete and create a small dust storm. It will need to be attached to a shop vacuum in order to use it. Keep in mind that pricing may vary depending on your area.
- 4 ½” angle grinder – Harbor Freight Tools – $16.00
- 4″ diamond turbo cup wheel – Amazon
- Optional dust shroud for the angle grinder – Amazon
- Floor maintainer rental – Home Depot
- Diamabrush concrete prep tool rental – Home Depot
Some Home Depot stores carry the optional dust shroud attachment and some don’t. Make sure to ask for it. If they don’t have it, you will need to grind the floor wet if you want to avoid the dust. If you find a rental with the dust shroud attachment, you will need to rent a shop vacuum to go with it or use your own.
The small angle grinder and turbo cup wheel work well for grinding flush any garage floor repairs or crack repairs. In addition, it will cover the areas near walls, corners, and other objects that the Diamabrush attachment cannot reach.
The small grinder is also good for smoothing out the raised edges and materials if you are filling contraction joints for a seamless floor appearance. They also work well to grind down any unusual high spots.
If you will be grinding dry with your own shop vacuum, then one other tool we can highly recommend is a Dust Deputy. Concrete dust is very fine and will clog up the filtration system of a standard shop vacuum fairly quickly. It requires frequent stops to clean them out.
The Dust Deputy works by creating its own dust collection system that keeps the filters of the vacuum virtually dust free. You can find the Dust Deputy here at Amazon.
Heavier Duty Concrete Grinding Equipment
As we stated earlier, the Diamabrush is a good choice for grinding and prepping garage floor concrete that is in fairly good shape to begin. However, it is not aggressive enough for anything more than that.
If you have high spots to take down, multiple concrete repairs that need to be ground flush, broom finished concrete, or some other type of rough surface, then a heavier duty grinder will need to be used.
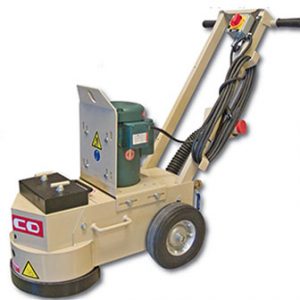
A good choice for that is the Edco 10” Concrete Grinder. It is a heavy machine (152lbs) that uses a 10” diamond impregnated grinding disc.
It can be plugged into a standard 110V outlet and has a vacuum attachment to keep down the dust.
We prefer a grinder such as this over the Diamabrush for removal of old paint and concrete coatings as well. It works much faster and does an excellent job at providing the correct surface profile for coatings.
These are fairly common and can be found at your local Home Depot and equipment rental centers. The rental costs vary from $150 – $175 per day. Be sure to check if there is an additional charge for the 10” diamond disc.
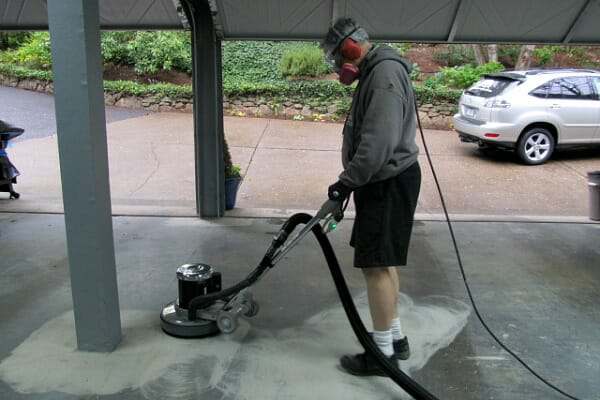
Grinding the Garage Floor
The first thing that needs to be done is to make any necessary repairs to your garage floor such as cracks, pitting, and other defects. It’s best to tackle these first before you rent any equipment. You don’t want to be making repairs while rental equipment sits.
After your repairs are complete, sweep the garage floor and clean any oil or grease spots from the surface. Grinding alone will not remove heavy oil stains and is why these need to be tackled first.
Next, if you have elected not to use a dust shroud and vacuum, prep yourself and the garage for the dust that will follow. While the Diamabrush does not create as much dust as a typical turbo cup concrete wheel, you will still have a small cloud of dust that will coat everything in your garage.
When dry grinding, make sure you wear an N95 dust mask or respirator approved for concrete dust. Concrete dust (crystalline silica) is considered a human lung carcinogen. Safety glasses and ear plugs are highly recommended for your own safety.
If grinding wet, start by wetting the surface of the concrete that you are going to grind. It’s best to work in sections when you do this. Using the floor maintainer with the Diamabrush attachment, start by slowly working the machine side by side and then a circular motion. It will only take a few minutes to figure out how long to work an area before you need to move on.
When grinding with the wet method, do not let the wet slurry dry out. It is a bear to clean out of the concrete properly if it dries. It can lead to a coating failure if it isn’t completely removed. Each time you finish a section, use your hose to blast the area clean while it’s still wet, and then move on to your next section.
To check your work, use the hose with a pressure nozzle to spray the area clean and then run your fingers across the surface. It should feel like fine to medium grit sandpaper and have a more granular look. Continue this way, grinding the garage floor one section at a time until you are done. Make sure to work the machine all the way up against the walls of the garage floor.
Because wet grinding can create quite the slurry, we recommend that before you blast a section clean, use a wet vac to suck up the majority of the slurry. This helps tremendously with keeping the amount of slurry that you hose out of your driveway down to a minimum.
Not counting the edge work or other hard to reach places, most people can grind a standard 2-car garage floor (approximately 400 ft²) in just over two hours or so when using this method.
Once done, this will leave a strip about 2″-3″ wide around the perimeter of the walls that the Diamabrush could not reach. There will be more in the corners. Use the small 4 ½” grinder with the diamond cup wheel to remove this remaining strip of concrete and the larger areas in the corners.
Be careful to keep the turbo cup wheel flat on the garage floor when grinding. If you apply too much pressure or angle it too much on the surface, it will leave “kiss marks”. These are small half-moon divots that can potentially show through your coating.
The concrete needs to be fairly dry or just damp when grinding with the turbo cup wheel. If it’s wet, you will need to use a ground fault circuit interrupter to prevent electrocuting yourself with the angle grinder. You can purchase these for about $25. Many times you can use the power cord extension that comes with the floor maintainers if you still have time on the rental. They usually have a GFCI built into the cord.
The other option which we prefer is to grind the edges first then follow up with the diamabrush. Just remember that if you are using a dust shroud on your grinder, a standard shop vacuum is not made to handle such fine dust and will clog up fast.
You may need to clean out the filter quite a few times while grinding the edges. Though you are not grinding a lot of concrete, if you elect not to use the shroud be prepared for the amount of dust this small grinder will put out.
Another Concrete Grinding Option
Another option for grinding your garage floor that is being used quite successfully is the 7” Diamabrush hand tool. This one is made to fit a 7” angle grinder and works fairly quick as well. You will need a dust shroud when using this tool and it works best with a variable speed grinder.
You can’t rent these, however. You will need to purchase them outright. Home Depot sells the 7″ version. You can also find them here on Amazon.
Diamabrush says that slower RPM’s are better. The high-speed grinders have a tendency of heating up and clogging the blades. If your only option is a single speed grinder, don’t use one that spins any faster than 6000 rpm’s. If you are worried about the speed, Diamabrush says grinding wet will keep the blades cool and prevent clogging or glazing.
Another tip is to keep it flat and do not lean into it in an effort to make it work harder. The weight of the grinder is enough to do the work.
Depending on how much suction your shop vacuum creates, you may need to shim the tool with a washer to raise the shroud off the floor to avoid suction lock. Some shrouds have a vent to adjust for this as well. Either way, these tools make quick work of the concrete.
Best Shop Vac for grinding concrete
If you are thinking of purchasing a new shop vac, we highly recommend that you look at this Dustless Wet/Dry shop vacuum at Amazon by Dustless Technologies. These are excellent vacuums that work extremely well when vacuuming up concrete dust, drywall dust, and variety of other fine dust particulates.

Professional installers are using these more and more as a backup or even as a replacement to the much higher priced specialized concrete dust vacuums. You can read the great reviews on these and find them here at Amazon.
They also offer an optional 25′ vacuum hose at Amazon that can reach twice as far as the original.
Final Cleaning
Once the grinding is done, it’s time to make sure the garage floor is clean of all the dust. If you ground the floor wet, then chances are the floor is clean.
To check, run your fingers across the surface when it has dried. If your fingers don’t have a lot of white residue on them, then you are good to go.
Another test is to press a strip of duct tape to the concrete and then pull it up. It should stick fairly well and come up fairly clean without too much dust. The floor will never be completely free of concrete dust, so don’t fret over small amounts on your fingers.
If you have a lot of white residue after a wet grind, then this is excess concrete dust that did not get hosed out well and will need to be cleaned. The best way to remove it is to mix up a solution of TSP (Trisodium phosphate) in a bucket, spread it out on the floor and lightly scrub it with a push broom or long handled scrub brush.
Using your high pressure nozzle, rinse the concrete real well making sure there is no more solution left behind. Work in sections if you need to so that the solution will not dry before you rinse it out. This will help lift any remaining slurry and dust that is in the pores of the concrete when you rinse.
If you did a dry grind, the easiest way to insure the concrete is clean and ready is to use the wide mouth attachment on your shop vacuum and just vacuum all the dust up. What’s nice about this method is you can start right away with applying your floor coating since there is no water on the floor that needs to fully dry.
Once the floor is done, test different areas by sprinkling water drops on the surface, paying particular attention to any areas that were coated in oil or grease or where you may have used a tire dressing that dripped onto your concrete. It should turn the concrete darker and absorb the water fairly quickly. If it just sits on the surface, then you may need to regrind and/or re-clean that spot before you apply your coating.
Grinding a garage floor with one of these easy methods will ensure the best profile for your garage floor coating to adhere to. It can be done in less than a day and is safer than using an acid etch.
How easy or hard is it for the average do it yourself person to do a light grind on the concrete floor???…..trying to save some money and do it myself but also don’t want to ruin the floor.
You can’t ruin the floor with a Diamabrush Mike. You can create small gouges called “kiss marks” if you aren’t careful when using a 7″ or 4″ cup wheel however. The key with using those is keep the wheel flat and don’t put pressure on the edge.
Shea,
I did a mechanical grind on my garage concrete floor last night using the Home Depot Floor buffer and Diamabrush concrete prep tool. After running the unit over the floor, the concrete had a somewhat rough texture, but once it completely dried the concrete turned smooth with a fine dust on top. What would be the best way to get rid of the white powder? There was a lot grey slurry, so I know the Diamabrush was penetrating the concrete. I have an electric pressure washer that I used to help push the slurry away. I thought I got it all, but I guess not. I had done an acid etch before hand, and got similar results. The concrete slab is roughly a year old.
Thanks,
Ryan
Hello Ryan. The white powder will come up, but it may take a few cleanings to get it all. This is what happens if the slurry is not hosed off well or let to partially dry while grinding. Wet the floor well then scrub it down with a stiff deck brush and a mild solution of laundry detergent. This will help to lift the dust out of the pores of the concrete. Rinse well with a high pressure nozzle on a hose. The electric pressure washer was most likely the culprit because though the water pressure was high, most electric pressure washers have low flow. The slurry needs a good volume of water to carry it out. Another tip is to use a wet vac on the slurry and then hose the remainder out. If you only have a slight bit of dust after the surface dries, you can wipe up the rest with denatured alcohol on a clean towel.
Shea, Sounds like your the go to guy. Some great advice. My question is I have a shop floor, apx. 1,000 sq.ft. It has a 2-part epoxy paint on it that is cracked and pealing. Got some moisture up under the paint one year after heavy rains for a week. I;m planning on removing the paint, then using a penetrating sealer to prevent moisture, then applying another 2-part epoxy. Home depot rents both a diamond brush concrete prep tool and also a coating removal tool. Which one should I use ? I’m thinking the prep tool will do a better job and be smoother ? Thanks.
Hi Alec. Since you are removing a coating you will want to use the coating removal tool, not the prep tool. The prep tool will take longer because it’s not designed for removal. Also, keep in mind that progress is going to be slowed down when removing a coating as compared to just prepping bare concrete. The coating removal tool works well on paint and cheap, low solids epoxy paints, but it will not work as well on higher solids epoxy coatings. It can take a while. If you have a better quality epoxy coating that you need to remove, many Home Depot’s rent a 10″ single disk Edco grinder that will make quicker work of the removal than the Diamabrush will. It will prep the floor in the process just like the Diamabrush.
Make sure to check with the vendor or manufacturer for the compatibility of a penetrating sealer with the new coating you want to apply.
Maybe this is a dumb question but—
I got the Harbor Freight 4 1/2″ angle grinder and 4″ diamond turbo cup wheel as you recommended. After screwing the wheel onto the arbor over the inner flange there aren’t any threads showing to allow the outer flange to be fastened. Am I doing something wrong or is the outer flange not needed with this wheel?
Hi Russell. There is no such thing as a dumb question. The turbo cup wheel does not need the outer flange. The grinder turns opposite the rotation of the threads thus keeping the wheel in place as you use it.
i have a old 2 car garage with a bad epoxy job from 10-12 years ago. Can i just grind the floor to clear that off and then not reseal or do I need a sealer on it. MN Winters
Hi Dan. You definitely want to seal it up after grinding. If not, it will act like a sponge and soak up water and possible road salts which will lead to spalling and ugly concrete. Penetrating sealers are inexpensive and easy to apply. Apply 2-3 coats since the pores will be opened up from grinding. It will protect your concrete and you won’t have to reapply since they only wear down as the concrete wears.
Shea, I’m having a new garage floor poured next week and would like to use a concrete densifier/sealer. How soon after it’s poured should I apply this product and is it a “must” that it be machined troweled?
Hello Rodney. When applying a densifier/sealer, that is, densifiers with a siliconate sealer added, you need to wait a minimum of 28 days after the concrete is finished. A machine troweled finish is not necessary for such sealers. We do recommend a hand troweled finish vs. a broom finish however when using sealers of this type.
Shea,
Great site, thanks for providing answers and information for the DIY crowd. Now, onto my question. My prep first starts by cleaning the floor really well with degreaser. I then plan on renting the EDCO grinder to level out some small imperfections versus the Diamabrush. Does the floor have to be 100% dry to use the grinder after cleaning?
Thanks!
Hello Zac. As long as the surface is dry you are good to go. If you start grinding when it’s wet it will create a slurry that is harder to clean up. If you are grinding the entire floor, it’s not always necessary to degrease first unless you definitely have oil spots and other rather bad areas that need to be cleaned first.
This is some great information, and I appreciate your point that grinding concrete will produce a lot of dust. When we did this project in our garage last year, we knew there would be some dust, but we weren’t prepared for how much it actually produced. It’s a good idea to take out any unneeded equipment and belongings before starting, so they don’t get coated in dust. Thanks for the great post!
You are welcome Kyle. You also make a great point about stuff getting coated with dust if you don’t use a vacuum system or take the proper precautions.
Hi Shea,
I have just grinded my concrete floor with a 10″ single disc grinder, my concrete was very hard and quite smooth and approx 12yrs old. I had to use the heavy duty blade to cut the top layer off and have now done that. I have got 95% of the areas except the low lying areas that are still dark and smooth, can I still apply my epoxy over these dark patches? or if not can I just scuff the dark areas in the dips with the grinder or do i have to remove 100% of the patches so that it is white everywhere? also do you recommend also doing an acid etch after grinding? thanks
Hello Craig. Just scuff those areas best you can with the grinder and then do a water drop test. If those areas readily absorb the water, then they are ready for epoxy. It’s not uncommon to have darker areas of concrete. These can be caused by uneven curing, density differences, and other reasons. Your concrete does not have to be white everywhere.
Good luck!
Thanks Shea,
after scuffing I was planning sweep, vacuum and then mop. How long do I need to wait till i apply the epoxy after mopping? does it have to be 100% bone dry? can i just test by feeling it or do it need to test it some other way? thanks
You need it to be as dry as possible Craig. The surface may look dry, but water that is still within the concrete from mopping can rise up as moisture vapor and create bubbles as it cures. A fan helps speed up the process. One trick instead of mopping is to wipe the surface with denatured alcohol applied liberally to a towel. It does a good job of picking up the fine dust and evaporates extremely fast. Just test a small area first. If it does the job, use it on the entire floor and you can epoxy immediately afterwards.
If you use water, an easy test is to tape down a piece of 16″x16″ plastic with duct tape. Make sure it is sealed at the edges. Let it sit for 12 hours or so. If the concrete under the sheet is not darker from moisture, then you are good to go.
Hi all! Really important question that I can’t find an answer to anywhere online… Once I’ve ground my entire garage floor, how long is it porous enough to clean and lay the epoxy? Is there a time frame limitation between grinding and pouring the epoxy?!?
Thank you in advance!
-Justin
Hello Justin. It’s porous as long as you keep it clean. If you wait quite a while, you will most likely need to give it a good cleaning first, but that is all that would be required.
Hi Shea
We are working on a new construction and have had a concrete slab poured that we plan to stain and seal as our finished floor. Unfortunately the pour did not come out completely even and flat and I would like to do some prep work to flatten some of the inconsistencies. Overall I would say the problem areas (on a floor of ~1300ft2) are fairly small. I am not sure whether I am best to go at this with sanding – if so what grit? – or with the Diamabrush that it looks like I can rent from my local HD. Many Thanks in advance for your thoughts.
Jonathan
Hi Jonathan. Concrete is extremely hard and sanding will not smooth out inconsistencies. Since you haven’t stated what type of inconsistencies you have, it’s hard to tell you what to use. A Diamabrush is great for prepping concrete for coatings, but not always the best for leveling concrete or taking out high spots for example. A 7″ diamond cup concrete grinding wheel on an angle grinder or a 10″ Edco stand up grinder is better for that.
Another consideration is what type of stain you plan on using. If you grind the concrete, you will be removing much of the concrete surface laitance and lime that acid stains react to in order to color it. It’s not as big of an issue if you plan on using a solvent stain or water based dye since they are not dependent on the laitance and lime.
Hello Shea,
we have a new construction home that we would like to install epoxy floors before we move in. The garage (oversized 3car) floor is pristine still. I haven’t done a water test on it yet, but i’m wondering if grinding is necessary for a brand new floor. I’ll still do the chemical cleaning that comes with the epoxymaster kit, but If i can skip an unnecessary step then that’d be great. Thanks for any response! This site is a wealth of information.
Hello Kyle. Grinding is only a must if the concrete has a sealer. Some builders use a cure and seal on new concrete to facilitate curing and avoid cracks. We have a post about testing for that here. Grinding is the only way to remove it. If the chemical cleaning you are referring to is an etching compound,then that is all that will be required to prep the surface if it doesn’t have a sealer. If it’s just a cleaner and does not etch the concrete, then you will need to acid etch to prep the surface.
Thanks so much for the quick response and information! I read through that link and it all makes sense to me. I’m going to do the test over the weekend and see what I come up with. Thanks again.
We’re glad we could help Kyle.
Test came back great. Did multiple spots. Concrete soaks up any water i put down on it, and quickly. so it looks like i can skip grinding and just do a good clean and acid etch. I’ll be going through all your pages with the installation information and things to avoid multiple times before i go for it. Thanks again.
Your welcome Kyle!
Awesome web site. My project is to smooth out an existing pool deck and then seal it so it is easier to clean. The concrete deck has become uncomfortable to walk on as it has been power washed from time to time. The power washing has blown out some of the softer concrete and left tiny peaks which are hard on the feet. The surface should not be polished, as it is next to a pool and could get slippery. However, we’d like to knock off the pointy mountain tops and then seal with a semi-transparent sealer. The sealer will (hopefully) make the concrete easier to clean, as quite a bit of organic debris – leaves, seeds, pollen, … – gets onto the deck.
Above, you mentioned using the ‘ 10″ Edco stand up grinder’ to smooth out high or low points. Any and all advice about grinding off the tops, or types of semi-transparent sealant to look at would be appreciated.
Hi Spencer. Is the concrete around the pool level or does it slope up towards the coping? If it’s level, then the Edco 10″ grinder would work well for knocking down the peaks. If it has a curved slope to it like some pool decks do, then it’s not a good choices as it will not grind the curved slope without gouging the concrete since it will not conform to the curve. In that case you are better off with the Diamabrush as it will conform to the curved slope.
A good sealer we know of to use around pools is Prosoco Salt Guard. It works very well around chlorine as well as saltwater if you have one of the newer saltwater pools.
Thanks for replying so quickly. The deck slopes up toward the coping, but not by much. Excellent point about the possibility of a curved slope. The slope is away from the pool, but not by much more than 3/4″ in 8 feet, ie, not completely flat, but not so curved as to be concerned about a ten inch disc gouging the slope.
The pool is diatomaceous earth filter with chlorine, so I’ll be looking into the Prosoco Salt Guard.
After checking a bit on the Prosoco Salt Guard, it looks to be a good penetrating sealer. Would it make sense to put down the Salt Guard and then follow up with something like HD6525-MMA™ which would provide resistance to organic solids like leaves, acorns, airborn pollens which currently cause brown staining over the winter?
Being able to clean up in the spring is important. Currently power washing at high pressure is needed to blow out the accumulated dirt. If the combination of sealants allows the dirt to be blown off at low pressure, it will help prolong the life of the deck. What do you think?
The HD6525-MMA is a topical sealer. If you want to use that then the penetrating Prosoco Salt Guard is not necessary. If it’s a topical sealer you want Spencer, then the HD6600-MMA would be an even better choice. You will want to add some anti-slip granules since a topical sealer around a pool can get slippery. Legacy Industrial can recommend the best size grit based on the use.
Hello. I’ve read a lot of the info on this site and it has been extremely helpful as I plan to reseal my garage floor. May question is related to a previously stained and sealed garage floor. Per Legacy and their suggested sealer and top coat for stained concrete I am going to prep the floor mechanically with the diamabrush etc so I can reseal the floor. What I am wondering is will the previous stain coloring scheme be impacted? We like the look of the stained concrete and I just want to clean the floor and reseal so it’s back in like new condition while durable for typical garage use. Any nuanced suggestions on this or should I proceed as outlined in many of the helpful articles on this site? Thanks
Hello Jeff. A little more info is needed here as the word “sealer” can refer to a wide variety of product both topical and penetrating. What type of sealer is currently on the floor now and what sealer from Legacy do you plan to use?
Sorry. Legacy suggested an epoxy clear sealer for stained concrete to maintain the stain appearance and a uv protection top coat. I am not entirely sure what the floor was originally sealed with but it is clear and has worn and dulled over time. It has to be about 9 years old at this point since it was done when the house was built. Thx
Update: A little more follow up here. I believe the original sealer was urethane. Legacy product I have is a clear coat epoxy sealer with a uv top coat to be added for additional durability.
Great Jeff. Legacy Industrial has years of commercial experience and what they recommended is right on track. The goal is to remove as much of the scratched and dirty urethane layer as needed leaving just enough left for the epoxy to adhere to. If you make contact with the bare stained concrete, grinding it may remove some color and leave swirl marks.
Another option is to use a 60 to 80 grit sanding screen with the floor buffer instead of the Diamabrush. It will be a little slower going, but it would be easier to control the removal of the upper layer of worn urethane and will not affect the concrete as much if you come in contact with it. We recommend contacting Scotty from Legacy Industrial if you have any other questions about prep and application. He works with the DIY crowd all the time and gets high praises for his help.
Hi, great site! I have a 1200sq ft garage that I coated with commercial epoxy paint. It looks great but shows every imperfection. It looks like the floor was broomed when poured 30 yrs ago. I thought the epoxy would fill in all the cracks, gouges, craters, etc. Some are 1/4″ or deeper. When i wash the floor, the dirty water sits in the holes, etc. How do you suggest to remove the epoxy and smooth out the floor, the way I should of done it first! My son is using it for a detail shop so the floor needs make a good first impression. On the face book page you can look close at the gouges that show up 10x in real life. Thanks
Hello Art. The facebook link was not working but we get the idea. What you need to do is grind the floor to break down the ridges from the broom finish and create a more uniform surface. We recommend using the 10″ Edco concrete grinder that you can rent from Home Depot or a local equipment rental. These are more aggressive and will remove the upper most top layer of the concrete. It will also remove most of the old epoxy and prep the concrete at the same time. Any divots that you have can be filled in with either a polymer modified cement patch or an epoxy patch mix with sand. This page has examples. What you should end up with is a nice uniform surface that will not show the imperfections of the concrete if you use a quality epoxy system.
Your pictures of a pitted floor are exactly what I have. I do have a 10’x10′ area where the previous owner must of spilled transmission fluid (20 yrs ago). After about 3-4 months, I could can see pink blotches in the epoxy. I used 2 coats of Sherwin William ArmorSeal 1000. Is there a better product ? the Armor Seal was $75 a gallon and it still stained. Thanks.
Hello Art. What it may require is grinding the epoxy off in that area and applying an oil stop primer. These type of primers provide good adhesion to areas of concrete that were oil soaked and will prevent the staining you have encountered. You would then epoxy over the primer with a minimum of two color coats since these special primers are dark in color. Here is an example of an oil stop epoxy primer.
Hello, this site has been tremendously helpful in planning my garage floor project. One question i have is, I plan on grinding my garage floor which isn’t in too bad of shape, but there are a few spots with paint, oil, grease, or just gunk on the floor. I don’t believe any of it is very bad and it’s mainly on the surface. Does grinding the floor prep it so i don’t have to worry about cleaning those spots or do i still need to clean them before or after grinding?
Thanks!
Hi Chris. Paint or other coatings are fine as is and will be taken off when grinding. Any heavy oil or grease spots should be treated first before grinding however. No need to treat the whole floor, just those areas. Once you grind those areas, just be sure to test them with a few drops of water to make sure they the water easily.
I have a cement patio that was repaired recently and the contractor ordered a mix that set up incredibly fast. He did not have time to smooth out the surface and brush it to keep it from becoming too slick before it set up, and now it is extremely slick and dangerous when wet. Would I be able to grind the cement and achieve a texture similar to what the texture would be when cement is brushed before curing? I do not want to seal the cement with anything after I grind it as I want it to eventually blend with the other patio areas that did not need repair.
Hi Jan. Before you grind, we suggest doing an acid etch first. The acid etch will better replicate older concrete in terms of looks. It will also open up the pores of the concrete and create a less slippery surface. Grinding would definitely work at reducing how slippery the concrete is, but it will create a more precise, mechanical look (for lack of a better word) that may stand out more when compared to your older concrete.
Thank you for your suggestion. My concern with the acid etch is killing the plants that are nearby with the runoff. Any ideas on that?
What do you think about sandblasting?
There are safe alternative etching formulas to use Jan. One that we don’t recommend for floor coating but would most likely do a good job for what you want to accomplish is by Rust-Oleum. You can read the literature here. It’s a citrus based etch that is safe for plants and grass. You can generally find it at your local home improvement center or here from Amazon. It’s inexpensive and definitely worth a try. You can sandblast concrete, but it’s a messy process and can be expensive.
Wow! Thank you so much! I didn’t realize there would be anything other than muriatic acid. I’m going to try the citrus-based etching formula and after I do, I’ll report back. You’ve been very helpful! Thank you!
You are welcome Jan!
Hi there, We recently used the 10″ EDCO grinder to resurface our garage in preparation for an Epoxy coating, but the grinder missed several patches of sealed areas that missed the grinder. The spots are relatively small (less than a few inches in diameter) — Do we need to use a angle grinder to polish up those areas? In other words, will those areas show through the final coat if the floor is not 100% even?
Hello Ryan. The Edco 10″ grinder does not follow the small contours or waves of the floor as well as the Diamabrush does. It requires more time in those areas to grind through the high spots. Many times these areas you refer to have been ground, but look different due to the light conditions or how much time the grinder was on the concrete. Have you tested them first to see if they absorb water as easy as the rest of the floor? If they do, then you should not have adhesion issues of the epoxy and they will not show through. If they don’t absorb water well, then yes, you will need to address them with an angle grinder or the epoxy will peel in those areas.
I have a 60 yr old home and attempted filling in garage fllor cracks with Quikrete Concrete Patching Compound. What shall I use to smooth left over compound on either side of the repaired crack? The white rough borders make the crack look worse than before I repaired it.
Hello Dottie. Usually a light grinding or heavy sanding will make it flush. Crack repairs in general only improve the appearance in the sense that there is not a crack to look at, but in general, they are not pretty.
Great site guys. I have a concrete floor that I would like to polish up in a small hotel foyer. The 7inch Diamabrush looks like it will do the job. Currently it has carpet tiles where they have used a small amount of glue to hold them down. My question is will I need to remove that glue somehow before grinding the concrete or will the Diamabrush take that off as well.
Hello Tony. Do you actually want to polish the concrete or are you just trying to remove the glue for something else? Polishing is a long process that involves a minimum of 3 steps in the grinding process, plus the application of a densifier and stain guard along the way. The 7″ Diamabrush will remove the glue if it’s fairly hard and prep the floor for a coating or sealer at the same time. If it’s gooey, then you will need to remove the heavy stuff first by chemical means.
Thanks Shea. Actually just a grind and probably the tlppc product you mentioned above. I am looking for it to have a imperfect affect.
Yes, that would work well then Tony.
I’m tackling the job of staining my basement concrete floor with water based stain. We had carpet laid over the concrete. We removed it and began scrapping the glue off. On the areas we couldn’t scrap we bought an adhesive remover. The adhesive remover worked great but left behind a shiny sticky residue. I assumed if I reapplied the remover because I thought this was excess glue it would remove it. Instead I now have more of this residue everywhere. I tried to clean it off. It won’t scrap off. I used a dawn, borax, baking soda and vinegar solution to try and remove it. It seems to have help but only a tiny bit. Some concrete areas are absorbing the water while other parts the water just sits. I’m wondering if I now need to rent a sanding machine to clean the entire floor of this residue. I’m trying not to use acid based strippers since this space is inside. I’m afraid if I sand this area it might ruin the look I’m going for with the natural “marble” look of the concrete once the stain is applied. Can you give me some advice and tips?
Hi Jackie. We suggest contacting customer service for the product that you used. Many times they have the solution you are looking for. Another product that we like for removing glue residue is made by Franmar. It is environmentally safe and works well. You can find it here. Generally you should be able to remove the sticky residue without having to grind. If you do a light grind to remove it, the stain will not develop as much of the character and mottling that you are looking for.
Hi there, I am converting a floor from carpet to concrete. The concrete is in pretty good condition, I just want to smooth it out a touch before I either paint or just seal it. I contacted my local HD about a floor sander but they don’t have one that will work on concrete. They said that a floor polisher will work. Is this true?
Hello Angel. I believe the wrong descriptive words are being used and are making it confusing. Floor sanders are used for wood floors and generally involve a large sanding belt. What you use on concrete that Home Depot rents is a floor maintainer (buffing machine) with the Diamabrush attachment. It is the one as shown in the video and will work just fine for what you want to do.
Ohhh. Thanks for clearing that up!
I used that machine for my sunken living room that is going from carpet to staining. However, when I was grinding, it was taking the concrete to like a very rough sandpaper texture. It’s getting rougher, not smoother. Will I need to resurface? There are some low spots and some concrete that was sticking up. Turning out to be much more work than anticipated!
That is what grinding does Robin. You don’t want a real smooth surface or the stain will not penetrate into the substrate.
Wow – what a great wealth of information you have here. I have several questions I’m hoping you can answer:
1) My 65 year old garage floor is stained with rust from paint cans, oil, and even a couple nasty smelling chemical stains (smells a little like a sharpie marker). I’m hoping cleaning (not sure what to use) followed by grinding and coating will remove the odor and provide a nice looking floor. Do you have specific advice for this challenge?
2) I’ve sprayed the garage out with a hose and there are areas where the water pools (low spots and high spots). It’s bad enough that running a squeegee leaves water in spots where the concrete is uneven (still smooth surface but just wavy). Do you think using the Edco grinder will help get the floor more uniform or flat so there’s less pooling? If so, is it obvious when grinding that you are making it more uniform? Any techniques you suggest would be greatly appreciated.
3) I really like the look of floors that have been ground and polished(?) so you can see the stones that were used in the concrete. Grocery stores in old buildings come to mind. Do you know what method is used to get that look? Would it be good for a garage floor with a sealer or clear epoxy?
I’m excited to read your reply – your advice to other commenters is very informative.
Thank you,
Casey.
Hello Casey. We recommend using a strong concrete degreaser on the stains and suspect chemical areas. It will not remove rust however. If the rust isn’t heavy then the grinding will take care of it. If it’s a heavy concentration of rust, a solution of 1 part muriatic or phosphoric acid to 4 parts water will remove it. Just be sure to neutralize it with some baking soda and water before you rinse it away.
Smooth wavy concrete can be a challenge to grind DIY depending on what you want to accomplish. The Diamabrush works well for prepping the surface for a coating since it can follow the contours much better, but it will not grind off high spots. The Edco 10″ grinder is more aggressive, but the 10″ head is not big enough for what you want to accomplish. Taking the waves out, plus grinding down enough to expose aggregate generally requires a pro with bigger industrial grinders and can get expensive. For polishing, it requires a process of multiple passes of finer and finer grit stones as well. For DIY, the bigger dual head concrete floor grinders do a better job of leveling out the concrete, but it does take time and a practiced eye. You can rent these from most local equipment rental companies. Many charge separately for the required diamond inserts with these as well. Your floor will also look heavily ground is some areas and not as much in others – something to consider if you want a clear coating.
Thanks for the helpful response Shea. I got a couple professional estimates today. It’s difficult to choose because they all say they have a superior product. One is $2400 for 506 sqft (one base coat plus two clear). The other is $3035 (two base coats plus one clear) but he’s using county records and saying my garage is 552 sqft. I hope I can see through all the promises and select the best provider. I still might just do it myself which I estimate would save me around $1200.
Any other advice you have would be appreciated.
Thank you again -Casey.
Verify their concrete prep methods Casey and be sure you know exactly what coating materials are being used as well as their benefits. Here is an article about choosing floor coating contractors that can help you out. We’re not sure about county records, but tape measures don’t lie.
We painted our concrete back porch / carport 12 or 13 years ago. We would like to remove the paint, as it has never “stuck.” We have tried paint removal products, pressure washing, and scraping, but nothing seems to remove the paint. The area is level, smooth, and approximately 1200 SF. Could you please advise on what type of equipment would be best for this project? We contacted our local Home Depot, but we were a little confused by the different options they provided. They said there were different equipment pieces, depending on whether or not we were going to remove it wet or dry. We would prefer to remove it dry and use a Shop Vac attachment to catch the paint and dust. Thank you in advance for your help.
Hi Stacy. It sounds like maybe your paint is more “stuck” than you thought 🙂 For removing it, the Diamabrush removal tool with a floor buffer is what you need. The removal tool is the one with less blades. Make sure they are fairly new and not worn down. If they are, ask HD to replace them first before renting it. You will need the floor buffer that is available with the skirt and vacuum attachment in order to grind dry without much dust.
Hi, Shea,
I am repairing minor cracks and spalling in my garage floor with the RUST-OLEUM 2 part patch kit, and then painting with BEHR 1 part gray epoxy paint as a coating/seal. I patched up the problem areas and cracks with the epoxy patch kit after cleaning/prepping, then manually ground the epoxy in the cracks with a hand held sander with a coarse grit. This did not smooth things our perfectly, but did a decent job for the most part. I applied a first coat of the BEHR Epoxy garage floor paint, and although the floor looks a lot better than it did, it is very obvious where in the garage the crack and repair areas are. It seems that the concrete floor and the epoxy patch absorb the paint differently, and it makes the patched areas obvious now. I have not applied a second coat yet. Do you think a second coat will improve this situation now that a first layer of epoxy has been soaked into the thirsty concrete? The paint says not to apply more than two coats, and I am in a bit of a quandary regarding what my next step should be here… Any thoughts?? Thanks, Shea!
Hello Erik. Repairs in concrete can telegraph through a coating if not ground flush. Thicker coatings do tend to hide it better than thinner coatings or paint, but it can still show. If the repaired area looks a little bit off color, then yes, a second coat will help. It wont do much though in terms of hiding any obvious high spots or bumps created by the repair.