
When fall arrives and temperatures start dropping across the country, it’s a good time to share some tips about applying epoxy to your garage floor in colder weather. Fall isn’t too late for your epoxy flooring project in most areas of the country but for others however, you may want to wait till spring after reviewing some of our tips and cold weather restrictions for garage floor epoxy.
Review epoxy TDS for temperature requirements
The first thing you want to do is review the Technical Data Sheet for the epoxy in question. 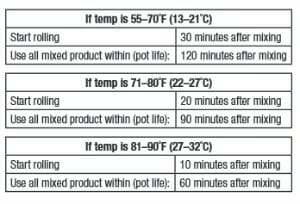 There you will find the required information about temperature specifications for application as well as specifications about humidity levels and dew points. If you are unsure about any of these, consult with the epoxy company or manufacturer for clarification.
If you are installing a multi-coat epoxy system, be sure to check the temperature requirements of each different product that you may be using. A primer can have different requirements than a base coat for example and a top coat such as polyurethane can be different than the base coat.
Besides temperature restrictions, a general rule of thumb is that you shouldn’t apply epoxy if the humidity is greater than 85% or the temperature is less than 5 degrees over the dew point. If you have anything close to that then it’s usually best to wait for better conditions to insure the best application. Most epoxies do not like a moist environment and will suffer from adverse reactions to the moisture in the air if you apply it in those conditions.
Temperature tips for epoxy floor coatings
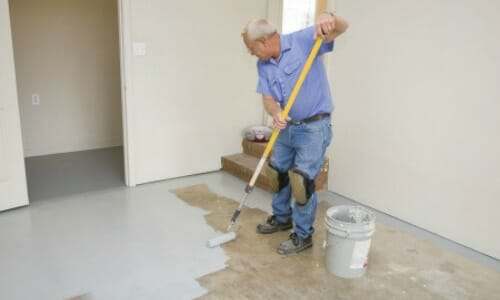
The most important temperature to pay attention to is that of the floor, not the air. In cold weather a concrete slab is almost always colder than the surrounding air. Epoxy will immediately take on the temperature of the slab once it is applied and this is the temperature range you need to pay attention to. The best way to do this is to use an infrared thermometer. You can purchase one very inexpensively from Amazon![]() .
.
Remember to check the slab temperature around doorways, vents, and walls. These areas can provide for the coldest spots in the slab with a heated garage and should be in the correct range before applying the epoxy. Always check these areas first before walking on them or applying a second coat. If you have a heated slab then your only concerns besides the correct slab temperature of course, would be humidity and dew point.
Some people ask about heating the garage itself. This can work depending on how cold it is, but it can take days for a slab to come up to temperature, not hours. If you do decide to go this route, stay away from kerosene heaters. They can dispense contaminants in the air that will end up in your floor. Propane heaters are much cleaner burning.
In addition, keep your epoxy products inside a heated room prior to installation. This will allow for better mixing and activation of the epoxy when you are ready for it.
One of the added benefits of applying epoxy in cooler weather is that your pot life will be extended. Just remember that your curing times are extended as well and you may have to wait longer before applying a second coat or gain full use of the floor. If you are heating the floor or entire garage, it needs to stay heated until the epoxy fully cures. If the temperatures drop below the manufacturer’s range, then the epoxy can actually stop curing and will never fully cure after that.
If you’ve reached the point where the weather is just too cold and you still have your heart set on a coating for your garage floor, then you may want to consider a polyurea or polyaspartic coating. These can be applied in much colder temperatures than epoxy and provide for even better protection. Just remember that they are a bit more costly.
If you have any concerns, always consult with the manufacturer. They will be the first who want you to have a successful outcome if applying an epoxy coating to your garage floor in cold weather.
I really appreciate the information on this site, but you should check your formatting in Google Chrome! On a PC with the current version (54.0.2840.99) the articles are unreadable.
Hello Kaja. It’s an issue with ad blocking software. Temporarily disable it and you should be able to view our site without issue.
my husband put the epoxy on and it apparently was too cold- it has been 10 weeks and its still not cured in a few spots. What do we do now?? How do we remove the tacky area and not mess up the rest (majority ) of the floor-its a new 3 car garage and the concrete was only 1 month old. He prepared it according to the manufacturer’s directions. It seems strange that only a small (5 x 5 ‘) area is affected.
Hello Cheryl. If the coating in those spots has not cured after 10 weeks then it never will. It’s possible that the temperature was right on the cusp and those were areas that were colder or near a draft. Sometimes scraping the sides of the bucket to get every last bit of the coating out can cause that as well. The reason is that the coating on the sides of the bucket don’t get mixed as well with the hardener. When it’s scraped out and rolled on the floor, it stays tacky and never cures properly. That’s why you never want to scrape the sides of the mixing bucket when pouring it out onto the floor.
Unfortunately the only thing you can do is scrape it up and recoat those areas with new epoxy. The problem with that, however, is that new epoxy does not blend in like paint on a wall does. Those areas will stand out unless you recoat the rest of the floor with it.
How much time should we wait in colder weather before bringing in the car?
As long as the temps are within the range stated by the manufacturer you will need to wait a minimum of 72 hours. An extra day would be better. You can always park on a piece of card board for a couple of days if you don’t want to wait longer than the 72 hours.
I live in Calgary AB Canada. I applied the black basecoat Friday at about 1:30pm in a heated garage with a radiant overhead heater (permanently set to 68 degrees (f)). The floor was poured around the 20th of September, and the garage framed and built right away around it. So basically 2 months has gone by since the slab was poured and cured. Yesterday when I applied the basecoat epoxy (from Dura-kote Epoxy 100) it was approximately 7 degrees (c). by 9pm it was 3 degrees (c). and overnight it dipped to Zero (but not below). Today at 2pm I went to go apply the main coat of metallic epoxy, but when I went in to turn on the lights, I took my shoes off (keeping the dust and dirt outside). I turned the light on, and saw my footprint in the black base. I got off it right away, and pressed my finger on it approximately 2 feet away from the edge of the door (didnt venture farther back to see whether or not the rest is hard, or just near the door). I could leave a small imprint in it. I’m concerned it wasn’t warm enough over night, or there might have been something else wrong before I applied the base coat. There are also LOTS of little air bubbles (no bigger than a pinky nail of an adult), and I’m not sure what to do next. I was planning on returning tonight to turn the temperature up a little bit to about 76 degrees (f).
A couple questions:
– If I go back tomorrow and it’s still soft or impressionable what do I do?
– If it’s not impressionable and I can add my metallic color coat, do I first sand down all the bubbles with sandpaper at 100grit? Using a hand sander, or a palm sander? Or do I rent a big industrial floor polisher style sander?
Please help!
Hello Dave. Did you check the actual temperature of the concrete slab? Remember, it’s not the air temp that makes the big difference, it’s the temperature of the concrete. If you applied your dark primer coat at an air temperature of 68 degrees (f) and the slab temperature is only 48 degrees (f) for example, then the epoxy is not going to cure in the normal amount of time or even at all. The reason is the epoxy almost immediately takes on the temperature of the slab. You need to check your slab temperature and compare it to what the data sheets state for the epoxy. Hopefully the slab is not too cool and you will just have to wait an extra day or two for it to cure. Keep in mind, however, that you will have the same curing issues (maybe worse) with the metallic epoxy if the slab doesn’t come up to minimum temperature. You may need to check with the manufacturer to see if they offer an accelerator additive. Just keep in mind that an accelerator will shorten your pot life some.
You didn’t say how you profiled the concrete before applying the epoxy. If you did an acid etch instead of grinding or you introduced water to the slab after grinding, you may not have let the concrete dry completely. Water vapor within the slab slowly releases even if the surface is dry. This water vapor can get trapped by the coating as it cures and form air bubbles. It can also happen from mixing the epoxy too vigorously and entrapping air during the mixing process. Your best bet is to take a floor buffer to the coating with an 80 grit sanding screen. This will knock down the air bubbles and allow the metallic epoxy to fill them in.
Thanks for the quick response. I wasn’t told anywhere about checking the slab temperature…. so I did it when the inside was warm, and realized after reading these posts the importance of slab temp. Now… I prepared it using a rented 18″ diamabrush power surfacer from Home Depot. I spent some serious good time on it, and then vacuumed up all the dust. I also spent a very good time on the vacuuming to ensure there was no dust left behind. I went back to the garage an hour ago, and could walk on it without leaving indents. The edges were definitely softer than the middle, or under the radiant heater. I’ve turned the temperature up to 76 degrees (f) now, and will hopefully be able to bring the temperature up a few degrees to help for tomorrow.
Now the real question lays here…. how do I get rid of the hundreds (or possibly thousands) of little bubbles and air pops? I saw that they can be scuffed by using 100 grit sandpaper (or 80 if they’re larger). I’m actually going to need to scuff up basically the entire floor. Good thing it’s the basecoat (in a pure black), and will then be sanding and adding my metallic color (x2 variations within one more layer by using 2 ribbons of 2 colors), and then using my Polyurethane Dura-Kote 400 application to seal it all up.
– DO hand sand them all? Or can I use a palm sander on low rpm?
Here’s a link to the basecoat.
https://photos.app.goo.gl/KS0R2wcQKoQjmpPk1
I see that you said to rent a floor buffer with 80 grit… is that like the large floor machine used for polishing, sanding hardwood, or the diamond coated bit to sand the concrete that I already used?
It’s a pretty heavy machine; with sandpaper on it might take it all off right away won’t it??) I just don’t want to mess the second coat up.
And I’m now convinced that it had to do with 2 things (after re-reading your response. 1) I mixed with a drill to fast and vigorously. And 2) the temp might have been a bit too cool.
I’ll get this finished and post some awesome pics! I totally appreciate your rocking help!
Use a floor buffer with a sanding screen, Dave, not sandpaper. Here is an example. When the epoxy is cured, it is very difficult to sand through it. Sanding epoxy will take quite a bit of effort as you will find out. The floor buffer with sanding screen will make life easier and get the job done faster. Work in small 3’x3′ sections at a time. Once you check your progress a few times you will get the hang of it.
When mixing epoxy, don’t pump the mixer up and down and don’t create a vortex that will suck in air. Just slowly move the drill up and about for the set amount of time an it will mix just fine.
Good luck!
awesome. I read somewhere to use denaturalized alcohol to clean up. Is that necessary? My concern is that if any of it sits inside the pores, that I’ll end up with a crazy and maybe unwanted effect. Any idea on how to clean up the remains (will it be dust or just little bits/chunks that get shot out from the grinder)? Or will it be very minimal?
dave
Denatured alcohol is what you want to use. It evaporates very fast. Wipe the floor after sweeping and vacuuming. Just make sure to use a lint free towel or cloth when you wipe the floor down. You can apply a coating almost immediately after using it.
Awesome, thanks. I used a palm sander to ensure I got right up to the edges of the drywall, and then used the floor polisher with an 80 grit disk. I then did a 3 step cleanup process. I vacuumed all the dust up, washed the floor in small sections of about 3’x3′ with plain water, and followed up with the same 3’x3′ using denatured alcohol. Waited an hour for all pores to ensure there was no liquid left inside any of the old craters. Applied my Blue Metallics with a Pearly Copper accent. See the updated google picture album in above link.
Next will be verifying there are no bubbles (otherwise I’ll be back to more dry time and a light buff again to get them out, and then the final polyurethane hardening/protective coat!!
Shea’s help has been unbelievable and amazing. I look forward to the finished product 🙂
It’s looking good, Dave! We are glad it’s working well for you.
Hello! I’m wanting to use the Rustoleum 2 part garage floor epoxy. It says not to paint it if it’s going to be under 65 degrees for 24-48 hours after painting it on. I have a 4 day window right now and my next window isn’t until July of 2020. But I’m planning to paint it on when it’s around 70 degrees, but the low is 61 and the low the following night is 56. I don’t mind an extra few days, or even an extra week for it to cure. But if it’s NEVER going to cure, that’s a different story and obviously a problem. How likely is this to succeed if I go for it?
Hi Mike. Slab temp is the most important. As long as the slab is above 65 degrees when you start you will be OK. It may require an extra day or two for the epoxy to cure, but it won’t harm anything. I would recommend waiting 5 days instead of the normal 3 before pulling a car inside.
Awesome, thank you!
Hi – I was planning on applying the Rust-oleum Epoxy to the garage floor this weekend. Slab temp should be around 65-70 degrees in the afternoon, but the lows overnight are going to drop to the mid to high 40s (ugh!). Is it possible to still apply this or will the drop in the temps overnight mess it up.
Hello Karen. If you are positive about your slab temp and if the day time temp is 65 or higher the next couple of days, then you will be OK. Just make sure you get it down while the day time temp is good for a few hours. Give the floor an extra day or two before driving on it as the lower night temps will slow curing time.
Awesome – Thank you! Will definitely be checking the slab temp!
I am applying the 2nd coat of base today and would like to get the clear done tomorrow before I leave for Thanksgiving. Slab temps have been in the mid 60’s-70. Is 24 hours enough time to wait to coat the clear (using rustoleum professional base and clear)?
Hi Bryan. Yes, that should be enough. The way to check is to press your thumb to the coating. If it’s not tacky and does not leave a thumb print, then it’s ready for recoat.
Awesome, thanks for the quick reply!
Hey, the second coat turned out great but now I have a bit of a dilemma. The outside temp has dropped and the slab in now down to around 60 degrees. Outside humidity is around 60% with sprinkling here and there. The rain will pick up tomorrow and so will the humidity. Should I try to get the clear down tonight? The weather will just be getting colder from here. It looks like I’m on the low end of the applicability range for the clear, do you think it will still be already to throw the clear on? Thanks again for your responses!
Yikes, you are in the definite gray area now. As long as the humidity doesn’t get above 80% for the first 5-6 hours or so after install you will most likely be OK. The epoxy needs the temps for cure. Generally, it will take longer to cure if the temps get around 55-60. However, if they drop down much more than that, you risk the possibility of the curing process not activating properly which can result in a tacky floor that never hardens all the way. The other option would be to wait it out and then degloss the surface to apply the clear when the conditions are more favorable.
I’m in the process of refinishing my basement and want to put down an epoxy coat. My slab temp is between 58.5 and 60.7 degrees everywhere except at the door where the temp averages 55.5 degrees in a roughly 4×4 ft area. My epoxy of choice says the minimum temp should be 60 degrees. Will I encounter problems with curing in the areas that are right on the cusp of being warm enough and how can/should I warm up the cold space by the door?
Hi J. More than likely you will be fine with temps on the cuff as long as the humidity is not high. It usually will result in the epoxy curing slower, but it will cure none the less. However, we recommend contacting the manufacturer first to discuss. For the area near the door, try to place a temporary seal at the base of the door to prevent the cold air from coming in across the floor. It will take a day or two for the concrete to warm if you are successful.
Hi, its fall and temperatures are between 50-70 degrees F where I’m located. Some nights are dropping below 50.
I’m interested in applying an epoxy coating on my garage floor, but would like something that can last 5-10 years. I have a 1.5 car detached garage. It seems there have been mixed reviews about the rust-oleum kits. Do you have any recommended alternatives? Whatever your recommendation – do
I have grinded my floor as a preparation step.
Thanks so much!
Hello Jeremy. That is correct, the Rust-Oleum EpoxyShield kits are not going to go 5 – 10 years. You will most likely suffer some form of hot tire lift within a year or so and then experience wearing out of the epoxy before 5 years. The Rust-Oleum Professional kit may go 5 years plus depending on how you use the floor. Both only provide a semi gloss finish. This article here talks more about them.
If you want something that is going to push 10 years or more, then you will need a commercial quality epoxy flooring system. These are available as kits from a variety of vendors. This one by Epoxy-Coat and this one by Roll On Rock are some examples. Our sponsors have other examples as well. A typical kit will include an epoxy primer and a high solids (90% +) epoxy color coat. A high performance clear coat is recommend. Temperatures are an issue though when dealing with epoxy. Rust-Oleum should not be applied if temps drop below 60 degrees. When it does, the curing process stops and may not restart if and when it warms above that. Some commercial quality epoxy might have a limit of 55 degrees, but that’s as low as it gets. If temps are going to be an issue for you, then we suggest looking at a single-part polyurea coating. These are actually easier to apply and can be applied in temps down to 40 degrees depending on the manufacturer.
I disagree with this statement at least partially. I used the rust-oleum two part kit and then put the clear coat on at my old house and never had a single issue. It looked good as new when I moved about 5 or so years later.
Hi Trey. That’s great to hear. The clear coat definitely helps, but your experience tends to be more of the exception. Not everyone has problems with these types of coating materials within the first 4 – 5 years, however, based on the quality of the material, experience, and numerous (as well as very common) complaints of hot tire lift and worn coatings after a few years says otherwise.
Thanks Shea,
I purchased a 100% solids 2 part epoxy from a vendor.
If I plan to put this down by myself, would you recommend doing anything differently? I was originally going to mix in smaller batches, but since its just me, I’m wondering if its better (or worse) to just mix the entire 2 gallons A and 1 gallon B together for 3 minutes and just pour on the floor as I go?
Hi Jeremy. 100% solids epoxy should not be mixed in batches of more than 1.5 total gallons at a time. Epoxy is exothermic and starts building heat as soon the two components begin to get mixed. A larger batch builds up heat faster and reduces pot life. In addition, once a 1.5 gallon batch is mixed it is immediately poured out onto the floor. If left in the bucket, it will get very hot and begin smoking within 5 minutes or so. At that point it is no good. I suggest you read our article here that covers general instructions for applying a garage floor coating. Also, pay close attention to the instructions that come from the vendor. They supersede any other general instructions.