
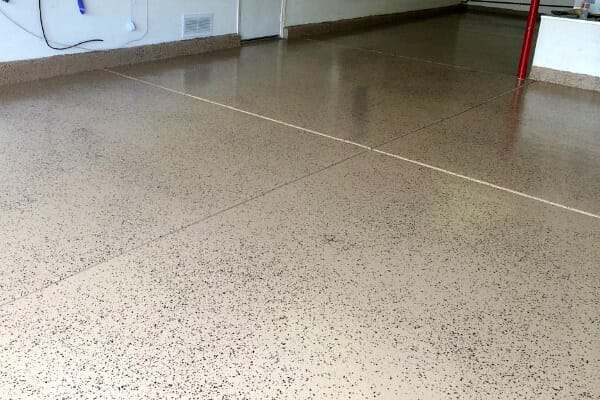
Two questions that we are often asked is how to recoat or apply a new coat of epoxy to an older epoxy floor that has already cured and can you apply a clear coat to an older epoxy garage floor coating? If you’ve done a little bit of research on epoxy application, then you know how important floor preparation is. So let’s discuss how to determine if your floor qualifies for a recoat and then how to prep the floor before you do.
When can you apply epoxy over an older coating?
There are many examples of when you can apply a new coat of epoxy over an older cured coating. The most common of these are for people who had previously applied a color coat and now realize that they want the glossy looks and advantages of adding a clear coat.
Sometimes it’s as simple as someone who planned a multiple coat flooring system and waited too long between coats, allowing the epoxy to cure, before applying the next coat in order to get a chemical bond.
Another reason is to renew the clear top coat. After many years of service in a busy garage, the clear top coat of an epoxy floor can start to show its age. With the proper floor preparation, you can add another coat of clear and make the floor look brand new again.
And then finally, you may have an older existing coating that is showing wear from years of heavy traffic and getting thin. As long as the floor is not experiencing any delamination issues, many times you can recoat right over a worn epoxy floor to create a brand new looking finish.
As long as the existing garage floor coating is a 2-part resinous product such as epoxy, polyurea, polyaspartic, or polyurethane, then you should be able to apply an additional coat of a compatible product without issue. However, to be safe you should always consult with the manufacturer of the new coating first.
When not to apply epoxy over an older coat
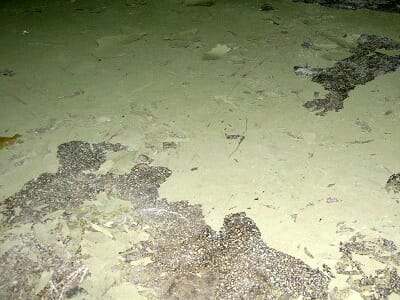 If the existing epoxy floor coating is peeling up or showing other signs of delamination, then you do not want to epoxy over it. There are bigger issues at play here that are causing the delamination. Applying a new coat of epoxy over such a coating will only lead to more problems. A complete removal of the old coating by grinding would be required.
If the coating is fairly worn with more concrete showing through than there is epoxy, then you will want to start fresh by grinding the floor.
Do not attempt to apply epoxy over existing concrete sealers. These need to be removed first as epoxy will not adhere to them. Also, floor paint is not a good base for epoxy and needs to be removed as well.
How to prep epoxy for another coat
The key to applying a new coat is to mechanically rough up the surface of the older coat to create enough bite for the epoxy to adhere to it. There are a couple of ways to achieve this.
The first is to use 120 grit sandpaper on an orbital sander or pole sander like this one at Amazon![]() . What you are trying to do is rough up the surface, not remove it. The surface should look deglossed after sanding.
. What you are trying to do is rough up the surface, not remove it. The surface should look deglossed after sanding.
Once done, sweep up the heavy stuff and then vacuum the entire floor with a shop vac. Next, use denatured alcohol on a small towel and wipe down the entire surface. The denatured alcohol will remove all the fine dust particles, evaporate quickly, and make sure that the surface is clean.
The other option is to use a floor maintainer (buffer) with a 100 grit sanding screen. You can usually rent these fairly inexpensively from your local home improvement center. They should have the sanding screens to purchase as well.
This method will go faster than the pole sander and cover a lot of floor quickly if you have quite a bit of square feet to prep. Just remember to occasionally check the sanding screen for wear and to make sure it hasn’t clogged up. After you are done, vacuum the floor and use denatured alcohol as described with the sanding method.
If you have an older clear coat that you want to renew, then you will want to use 80 – 100 grit sandpaper or a 60 – 80 grit sanding screen first to actually remove a small layer of the coating. This will help to eliminate any deeper scratches and/or embedded dirt that has marred the finish.
Do the same if you have a worn coating that is adhered very well but has some spots where the coating has worn through to the concrete. The more aggressive grit will insure that the bare concrete will be prepped properly as well.
Floor prep such as this goes fairly quickly. Once you wipe down the floor with the denatured alcohol, your floor is ready for a new coat of epoxy or floor coating of your choice.
Hey,
You seem to be giving great advice so I’m hoping I can get some too. I just painted my basement floor last weekend with rustoleum 2 part clear epoxy with rustic brown stain additive. I had believed that one box would be enough, but evidently should have gone with 2. Now half the floor is the beautiful end result I had hoped for while the other is patchy/ has bare spots. Will sanding the bare/thin patches and reapplying leave a significant change in appearance from the side that was coated well? should I sand the whole thing and reapply but thicker on the other side this time?
Appreciate the help, first time project of this type not going as planned.
Thank you!
Hello Kailan. If you rough up the area where it went on thin and then apply another coat it will turn out nice. However, if it overlaps the first half of the floor the overlap line will be very noticeable unless there is a natural border between the two. If there is no natural border, the only way to avoid the overlap line is to apply a second coat to the entire floor.
I recently applied the Rock Solid Grey and when it was dry I discovered numerous thin areas and a couple oil areas that need repair. Can I roughup the entire 870sqft floor and apply a different epoxy ? Is epoxy compatible for this polycuramine floor ?
Thanks
Hi Darrel. The most important part is the oil areas. Did the coating peel from poor adhesion or did it adhere well but develop fish eyes? If it peeled, you will need to make sure to get the concrete properly prepped and clean in those areas first or nothing will adhere properly. If you have fish eyes, it will require roughing up that area. In terms of a recoat, you have a couple of choices. RockSolid actually allows for a 7 day window for recoating of the same product before having to rough up the surface. If you don’t want to go with RockSolid again, then yes, you can apply a different epoxy. In that case you will need to rough up the surface first regardless before application of your coating of choice.
Hi, I applied Rustoleum 2 part epoxy coat on my garage late last week. I am now wishing to apply Valspar 2 part epoxy clear coat on top (about 4-5 days later). Do I need to rough up the surface, or is it OK to go ahead and apply clear coat with no surface prep? Thanks!
Hi Matt. Rust-Oleum EpoxyShield has a 72 hour recoat window. Since you are past that you will need to degloss the surface before applying the clear coat. It’s not difficult to do with a new coating and you should be able to do it in an hour or so. Just use a pole sander and 100 grit sandpaper. You aren’t trying to remove any of the coating, just provide a rougher, deglossed surface for the new epoxy to bond to.
what do I need to do to recover and existing Apoxsee floor in my garage
Can you be more specific John? We discuss how to recover an existing epoxy floor in the article.
Hi I used a Behr garage floor paint on my garage. I forgot to bond it and it is now peeling. Can I recoat and seal it with a garage floor sealant. Will it still peel or come of with hot tires. Or do I need to remove the paint and start over? Are there any other options?
It will still peel up from hot tires Mariam. Paint does not stand up well to hot tires, nor can you seal paint. If you want to avoid hot tire issues and have a much longer lasting coating, we suggest removing it completely and apply and actual 2-Part epoxy coating. If you don’t know the difference you can read about it here.
I used epoxy shield concrete patch and repair for the cracks in the floor. The next day after covering 3/4 of the garage with the epoxy gray and chips, I notice where I put the patch and repair, it was flashing through the paint. So I was in hopes it would go away after drying, but it didn’t. The next day I put the epoxy shield clear coat on, hoping that it would dim the flashing, but again, it didn’t. A second coat of the epoxy grey would have been a lot cheaper. My question is, could I redo the same process, after 24 hours of putting the clear coat on, would the epoxy shield color, chemically bond over the clear, without sanding?
Yes you can Alan. Rust-Oleum states a 72 hour recoat window before you need to rough up the surface. When you repaired the cracks, did you grind the repair work flush with the concrete? If not, it will telegraph through the coating. A second coat of color may or may not hide the work.
No, I didn’t grind it and wish I did . Lesson learned. I pulled it tight to the concrete and its a little noticeable over certain spots, if you stand over it and stare hard at it. The chips keeps the eye off of it, great. When I was 3/4 of the way and seen I had plenty to finish and then got heavier with the coat and it did cover the repairs, so now I know I was skimping when I started out. I might can lightly sand over any rise spots. since I have a clear coat thickness. I was wondering about the adhesion of the color over the clear coat to start over. Thank you for the quick response. I’m going to try it again in the morning.
I just completed my first metallic epoxy garage floor and I love it. It turned out far better than I imagined. It has cured for 5 days now. In fact I’m so happy with it, I’m reluctant to sand it and apply the topcoat. But I’ve been told it has to be done in order for the topcoat to properly adhere. I’m afraid that the scratches done by sanding will be visible after I apply the topcoat. It’s like I’m “messing up” something that I love just the way it is. Any guidance you can provide ?
Yes, you have to degloss and rough up the surface if you waited longer than 24 hours before applying your high performance clear coat Michael. No worries though, once you apply the clear the gloss will come right back and look fantastic. All the microscopic scratches from the sanding are filled right in and it looks good. Once you clean up the floor after sanding, make sure to wipe the surface down with denatured alcohol on a microfiber or lint free cloth. This will remove all the fine dust and debris from the surface so that nothing gets trapped under the clear.
What grit should be used?
It’s in the article Wendy. 100-150 grit for sandpaper and 80-100 grit for a sanding screen.
I recently applied epoxy in my garage and it looks great, except lowes didn’t mix both gallons the same. Now half of the garage looks tan and the other looks olive (the color I intended). Can you tell ,me what my options are? I spent a lot of time sanding and degreasing before I applied the epoxy, and I feel like I just did a whole lot of work for nothing. Can I apply another coat of epoxy over the entire floor, or will it not adhere?
Ryan, are you sure it’s epoxy that you have and not paint? Lowes does not mix epoxy there. They only sell pre-packaged kits that come ready to go in a box. Let us know either way and we can recommend what to do.
I have a 2 car garage that was “coated” sometime before I bought the house (5yrs ago – house built in 97). It is failing in all of the high traffic areas with pealing etc. I want to do the job right. Can I really just sand and re-coat? is there any compromise here as opposed to renting a floor grinder and starting fresh? Also what would you recommend for a epoxy? I do light construction, concrete, framing etc and am not afraid of leaning in a bit and doing it right. Commercial products dont scare me – I just want to do it once.
Good questions Joe. If you don’t know exactly what type of product was put down beforehand, we recommend grinding it off and starting fresh. The reason is that how well a coating bonds is totally dependent on what it bonds to. You don’t want to apply a quality coating on top of an inferior coating or one that was applied incorrectly. If you know that it was a quality coating that just took some hard abuse, then you would have a good argument for just roughing up the surface and coating over it.
We recommend using a high solids or 100% solids epoxy with a high performance polyurethane or polyurea top coat. An epoxy primer is recommended but not mandatory in most cases. You won’t find this type of product from your home improvement stores. Most is purchased from floor coating vendors that sell online. Our sponsors that advertise on the right hand side of our site are a great example.
I applied epoxy and sealer on my garage floor 5 years ago, the finish was bright and beautiful. It is now showing its age, looks faded in high traffic areas and has yellowed in the areas that the sun reaches. How can I restore this back to the bright finish ? I have no peeling at all but the dirt marks will not wipe up in some areas
Hello Kevin. Epoxy will yellow over time when exposed to the sun. How fast depends on the clear top coat that was applied. If the clear was epoxy, then it has yellowed as well. You can bring back the gloss by prepping the surface, as discussed in the article, and then apply a new clear top coat. However, it will not fix the yellow issue with the epoxy. The only way to fix that would be to apply a new color coat of polyurethane or polyurea with a similar clear coat. That combination will never yellow.
THANK YOU
I have a small Frozen Yogurt store that has existing Epoxy over concrete. The Epoxy is looking a bit rough from kids walking through in baseball cleats and 5 years of high traffic…but not peeling or anything, just looks worn down a bit.
I want to put a fresh coat of Epoxy that is NON SLIP on it and am planning this…
1. Tuesday sand floor with pole sander and remove dust.
2. Tuesday 9pm roll Benjamin Moore Epoxy on floor
3. Wednesday 6am roll 2nd coat of Epoxy on floor
4. Wednesday 5pm roll coat of CLEAR epoxy on floor
5. Thursday 11am open for business
A couple questions:
– Does this sound like a solid plan?
– Do you recommend mixing sand in with Epoxy or sprinkling it after rolling?
– During/after which coats do I put the sand on (to make it non stick)
With exception to the use of sand David, your plan looks pretty good. The sooner you can get the clear on before you open for business the better off you will be. 24 hours or more before would be ideal. When timing for your recoats, if you can’t leave a thumb print in the coating then it’s ready for another coat. Regarding the sand, it is not a very ideal non-slip grit for epoxy. The reason for this is that sand can actually break down under pressure. This can cause little pock hole marks in the coating that distract from the finish and collect dirt easily. If you still want to use sand, it will either need to be tossed out onto the surface immediately after the first coat or mixed into the epoxy with the second. Sand will discolor the clear if it’s introduced into it. We highly recommend the use of a polymer grit or aluminum oxide grit instead, depending on the solids content of your epoxy. It would be mixed into the final clear coat before application.
Hi, I just bought a house that has a nice coat of epoxy tan on it with a few sprinkle chip flakes. It does not look sealed. I want to add a lot more sprinkles to the floor and give it at least 2 coats of sealer. Can I sprinkle more flakes into the first clear coat then seal it again.? Yes I will rough up the existing epoxy first before applying clear coat. Thanks Jim
Yes, you can Jim. It’s exactly how some installers fix issues with uneven color flake distribution.
Thanks Shea> We are having a problem with our bathrooms at work.(small 2 stall ones) The floors are turning black in spots,( it is not dirt) _ It is happening on the curved baseboards and Esp bad beside toilets, it looks like the black ran down the baseboard. This was a professional install done originally 2005 and touched up 2011. I want to call the company but would feel better with would feel better with some knowledge first. I hope you can help. Thanks Donna
Hello Donna. A coating does not have the ability in most cases to turn black in color. It sounds like there is a biological reaction taking place. You may have a mold or mildew issue that is developing in areas where the coating is breaking down or wearing away. Moisture may be getting trapped in spots and would make something like this hard to clean. It could be from moisture migrating up through the concrete and finding ways through the bottom of the coating or getting in somehow through the top. Once the source is determined, it generally requires sanding it out and a new top coat applied. We couldn’t be certain though without an inspection. Calling the company to come take a look is good place to start.
Hello,
My clear epoxy coat was mixed with a resin to make it less slippery and glossy, however the resin was not applied evenly and there are parts of the floor that have more concentrated areas of the resin. I am not sure if this was avoidable by mixing them better nor am I aware of what product was used. I do know that it was not the epoxy bought from Lowes or Hone Depot and was more durable.
My question is what can be done to make it all look even? Would applying another coat help or would it do the same thing? or would the clear coat have to be sanded and roughed up and then another clear coat applied? If that’s the case, would the sanding mess up the color and chips that were applied before the clear coat?
Hello Sandy. We are not quite sure what you mean by the word “resin”. Epoxy is a resin. Do you perhaps mean something like an anti-slip additive? These small granules can make the floor less glossy and less slippery as you stated. If so, this usually happens from the granules settling to the bottom of the paint tray or mix bucket during application. Depending on what type of clear is used, it’s important to mix occasionally to keep the granules from settling. If not, the roller picks up little of the granules or way too much and it creates an uneven distribution. The only way to try and correct it is to sand down a good portion of the clear and reapply. As long as you do not sand through the clear, it will not affect the color flakes.
Hi,
I have a couple questions. I am reapplying the same epoxy as I used 5 years ago. The floor is worn and there is some minor pitting in a couple spots from salt in the winter that I bought a repair kit for. There is no peeling though. I would like to know if I should patch the floor first and then sand it before applying the epoxy or sand first, patch, and then epoxy?
Also I had bought a degreaser to apply. Should I still use this degreaser too or just sand the floor before putting on the epoxy? Thanks a lot for the help.
If you have an epoxy coating on the floor already Adam, the sanding should remove all dirt and debris and the degreaser should not be needed. Generally it is best to make all repairs first then prep the surface. Keep in mind that the proper material for repairing pitting will not be smoothed out by the sanding process. It’s too hard (harder than concrete) and will require grinding to create an even surface. You can sand after grinding smooth the repaired areas.
Hi, I have been referring to your articles about painting my garage floor and find them really detailed and informative.
I painted my garage floor with 100% solids 2 part epoxy and had initially planned for only two coats. However after I was done with two coats I realised that I want one more coat and then want to follow it up with two coats of Urethane for the gloss. I have two questions:
1. It has been almost 10 days since the previous coating, to apply the third coat (100% solids 2 part again) do you recommend that I sand the current surface before I apply the third coat?
2. Can anti-slip substance be added to the Urethane coating?
Thank you.
Yes Uptal, you will need to degloss the surface first by roughing it up with sandpaper or a sanding screen. This process helps to provide bite for adhesion. Apply the anti-slip additive into your last coat of polyurethane.
We coated our garage floor with Rustoleum epoxy floor color and 2 clear coats a few years back. Over time it is showing wear and fading. We would like to recoat the floor with the same products again. Is it okay to put the colored epoxy floor coating over the clear coats? We used a floor sander and scuffed up the floor but you can still see some shine on it from the clear coating. Will the epoxy color coat adhere to the already clear coated floor?
Yes, it’s OK to do that Lisa. As long as it’s not a glossy shine and you used the proper grit when sanding you should be fine. It also helps to wipe the floor down with denatured alcohol on large lint free cloth or towel.
I want to redo the epoxy coating on my garage floor . Can I change the color without completely stripping the old coating? Thks
Yes you can Ken. Just make sure the old epoxy is still adhered well.
Hi,
About 10 years ago I applied a Rustoleum Epoxy floor kit w/color chips to my basement and it came out great. I recently wanted to redo my floor as it had worn in some areas. I was told to prepare the floor by grinding the old epoxy off the entire area. After many hours of grinding and removing all the dust I reapplied a Rustoleum Epoxyshield kit w/color chips to the same area and it looks terrible. I can see marks from the grinder and it is very dull in several areas. Where it used to be a smooth finish it is now dull and patchy. It has been two weeks since I did the floor. Is there anything I can do at this point to get a smooth, uniform finish? Any advise would be appreciated.
Hello Diane. It sounds like the coverage rate of the epoxy was stretched too far. Grinding does a great job of opening up the pores of the concrete so the epoxy can penetrate and get a good bond. It’s normal to lose some coverage rate from the epoxy soaking in. When the coating is stretched to cover the area you are working with, you end up with a very thin coating that can look dull in areas. You have to remember that it’s a coating and not paint. We suggest roughing up the surface with 100 grit sandpaper and then apply another coat. Your coverage rate will increase since it’s not soaking into the concrete, it will increase the thickness of the coating to help hide the grinding marks, and it will bring the gloss levels back.
Great! Thanks so much for your help. I assumed that was the issue but wasn’t sure I could go back over it.
Hi, about 7 years ago I put rust -oleum epoxy kit, tan with specks, on my garage floor. My garage floor has cracked and sunk about 1/8″ in an area about 7’x10′ and another long crack. How do I level the area and fill the long crack, in some areas 14″ wide, so I can reapply more epoxysheild?
Hello Lynda. The bigger concern is why did such a large area sink to begin with? You may make repairs just to have it sink more later. For the repair you would need to grind the old epoxy off the surface and then fill the area with a self-leveling polymer-modified cement. We have an article about fixing low spots here. Keep in mind though that 70 square feet is a large area and could get expensive to fix. You may be better off just repairing the cracks and then grinding the transition smooth.
Thank you, I have looked everywhere to find a solution to the problem. I was told in the hardware store to put a product over the sunken area so the leveling cement would adhere to the epoxy.
You need to remove the epoxy first by grinding Lynda. This is the only way to provide the proper substrate for the correct product. Do not use the self-leveling underlayment products found in home improvement centers that are used for indoor flooring. They are not designed for traffic without another flooring installed on top of it, nor are will they accept coatings very well.
Hi. I just epoxy my garage with epoxytech 100 solid epoxy. I ran out and miss a section. In some parts I have to go on top of epoxy that dried for 2 weeks. (I had to order more) should I re grind to bare concrete or will scuffing be enough. The dry part also has a clear coat applied over it.
Just degloss and rough up the surface with 100 grit sandpaper Damian.
My garage floor has just been painted with epoxy garage paint 2 days ago, now I want tflakes on it to cover a crack from my garage flooring, what to do?
The only thing you can do at this point Mary is to recoat the surface and apply the color flakes this time. It will require roughing up the surface with 100-150 grit sandpaper in order for the new coating to adhere.
Is there any other way to conceal the crack on my garage floor? It is normal according to my builder and got an inspector to check on it, My house is a new construction, what if i put a chip over a top coat? or do I rather leave my 2 day old epoxy painted garage as it is?
Generally cracks are repaired or filled before you epoxy. If you try to epoxy over a crack the epoxy tends to seep into it as it cures. This exposes where the crack is at and telegraphs right through the coating. You can either repair the crack and recoat the floor or if the crack is not very wide (less than 1/8″) you can recoat the floor and do a full color flake dispersal until refusal. This will require a clear top coat as well.
It isa long hairline acrosss my garage, will I need to sand the whole garage and recoat the whole garage again, thanks for answering all my questions.
What brand and type of epoxy are you using Mary? Do you have a link to the product? Regarding repairs and patching epoxy flooring; epoxy does not blend well like paint does. It will show clear roller marks where it overlaps which will stand out fairly well – more than the crack does. That is why when doing a repair, especially for a long crack, you will want to recoat the entire floor. So to answer your question, yes, you would need to sand the entire floor for a recoat.
Ok… so I spent the time and effort to prepare my concrete floor properly and Yesterday I applied a coat of 100% solids two part Armorpoxy. It was going great until I took a little too long to finish laying it down. It started to cure and thicken up on me. I finished the floor, but there is an area where it went on thick and is noticeably a little uneven. I am nearing the 24 hour time frame where they recommended to put down the clear top coat. I don’t have any more epoxy to lay on another coat first to smooth out this area, and likely wouldn’t get the same color shipped to me in time to meet any window I may have for recoating it. If I sand that area at this point to help smooth it out, will the top coat make it look smooth? Or, should I wait until I can get more epoxy to sand the whole floor and give it another coat?
Many times sanding a rough area where the coating is thick will help to smooth things out Frank. You would need to degloss the rest of the coating as well since you would be past the recoat window. Though the sanding leaves scratches and deglosses everything, the clear makes the coating color pop again and all the sanding marks disappear. ArmorPoxy has great customer service. We recommend contacting them to discuss your issue.