
A metallic coated garage floor can create a stunning and exotic visual appearance. However, cost and the moderate to difficult application process has kept all but the fearless DIY enthusiasts from considering this epoxy flooring option. Fortunately, the application anxiety and cost has slowly started to change with the introduction of RockSolid’s Metallic garage floor coating kits.
Update!
We have a one year review of a Silver Bullet RockSolid metallic installation from Mother Daughter Projects. You can read about their results and watch the video of their review further below.
In 2014, RockSolid upped their game by introducing their new Polycuramine epoxy formula to the DIY garage floor coating market. It was developed to compete with the traditional garage flooring kits produced by Rust-Oleum, Quikrete, and Valspar as an example.
If you are unfamiliar with Polycuramine, you can read our review of the RockSolid garage floor kit. It is this same Polycuramine formula with the patented burst pouch technology that is used for their metallic floor coatings.
 When RockSolid first introduced their metallic floor coating, it was marketed as a home interior product only and was available in 4 metallic colors.
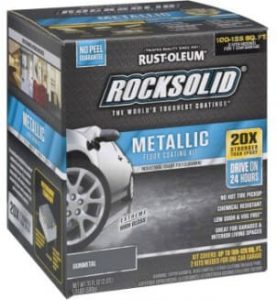
Recognizing the need for a DIY friendly metallic garage floor coating, Rust-Oleum now markets the RockSolid metallic coating as a garage floor kit, available in 8 metallic colors.
These colors include Silver Bullet, Copper Pot, Earth Brown, Cherry Bomb, Amaretto, Gunmetal, Burnished Gold, and Brilliant Blue. You can view samples of these colors from Rust-Oleum’s information page here.
The short video below has some good examples of the various metallic colors on a garage floor.
RockSolid vs other metallic coatings
So what makes RockSolid metallic coatings different from the other metallic coatings available?
Until recently, most metallic epoxy coatings are of the commercial variety. They generally require a coat of dark epoxy primer to be applied first, followed by a coat of a 100% solids metallic epoxy mix, and then a top coat or two of clear polyurethane or polyurea.

The process requires dripping solvents onto the floor after the metallic epoxy mix has been applied. The solvents create movement within the metallic pigment which creates the different designs of molten rivers of lava and moon craters that make these coatings so interesting. Some manufacturers incorporate blowing the surface with air in order to get the same movement of the pigment.
Knowing that this process was too involved and cost prohibitive to the average DIY enthusiast, RockSolid Metallic takes on a completely different approach.
Using their patented Polycuramine formula, a metallic pigment is mixed into clear Polycuramine and applied directly to a properly prepared, bare concrete garage floor. Unlike the other metallic epoxies, a dark primer coat is not needed and solvent is not dripped onto the epoxy surface.
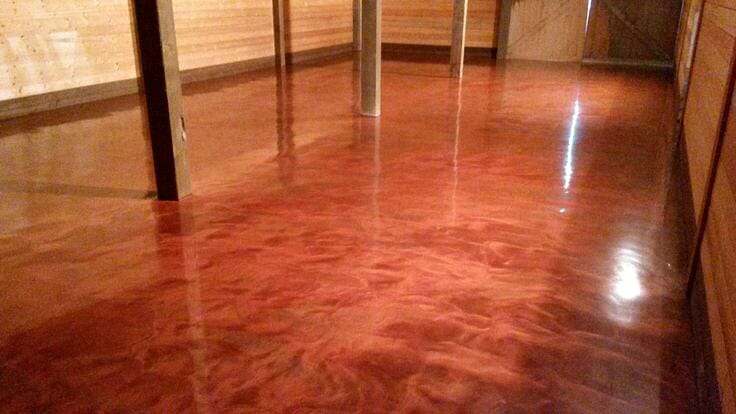
While the coating does not create quite the same 3-D effect of the commercial equivalent, it does provide a very glossy and cloudy appearance of the metallic colors that is very pleasing to the eye.
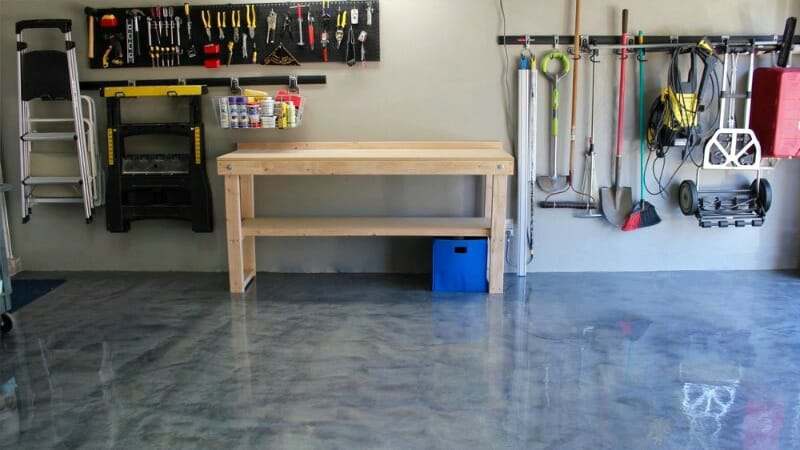
Applying RockSolid metallic garage coatings
This is where the metallic floor coating kit really shines. It is applied in the same manner as the standard garage floor kit. The only difference is mixing in the metallic pigments with the Polycuramine and going over the coating with the required circular motions of the application roller.
RockSolid provides an eco-friendly etch solution to clean and prep the concrete surface. Any heavy dirt, grease, rust, or oil stains should be cleaned prior to the use of the etch solution. The etch solution works by opening up the pores at the concrete surface in order to create the proper substrate for the Polycuramine to adhere to.
Once the concrete is completely dry, mix the burst pouches and add the metallic pigment according with the RockSolid directions. Once it has been mixed, you will cut-in your edges for each section with a 3” brush. You will then pour 3”- 4” ribbons of the material onto the floor in 5’ sections. Roll it on and then work the area in circular patterns with the application roller.
RockSolid metallic coatings can be walked on within 12 hours. We recommend that you wait 24 hours before moving items back into the garage and a minimum of 48 hours before driving on it. Even then, we recommend parking on cardboard for another day or two while the coating continues to cure.
How difficult is it really to install?
Lately we had been getting enough questions about this floor coating that we started to make plans about doing a separate write-up on it. What finally got the ball rolling for us was when we were contacted by Steph from Mother Daughter Projects.
As it turns out, Steph and her mother Vicky had just installed a RockSolid metallic coating in Silver Bullet on Steph’s garage floor and she wanted to share the results. Steph did a great step-by-step article with plenty of photos on what was required. This included listing a couple of mistakes and what she would do differently next time.
This is a great video of their RockSolid metallic application
Considering that she had old paint on her floor to contend with, the results of her installation are fantastic. It would have been easier if they had a bare concrete floor to work with, but those are the obstacles that have to be addressed sometimes when installing a floor coating.
Review update
We were recently contacted by Steph from Mother Daughter Projects about a one year review they did of their installation. Overall they have been very satisfied with the coating though they did need to make some repairs for hot tire pickup. After further examination, it looks like the reason for the repairs most likely had to do with the condition of her concrete at the time of installation and was not a result of product failure.
Though they had some issues with Rust-Oleum shipping out damaged product, they did a great job with the repairs that needed to be made. They also provide excellent information about what they have learned over the year as well as documenting how the floor looks after the many projects that have been done in Steph’s garage.
You can read their article here to get a more detailed explanation of what they have learned and how they like the performance of the coating.
Important tips
The first thing we want to point out is that the coverage rate for RockSolid metallic coatings is 100 – 125 ft² per 70 ounce burst pouch. That is half that of their standard garage floor kit. The reason for this is that the metallic coating is applied at twice the thickness in order to obtain the deep, cloudy look that metallic epoxy creates.
So a typical 400 – 425 ft² 2-car garage floor will require approximately four 70 oz. burst pouches instead of two. The kit even comes with a thicker 3/8” polyamide roller for the application.
Do not attempt to stretch out the coverage rate. If your math puts you 50 ft² short, you will need another pouch. Stretching out the material will result in a less glossy surface that will lose depth in appearance.
If it’s in the budget, we recommend applying a clear coat of Polycuramine over the metallic coating as well. This not only helps to increase the longevity of the floor coating, the additional clear coat will also act as sacrificial layer and protect the metallic color from scratches.
Another additional benefit of a clear coating is the ability to recoat the surface at a later date. This can make a garage floor coating look brand new again. All that is required is cleaning the floor and then roughing up the surface with 150 grit sandpaper before application.
Where to buy
RockSolid Polycuramine coatings are now available at many home improvement centers, hardware stores, and big box retail outlets since it was first introduced. Menards and Home Depot are an example. Amazon is one of the better places to find a large selection. You can view the latest pricing here.
It really does pay off to shop around. We have found that pricing can vary as much as $30 a kit depending on sales and where they are purchased.
Final thoughts
If you have wanted a metallic coated garage floor but were too intimidated by the installation process and/or the price, then this RockSolid metallic coating is definitely worth a look. We have continually been impressed with the beauty of this coating for the minimum amount of work it requires.
One thing to keep in mind however is the very glossy nature of metallic coatings tend to show scratches more than a traditional garage floor coating. If you have a very active garage with numerous projects and automotive repairs for example, then this type of coating may not be for you. This is especially true if you are worried about keeping the look pristine.
However, if your garage is more of a showcase to park your vehicles, make light automotive repairs, and refrain from hard core projects, then this flooring just may fit the bill.
hi Shea,
Since the polycuramine is thin, do you recommend a base primer rocksolid gray primer coat then the metallic layer and clear topcoat?
Hello Chris. You could certainly do that to help create a nice build and a good foundation for the Metallic coat. Keep in mind however that the Metallic Polycuramine is applied twice as thick and will not have any inconsistency in color if that is what you are trying to avoid.
Hello, Thank you for the review and the tip’s. I have a garage project on process, Currently on the preparation stage. We all ready acquired four + one 70 Oz kits of the rock solid brown metallic for my two car garage. My question is the following, is the rock solid clear coat the same as the rock solid metalic minus the metalic powder, ech solution and possible diferent application roller?, In other words is the pouch containing the A and B mixture the same? For a minute I thought it might be absurd to suspect that they have the balls to charge more for lees but the more I think it the more I believe of the possibility, Manufacturers are well known for this behavior. If this is the case I will purchase a few more rocksolid bronw metallic and just use the liquids for top coat purposes. Ps my local big box store currently have a killer deal on the rock solid metalic and the clear top coat costs more in comparison with the regular price of the of the rock solid metalic.
Thank you.
Hello Francisco. You raise a great question. We suggest that you call Rust-Oleum and speak to them directly about this. When we first wrote the article about RockSolid’s polycuramine garage floor kit, we saw that the Diamond Clear initially cost much less at some retailers than the garage floor clear. A call to Rust-Oleum verified that it was the same product, just boxed differently. We would not be surprised to learn though if the clear polycuramine that comes with the metallic kits has an additive that allows the metallic colors to mix and disperse properly. It’s definitely worth the call however.
Thank you.
Francisco,
I’m sure you’ve probably finished your project, but I’ll chime in for the sake of others who may read the post in the future. I’ve recently worked with both the RockSolid Metallic and the RockSolid Clear polycuramine. I had the same questions regarding the price and product differences (if any, aside from the metallic additives). You’ll find on close inspection of each product that they are, in fact, the same polycuramine (minus the metallic additives for that product), and the same weight of each as well. My theory is that Rustoleum charges less for the metallic to keep people from getting sticker shock at how expensive a project would be using the metallic since it’s necessary for it to go on much thicker to get the desired effect.
If you read the box, they say they are 90 Fl oz and 70 Fl oz for the clear and metallic respectively. My guess is that the weight is based on the final mixture of the two liquid chemicals together with the additives included with each. The metallic pigments weigh almost nothing – they’re extremely light, and thus able to “float” in the chemical mixture. The non-stop additive (included with the clear only) is much heavier, which is why it must be mixed frequently during application, lest it settle. The weight difference between these two additives would account for the labeled indication that one is 20oz heavier.
Since I’m writing, I may as well let you in on a few other tricks regarding the metallic additives. First, you’re not at all restrained by the colors Rustoleum has chosen to market. If you’d prefer a candy apple green or hot pink floor, for example, you can order those colors from online retailers that sell them as additives for car paint – and some of the sites selling the mettalics for the newer rubberized paints have hundreds of color options. Many of the more standard colors are quite cheap, but the newest color-shifting additives can be quite pricy.
Also on the topic of the metallics – and this is a tip that will really help, especially with first-timers or anyone who appreciates a little extra time to work with the material once the liquids are mixed – you should pre-soak the metallic additives! This is by *NO MEANS* to say that you should add water or anything else, as doing so *will* ruin the final compound. However, if you soak the metallics for an hour (or even overnight) in either ONE of the two chemicals – “Part A” *OR* “Part B” – it will give the super-fine metallic additives a chance to get better coated and to separate out. This has the added benefit of cutting down the time necessary to properly mix them in with both parts of the compound significantly. **If you do go this route, be sure to FULLY drain whichever part of the compound you use to do so, and that you also FULLY drain the second part when you go to mix them together later on. As per the directions, don’t mix the two fluid parts together until you’re ready to work. You’ll still have to mix the parts together well – I would definitely recommend a paddle mixer for that – but you’ll be mixing the presoaked metallic additives at the same time, thereby reducing the time it takes to prep the material before applying it to the floor by 10-15 minutes (the amount of time it takes to really mix those super-fine metallic additives into the compound properly if done the “standard way”), and the metallics will be better dispersed.
Hope this helps someone out there. Have fun, and enjoy the result. It really can be spectacular!
We have interior concrete floors that have a red/maroon color. Can this product be used inside the home on concrete floors? Or would you recommend something else? Thanks!
Hello Clark. Yes, you can use it in the home. The metallic was marketed for the home interior originally and then found its way to the garage as an exotic garage floor coating.
Is the floor slippery? Or is there a grit to put on it for traction?
It can be slippery when wet Nate. You can add an anti-slip to the final coat, but you will want to keep in mind that it can diminish the glossiness of the coating.
Thanks for all of great articles. They are very helpful.
You recommended a top clear coat of Polycuramine. In other articles you suggested a polyurethane clear top coat with an epoxy base coat was the best combo. Can you please help me understand the differences between these? Is a polyurethane top clear coat not recommended over the Polycuramine metallic?
Thank you
The clear polycuramine is the recommended clear coating within RockSolids’ lineup Jake. You can use a polyurethane top coat instead however. Just be sure to get it down with 24 hours after applying the RockSolid color coat or metallic coat. A high performance polyurethane is going to have better chemical and scratch resistance than the polycuramine. It’s also U.V. resistant as well.
I have a brand new garage floor. Do I have to wait to apply and if so how long? In addition, I forgot do I have to etch the cement since it is so new?
You need to wait a minimum of 30 days after new concrete is poured Norma before you can apply a coating. Yes, you definitely need to etch the cement. New concrete is freshly troweled and will resist penetration of the coating more than older cement. New or old, the most important part to applying any coating is proper preparation of the concrete. Poor prep is the number one reason coatings fail.
Was looking at doing this to my floor in the house. How well do the colors mix if you are going for a two tone look?
We aren’t sure to be honest Joette. In order to do that you would need to pour two different colored ribbons on the floor at the same time and then roll them out and swirl from there. The only problem is that it would require mixing two different batches at the same time which is too much to deal with at once. What you would have to do is cut the corners of each burst pouch from each color and pour the contents into separate containers and then mix equally as you go. We would love to see your results if you tried it though!
I tried this with the “Cherrybomb” and the “Copper Pot”. It takes a process that is a bit daunting and stressful in the first place to whole new heights. It was basically panic-inducing with all that rides on such a small timeframe. In my case, the floor came out alright, but not really two-tone – it’s more of a rusty red-orange with very little discernable contrast between the colors. My recommendation with something like that would absolutely be to have it done professionally if that’s the look you’re set on. If you can’t afford to do that, tho, I would highly recommend not trying it yourself and to stick with a single color unless the idea of a solid mix of your two tones is as appealing to you as one of the solids.
I am having my garage leveled by grinding it down; do I need to etch it in this case before applying the product?
Grinding eliminates the need to acid etch Nick.
When we applies the oroduct, it was applied in too thin of a coating. Cab we put a second coating on this product? If so, what is the time frame that we could do so?
Yes you can Suzy. RockSolid states you have up to 7 days to add another coat. After that you will need to rough up the surface with 100 grit sandpaper first before applying another coat.
I need to “seal” the edge between wall and garage floor, is there a recommended product that the polycuramine will stick well too; or opposite is there products that I should not consider (like maybe silicone)?
The edge you are referring to Nick is the expansion joint between the slab and wall. What you should do is apply the coating first and then run a bead of SikaFlex self-leveling sealant in that joint. That joint expands and contracts with temperature change and requires a flexible sealer. While RockSolid is a more flexible coating that standard epoxy, it will not flex enough for the joint and will crack around the perimeter after a period of time. Most flexible sealants for expansion joints (including SikaFlex) will not accept a coating. Keep in mind that there is a difference between expansion joints and contraction joints. If it was a contraction joint, there are fillers you could use. This article helps to explain the difference.
I am starting to put together the required number of kits to do my 2 car garage in the Silver Bullet finish, and was thinking about adding a pearlescent additive, in addition to the supplied metallic powder. I have a fair amount of experience with using these types of powders in automotive coatings, but really have no idea how much I should add to an epoxy coating. I’m thinking about adding a blue pearlescent powder to the Silver Bullet kit; thoughts on what type and amounts to be used? Thanks!
Hello John. We see where something like that could look nice, but you are in uncharted territory since these are designed as simple DIY kits and we don’t know of anyone who has experimented with them in this way. RockSolid’s metallic tint packs are 10 oz and mixed one per pouch. If we were to do this, we would start with 3 oz of blue in order to get some blue accent. Of course you can add more if you want more blue, but how much we can’t tell you for sure. If you do mix some blue in, let us know and send some pictures. We will be more than happy to let others know.
How do you think the appearance would be affected if I applied the metallic to the concrete and then overlay it with a clear coat with Rocksolid’s antiskid additive?
Will this dull the appearance? How else might this change the appearance or performance?
It will take some of the gloss out for sure Brad. It still looks nice, but it won’t have the mirror like finish to it.
I underestimated my square footage by about 50 square ft, so it came out fairly see thru and I need to add another kit, but there is a fairly large patch of green paint on the floor that is still quite visable as well as all the concrete patch lines. I was under the impression that it would cure solid, not transparent. Using the silver bullet, rock solid by rustoleum. Will adding another kit solve this problem or do I need to put a solid color primer down and then start over.
Hello Vicki. If you stretched the coverage rate of the coating and applied it over paint of another color as well, then what you see is not unusual. It’s usually best to remove old paint first and work with bare concrete. Regarding your patches, if you did not sand or grind them to blend flush with the rest of the floor, they can telegraph right through the coating. A second coat will take care of the issues of transparency and color uniformity since the coverage rate will increase. This is due to the fact that you will not lose any of the coating to the concrete. However, the repair areas may still show through.
Wow, I am disappointed with my first phase of the metallic. My garage has four, 87 sf sections so I thought one box per section would be sufficient. I was wrong, terribly wrong. I got about 65 sf covered with one box and that covering was thin enough to see the profile of the concrete. I decided to use a second box on the same section to get a thicker coat that would allow for the swirl texture.
Pretty disappointed that my floor will cost twice as much to complete.
How was your floor profiled Brad?
I used a floor grinder.
Interesting. According to Rust-Oleum the recommended coverage rate for the metallic is 100-125 sq.ft. It’s possible that your concrete is more porous than usual from the grinding and absorbed more of the coating resulting in the poor results for the first coat. We’ve always felt that the coverage rates for RockSolid is a bit generous and is why they are not fond of grinding if you can help it.
I would like to try using this product in my mudroom beside the garage. It’s a 3/4″ plywood floor. I haven’t seen any info online about the compatibility of this finish on wood. Should I use some kind of primer first to hide the wood grain? Should I prime it to have it seep in and seal the wood? Polyurethane coating at end for scratch resistance? This room is open to the rest of the house. Is there any volatiles when polyurethane is fully cured? The room has big windows, you stated polyurethane is UV protective as well. I was under the impression than polycuramine was 20x stronger than polyurethane. thanks in advance for your help/suggestions
Hello Jason. Metallic epoxy finishes show scratches much more easily than standard epoxy finishes. You will definitely want to add a durable clear coat to protect it. RockSolid is designed to be applied over concrete surfaces only and they will not honor warranty issues if it is applied to anything else. However, we know of some who have applied it to wood with satisfactory results. When applying it to wood you will need to sand the surface with 80 grit sandpaper first. Two coats may be needed. Wood primers are not compatible with epoxy or polycuramine. The RockSolid product is low in VOC’s and safe to apply indoors, however, a high performance polyurethane is solvent based so you would have to deal with some high VOC’s temporarily when applying it. A high solids polyurea may be better as most are low in VOC’s and U.V. resistant as well.
When applying a clear coat, you will need to let the polycuramine cure for a few days and then rough it up with 100 grit sandpaper to apply the clear coat. No manufacturer has done testing with polycuramine to determine if their product will bond chemically, so it needs to cure first and then be prepped mechanically to apply a clear. Read our article about polycuramine. It is not 20 times stronger than 2-part epoxy and it’s not as abrasion resistant as a high performance polyurethane or polyurea.
thanks for the quick reply. I think the two main reasons I thought of using polycuramine were the low volatiles and the ’20x harder’ quote. well, and the color choices too. Since I will be adding a polyurethane on top anyways how about just using a thick layer of it from the start with some color added? The volatiles don’t linger for too long? My floor is only 8′ X 12′ and working time wont be a concern due to the small size. I was even thinking of just pouring two or more gallons of the stuff and spreading it out to self level and avoid having to put a second coat. What would your first choice be for covering this plywood then? My daughter wants a cherry red floor….
Sorry for not replying back sooner Jason. We missed your follow up. Polyurethane can not be applied thick or you will have all kinds of problems. You can’t add metallic mix to it as well. That is why it’s used primarily as a clear coat or final color coat since it does not amber like epoxy does. What I suggest you do is contact GarageCoatings.com. They have metallic coating product in a low VOC epoxy and polyurea formula which you can use indoors. I believe it can be used on wood as well. Just give them a call and tell them your project.
my RopckSolid coating did not harden.How do I handle it
Generally it requires scraping the coating off the floor and wiping down the concrete with denatured alcohol to remove the remaining residue. You may want to give Rust-Oleum customer service a call and see what they can do for you regarding the issue. It may not have been mixed thoroughly in the pouch or applied in too cold of weather.
I want to put Rock Solid on top of my Epoxy covered garage floor. Would this be a good idea to go forward with. I guess I just need to know if it is possible to just use the rock solid ontop of the epoxy floor?
Hello Al. As long as the epoxy that is currently on your garage floor is still adhered well, you can apply RockSolid over the top. I will require that you clean the surface first and rough up the old epoxy with 100 grit sandpaper. We have an article about how to do that here. If the older epoxy is peeling in various places, you would be better off removing all of it first.
This product could be applied to any concrete surface, right? I’m wondering if I could use it on my concrete porch. The space is covered, but open on one side. Can you think of any reason why I shouldn’t try this on my porch?
You don’t want this type of coating exposed to the sun for any length of time Kelsey. If it is, it will amber (turn a yellow tint) from the U.V. rays. It’s designed primarily for indoors and garages. If it doesn’t see much direct sun, then yes, you could use it on your porch. If the porch gets wet from weather, you will want to add an anti-slip additive since it can get slippery. Just keep in mind it will reduce the gloss some.
Great Info!
I am planning to use the copper pot in my basement. It is minimum 1000 sqft. Do you have any advice on making sure the finish is seamless. I will probably use 8-10 burst pouches. Will I be able to apply to an area with pouch 1 then join that area with last pouche’s as I work out of the basement. I have the gunite spikes which should allow me to walk on floor. 1000 sqft need some careful planning
Thanks
Plan on a minimum of ten 125 sq.ft. kits James. It may be wise to have an extra on hand that you can return if you don’t use it. The key is to keep a wet edge going at all times. If you have a helper it can be done fairly easily. Have your helper mixing the burst pouches just before you are finished applying each kit. Your helper can then pour the epoxy out in ribbons just as you are finishing each application. If your garage is wider than it is deeper, start on one end and work towards the other. That way your wet edge is kept shorter. What ever you do, do not stretch the coverage rate. We suggest taping a spot on the wall that marks each 100 sq. ft. and keep each kit within that range.
Thanks for the quick response. I will definitely have 10 kits ready and mark off checkpoints. I’ll be able to move pretty fast…no brush work needed cause I’m install baseboard afterwards.
Lasthe question…I’m sure I can use muriatic acid but just wanted your feedback on the topic. I have bare concrete and only have to worry about drywall mud cleaning and dust. I don’t want to pressure wash…no floor drain, don’t “want” to remover threshold, and pressure washer may be too much for to depend on shop vac water removal. Do you have any suggestions on cleaning…I have 50 feet run. Open to threshold removal and shop vac use just would like your feedback
Grinding would negate the use of water James. You just need to use a good vacuum attachment to keep the dust down. If you do etch, you are going to have to use a wet/vac or remove part of the garage door threshold. We suggest using what Rust-Oleum supplies in the kits. It’s ECO safe and does a good enough job for the RockSolid coatings. Polycuramine penetrates concrete very well and the citrus acid etch seems to work fine. In fact, Rust-Oleum is not fond of using anything much more aggressive since the coating tends to have issues with coverage rates when you do.
Thanks. Good point with the coverage rates changing. I’ll just have to remove threshold and have a few squeegee’s going to push it out. It will only be hard at the end ofvthe 50′ run. And will use rustuleum etch from kit.
You’re welcome James.
I wanred to post a pic of the floors for an update. But don’t see how. But here’s the follow up cause I know this site is helping others
I pressure washed and etched with rustoleum product. But after reading directions it says indoor application’s don’t need to be etched. But I think I would of etched anyways. I also had to use the moisture stop cause after washing it took a long time to dry and the moisure test revealed problems. I also would recommend the moisture stop for any application. Just in case is better than problems later.
The only con with this product is the coverage. I ended up using 12 boxes!! And I’m sure I’ll need a 2nd coat to perfect the floors. I’ll wait on that til after all the defects become exposed.
Overal I give would rate it a 6 out of 10. But compared to high cost of epoxy I give this a 8 because of the DIY and epoxy swirl look
Thanks for all the help
Thanks for the update and review James. The instructions for indoor applications refers to inside the home, such as an entry way or kitchen for example. These areas don’t get vehicle traffic obviously, so you can get away without as much prep. Good job with the moisture test, you dodged a bullet by performing one! Yes, the big con with the RockSolid kits is the stated coverage rates. Unfortunately we can’t post images in the comments section, but if you like the way the coating has turned out, feel free to email us at info@allgaragefloors.com. We would be happy to add it to our gallery page.
My floor measured 16′-4″ x 14′-2″. So that comes to 231 sq. ft. So I purchased 2 kits. I barely had enough to finish the job (scraping the bottom of the pail).
I did a concrete floor that was very smooth. Never been sealed or painted and totally enclosed as a screened porch. So I etched the floor as directed and “thoroughly” rinsed it off and let it dry for over 24 hours under a 7 foot diameter fan 12 ft. above the floor. I turned the fan off during the application. The temperature was 75 degrees and not in the sun. All just perfect. But here’s bone to pick. It is hard to tell exactly how much per sq. ft. you are applying. The stuff is like a very heavy paint. You can’t tell if you have it thick or thin even with all the effort to do apply it evenly. Most of it is beautiful, but there are some 4 square inch spots where the roughness of the normal concrete finish shows. I was so busy worrying making the “circles” for the effects that I overlooked a couple “holidays” (painters term for not enough paint applied). How can I touch those spots up? Some clear coat? So yes, it is fairly easy, but experience by the end of the project helped me see my errors. Oh, and the best place I achieved a dramatic marble look was where I finished up at the doorway entrance. I used the 3″ brush to create some swirls and wiggle pattern to finish up. Most beautiful effect in the whole room. You really ought to put the stuff down with the roller, then pattern small 2 x 2 spaces as you go with the brush. My $280 worth of advice.
Thanks for reporting in with your results Dave. The reason it’s so thick is because it’s an actual coating and not paint. Unfortunately, there isn’t much you can do about the “holidays”. Epoxy – especially metallic epoxy – does not touch up like paint does. Unless you recoat the entire floor, touched up areas will stand out. You can watch the 1 year update video on our page from Mother Daughter Projects. They patched a few areas of their floor one year later. Though they did a good job of it, you can see where it was done.
One tip when applying coatings is to look at coverage rates closely, especially with RockSolid. They have a reputation of being a bit liberal with their coverage rates. The metallic epoxy kits cover from 100-125 square feet each kit. That means there is a potential of two kits covering only 200 square feet total depending on the condition of the concrete and how it is applied. It’s best to lay some tape down at a halfway point so you know how much area you have to cover for each kit. The other alternative is to have an additional kit handy in case you are running short. You can always return an unused kit.
this product looks gorgeous but is it slippery when wet?
Yes, it can be slippery when wet Beth. We suggest applying the RockSolid clear coat with an anti-slip additive if it’s a concern. Keep in mind that anti-slip additives will reduce some of the gloss.
What would be the best procedure for applying polyurethane as a clear top coat?
Hello Nicholas. We have had reports of people having success with a polyurethane if applied within 8-10 hours, but that is really all the info we have on that. Rust-Oleum will not recommend it since it’s not their own product. We do know, however, that if you let the RockSolid cure first and then degloss the surface by roughing it up with 100-150 grit sandpaper, you can apply polyurethane without issue. This is the safest way to apply it.
Hi Shea,
I want to make sure I understand what products can be used to clear coat over the Rocksolid polycuramine. In one of your 2016 replies you indicated that a clear polyurethane can be applied over the the polycuramine if done so within 2hrs of the the application. In another reply you indicate that the polycuramine would need to be sanded with 100 grit paper prior to polyurethane application and perhaps this was the case since the clear coat was being applied later that 24 hrs from the initial application. I would like to use either a polyurethane or polyurea to protect the polycuramine given their advantages(non yellowing, harder, faster drying, etc). My preference would be Nohr-S but their reply has been to use this product only over their own epoxy(as I suspect it has not been tested). Your quick thoughts on this are appreciated as I would like to purchase products ASAP. Thanks
Hello Jim. Most thermosetting resinous coatings (primers, color coats, clear coats, etc) will bond chemically if applied within the manufacturer’s stated “recoat window” of the coating you are applying it to. However, if testing has not been done by the manufacturer they will not recommend it nor stand by their product. A lot of this has to with marketing reasons. Companies do not want to promote other companies products. Sometimes if a company does not carry a particular type of coating, another company may do testing to verify compatibility in order to fill that niche.
We have had reports of people using a polyurethane on RockSolid with success when applied after 8-10 hours, but that is all the info we can offer regarding that. We do know that when mixing different brands of most coatings (including RockSolid), if you let it cure first and then rough up the surface for a mechanical bond there will be no issues. This is always the safest way to approach it when mixing product. Staying within a manufacturer’s stated line of products is always the standard recommendation, unfortunately, RockSolid only offers the same product in clear. As an example, Legacy Industrial has epoxy (including metallics), polyurethanes, polyaspartic, and polyurea that can be used on most of their coatings. I hope this didn’t confuse the issue for you.