
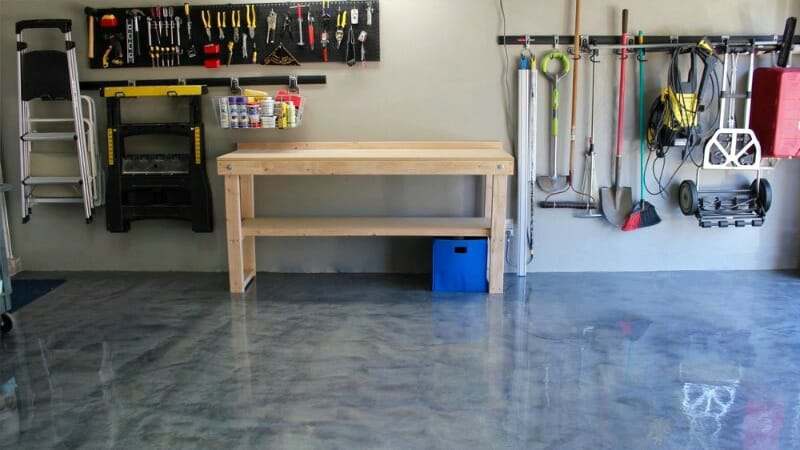
A metallic coated garage floor can create a stunning and exotic visual appearance. However, cost and the moderate to difficult application process has kept all but the fearless DIY enthusiasts from considering this epoxy flooring option. Fortunately, the application anxiety and cost has slowly started to change with the introduction of RockSolid’s Metallic garage floor coating kits.
Update!
We have a one year review of a Silver Bullet RockSolid metallic installation from Mother Daughter Projects. You can read about their results and watch the video of their review further below.
In 2014, RockSolid upped their game by introducing their new Polycuramine epoxy formula to the DIY garage floor coating market. It was developed to compete with the traditional garage flooring kits produced by Rust-Oleum, Quikrete, and Valspar as an example.
If you are unfamiliar with Polycuramine, you can read our review of the RockSolid garage floor kit. It is this same Polycuramine formula with the patented burst pouch technology that is used for their metallic floor coatings.
 When RockSolid first introduced their metallic floor coating, it was marketed as a home interior product only and was available in 4 metallic colors.
Recognizing the need for a DIY friendly metallic garage floor coating, Rust-Oleum now markets the RockSolid metallic coating as a garage floor kit, available in 8 metallic colors.
These colors include Silver Bullet, Copper Pot, Earth Brown, Cherry Bomb, Amaretto, Gunmetal, Burnished Gold, and Brilliant Blue. You can view samples of these colors from Rust-Oleum’s information page here.
The short video below has some good examples of the various metallic colors on a garage floor.
RockSolid vs other metallic coatings
So what makes RockSolid metallic coatings different from the other metallic coatings available?
Until recently, most metallic epoxy coatings are of the commercial variety. They generally require a coat of dark epoxy primer to be applied first, followed by a coat of a 100% solids metallic epoxy mix, and then a top coat or two of clear polyurethane or polyurea.

The process requires dripping solvents onto the floor after the metallic epoxy mix has been applied. The solvents create movement within the metallic pigment which creates the different designs of molten rivers of lava and moon craters that make these coatings so interesting. Some manufacturers incorporate blowing the surface with air in order to get the same movement of the pigment.
Knowing that this process was too involved and cost prohibitive to the average DIY enthusiast, RockSolid Metallic takes on a completely different approach.
Using their patented Polycuramine formula, a metallic pigment is mixed into clear Polycuramine and applied directly to a properly prepared, bare concrete garage floor. Unlike the other metallic epoxies, a dark primer coat is not needed and solvent is not dripped onto the epoxy surface.
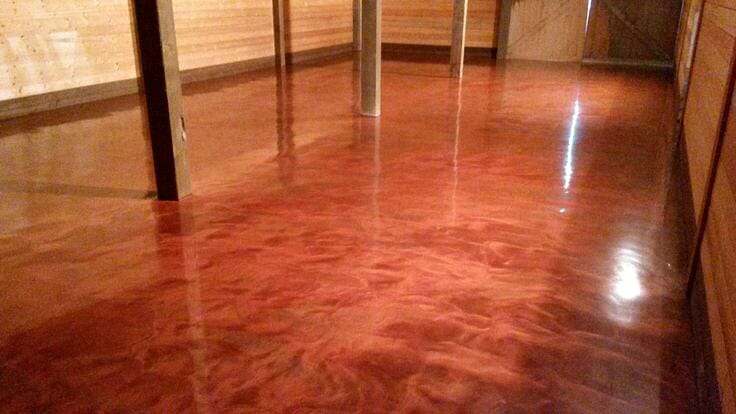
While the coating does not create quite the same 3-D effect of the commercial equivalent, it does provide a very glossy and cloudy appearance of the metallic colors that is very pleasing to the eye.
Applying RockSolid metallic garage coatings
This is where the metallic floor coating kit really shines. It is applied in the same manner as the standard garage floor kit. The only difference is mixing in the metallic pigments with the Polycuramine and going over the coating with the required circular motions of the application roller.
RockSolid provides an eco-friendly etch solution to clean and prep the concrete surface. Any heavy dirt, grease, rust, or oil stains should be cleaned prior to the use of the etch solution. The etch solution works by opening up the pores at the concrete surface in order to create the proper substrate for the Polycuramine to adhere to.
Once the concrete is completely dry, mix the burst pouches and add the metallic pigment according with the RockSolid directions. Once it has been mixed, you will cut-in your edges for each section with a 3” brush. You will then pour 3”- 4” ribbons of the material onto the floor in 5’ sections. Roll it on and then work the area in circular patterns with the application roller.
RockSolid metallic coatings can be walked on within 12 hours. We recommend that you wait 24 hours before moving items back into the garage and a minimum of 48 hours before driving on it. Even then, we recommend parking on cardboard for another day or two while the coating continues to cure.
How difficult is it really to install?
Lately we had been getting enough questions about this floor coating that we started to make plans about doing a separate write-up on it. What finally got the ball rolling for us was when we were contacted by Steph from Mother Daughter Projects.
As it turns out, Steph and her mother Vicky had just installed a RockSolid metallic coating in Silver Bullet on Steph’s garage floor and she wanted to share the results. Steph did a great step-by-step article with plenty of photos on what was required. This included listing a couple of mistakes and what she would do differently next time.
This is a great video of their RockSolid metallic application
Considering that she had old paint on her floor to contend with, the results of her installation are fantastic. It would have been easier if they had a bare concrete floor to work with, but those are the obstacles that have to be addressed sometimes when installing a floor coating.
Review update
We were recently contacted by Steph from Mother Daughter Projects about a one year review they did of their installation. Overall they have been very satisfied with the coating though they did need to make some repairs for hot tire pickup. After further examination, it looks like the reason for the repairs most likely had to do with the condition of her concrete at the time of installation and was not a result of product failure.
Though they had some issues with Rust-Oleum shipping out damaged product, they did a great job with the repairs that needed to be made. They also provide excellent information about what they have learned over the year as well as documenting how the floor looks after the many projects that have been done in Steph’s garage.
You can read their article here to get a more detailed explanation of what they have learned and how they like the performance of the coating.
Important tips
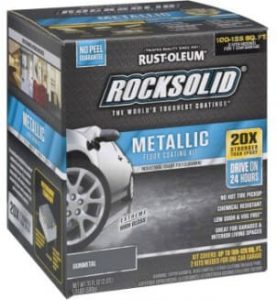
The first thing we want to point out is that the coverage rate for RockSolid metallic coatings is 100 – 125 ft² per 70 ounce burst pouch. That is half that of their standard garage floor kit. The reason for this is that the metallic coating is applied at twice the thickness in order to obtain the deep, cloudy look that metallic epoxy creates.
So a typical 400 – 425 ft² 2-car garage floor will require approximately four 70 oz. burst pouches instead of two. The kit even comes with a thicker 3/8” polyamide roller for the application.
Do not attempt to stretch out the coverage rate. If your math puts you 50 ft² short, you will need another pouch. Stretching out the material will result in a less glossy surface that will lose depth in appearance.
If it’s in the budget, we recommend applying a clear coat of Polycuramine over the metallic coating as well. This not only helps to increase the longevity of the floor coating, the additional clear coat will also act as sacrificial layer and protect the metallic color from scratches.
Another additional benefit of a clear coating is the ability to recoat the surface at a later date. This can make a garage floor coating look brand new again. All that is required is cleaning the floor and then roughing up the surface with 150 grit sandpaper before application.
Where to buy
RockSolid Polycuramine coatings are now available at many home improvement centers, hardware stores, and big box retail outlets since it was first introduced. Menards and Home Depot are an example. Amazon is one of the better places to find a large selection. You can view the latest pricing here.
It really does pay off to shop around. We have found that pricing can vary as much as $30 a kit depending on sales and where they are purchased.
Final thoughts
If you have wanted a metallic coated garage floor but were too intimidated by the installation process and/or the price, then this RockSolid metallic coating is definitely worth a look. We have continually been impressed with the beauty of this coating for the minimum amount of work it requires.
One thing to keep in mind however is the very glossy nature of metallic coatings tend to show scratches more than a traditional garage floor coating. If you have a very active garage with numerous projects and automotive repairs for example, then this type of coating may not be for you. This is especially true if you are worried about keeping the look pristine.
However, if your garage is more of a showcase to park your vehicles, make light automotive repairs, and refrain from hard core projects, then this flooring just may fit the bill.
Hi, I have question about metallic epoxy coatings on my garage floor. My garage is around 280 sq ft, I assume 3 box of metallic epoxy coatings should be good enough for the job. My question is I would like to put the top clear coating on top of the metallic epoxy coating, I am wondering how long do I have to wait until I apply the top clear coating? I plan to use RockSolid Clear Polycuramine Top Coat, do I need 1 box or 2 boxes? thanks for your advise.
Hi Daniel. You need to wait a minimum of 8-10 hours before applying a second coat. RockSolid allows for up to 7 days for a recoat. You will need 2 boxes for 280 sq. ft. One box only covers 200-250 square feet. You cannot stretch the coverage rates of coatings without bad results.
I have used epoxy to fill the gap, do you recommend to use primer to paint the filled gap? I plan to print only one coat of metallic epoxy and one coat of clear Polycuramine Top Coat, but basic on the recommendation from Steph from Mother Daughter Projects, she suggest to put a primer on top of the gap. If I need to put primer or other epoxy paint on the gap, which brand and type of paint do you suggest? Thanks,
Hi Daniel. Can you elaborate a little more about the gap? What are you referring to exactly and what kind of epoxy did you use?
There are floor crack, the wide is around 1mm-3mm, those gap are very minor and I have used Rust-Oleum Rocksolid Fast Patch Concrete Crack Repair Kit to fill them. My question is do I need to put floor primer on the filled area before I put RockSolid Silver Bullet Metallic Floor Coating? Or should I put Metallic coating directly since I will also put the clear coat after either way.
Hello Daniel. The key with any crack repair is to make sure the repair has been ground flush with the rest of the concrete. It’s just like repairing wood or a dent in a fender. If the repairs are not sanded smooth to blend with the surrounding area it will show through. If you use a primer, it has to be an epoxy primer and it needs to be applied to the entire floor, not just a repair. You cannot use concrete paint primer as the two products are dissimilar materials (acrylic vs epoxy), they will not chemically bond, and the acrylic is of inferior quality. A primer is always a good idea when applying a metallic epoxy, but people who purchase the DIY kits such as RockSolid tend to shy away from it due to the additional expense. Most epoxy primers are typically $110-$120 dollars a gallon at a coverage rate of 300 square feet.
Thanks for advise, and I will sand the gap before I apply the metallic coating.
Question:
I got some bubbles when I applied the Rock Solid floor coating. I’m planning to sand those out. How long do I need to wait before I can sand the floor?
Also – I will need to refinish over the sanded surfaces … can I add paint thinner or mineral spirits to another box of the Rock Solid Metalic so that I can stretch the material to cover the entire floor? 420 sq ft. I’ve already used 4 boxes.
You can sand after 24 hours Steve. RockSolid cannot be thinned. It’s a thin coating as it is that experiences issues already from people trying to stretch it out. Plus, thinning will increase the color translucence and you will not get a consistent solid color.
Question:
I applied the Rock Solid Metallic Earth Brown to my garage. After the second coat we waiting and applied the top clear coat. Wherever we poured the clear coat it retained the white color even though we rolled it out. This only happened in the pour spots. Will that go away and if not how do we fix it?
Hi Matthew. Most likely the areas where you poured out the clear were not rolled out enough and is much thicker than than the rest of the coating. Our guess it that the particular formulation that RockSolid uses for their DIY kits does not like being applied too thick. The white color is from the coating curing very slowly. Give it a week to slowly cure and hopefully it will turn clear. If it doesn’t, your only alternative would be to sand or grind the uncured section down to the color coat and reapply the clear. We suggest you give Rust-Oleum customer service a call to verify.
I did not see any comments about winter salt dripping from cars and sitting on your product? How well will this hold up to three months of winter and salt?
Hello Jeff. Just to be clear, we don’t manufacture or sell product. RockSolid is a product of Rust-Oleum. In terms of your question, RockSolid will do fine against winter salt as long as you don’t let it set for 3 months. You should clean the floor of the salt residue a few times during the winter. It you don’t, you run the risk of deglossing the finish and possibly developing some light staining.
Can you apply it to any other surface (other than concrete)?
RockSolid does not warranty it for any other surface that we are aware of, Tim. However, most coatings such as these can be applied to some other surfaces if prepped properly. It’s just not the best choice of finishes for other surfaces in most cases.
My home was built in 1949 and had the original red and white chip formica coating. I repaired some knife gashes, lightly cleaned it with steel wool to take off any surface issues and then sponged it with red and white acrylic paint as an undercoat so that it would show through. I used the rock solid in clear first on the backsplash since the original formica was in good shape there and I used rock solid metallic coating in cherry bomb on the horizontal surface. It is holding very well, is easy to clean and gets a ton of compliments. I plan on using it in my basement and garage as they are adjoining and depending how well that works will use it on the kitchen floor to match the counters. So far it is awesome.
What is the difference, if any, between the durability of the metallic and the regular Rock Solid product?
Technically there is no difference in the durability between the two, Mike. However, the metallic coating is required to go on thicker which is why the coverage rate is half that of the standard coating. As a result, in terms of wear it would last longer, but two coats of the standard coating would be approximately as thick as the metallic coating and wear just as long. Keep in mind though that the metallic coating will show all the small scratches and dirt much more readily than the standard coating due to the high gloss metallic finish.
I am considering using this product on my basement rec room floor. I am worried about it being slick with socks on – most the time people will not have shoes on since it’s indoor space. Can you elaborate about the slickness? Any floor can be slick – would it be like a wood floor in comparison? Thank You.
Hi Lana. The metallic floor is exceptionally glossy which will make it like an ice rink with just socks on. Floor coatings like this one do get less slippery as normal traffic develops microscopic scratches, but it would still not be advisable to wear just socks. It may be like a freshly waxed wood floor after it’s had some traffic. RockSolid does offer an anti-slip media that you can mix into the last coat, but it will reduce the glossiness of the floor somewhat.
I want to use this product on a second floor outdoor deck that now has ceremic tile and leaks to the room below. Will it work
thanks
Hi Nick. Epoxy can’t be used for outdoors. It’s not U.V. stable. The coating will amber (turn a yellow tint) and may even begin to chalk. Also, you cannot apply epoxy over ceramic tile. The surface is too smooth.
Hi. We just purchased another home with that speckled gray garage floor. Since we have the gun metal gray rustolem on our current garage floor can I duplicate it over the speckled garage floor?? We LOVE our epoxy floor and highly recommend doing it. After you get the hang of application, it’s pretty easy, but a two person job.
Hello Betty. What exactly do you mean by speckled gray floor? Is it an epoxy coating you are referring to? If so, you can rough up the surface with 120 grit sandpaper and then apply the RockSolid over the top of it.
Hi there,
I just done my garage floor with Rock Solid, Gunmetal Grey Metallic, im in Australia so I done the job at night to work with the cool rather than against the heat of the day. Unfortunately, working under lights threw me a bit with the shadows & I have applied it uneven in spots which spoils the whole job as it looks awesome. How do you recommend I prepare what I have just done before I apply a top coat to cover the uneven patches.
Hello Grant. RockSolid allows up to 7 days to recoat without any additional prep so you are good there. However, if it’s a clear top coat that you plan to apply, it will not fix the current problem that you have. The reason is because the coating is clear. Everything that you see now you will still see once the the clear coat in on. The only way to fix the issue of it looking uneven would be to apply another coat of the Gunmetal Grey Metallic.
I am wanting to do a tile effect with Cherry Bomb and Gunmetal, we have a 10 × 24 ft room in our basement. Would you suggest putting painters tape down to get the “tiles” I want and then put the clear coat over top?
Hello Jenna. Creating a tile effect with concrete coatings can be done, but it is very time consuming and difficult. Remember, coatings are not like paint and you only have a limited amount of time to apply them once mixed. They are also much thicker than paint and create thick edges if you are not careful. You will need to tape out the entire floor for the first color, remove the tape, and then re-tape again for the second color. On top of that, you need to pull the tape at the correct time. Pull it too soon and the coating will run. Wait to long and the tape will stick in the coating. You need to use high quality painters tape and make sure to press the edges in good. It may require sanding of the coating with a 100 grit sanding screen on a floor buffer afterwards to get all the edges to smooth out. The sanding will make the color coat dull, but a clear top coat over the color coat will bring the shine back out and protect the color coat.
So would it be best for me to paint the floor and then put the top coat on?
No, not for a garage floor Jenna. The paint will peel right up off the concrete from hot tires. Also, you would only be able to use a water based clear epoxy for the top coat since most coatings are not compatible with paint.
Do you know the approx. timing to get the tile effect done? How long would the tape need to be down and how long before it has to come up?
Hi Jenna. It’s going to be somewhere in the 30-60 minute range. We highly recommend doing some testing first to determine that. You can mix a small quantity of the product at the correct ratios to help figure it out. Professional installers who do that type of custom work do the same thing when using a product that is new to them.
Hi, quick question about the RockSolid non-metallic (or both for that matter). Would it be possible to coat the top of the RockSolid with a polyaspartic or Polyurea top coat? Would there be any adverse chemical reactions that would damage the RockSolid? I am Considering this as a low cost alternative to a full DIY Polyurea / polyaspartic floor coating kit.
Hi Jesse. Yes, you can apply either of those to RockSolid if you allow the coat to cure for a few days first. You then would need to rough up the surface with 120 grit sandpaper and apply your clear of choice. The reason for this is that the chemical bond between RockSolid and other coating has not been tested or approved by other coatings that we are aware of. If you are fine with a traditional color coat, our recommendation would be to apply the Rust-Oleum Professional EpoxyShield first and then apply your clear of choice. Rust-Oleum Professional has a higher coverage rate and does not go on as thin, thus avoiding the cosmetic issues that some have with non-metallic RockSolid. Plus, polyurea or polyaspartic can be applied to the Rust-Oleum within 24 hours for a chemical bond.
My apologies for posting the question twice.
So I’d need the RockSolid kit, the the Rust-Oleum epoxy shield, and then the polyaspartic on top of both of them??
No worries, Jesse. The answer is no. If you want to apply a polyurea or polyaspartic clear topcoat over the RockSolid Metallic, you would need to let the RockSolid cure for a few days, then degloss the surface by roughing it up with 120 grit sandpaper, and then apply the clear topcoat. RockSolid is a proprietary blend of coatings called polycuramine. No manufacturer or anyone that we know of has tested or will approve the chemical bonding ability of any other coating to polycuramine. That is why it has to cure first and then be roughed up for a mechanical bond. If you don’t go with metallic and opt for a traditional grey or tan color instead, we then recommend applying the Rust-Oleum Professional EpoxyShield to your concrete (not RockSolid) and then a polyurea or polyaspartic clear topcoat since these are known to bond chemically with the solvent based epoxy.
Shea,
Now I understand (I think). RockSolid has a basic set that is non-metallic with the flakes which is what I was looking at purchasing.
But that product in particular uses the polycuramine, for this one, I can’t use a Polyurea top coat, but if I use the EpoxyShield with flakes, then I can use the Polyurea top coat. If I use EpoxyShield, can I then use the ArmorPoxy SPGX TOP COAT WITH anti-slip? Or what do you recommend to be used on top of the EpoxyShield?
Thanks and sorry for the ignorance.
You are correct, Jesse. As long as you use the Rust-Oleum Professional EpoxyShield you should be fine. The SPGX will bond chemically with it. Before you do that, however, we suggest giving ArmorPoxy a call and have them price out the complete cost for a coat of SPGX color and coat of SPGX clear. You may find that it’s close to the same price range as the former. Just tell them we sent you.
I gather it’s not required but would using an epoxy primer help ensure a better surface for Rock Solid Metallic floor coating (Polycuramine)? I see videos with lots of air bubbles and other imperfections, so I’ll invest in the primer if it will improve results.
If so, is there a recommended primer/brand? Are there any other instructions you can provide for using a primer first?
Hi Felicia. We answered the majority of your question yesterday when you posted it in the primer article here. Just scroll down near the bottom to read it. Epoxy primers are not found at home improvement centers and must be purchased from floor coating vendors who specialize in commercial quality product. This here is an example of a good primer.
Our recommendation if you want to use the RockSolid product is to just apply two coats. The first would act as the primer coat and the second would be your finish coat. If it’s a metallic that you want to apply, we would suggest applying the grey standard color first (it’s less expensive per square fooot) and then the metallic coat. This will ensure a more accurate coverage rate for the metallic since it’s not getting absorbed into the concrete and there is not additional prep needed since you are using the same product (polycuramine). RockSolid allows up to 7 days for recoating.
Have you any input about mixing the rocksolid metallic colors, I.e. adding some of the brilliant blue to the gun metal? Say, mixing three gun metals with one blue, then splitting the shavings into 4 batches again? Or applying a second layer of grey over a blue “primer” layer, or vis versa?
Thank you
Hi Kevin. We wouldn’t recommend it and will try to explain why. RockSolid Metallic was designed with the novice or first time installer in mind. For simplicity it requires that you work out of a paint tray as you apply it and follow up with the swirling action of the roller as you go. It makes for a simple application process that provides fairly consistent results and is hard to mess up.
Unlike RockSolid, traditional metallic epoxy floors use much thicker 100% solids epoxy. It requires that you pour all of the product out onto the floor in ribbons immediately after mixing. It is then spread out with a gauge rake or squeegee then back rolled. To get the two tone color effects for these types of floors, the main color is dispersed in ribbons first, followed immediately by a secondary color in ribbons for effect. The two ribbons of color are then spread with the gauge rake and back rolled. This is how the smooth transitions of different colors is accomplished. Some require the addition of small drops of solvent to get the looks of craters and etc. Each floor looks different and they all require a little bit of artistic abilities. Installers get better with experience. We have seen some first time floors that frankly looked awful.
If RockSolid is poured out onto the floor in this manner it would reduce your coverage rates by less than half. It may also result in small pinholes and bubbles in the finish as the small amount of solvents in RockSolid try to escape from the thicker than normal application. If you were to apply a small amount of the blue over the gray immediately after the gray was back rolled and swirled, you may be able to get some of those effects, but then again it just might blend into a steel blue color. You could always mix a very small batch of each and experiment first.
Instead of doing that, we would recommend applying products that are designed for the type of look you want in the first place. Pure Metallic is an example of a company that sells kits tailored for the DIY installer as well as the professional. You may find that the cost is not that much more as well.
Thank you Shea, your advice is sound. I’d like to elaborate on another approach. If I have 3 kits of gunmetal, and 2 kits of brilliant blue, they each have containers of the metallic dust to be mixed into the 2 part epoxy resin, then rolled onto the floor. Do you see any issue with mixing the metallic dust of each kit into a single batch, then dividing it evenly by weight with an accurate scale. That would in essence, mix the colors, while continuing to follow the installation instructions of rolling out the product.
Either that, or simply mixing two of the batches and rolling them out together at the same time overlapping?
I know, I’m being stubborn and sticking with a single product line. I’m slow and the wife has already begun hounding me for leaving my garage cabinets in the living room for so long.
Hi kevin. No, you cannot premix two or more colors of the metallic additive together. All it will do is produce one single metallic color just as mixing tint for paint does. Metallics have to be premixed separately and then combined on the concrete as previously stated. Again, one of the problems you have is that RockSolid is not designed to be applied in such a manner.
Yes, you can try applying the two different colors at the same time by immediately rolling over one color with the other and swirling together, but there is no guarantee that will work to your satisfaction. I highly recommend mixing a very small batch of each and experiment first in an inconspicuous area before you attempt that.
Hi there, we’ve did our garage floor in the grey rustoleum with specks and are loving it. We have porcelain off white tiles in our kitchen and we are looking to re-do the flooring with the copper metallic rustoleum. Question: The pack we purchased says that it is suitable for use on tiles, so we are presuming it’s okay. Any particular prep needed for tiles? a primer perhaps?
Do we have to use a patch/crack repair kit to cover the grout in the tiles? or will the rustoleum cover it up on application? I guess we don’t mind if it’ll still look like rustoleum tiles, as long as I don’t have to deal with the white floor again!
Thanks in advance
Hi Maria. Applying a coating to tiles is always risky. The reason is that scuffing up tiles enough to provide good adhesion, particularly dense tile such as porcelain, can be tough and labor intensive. Rust-Oleum actually says in their data sheets to contact them first before applying to tile. Also, the Rust-Oleum coatings are thin. They will not fill-in irregularities and grout lines. It will provide the appearance of tile that was painted a different color. To get the smooth look you would need to fill in all the grout areas with a 100% solids epoxy first. You would be better off to just remove the tile and then prep the bare cement with grinding if you want to apply a coating.
Appreciate the review and information. Thinking about using this on a basement floor. For best results would you recommend a primary thick coating or a slightly thinner first cost with second coat followed up after 24hrs?
Hi Chris. The metallic version of RockSolid goes on twice as thick as the standard version. That’s why the coverage rate is half that of the standard coating. You shouldn’t have any issues with the metallic version if you stick to the coverage rates.
Hello. I have two hundred square foot rectangle. I want a thicker feel. It has an epoxy grey primer I’m applying the black pearlesents.
I was going to use two kits but then I thought three just to get great coverage. What your thoughts and can I clear coat with epoxy shield after 12 hours. And the primer was done a day ago it will be 5 days when the RockSolid is applied
Thanks
Hi Berlin. You need to be careful how thick it is applied in one coat. If it goes on too thick it will create bubbles from the solvents escaping as it cures. The primer effectively blocks the coating from being absorbed into the concrete so you are going to get good coverage to begin with. Divide your area in half and apply one kit to each half. If you want it to be thicker, then use two more kits in the same manner. You can apply a clear coat after 12 hours.
I’m planning to replace my cement garage floor with new concrete. Is there any prep work required on new concrete?
Hello Ron. Yes, whether your concrete is new or old you still need to do the proper prep work for coatings. In fact, new concrete needs it more than old many times due to the smoother troweled finish. There is only one coating that can be applied without prep work if the concrete passes the required test. You can read about it here.
I have just completed coating my garage floor in metallic blue and had a few issues with the product .
First one was that one of the foil bags for the 2 part epoxy was leaking when the box was opened so i had to have that replaced .
Secondly it became very obvious that the stated coverage ( 23sqm) was rubbish , to get the desired finish as shown on the box you only get about 10 sqm per box so that blew my budget out badly .
Thirdly you CAN mix more than one of the epoxy bags at one time and realisticly it goes on so fast doing only one bag at a time is a waste .
Fourthly beware the rollers as one had the covering come off during coating which made a mess that had to be fixed after it dried and use the rollers to spread out the coating rather than using them in a traditional rollon manner , it works better that way .
Fithly and this is really important and they don,t mention it in the instructions is that if you are going to have to mask tape anything up DON,T use paper masking tape or newspaper as this product will soak straight through and glue it to what ever you are trying to protect , use a plastic masking tape that will not allow this product to soak through , belive me when i say it was a real pain to clean up .
Lastly try to do the whole job in one go as you WILL see the join lines and pour the mixture onto the floor and spead it out with the roller as stated above and DON,T work it to much with the roller as it can develop bubbles in the finish which are another pain in the butt to fix .
All in all i like the finish , it looks great part from the join lines as i didn t have the luxury of doing my whole garage in one application , i give this product 6/10 based solely on the basis of the inaccurate information on the product which more than doubled the cost of the project .
Hi Peter and thanks for your review. We agree about coverage rates with RockSolid and have stated so many times. They need to either add more product or reduce the stated coverage rates. We do not recommend mixing more than kit together at a time. If allowed to sit in the bucket for any length of time or if the person is somewhat slow at application, it WILL begin curing at a much faster rate and thicken up as you go making it difficult to apply correctly.
Hello,
Great advice, thanks for taking the time.
1. You mentioned a primer so the more expensive rock solid metallic gets better coverage. Can you please specify which products would work?
2 planning on using it in an unfinished basement. Do the expansion joints need to be filled in? If so,can you specify products?
3. Heard that due to potting time, it’s advisable to use the mixing bucket for only two boxes at a time? (Project is about 600’sq
4. (Lastly) can one color be applied over another? Eg going with metallic blue for water look, and thinking of edging it with burnished gold for sand look on edges
Thanks!
Hi Dirk. Have you conducted a moisture test during the wettest periods of the year in order to determine if a coating can be used? Basement floors traditionally develop moisture unless a vapor barrier was installed prior to the concrete being poured. Coatings do not tolerate moisture in concrete very well.
1) RockSolid metallic does not require a primer. However, if you want to use one we recommend applying one coat of RockSolid polycuramine in the black color. Dark colors help to create more depth in the metallic coatings and the black RockSolid is compatible with the metallic RockSolid for recoating.
2) Do you have expansion joints or contraction joints? Only one can be filled to coat over. This article here has the information you are looking for.
3) Do not mix more than one kit of RockSolid at a time! Doing so can accelerate the thermosetting coating and cause it to cure faster than it can be applied.
4) Yes, you can apply a different color over an existing color. Because there will be a raised edge where the one coat overlaps another (due to the inherent thickness of coatings vs paint), we recommend applying a clear coat over the entire process in order to reduce the noticeable edge and create a smoother transition from one color to the next.
Can you add glitter to the metallic rock solid?
Hi Armani. Technically, you can add glitter to most any coating. However, it requires a lot of glitter and can overpower or detract from the metallic effect of the coating.
Hi
Can I use metallic rock solid over a vinyl garage floor
Hi Yuna. No, RockSolid can’t be applied to vinyl. It will peel right up.
Hi,some of the YouTube videos I’ve watched say it would be beneficial to rent a machine to remove the top layer of the concrete to prepare for better adhesion.My floor is not previously painted but does have some old spray paint stains here and there. Do you recommend “sanding” the concrete with this floor machine?
Hi Joanne. Many of the videos that reference grinding the concrete are applying commercial quality, multi-coat epoxy, and metallic epoxy systems. RockSolid is not such a product. It comes with an eco-friendly citric acid etch to prep the concrete. If you grind, RockSolid will adhere well, but the coverage rates will go down and the first coat will cure too thin and not look good. This is due to how much gets absorbed by the concrete from grinding. This is one of the reasons that Rust-Oleum states in the data sheets not to grind. Just sand off the paint overspray and then use the supplied etch for the best outcome.
Hi I just recently applied the rustoleum metallic epoxy floor to my primed concrete floors, it looked great and glossy but then we made the mistake of trying to clean the floors with a mop and soap before putting a sealant over it, and now the floors are cloudy and not glossy! I’ve been trying to research all morning about how to fix the cloudiness, learned a little too late that soap is NOT the way to go for cleaning the floors. Is the cloudiness permanent or is it fixable? Does acrylic sealants work over the polycuramine or do I need a special sealant and sand the surface first? Please help!
Hello Rocky. Yikes… As you found out, you never use soaps on a coating between coats. How long was the coating down before you mopped it? Also, acrylics are not as durable as epoxy or polycuramine. The number one rule for coatings is that the clear coat should be equal to or better in performance than the color coat.