
Learning how to grind a garage floor for an epoxy coating or paint hasn’t always been the easiest or most straight forward of projects for the average homeowner. It frequently raises more questions than answers and can lead to frustration when trying to figure out the best way to do it. Many of these questions relate to what type of grinding equipment to use.
While it is not the most difficult thing to do, trying to figure out the right tools to rent or buy can be daunting. Plus, dust control can be an issue unless you spend more money for the proper vacuum equipment. With so many choices, it can get plain confusing and even expensive.
Our objective here is to present to you an easier and more economical way to grind your garage floor. It can typically be accomplished in less than a day for most standard 2-3 car garages.
Besides helping to eliminate the confusion and questions that arise, it will also instruct you how to provide a nice profile for your coating of choice. It’s just one less thing to worry about when learning how to epoxy coat your own garage floor.
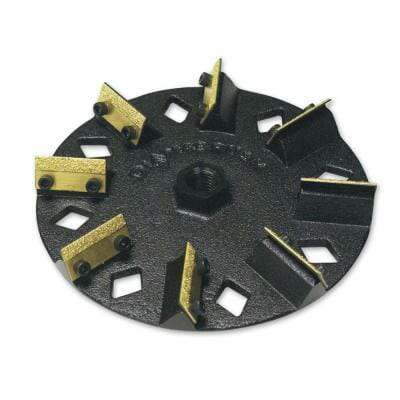
Diamabrush Concrete Grinding Tool
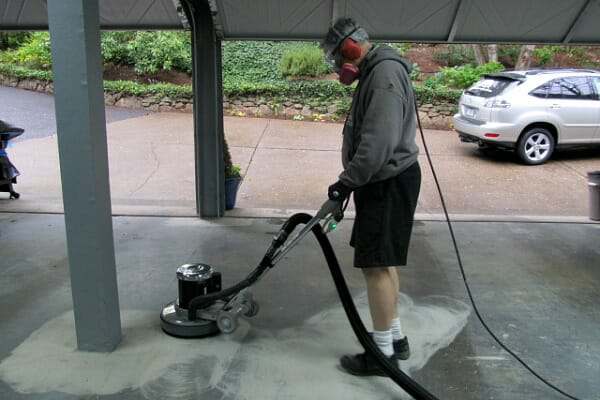
Fortunately, a company called Diamabrush has introduced a concrete prep tool that attaches to the bottom of a floor maintainer. It is available for use from a large assortment of rental companies. The Diamabrush is a great choice for garage floors that are in relatively good shape to begin with.
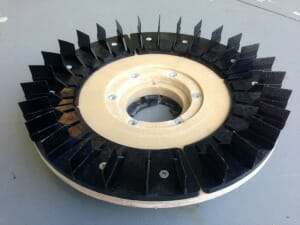
The Diamabrush consists of a series of diamond coated blades that are attached to a buffing wheel.
These blades abrade the surface of the concrete to provide the proper profile for an epoxy coating.
This process of grinding your garage floor is much easier to manage than the traditional 7″ angle grinder with a concrete turbo cup wheel. Plus, it keeps you off your knees.
In addition, the large size of the tool covers more area. Furthermore, the flexible blades prevent grooving or kiss marks that can happen when a turbo cup wheel is not held flat and goes up on edge.
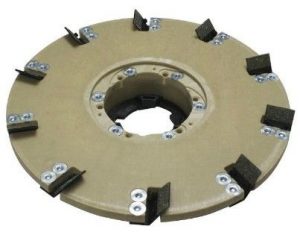
Diamabrush also offers a separate removal tool that is used for removing old paint, thinset, mastic, or even thin epoxy coatings.
You can identify it by the smaller number of diamond blades compared to the prep tool.
If you use this tool to remove old paint or a thin coating down to bare concrete, it will prep the concrete surface at the same time. You will not require grinding with the prep tool afterward. Diamabrush does not recommend the prep tool for removing old paint and thin coatings.
The nice feature about both of these is that they can be used either on a wet surface to avoid concrete dust or you can attach a dust shroud with a shop vacuum to grind dry. Dry grinding with the proper attachments prevents the heavy concrete dust or messy cleanup of a wet slurry.
Note: The Diamabrush is not an aggressive concrete grinding tool that can remove heavy layers of concrete. For example, it will not level high spots or smooth out heavily repaired areas of concrete. You will need to use a turbo cup grinding wheel or a more aggressive grinding machine for that type of work.
This post may contain affiliate links. If you use these links to make a purchase, we may earn a small commission. As an Amazon Associate, All Garage Floors earns from qualifying purchases. You can read our full disclaimer here.
tools for grinding your garage floor
These are the basic tools that you will need to acquire before you start grinding your garage floor. It’s a bonus if you already have some of these or know of someone who can lend them to you. You can apply the cost savings to your garage project.
Harbor Freight has cheap angle grinders for under $20. Unless you plan on using it for other projects, we don’t recommend spending more money on a better grinder.
The dust shroud for the angle grinder is optional but highly recommended. These small grinders will eat up concrete and create a small dust storm. It will need to be attached to a shop vacuum in order to use it. Keep in mind that pricing may vary depending on your area.
- 4 ½” angle grinder – Harbor Freight Tools – $16.00
- 4″ diamond turbo cup wheel – Amazon
- Optional dust shroud for the angle grinder – Amazon
- Floor maintainer rental – Home Depot
- Diamabrush concrete prep tool rental – Home Depot
Some Home Depot stores carry the optional dust shroud attachment and some don’t. Make sure to ask for it. If they don’t have it, you will need to grind the floor wet if you want to avoid the dust. If you find a rental with the dust shroud attachment, you will need to rent a shop vacuum to go with it or use your own.
The small angle grinder and turbo cup wheel work well for grinding flush any garage floor repairs or crack repairs. In addition, it will cover the areas near walls, corners, and other objects that the Diamabrush attachment cannot reach.
The small grinder is also good for smoothing out the raised edges and materials if you are filling contraction joints for a seamless floor appearance. They also work well to grind down any unusual high spots.
If you will be grinding dry with your own shop vacuum, then one other tool we can highly recommend is a Dust Deputy. Concrete dust is very fine and will clog up the filtration system of a standard shop vacuum fairly quickly. It requires frequent stops to clean them out.
The Dust Deputy works by creating its own dust collection system that keeps the filters of the vacuum virtually dust free. You can find the Dust Deputy here at Amazon.
Heavier Duty Concrete Grinding Equipment
As we stated earlier, the Diamabrush is a good choice for grinding and prepping garage floor concrete that is in fairly good shape to begin. However, it is not aggressive enough for anything more than that.
If you have high spots to take down, multiple concrete repairs that need to be ground flush, broom finished concrete, or some other type of rough surface, then a heavier duty grinder will need to be used.
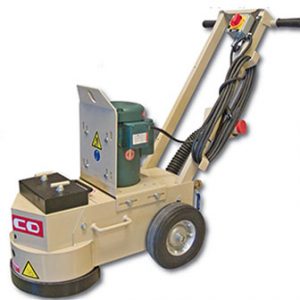
A good choice for that is the Edco 10” Concrete Grinder. It is a heavy machine (152lbs) that uses a 10” diamond impregnated grinding disc.
It can be plugged into a standard 110V outlet and has a vacuum attachment to keep down the dust.
We prefer a grinder such as this over the Diamabrush for removal of old paint and concrete coatings as well. It works much faster and does an excellent job at providing the correct surface profile for coatings.
These are fairly common and can be found at your local Home Depot and equipment rental centers. The rental costs vary from $150 – $175 per day. Be sure to check if there is an additional charge for the 10” diamond disc.
Grinding the Garage Floor
The first thing that needs to be done is to make any necessary repairs to your garage floor such as cracks, pitting, and other defects. It’s best to tackle these first before you rent any equipment. You don’t want to be making repairs while rental equipment sits.
After your repairs are complete, sweep the garage floor and clean any oil or grease spots from the surface. Grinding alone will not remove heavy oil stains and is why these need to be tackled first.
Next, if you have elected not to use a dust shroud and vacuum, prep yourself and the garage for the dust that will follow. While the Diamabrush does not create as much dust as a typical turbo cup concrete wheel, you will still have a small cloud of dust that will coat everything in your garage.
When dry grinding, make sure you wear an N95 dust mask or respirator approved for concrete dust. Concrete dust (crystalline silica) is considered a human lung carcinogen. Safety glasses and ear plugs are highly recommended for your own safety.
If grinding wet, start by wetting the surface of the concrete that you are going to grind. It’s best to work in sections when you do this. Using the floor maintainer with the Diamabrush attachment, start by slowly working the machine side by side and then a circular motion. It will only take a few minutes to figure out how long to work an area before you need to move on.
When grinding with the wet method, do not let the wet slurry dry out. It is a bear to clean out of the concrete properly if it dries. It can lead to a coating failure if it isn’t completely removed. Each time you finish a section, use your hose to blast the area clean while it’s still wet, and then move on to your next section.
To check your work, use the hose with a pressure nozzle to spray the area clean and then run your fingers across the surface. It should feel like fine to medium grit sandpaper and have a more granular look. Continue this way, grinding the garage floor one section at a time until you are done. Make sure to work the machine all the way up against the walls of the garage floor.
Because wet grinding can create quite the slurry, we recommend that before you blast a section clean, use a wet vac to suck up the majority of the slurry. This helps tremendously with keeping the amount of slurry that you hose out of your driveway down to a minimum.
Not counting the edge work or other hard to reach places, most people can grind a standard 2-car garage floor (approximately 400 ft²) in just over two hours or so when using this method.
Once done, this will leave a strip about 2″-3″ wide around the perimeter of the walls that the Diamabrush could not reach. There will be more in the corners. Use the small 4 ½” grinder with the diamond cup wheel to remove this remaining strip of concrete and the larger areas in the corners.
Be careful to keep the turbo cup wheel flat on the garage floor when grinding. If you apply too much pressure or angle it too much on the surface, it will leave “kiss marks”. These are small half-moon divots that can potentially show through your coating.
The concrete needs to be fairly dry or just damp when grinding with the turbo cup wheel. If it’s wet, you will need to use a ground fault circuit interrupter to prevent electrocuting yourself with the angle grinder. You can purchase these for about $25. Many times you can use the power cord extension that comes with the floor maintainers if you still have time on the rental. They usually have a GFCI built into the cord.
The other option which we prefer is to grind the edges first then follow up with the diamabrush. Just remember that if you are using a dust shroud on your grinder, a standard shop vacuum is not made to handle such fine dust and will clog up fast.
You may need to clean out the filter quite a few times while grinding the edges. Though you are not grinding a lot of concrete, if you elect not to use the shroud be prepared for the amount of dust this small grinder will put out.
Another Concrete Grinding Option
Another option for grinding your garage floor that is being used quite successfully is the 7” Diamabrush hand tool. This one is made to fit a 7” angle grinder and works fairly quick as well. You will need a dust shroud when using this tool and it works best with a variable speed grinder.
You can’t rent these, however. You will need to purchase them outright. Home Depot sells the 7″ version. You can also find them here on Amazon.
Diamabrush says that slower RPM’s are better. The high-speed grinders have a tendency of heating up and clogging the blades. If your only option is a single speed grinder, don’t use one that spins any faster than 6000 rpm’s. If you are worried about the speed, Diamabrush says grinding wet will keep the blades cool and prevent clogging or glazing.
Another tip is to keep it flat and do not lean into it in an effort to make it work harder. The weight of the grinder is enough to do the work.
Depending on how much suction your shop vacuum creates, you may need to shim the tool with a washer to raise the shroud off the floor to avoid suction lock. Some shrouds have a vent to adjust for this as well. Either way, these tools make quick work of the concrete.
Best Shop Vac for grinding concrete
If you are thinking of purchasing a new shop vac, we highly recommend that you look at this Dustless Wet/Dry shop vacuum at Amazon by Dustless Technologies. These are excellent vacuums that work extremely well when vacuuming up concrete dust, drywall dust, and variety of other fine dust particulates.

Professional installers are using these more and more as a backup or even as a replacement to the much higher priced specialized concrete dust vacuums. You can read the great reviews on these and find them here at Amazon.
They also offer an optional 25′ vacuum hose at Amazon that can reach twice as far as the original.
Final Cleaning
Once the grinding is done, it’s time to make sure the garage floor is clean of all the dust. If you ground the floor wet, then chances are the floor is clean.
To check, run your fingers across the surface when it has dried. If your fingers don’t have a lot of white residue on them, then you are good to go.
Another test is to press a strip of duct tape to the concrete and then pull it up. It should stick fairly well and come up fairly clean without too much dust. The floor will never be completely free of concrete dust, so don’t fret over small amounts on your fingers.
If you have a lot of white residue after a wet grind, then this is excess concrete dust that did not get hosed out well and will need to be cleaned. The best way to remove it is to mix up a solution of TSP (Trisodium phosphate) in a bucket, spread it out on the floor and lightly scrub it with a push broom or long handled scrub brush.
Using your high pressure nozzle, rinse the concrete real well making sure there is no more solution left behind. Work in sections if you need to so that the solution will not dry before you rinse it out. This will help lift any remaining slurry and dust that is in the pores of the concrete when you rinse.
If you did a dry grind, the easiest way to insure the concrete is clean and ready is to use the wide mouth attachment on your shop vacuum and just vacuum all the dust up. What’s nice about this method is you can start right away with applying your floor coating since there is no water on the floor that needs to fully dry.
Once the floor is done, test different areas by sprinkling water drops on the surface, paying particular attention to any areas that were coated in oil or grease or where you may have used a tire dressing that dripped onto your concrete. It should turn the concrete darker and absorb the water fairly quickly. If it just sits on the surface, then you may need to regrind and/or re-clean that spot before you apply your coating.
Grinding a garage floor with one of these easy methods will ensure the best profile for your garage floor coating to adhere to. It can be done in less than a day and is safer than using an acid etch.
Why couldn’t you use floor stripper and dilot with water and use a 175 rotary machine and black pad and clean concrete.and then neutral it with water. And then put epoxy on.
Hello Travis. Floor strippers remove waxes, paint, glues, and etc. They do not have any effect on concrete. You need to remember that you are dealing with concrete, not wood. It takes a 25 grit diamond impregnated disc or blade to sufficiently rough up concrete enough to expose the pores. A black scrubbing pad on a floor buffer will have no effect except to clean it.
Is 40 grit okay?
For what, Mike? Are you referring to diamond discs or pads? What product do you plan to apply?
I used Rust-Oleum Concrete Patch and Repair (2-Part Epoxy) to fill in a few holes/spalling. Will Rust-Oleum EpoxyShield adhere to the patch and repair areas or should I “ruff” them up with sandpaper or a steel wire brush?
You need to rough them up, Mary. Use 40-60 grit sandpaper. Ideally you should grind them flush so that the repairs don’t telegraph through the coating. Sanding will rough them up enough for the coating to adhere, but it cannot smooth out the repairs.
We live in Wisconsin and have been told Our garage floor is damaged by road salt so it is not smooth all around. I wold like to paint the floor to prevent more damage. Would grinding it work? Is there a cement I should use to cover the eroded areas first before grinding?
Hello Michael. Proper cleaning and then repairing of the concrete is required before you apply a proper coating. You can’t use cement for repairs as it will not bond well and easily separates and cracks. What you need to use is polymer-modified concrete or an epoxy sand slurry. We have an article here on pitting and spalling. Once it is repaired, you will then need to grind to smooth out the repairs and prep for the coating. I’m assuming you don’t mean paint since it would not hold up one winter.
My garage seems to have a broom finish..do you know of anyone cleaning it well and then doing an epoxy coating or is the broom finish to rough for epoxy?
Hi Jeffrey. Broom finished concrete still needs proper prep. It needs to be etched at a minimum in order for the coating to penetrate. If you want a typical smooth finished coating, then you need to grind in order to knock down the ridges formed by the broom. Typical broom finished slabs that are coated without knocking down the ridges do not perform as well. All those little high ridges are weak spots on the surface and have a tendency to break away under impact and other heavy traffic or abuse.
Hi Shea,
I managed to get my hand on some Rust-Oleum RockSolid kits that were in clearance and so I bought 4 single garage kit to cover my double one.
My first question for you is: the boxes look quite dusty and old (probably inside the shop for couple of years) although the bags of part A and B looks in good conditions, do this product has some shelf life that I should be worry about?
The concrete of my garage is 2 years old, is quite porous and has a rough finishing. From reading the forum my steps should be: clean and degrease it, patch the cracks, grind it, and clean it again. I believe, correct me if I’m wrong, that I do not need to etch it if It pass the “water drop” test after grinding. Now, at this shop they were also selling this product “Rust-Oleum RockSolid Porous Concrete Floor Primer” (not on sale) that I couldn’t find much info on the internet. Would you recommend to spend the extra bucks and time on it or the fact that I got possibly abundant product would be sufficient to have a good result at the end?
Also do you recommend to apply all the product a bit thicker the first time or apply two coats?
Thanks a lot for your time.
Hello David. RockSolid Garage Floor Coating kits have a shelf life of 24 months. If they are older than that then you should not use them. You will most likely experience curing issues and uneven color if you do. In addition, RockSolid no longer makes the Porous Concrete Floor Primer. I would not use it.
Providing the garage floor kits are not expired, most of the steps you outlined for prep are correct. Cleaning after grinding usually just requires sweeping and then vacuuming the surface real well with a shop vac. Etching is not done after grinding. Grinding supersedes etching and is the preferred prep for most coatings. Make sure you mix everything in the pouches real well because there will definitely be settling of components due to sitting so long. Pay close attention to the coverage rates in the instructions and make sure that two kits will cover the entire square footage of your garage. If not, then you need more. Coatings cannot be stretched like paint. The first coat (2 kits) is going to act like a primer coat. RockSolid is a thin coating and one coat will not look good on concrete prepped via grinding. However, the second coat will not be absorbed by the concrete and will look much better with even color tones and gloss.
Does every surface needs grinding prior coaring? In my case, the concrete slab is home-made and has only been hand smoothen (hasen’t been mechanically polished). The surface does look porous and it has no sheen.
If possible, i’d only grind some rougher area and leave the rest like it is but I also want my epoxy to bind with me floor. I am also planing on using 2 coats of 50% solids waterbased epoxy.
Hi Lou. You have to either etch the concrete or grind in order to get the proper profile for epoxy. It does not matter if the slab is new or old. This article here explains more.
I have a 200 sqft workroom attached to my garage that I’m trying to finish. It’s trowel finished although not perfectly smoothed. It originally had 2 coats of latex applied so I rented the Diamabrush removal tool and overall it did a great job. Both in terms of removing paint and smoothing out trowel marks. However, there’s certain parts of the floor where very small bits of paint remain in some of the deeper pores. Here’s an image of what the worst section of it looks like now. The picture really makes the dark green pain pop out … it’s much fainter to the eye: https://imgur.com/bmmAyTK
Initially I was planning to put down RockSolid polycuramine but your site has me rethinking that choice in favor of a single part polyurea. Rocksolid says it can be laid over existing paint as long as it’s secure. I feel confident that any paint that survived the Diamabrush is secure enough. However, would the remaining paint be a deal-breaker for polyurea? I could go back and spend another $200 on renting the diamond grinder to get rid of the remaining paint. However, at that point I should probably cut my losses and go with TrueLock tiles since for that size it works out to be the same cost.
Thanks for sharing your experience, was happy to find this site after reading a few ‘best whatever’ sites that clearly exist to shill a particular vendor’s product.
Hi Bryan and thanks for the kudos. The grinding provides a rougher surface for better mechanical bite as well as opening the pores. It’s not uncommon to have a bit of paint remaining in the pores like that after a grind. If you can place drops of water randomly in those areas and the concrete immediately turns darker and will absorb the water in less than minute, then you are good to go with a coating of your choice. What you don’t want is for the water to bead or just sit there. If it does, so will the coating.
Shea-I’ve ground my floor and I would say about 97% has a really good profile where all of the cream was removed. I used an Edco double disc machine and since my slab wasn’t perfectly flat in a few places there are still hints of cream still present. I have a 5″ turbo wheel on an angle grinder and that is so aggressive it is hard not to make the “kiss marks” you mentioned. Any tips of “light” grinding tools/techniques?
Much thanks.
Hi Dave. Wavy areas of the floor can be difficult some times. Keeping the grinder completely flat and working in small circles will help. Did the Edco machine not make contact at all with those spots or just not as much contact? If it did make contact, just do a quick water drop test to see if the concrete immediately turns dark and absorbs the water. If it does, you are good to go. Another option would be to etch those small areas. If there are a lot of areas like that, Diamabrush sells their 4.5″ grinding wheel with the flexible tabs. It’s pricey though. You can view it here on Amazon.
I have a 1,700 sq ft warehouse built in the 70’s. The concrete is in very good shape for its age but has a lot of paint overspray that was discovered when the carpet was removed.. About 200 sq ft had vinyl tile from the 80’s that has been removed. Under that area is some sort of very thin black coating/adhesive. I want to stain the entire floor with DeltaDye concrete stain. Can I use the Diamabrush removal tool to remove the paint and adhesive and prep the floor or will it leave the surface too porous for the stain?
Hi Charles. No, grinding will not leave the floor too porous for the stain, but it will reduce the coverage rate some and require a second application. The Diamabrush removal tool will work. However, for a floor that large it could take a long time. We would recommend renting a dual head concrete grinder from your local equipment rental. Also, Legacy Industrial has good customer service when it comes to DIY installs. We would recommend giving them a call or emailing for additional tips.
Hi shea. nice article.
I have a sealant over my garage floor. Did the water test and it just sits there.
I need to remove the sealant and then I can begin the cleaning and degreasing and etching. I was thinking about wet grinding the floor using the diamond brush removal tool. Would that be the best way to go or do you have any other recommendations.
thanks
Hi Alex. Yes, the Diamabrush will work to remove the sealer. Once you grind the floor there is no need to etch.
Thanks so much for the wealth of great information. I’ve read though so many Q&A’s to find my situation. But couldn’t find exactly what I’m looking for.
I have a late 1940’s 560 sq ft garage with a rough broom finish that I want to knock down the broom finish and put a sealer (possibly dye, but it’s not imperative).
I’m turning the space into an art studio/workshop and only want to be able to keep the floor clean and easy to sweep or wipe spilled paint. I’d be perfectly happy with a relatively smooth, somewhat even surface. Nothing fancy.
The existing floor has some cracking, lots of broom texture and areas of where someone squeezed out lines of some kind of hard glue for a carpet (not troweled glue).
I’m not at this location full-time, and would prefer to work on half the floor at a time so I don’t have to remove all the stuff in the garage to the outside in the rainy season.
I could rent a 10″ Edco, but live in a rural area where I likely need to rent it for more than 4 days to pick it up, do the work, and return it. It would cost me less to purchase a 7″ angle grinder, Diamabrush Concrete Abrasive tool, shroud, and Dust Separator for my shop vac. I could also do parts of the garage over many weeks without worrying about rental fees.
Am I setting myself up for failure to purchase the 7″ grinder and accessories? Will the Diamabrush 7″ Concrete Abrasive Removal Tool work to smooth out the surface enough to seal and keep it clean and scrape dropped paint up when I make a mess working on my art? That’s all I need, no showroom finish.
I’m just looking for a cleanable surface and have even considered gluing down vinyl squares, but I don’t think they’d stick well to the broom finish.
Hi Cait. You actually have a good plan considering your situation. The Diamabrush for the 7″ angle grinder is a more forgiving grinding tool due the flexible diamond impregnated blades. A standard turbo cup concrete grinding wheel is more aggressive and can leave kiss marks in the concrete until you get proficient with it. Hopefully you can do the the entire floor without having to replace the blades. For a sealer, we would recommend a product called TS210 by Concrete Sealers USA. It’s very durable, easy to apply, and not very expensive compared to other coatings. In addition, you can apply a water-based dye to the surface first if you want to add a decorative aspect to the surface.
Wow, Shea, thank you for the quick response. I’m researching the grinders, wheels and shrouds. I typically purchase Makita, but I think I read about best to have a variable speed. Makita has a 6500 RPM and a soft-start 8500 RPM 7″, neither appear to be variable speed. It is better to get the lower RPM if variable speed isn’t available?
Makita also has a 24 segment Diamond Cup Wheel that looks like it would make quick work of my floor. I think I could get proficient enough quickly by testing on some out of the way bad spots. The slab has a very rough broom finish.
It sounds like the Diamabrush 7″ concrete abrasive tool is a little lightweight, but sufficient, and may wear down part way through, & the wheel cup may be on the too aggressive side. Since I’m not concerned too much about “kissing” the concrete, but would prefer to save my knees and back, getting the job done more quickly – is the concrete wheel going to get the job done faster with less concern about wearing out?
Thanks for the recommendation on the sealer. I was looking at the Legacy Industries HD-6600 MMA based on other blog postings. Is that an inappropriate option?
Yes, the lower RPM is better. A diamond cup wheel will make quick work of a broom finish and easily go the distance. The Legacy Industrial HD-6600 is a high quality MMA acrylic sealer. It would have a glossier look than the TS210 and do well. The only reason I didn’t mention it was because you spoke of possible paint spills. The TS210 will stand up to mild applications of paint thinner or mineral spirits if necessary for cleaning up paint, but the MMA acrylic will soften and allow the paint to bleed into the coating if those type of chemicals are used. If you wipe the paint up right away, then it won’t be an issue.
I’ve read numerous pages of these questions and didn’t find a problem as extreme as the one I’m facing, so thanks in advance. We bought a 24 year old home with a finished basement of 635 sq ft that had good quality laminate flooring. After about a year the laminate started separating so I decided to remove it and have porcelain tile installed instead. All upstairs floors are hardwood. You could feel the laminate floor flexing as you walked, something we didn’t pay attention to until the laminate started separating.
There was a 1″ layer of moisture barrier under the laminate with areas of cardboard on top of the barrier that were placed to make up for the uneven concrete below. Upon removing all that the contractor used a laser level to determine that the floor has high and low spots. We plan to use a leveling compound before laying the tile over thinset but the variance is about 2″ comparing the highest point to the lowest point. The very experienced contractor has never seen a concrete floor this poorly leveled. It was decided to try to lower the highest section of at least 30 sq ft and a couple of smaller areas by about 3/4″ to allow the top of the leveling compound (or new concrete) to match that height for both rooms (living and bedroom). You could see that there had been carpet at one time due to residual glue, but this is a high humidity geographic location where carpeting wouldn’t work.
Is there a tool that can remove this amount of concrete. The contractor is considering using a diamond saw to crosscut the highest areas and to demo them with sledges, remove the debris, then re-pour.
We can’t simply pour more concrete or leveling compound without lowering the high spots because raising the entire level of the floor to the highest point would make the floor higher than the thresholds of the doorways and the bottom of the downstairs fireplace.
Hi Dave. What would be required is a concrete scarifier. This video here demonstrates how they work.
So, we are buying a house that already has an epoxy coating with flakes in the garage. But we don’t like the color. Is it possible to just paint over with a new epoxy color and flakes? Or do we have to strip the paint before applying a new coat? Thank you.
Hi Rachel. You will need to degloss and rough up the surface. We have an article here on what is required.
Hi Shea, and thanks for the excellent guidance. We’re re-doing our garage floor which was epoxied 25 years ago with PPG’s two part AquaPon epoxy. Great stuff but I didn’t prep the floor adequately way back then and it failed in areas that had years-old oil and grease stains. Fast forward to today: I’ve rented the diamabrush from Home Depot and it removed maybe 80% of the old epoxy (tough stuff!); I’ll get the remaining patches with a 7″ grinder. I’m putting on PPG AmerLock 2 which is their current generation two-part epoxy. It’s listed as “self priming.” Would it be sensible for me to go ahead and prime it with a suitable epoxy primer? Many thanks.
Rob
Hi Robert. The big question is, did you get the areas with oil and grease stains properly cleaned up? Do they readily absorb water without issue? If those areas are still questionable after grinding and cleaning, then we would recommend an oil stop epoxy primer. The one issue with oil stop primers is that they are dark. If it’s only applied in certain areas, the dark color may have an effect with the colored epoxy and look slightly darker than the surrounding areas. If that happens then a second coat of colored epoxy is required. Other than that, the only other consideration are the benefits of an epoxy primer before applying a high solids coating. For your situation, the added benefits would be improving the overall thickness of the coating and preventing cosmetic issues with the PPG coat. If you are interesting in epoxy primers, Legacy Industrial has a good selection here.
Hi and thanks for the good article. I have a question as I’m planning to grind my garage to prepare for epoxy, but I’m not sure how far to grind. I want my epoxy to finish on the inside of the garage without extending it onto the 7 inches of concrete that sits outside the doors. Do I still grind the outside portion and finish it another way? Or do I only grind the inside portion where I plan to epoxy? I’m worried it will create a lip that will affect water run off.
Hello Zach. Grind to the garage door threshold and not past that. Unless you have very soft concrete, the epoxy coating is going to be thicker than the amount of concrete you remove from the surface.
HI Shea,
I want to apply an epoxy or polyaspartic coating to my 70 yr old garage slab. It has some cracks as wide as 1 inch. Is there any way to know if shot blasting or diamond grinding is the way to go? The floor has spalling all over and the cracks I mentioned.
Hi Brad. We can’t accurately advise on a floor in poor shape without proper inspection. 1″ wide cracks are not good. Combine that with the spalling and you are looking at a lot of work. Shot blasting is the best method when dealing with a lot of spalling. We would recommend doing that first, then filling of the cracks with the proper material and grinding flush. After that it would need a 100% solids epoxy sand slurry applied over all the spalling to fill-in and level the concrete. Once that is done, then you can apply your coating of choice.
Hi Shea,
I have already used an acid etch on the floor and I guess my garage floor is sealed because the floor does not feel like sandpaper. Is it safe to use the diamabrush over the acid etch without finishing the clean up? I still have spots of white acid etch and it’s taking a while to clean it up perfectly.
Thanks!
Sam
Hi Sam. Did you properly neutralize the etch and not let any of the concrete begin to dry during the process as we outline in this article about acid etching? If you haven’t neutralized the concrete, it’s imperative that you do so. Otherwise, the acid stays active and will affect the coating and the concrete negatively. Also, have you done a water drop test on the concrete? If you place a 1/2 TSP of water in various areas, the concrete should immediately turn darker and absorb all of the water in less than minute. If so, then it will accept a coating. However, if the water just kind of sits there and takes a long time to be absorbed, then you most likely have a sealer that needs to be treated with grinding. If that is the case, then the Diamabrush will do the job.
The etch I used came from the kit from Lowe’s. I don’t think it was muriatic acid. It was citric acid. Do I still need to neutralize that? Could that be why it didn’t etch my floor?
No, the citric acid etch doesn’t need to be neutralized. Just don’t let the concrete dry while using it and make sure to rinse the surface well. They are not an aggressive etch and don’t do a very good job you have a dense concrete surface that is very smooth. However, no acid will work if the concrete is sealed.
Great article. Your site has been helpful as i begin my project. First timer here. So i have a couple questions:
1) I am currently in the process of diamond grinding my two car garage. I planned on filling cracks AFTER i diamond grind with 1/4 inch foam backer rod and DAP self leveling crack filler. Is this okay? Or should i have filled the cracks before grinding? Can i stick with my original plan and just sand the filler with 40 grit after it sets?
2) ive seen people recommend to do both grinding and acid etch. I was only planning on grinding the floor. Is this okay?
3) Is it necessary to pressure wash the floor after grinding to clean it? Or is dry sweeping with a stiff broom and vacuuming with a shopvac enough to get the concrete dust off the surface?
My plan is to finish diamond grinding, sweep/vacuum, fill the cracks, sand and vacuum those areas, then lay down a 100% solids epoxy primer (Simiron 1000HS), then a 100% solids epoxy (RokRez Pro), and then seal it with a polyaspartic top coat (Simiron 2000PA) for UV protection etc.
Also, can I mix in slip resistant granules to the polyaspartic topcoat?
Thanks for your help!
Hi Josiah. I will answer your questions by number.
1). Don’t use the DAP filler. It’s a self-leveling crack sealant and not an actual crack repair product. It is too flexible, it’s not as strong as the concrete, and it will not sand flush well. You need to use an actual epoxy or polyurea crack repair product. This article here discusses repairing cracks the type of materials to use. You can do repairs before or after grinding. Just make sure to grind the repairs flush so that they don’t telegraph through the coating.
2). Grinding supersedes etching and is the preferred method because etching is not as effective or can be done with a controllable outcome like grinding. There is no need to etch after grinding, but you may have to grind after etching. Plus, you don’t want to introduce water to the concrete if you can help it or you will have to wait 24 to 48 hours before applying your coating.
3). Just sweep and then vac with a good shop vac. Any residual surface dust can be mopped with denatured alcohol applied liberally to a microfiber mop pad. You are applying good products, so your coating system should last years. Mix the anti-slip media into the last coat of Simiron. Be prepared to work fast with this product. Even though it has an extended working time, you need to be smooth and quick. I highly recommend using two people.
Thank you for your help!
Is there a good crack filler you can recommend?
We have recommendations on the crack filler page. The Xtreme Set by Legacy Industrial is our favorite for a lot of repairs, but it is the more expensive option.
We have a mechanical room in our house that contains 3 water tanks holding 300 gal per tank, an aqua filter system and a wall of pipes for radiant floor heating to main level. The concrete floor is not drawing to the floor drain and we’ve had 1/4” to 1/2” areas of water in some parts of the floor due to rain. We’ve installed rain gutters to the house and it has helped solve the problem but the floor doesn’t “float” enough to reach the drain. We’re in rural Montana and finding someone reliable is difficult. Any advice as to how to fix it?
Hi James. We would recommend applying a polymer-modified cement such as Ardex K 301 to fill in those areas and adjust your slope. It’s a self-leveling concrete topping that can be applied up to 3/4″ thick on both dry and wet surfaces. You need to obtain a minimum 1/4″ drop per foot for water to flow across the surface to reach the drain.
Shea, Thanks for the awesome information. I’ve been grinding our garage floor which is old and has some layer of paint or coating on it. The corners / sides have been brutal and I’ve run into a couple issues:
1. Because of the dust shroud, I can’t fully get to the edges leaving an outer perimeter of the old coating.
2. Because the edges are much harder to remove than the middle, in some spots I’ve left a noticeable elevation difference as I’ve been running the grinder longer on the edges than the middle to cut through the older coat.
3. The back half of my garage is elevated and there is a vertical section of cement I can’t grind down because of the angle.
Any advice on how to deal with these issues. My first thought was to try and use etching once I finish with the majority of the floor?
Thanks!
Matt
Hi Matt. You can remove the dust shield to get those edges. Make sure you are wearing an N95 mask or respirator. It can also help to have someone hold the vac hose near the grinder as you go. Coatings will adhere to a vertical surface as long as it is not real smooth. You will not be walking or driving (hopefully) on this surface, so optimum adhesion is not required.
Elevation issues from grinding may or may not show depending on what type of coating you are using and how much flake coverage you plan on. For example, full flake coverage tends to camouflage and/or level out these issues. 100% solids epoxy can also level out those areas if applied with a gauge rake. If it’s really bad, you can always apply a patch repair of 100% solids epoxy and sand that is mixed together and troweled on. You can then grind it all flush after it has cured for 10-12 hours.
Thanks Shea! One last question, I was planning on using the Rust-Oleum Cleaner on Degreaser over the garage floor once I finish the concrete prep. Is there any reason I shouldn’t do this since I’m grinding the concrete and not etching? Thanks!
No, don’t use it. It won’t be effective once you grind.
I have a 30yr old pad I’m trying to epoxy. At one point in time it was sealed, but the sealant has worn. It some places the water beads, in others it doesn’t. I took a dimabrush to the whole thing to scuff it up. Because it used to be sealed, I was going to use Rust-Oleum’s Concrete primer. Should I do that or was the dimabrush good enough to not require the primer?
Hello Tony. What epoxy product are you using exactly? Concrete primer is a latex acrylic paint (not a coating) and is not chemically compatible with epoxy. In addition, concrete paint primers do not adhere nearly as well as actual epoxy and are far inferior. The two should never be combined. The only time a concrete paint primer can be used is if you are applying a 1-part epoxy paint, which is not an epoxy coating. This article here explains the differences.
Shea,
Thanks for the response! Sorry, “epoxy” was misleading. I’m looking to use Rust-Oleum’s Rocksolid. So I used the dimabrush, then I’m thinking Rust-Oleum’s Concrete primer, then the Rocksolid.
Hi Tony. The same rules apply with one exception. If it’s the Rust-Oleum Concrete and Garage Recoat Primer, then RockSolid will be compatible. However, the primer is only to be used on bare sealed concrete or current coatings that are sound. It’s Rust-Oleum’s easy solution for those that don’t want to do the recommended concrete or older coating recoat prep. They do not recommend using in on bare unsealed concrete or concrete that was profiled via grinding. In addition, it will not adhere nearly as well as RockSolid. We spoke to Rust-Oleum about their primer when they first contacted us and asked if we would do a review when it was first introduced. They would not disclose the adhesion ratings and would only state that it passed their requirements.
When using RockSolid, we highly recommend that you reduce the coverage rate by approximately 20%, particularly on concrete profiled via grinding. RockSolid is a thin coating and penetrates concrete well. That combination along with Rust-Oleum’s over-generous coverage rates typically leads to patchy color tone and gloss. This is because the wet film thickness when applied at their recommended coverage rates is too thin. This is a common complaint that requires the application of a second coat to fix the problem. We had to update our review of RockSolid when this became a common problem.
Ok. So I used the dimabrush on my sealed concrete. It didn’t so much grind away the top but rather just scuff it up. Is that enough to apply the Rocksolid directly?
I have a 430sq ft garage. I have three bags of Rocksolid that are supposed to cover 600sqft, so I’m thinking I should be good coverage wise.
Hi Tony. Yes, that is exactly what the Diamabrush does. Just verify with a few scattered water drop tests that water gets absorbed by the concrete and does not bead. Direct to concrete provides the best bond for RockSolid. The amount of material you have should work. Divide the garage up into three equal sections and use each mixed burst pouch for each section. You should be able to achieve a thicker wet film thickness to achieve good color, tone, and gloss.
Shea,
All these Q’s refer to a garage floor. I have a basement that is sealed, so will need grind it before putting down an epoxy that (it claims) will seal in urine odors. Do the same guidelines in the article apply to my situation?
Thanks,
Dave
Hi Dave. Yes, these guidelines apply to all concrete, basements included. Since it’s a basement, you may want to view our article on moisture testing. In addition, we have an excellent article on how to remove urine odors from concrete that we recommend you read as well.
Thanks so much for your fast reply to my question, however I cannot find the post to refer to the information you provided! I am unsure as to whether I should grind my basement floor or just sand it. Mostly the epoxy coat is just thinned with age, but there are a few areas in one particular room where it’s worn off entirely and the concrete is eroded, there is also pitting that was epoxied over and a lot of imperfections that were not repaired. My question is wouldn’t grinding those areas take care of the problems? Why would you need to repair them before you grind the floor? I was reading about applying the self leveling epoxy coat and other techniques. Could I just sand most of the areas and grind the problem areas? And how would that affect the preparation? Bare concrete needs etching and the sanded part doesn’t right? You mentioned eco etching, what is that? We did ours with acid originally. Not fun! This is for an animal shelter, and it is not by any means perfect or very attractive, but just needs to be functional and sealed. This is probably not very clear but that is because I’m not very clear about what to do. I want to do it myself because typically people you hire don’t do it right.
Hi Laura. The information we provided for your last question can be found here. Grinding areas of pitting and spalling may remove loose concrete, coating, etc. However, it does not fix the area. You can’t just grind away the area or you will have a severe low spot. And that is a lot of grinding to do. All loose pitting and spalling materials should be removed and then filled with the proper repair material. Once the repair material has cured, you need to grind the repaired area flush with the rest of the floor. The grinding preps the repair material for a coating as well. We have an article here that discusses these types of repairs. Small imperfections and defects can be covered with a 100% solids epoxy coating only. A gauge rake needs to be used to pull the epoxy over those areas so they can fill and self-level.
Yes, bare concrete requires etching, and any coating that is sound require sanding. There are some etching solutions available that do not use muriatic acid and are considered safe for the environment and use indoors. They do not produce harmful fumes. These are called eco-friendly etches. Eco-Etch Pro is one such example.
Wonderful tutorial. First. one I have seen on this. I have a 5 car garage. It was a builders own home. The garage floor already coated with some type of flake coating. After 15 years it is beginning to come off in parts under the tires. And I hate the color. How can I remove it myself yo keep costs down. Also includes a set of 4 stairs. Thank you. Ps. It is extremely slippery when wet
Hello Karen. We are guessing you are working with 1000 – 1200 square feet of concrete. It’s going to take some work to remove that much coating. We highly recommend renting a dual-head concrete grinder from your local tool rental. A single-head unit will take far too long and not be as effective. If you are going to apply a quality coating yourself, you may want to get some free estimates from a coating contractor or concrete contractor to come and grind it off for you. Average pricing for grinding is just over $1 per square foot. Compare that cost to what it will cost for the rental equipment. You will need the rental equipment for a minimum of one day and maybe two. Depending on the quote, it may be worth the cost to have someone else do it.
Hello Shea,
I’ve been doing research into the best products and processes for waterproofing a concrete shower floor (part of a slab on grade home) and your name and website was recommended by a few other DIY/home improvement blogs. I’ve read through most of your articles related to concrete cleaning and surface preparation and application of epoxy coatings, which have been very helpful.
I still have question that is perhaps specific to our situation. My husband and I are split on the best way to etch the shower floor before we apply a resin for waterproofing purposes. I think that we need to grind the floor because it was treated with a penetrating sealer by the builder when it was originally installed (about 4 years ago). My husband would prefer to work with a chemical etcher because he is concerned that grinding it will reveal aggregate and dramatically change the floor appearance. We would appreciate your insight into which method would be best.
Hi Abigail. If a penetrating sealant was applied to the concrete, then an etch is not going to work very well if at all. Etches work by reacting with the free lime and other minerals in the concrete. If a sealant has been applied, then the etching solution is effectively blocked from penetrating the surface very well. In addition, many penetrating sealers form a gel-like barrier at the subsurface that coats these minerals. This helps the concrete to resist salt, chemicals, and moisture. Contrary to what many believe, good concrete etches or muriatic acid etches do not dissolve sealants and paints. Because they can’t react to the concrete, they just sit there and don’t do much. This is why you need to grind. It will remove the sealant at the surface and open the pores. It only requires removing a very thin layer at the surface. Why is there a concern with the look of the concrete? What type of resin are thinking of applying? What is the look you are trying to achieve?
Hey Shea,
Thanks for the response and sorry for the delay in responding. The penetrating sealer is interesting because it really only provides a maximum of 5-10 seconds of resistance to absorbing the any water dropped onto it. After that it absorbs the water an turns dark. So if we know there was a sealer applied but it passes the drop test, would mean that chemical etching would provide enough surface texture for the epoxy to adhere to? Again, I’m wanting to err on the side of just grinding and being certain.
The concern with appearance is just that it would make concrete floor in the shower look drastically different from concrete in the rest of house. My husband is partial to the uniform look of our slab floor and it’s consistency throughout our home. Because of this, and because our main concern is waterproofing versus high/heavy traffic, we were planning to apply a clear epoxy resin by Rust-oleum to it (like https://www.menards.com/main/paint/interior-paint-stain/floor-coatings/rust-oleum-reg-concrete-saver-reg-6500-epoxy-floor-primer-activator-1-gal/s6502410/p-1444453081059-c-8022.htm or https://www.grainger.com/product/6H050). What I am most concerned about it making sure that whatever we apply STICKS because I don’t want to have to deal with it peeling up or separating anywhere and having to be redone.
Thanks again for your time and thoughts – they are greatly appreciated!
Hello Abigail. If that is the case, then we recommend testing a small area with an etch first. Eco-Etch Pro would be a product that we recommend. Do some water drop tests after the concrete has completely dried. If the water does not bead and is absorbed fairly quickly, then you should be fine.
You need to be careful when purchasing concrete floor coating products from large retail stores and home improvement centers. In your case, the image from Menards does not match the product description. The image is for the Rust-Oleum 6500 Penetrating Prime and Seal Activator. It is an 85% solids (not 100%) primer that is applied before the Rust-Oleum 6500 100% solids epoxy. So which are they selling? Here is the data sheet for the primer from Rust-Oleum. Here is the data sheet for the 100% solids 6500 from Rust-Oleum. I suggest reading them carefully to understand the application process. The 6500 primer is not intended as a wear surface. In addition, it has solvents so there will be issues with VOCs that can stink up the house. Instead of using the primer, we would suggest mixing a small amount of the 100% solids 6500 to apply one thin coat to avoid outgassing. If it does happen, you can sand the bubble out. You can then apply a thicker coating over that without fear of outgassing.
Also, since this is for a shower, it is HIGHLY recommended to use a polymer anti-slip media in the final coat. Wet coatings are slippery as is. Add soap to the mixture and it will be more slippery than an ice rink.
Sounds good, i will try it with Eco Etch first and then if I need to I will grid. It is an odd case because we never got the specific product used by the builder but I did watch them apply some kind of sealer. However, I’ve always commented on how quickly the floor absorbs liquids and oils and figured it was poorly applied until I read you’re piece on penetrating sealer types and functions.
Yes, thank you for the warning about buying from Menards. Honestly, I hadn’t even looked at the photo, just scrolled to the description to make sure it was a 100% solids epoxy coating, which as you noted doesn’t match the name or photo! I am eyeballing Leggari kits after watching some of their in-home installation videos. I have worked with epoxy resin before in smaller, decorative applications but have never applied it to concrete or had to buy it in large enough quantities to apply it to a floor. I wonder what your opinion would be of Total Boat (https://www.totalboat.com) or Alumilite (https://www.alumilite.com) products for this kind of situation?
I am definitely planning to add a grit layer to the final coat of epoxy and, per your piece on anti-slip floor coatings, had added Shark Grip to my Amazon cart. Thanks for looking out – I’m too young to entertain the idea of a hip cast.
Hi Abigail. You need to be careful when looking at art resins and tabletop resins. Epoxy has many formulations designed for specific purposes. Manufacturers that formulate art resins and tabletop resins are looking to achieve different characteristics. How well they wear under foot traffic and vehicles is not one of them (I know you won’t be driving your car in the shower – hopefully). The point is, they may not be the best choice. Leggari is fine since many of the products are also used for foot traffic and garages. Make sure the epoxy you use is 100% solids to avoid VOCs. Plus, it allows you to apply it thickly. If you use an epoxy primer first, make sure it is water-based and from the same manufacturer. It will be low or no VOC as well.