

“Why do I have to etch new concrete for a garage floor coating? After all, the concrete is new and shouldn’t require etching, correct?” These are some of the most common questions we get from those who want to apply epoxy or a DIY garage floor coating kit. This happens after reading the application instructions. If you are not that familiar with concrete coatings, then we can understand why the question of etching would come up.
The short answer is: Yes, even new concrete needs to be etched before applying epoxy or a similar type of garage floor coating.
Etching is part of the concrete preparation process. In fact, proper preparation of the concrete before a coating is applied is the most important part. Poor concrete prep is the leading cause of epoxy floor coating failure.
Also known as a concrete surface profile (CSP), the process of acid etching opens the pores of the concrete. It creates a more porous and rougher surface. This is needed due to the viscous nature of epoxy and other coatings. They are very thick in consistency – much thicker than paint for example.
This thickness does not allow the epoxy to penetrate into the concrete surface very well. Nor does it allow it to create a strong mechanical bond. When the pores of the concrete are opened up and the surface is made rougher, epoxy and other garage floor coatings will penetrate and create a tenacious mechanical bond with the surface as it cures.
New concrete can restrict the penetration of epoxy even more than older concrete does. The reason for this is that the surface has been freshly troweled smooth. This creates even less mechanical grip and access to the pores at the surface.
Concrete surface profiles are referred to in the industry as CSP. A number assigned to the CSP dictates the actual profile or roughness of the surface. You can see magnified examples of CSP profiles in the chart below.
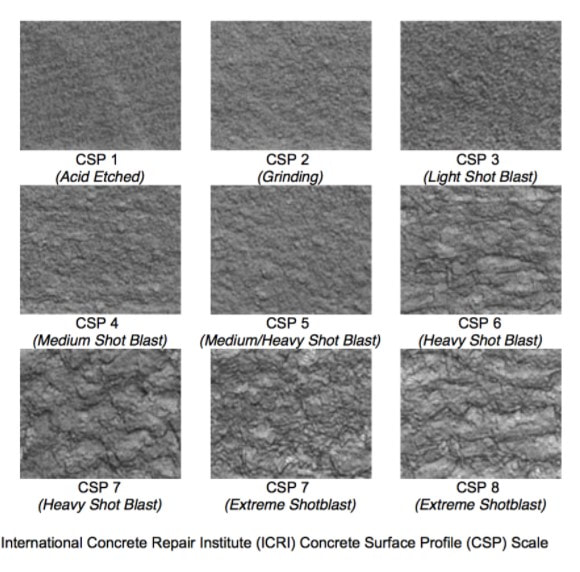
The majority of garage floor coatings require a minimum surface profile of CSP-1. This can usually be achieved by etching the concrete. Some of the thicker industrial coatings may require a minimum CSP-2 profile. This can only be achieved through grinding the concrete.
Is grinding better than etching? Grinding will always create a rougher and more desirable surface profile. However, many garage floor coatings and DIY epoxy kits can do well with etching only if it is done properly.
Cleaning the concrete surface of dirt, oil, and other contaminants before etching is important as well. Oil in particular will not allow epoxy or other garage floor coatings to penetrate into the concrete. In addition, acid etching will not remove oil.
If you attempt to apply a coating over an oil stain that was not cleaned properly, the oil will actually repel the coating. It will create what is known as fish eyes. These are crater-like openings in the coating that begin to form after the coating has been applied.
Important to note is that you need to match the strength of the concrete etching product you use with what the manufacturer or vendor recommends. Not all concrete etching solutions are created equal.
For example, a citric concrete etch typically is included with the lower-performing DIY garage floor coating kits. These are the ones that you can purchase from your local home improvement center. Also known as “Clean & Etch” solutions, these are Eco-friendly and safe for the environment.
Nevertheless, this particular type of citric acid etch is also the least effective at etching concrete for coatings. They tend to work well enough in most circumstances for these DIY epoxy kits though. Most of these kits are low in solids content (not as thick) and do not require as rough a surface profile. However, you would not use this type of product for a thicker, higher-quality coating.
Acid etching is the best for providing a true CSP-1 surface profile of your concrete. Muriatic acid is not Eco-friendly though and requires taking the proper steps to be safe and successful.
If acid etching is not for you, there are safer etching alternatives. These are stronger than what you can find at your local home improvement center.
Are there garage floor coatings that don’t require etching?
Once it’s discovered that etching of the concrete is required for a garage floor coating, a typical question follows up. “What coating can I use on my garage floor that doesn’t need etching?”
The answer is almost none. However, Rust Bullet is one manufacturer that makes a garage floor coating that you can apply without having to acid etch the concrete.
Their decorative and colorful option is called DuraGrade Concrete. The more industrial-looking version is Rust Bullet for Concrete.
Before you get too excited though, pay close attention to the water absorption requirements. The concrete needs to pass this test before Rust Bullet Concrete or DuraGrade can be applied. If the concrete is too smooth or does not absorb water very well, then you will still be required to rough sand or etch the concrete surface.
Before Rust Bullet introduced itself a few years back, there were no traditional garage floor coatings to speak of that did not require the etching or grinding of the concrete. And to our knowledge, there have not been any others to choose from since.
The simple fact of the matter is that the manufacturers of concrete coatings know there is no substitute for proper concrete prep. If you don’t want issues with your garage floor coating peeling, then etching will be required.
In short, if you want to take advantage of the many benefits of a quality garage floor coating, then there is no getting around the fact that proper concrete prep is required. You will need to etch your concrete at a minimum before applying epoxy or a similar coating to your garage floor.
What CSP can I expect to obtain with Rust-oleums Clean and Etch. Main ingredient appears to be Urea Monohydrochloride which best I can tell is an organic acid salt.
Hi Peter. From our experience Rust-Oleum Clean and Etch will not achieve a CSP-1 profile in most cases. However, it tends to rough up the profile and open the pores enough to work OK for the Rust-Oleum products since they are lower in solids content and less viscous than higher performance coatings.
Hello,
I plan on using Rustoleum Epoxyshield but I don’t need it on the 5in stem walls, so I will use the blue tape to cover them. I want to do two coats of epoxy on the floor only. Must I immediately remove the tape after the first coat is applied or can I leave it on during second coat application 12-16hrs later? I’m not sure how “forgiving” this epoxy is.
Thanks!
Tony
Hi Tony. You will need to pull the tape no later than 20 minutes or so after applying the first coating. Epoxy cures extremely hard. Unless you want the tape embedded, you need to remove it.
l just had a 6’x6′ area resurfaced with QuikCrete after a particularly gruesome snowstorm had us using salt and a metal snow shovel on a painted concrete surface. The mason who did the job used a bristle broom to create a rough surface on the new concrete. He recommended Behr epoxy to finish it. l ended up with Valspar, but the directions said to wait 60 days for the concrete to cure. #1, does the bristle broom constitute etching, or is that only a chemical process; #2, do l REALLY need to wait 60 days for it to cure (the mason did not mention either a curing period or the etching process); and #3, should l scrap the whole deal and slap some paint on instead? If l use the epoxy, do l need a pre- coat of something or a top coat, or will l need 2 coats? And lastly, can l cover the rest of the already painted part of the walk with the epoxy for uniform color? Sorry, l guess that was 5 questions.
Thank you in advance for any assistance you can give me.
Hi Maureen. Polymer-modified concrete resurfacers only need 24 hours or so of curing before applying a coating or paint. The reason for this is that they are applied thin. If it was a deep repair of 2-3 inches, then you would want to wait a few days or so. New concrete pours require a minimum of 30 days before coating or painting.
DO NOT USE and epoxy coating for outdoors. Epoxy will deteriorate from exposure to direct sunlight for long periods of a time. What you need to use is a concrete paint or a 1-part epoxy paint. 1-part epoxy paint is not an epoxy coating. It is latex acrylic concrete paint with a little bit of epoxy resin added to increase durability. These type of paints are U.V. stable and can be used outside. The Behr product is an example of a 1-part epoxy paint. This article here explains the differences between true epoxy and 1-part epoxy paint.
The broom finish will provide enough bite for the paint. You will most likely need to apply a couple of coats though to get a good finish. As a side note, concrete resurfacers cannot be etched. They do not contain the same minerals that standard concrete does that the etching solution reacts with. If this was a garage floor that was going to be coated with epoxy, you would need to grind the surface in order for the epoxy to adhere properly.
Hello, Shea, and thank you for your response. Things got a bit stickier since my initial post. The mason has agreed to come and seal the area he ground down and resurfaced. I don’t know what product he will be using. The product I have is an Exterior Concrete Sealer (grey), touting “heavy-duty resin” on the label. With 2/3 of the walk painted and this new 1/3 sealed (and a lighter color), will I be able to use the Exterior Concrete Sealer to even up the color on both the painted surface and the sealed surface? Or would I need to strip the paint off first?
Thank you again!
Maureen
Hi Maureen. What do you mean by “seal” exactly? I need more information. Can you provide the exact name of the products to be used? Also, is your goal to use the same product over the entire walkway?
Hello,
Well, yes, I’m wondering that with part of it painted and part of it sealed, if there are inconsistencies with color, can I apply the sealer to the painted concrete? The product I’m using is Valspar Exterior Concrete Sealer (grey). You can find it on Valspar’s website, valspar.com, under Concrete, Brick and Floor Coatings under the “Products” tab. Specifically for patios, driveways, pool decks and other masonry surfaces.
Thanks!
If you look on that page, Maureen, it states specifically in the prep section that it is for bare concrete and masonry. If the concrete is painted, the paint needs to be removed first and then the instruction followed for bare concrete. Concrete paint and concrete sealers are not compatible. You need to go with one or the other. I hope that clear things up.
Shea, I just put down self leveling compound on my basement floor. Since I cant acid etch it, you recommended that it be grinded. Grind with what?
Hi Mikel. Hopefully you used an actual polymer-modified product that is designed as an actual wear layer and did not apply a self-leveling underlayment whose intended purpose is to provide a level surface for tile, wood floors, and carpet. The Diamabrush attachment on a floor maintainer would be the easiest grinding method and the most forgiving. The goal is to create the proper profile and not to take down a lot of the surface. This article here shows what it looks like.
We had a new shop built with a new concrete floor. The expansion joints were chipping all around the edges without ever using. The company that poured the concrete came back and applied foam in cracks and then self leveling caulk (Silkaflex) into joints. I want to apply Rustoleum Epoxy Shield to floor. Is the acid etching process going to ruin the caulk? Will the epoxy stick to the caulk?
Thank you.
Hi Dianne. Rust-Oleum EpoxyShield is a residential quality coating that uses a citric acid etch. It should not harm the SikaFlex. Do not apply the epoxy to SikaFlex though. It will not stick well and is not suited to have a coating applied over it since it’s too flexible. Just as an FYI, if this concrete surface is going to be a busy shop environment, then we do not recommend EpoxyShield. This article here will give you an idea of what to expect from these type of residential quality DIY coatings.
Thank you. What would you suggest for a busy garage and a surface that looks good. Possibly water based stain with a clear coat over it?
We recommend using commercial quality coating products, Diane. You truly get what you pay for with coatings and you don’t want to buy anything that you can purchase at a home improvement center if you want something that is going to last. Single-part polyurea is an example of a commercial quality coating. I would suggest looking through our product reviews section as well as our Epoxy 101 section to get a better understanding about coatings. Stains and dyes create a nice decorative finish, but they still require a high quality clear coating to protect them. If using a water-based dye, you will need to prep the concrete first via etching or grinding so that the clear coating will adhere properly.
I have a new slab that has a broom finish. It is 24 X 40 and will have a building installed in 2 weeks. Does the new slab need to be etched? Can I epoxy the slab before the building is installed?
Thanks
Cliff
Hi Cliff. Yes, the concrete still needs to be etched. A broom finish will not provide the proper profile. In fact, a broom finished surface requires much more epoxy to get a smooth finish and will reduce the coverage rate considerably. We would recommend grinding first in order to knock down the broom finish.
hello, i need my basement sealed and am considering an acrylic sealer. i was warned not to use etch indoors due to the difficulty in rinsing. its a plain old basement floor built in 2013. should i etch?
Hi Bob. Acrylic coatings typically do not require etching. If you place a few drops of water on the concrete in various areas and it gets absorbed within a few minutes, then the only requirement is to make sure the concrete is clean and free of any oil, waxes or other contaminants before applying the acrylic coating.
I’m installing EpoxyShield in a Florida garage. I’ve been prepping the floor for a few days, using a 7” angle grinder with a Diamabrush attachment to remove the previous paint and other coatings (not sure what previous coatings were used over the years as the house is 70 years old). After reading many of your articles, I’m concerned that the concrete is too smooth for good epoxy adherence. I’ve read that it should feel like 150 grit sandpaper, it’s no where near that rough. I’ve performed the water drop test and the water beads do immediately turn the concrete dark, but beads will sit on the surface for 10+ minutes without fully soaking into the concrete. I’m kind of baffled because I’ve spent so much time mechanically grinding the slab down to what seems like bare concrete but still can’t seem to meet the 150 grit and water drop test. Just a note, when performing the water drop test, if I spread the water thin across the surface, it seems to accept the water into the slab. Is it possible this slab is just super dense? Any help would be greatly appreciated!
Hi Demetri. Areas where the concrete turn dark and absorb the water, even if it takes a few minutes, will be fine for the type of coating you plan to apply. Dense concrete can react that way. However, if you have areas where the water just beads and doesn’t soak in, then neither will the coating. Those areas will require further grinding. Don’t worry as much about the surface feeling like 150 grit sandpaper. Concrete has a different feel and most people think it feels much smoother than it is.
Thanks, that helps. What would be the purpose of continuing to grind, just so I understand. Does the concrete become more porous further down? Would muriatic acid help instead of grinding at this point?
The surface of concrete can become very smooth when it is troweled during the finishing process. Dense concrete can make removing that smooth finish more difficult. It’s not that you need to grind down further. You just need to grind enough to rough up that smooth surface. If you rented a grinder, muriatic acid can come in handy to treat tough areas instead of renting the grinder again. However, it’s not as efficient as grinding. If you do use it, make sure to neutralize properly and rinse well. Allow the concrete a couple of days to dry out.
How important is it to use a degreeser on a new floor? I used a little bit of soap and water and then after I washed that I then did a muriatic acid etch. I’m a little bit worried that cleaning with soap and water may not have been enough
Hi Dennis. If the concrete was not really dirty, had oil stains, and other contaminants, then a soap scrub works fine. Degreasers are used if you have grease and oils in the concrete. Just make sure that you properly neutralized the muriatic acid etch or you will develop problems later.
Hi Shea
Thanks for the site, I feel pretty well briefed now on the various techniques and will be going for a 100% solids coating from a local manufacturer rather than a DIY kit.
Happy with the prep stages (we’ll be spot treating a couple of small oil stains, TSP washing everywhere and then acid etching with muriatic followed by neutralising / rinsing with bicarb)
Can you recommend whether its best to deal with a several hairline cracks before or after the washing and acid etch? I was tempted to deal with the cracks first (two pack epoxy-based filler after routing them out slightly) then wash and acid etch, but I‘m a bit concerned about affecting all that filling work with the acid and whether it’s better to do the crack filling as the last thing?
Many thanks!
Hi Daryl. We recommend doing any repairs before final concrete prep (etch or grind), but it’s not required to do it in that order. It just ensures that the floor is clean and ready to go once done. Just make sure to sand or grind the repair areas after the filler has cured. The acid will not have any effect on the epoxy, nor will it provide the proper profile for the coating to adhere to the repair.
Hi Shea, My husband and I are following the directions on the Rust-Oleum Epoxy Shield 2.5 car garage kit. We are at the point where we can paint the floor, but the humidity here is scheduled to be high for the next two weeks, taking us into August, which probably won’t be any better. Will we need to repeat the cleaning, etching, and moisture stop steps if we have to wait until September to paint? We want to put our “stuff” back in the garage on top of tarps to keep it clean until the humidity is at the right point for us to move forward. Thanks for your help.
Hi, Jan. Great job paying attention to the humidity level. Once the concrete is etched, the surface will not change. All you need to do when the weather finally cooperates is make sure the concrete is clean before you apply the epoxy.
After etching the concrete properly can I apply a primer before the Rustoleum floor kit? Someone told me that is another benefit
Hello Sheri. We are assuming you are referring to 2-part epoxy kits. The Rust-Oleum kits are not intended to be used with a true epoxy primer. True 2-part epoxy primer coatings are of higher quality and cost more than Rust-Oleum epoxy. The Rust-Oleum kits are budget-friendly, residential performance kits. This article here explains more. Do not confuse an epoxy primer with concrete primer paint or concrete bonding primer. They are not epoxy and are not compatible with epoxy coatings. Apply the Rust-Oleum epoxy directly to properly prepared bare concrete for the best performance.
What is the difference between epoxy and concrete stain
Hi Judy. Epoxy is a very hard coating that is much thicker than paint. Stain permanently colors concrete but does not protect it. A clear coating must be applied over it to seal the concrete and make the stain colors pop. I suggest reading this article about epoxy and coatings and this article about stains.
Hi. I am hoping to apply Rustoleum Epoxyshield on my house’s 50-year-old basement floor. I have someone lined up to do the grinding. However, when the floor was originally poured, the framing boards were not removed, so the floor is made up of numerous sections of concrete surrounded by 2X4s on edge. What should I do to prepare the wood for an epoxy finish?
Hi Susan. 2×4’s where fairly common to use as expansion joints up through the 60’s and into the 70’s. You can apply epoxy to the boards, it just requires sanding the surface with 80-100 grit sandpaper to remove any old residues and other contaminants so that the epoxy will adhere. Keep in mind though that epoxy does not flex. If you get any movement of the boards or expansion or contraction of the concrete, cracks in the epoxy will form between the boards and concrete. Also, EpoxyShield is a thin water-based coating. Due to the grinding, you may need two color coats. This is because the first coat will be absorbed more than usual by the concrete and can sometimes end up too thin. The result is a splotchy looking floor with pale color. If this happens, a second color will be needed.
Thanks for the quick and comprehensive reply! I don’t want to create a problem for myself down the road. Would you recommend something other than epoxy, like basement floor paint? Or maybe putting a concrete patch over the boards prior to grinding? Know that I really appreciate your input.
Paint is more flexible, but a lot less durable than epoxy. It has more of a flat finish as well. Plus, you can’t apply a clear coat if you were planning on that. Lastly, though it is more flexible, it will still form a crack along both sides of the joint, though it may take longer to do so. One of the problems is that the boards create a large span between the slabs. Also, 2×4’s back in the day used to be closer to 2″ wide than the 1.5″ they are today. You cannot create a seamless looking joint that the epoxy will cover if that is your goal. The gap is just far to wide. Are the boards flush with the concrete height or 1/4″ or so below it?
The majority of the boards are at or very slightly below the level of the slabs. I would say nowhere is any as low as 1/4″ below the slabs. The basement got wet in May and I’m still trying to come up with a viable solution for a floor covering. (It had been carpeted, which I always thought was crazy.) I’ve read about self-leveling products that I thought I might be able to use and then let the grinder smooth it all out. Thanks again for your help. Much appreciated.
Hi Susan. There are specially formulated epoxy and polyurea fillers with higher elongation rates that can fill the joints as long as the boards are below the joint level. However, if the independent slabs expand or contract too much, the epoxy coating over the top of the joints will still crack. Joints such as yours usually are left alone when it comes to coatings since there is not a proper method available for covering them up. Of more concern is where did the water come from? Coatings do not tolerate moisture well from below. Have you moisture tested the basement? If you have moisture or moisture vapor that transmits from below the slabs, then a coating will not work as it can begin to peel up over time.