
Should I apply a clear top coat to my epoxy garage floor coating? This is a reasonable question that pops up from time to time for the average DIY’er looking to save some money. The real question, however, is why wouldn’t you apply a clear coat? After all, there are many benefits to adding a clear top coat over the color coat for a garage floor.
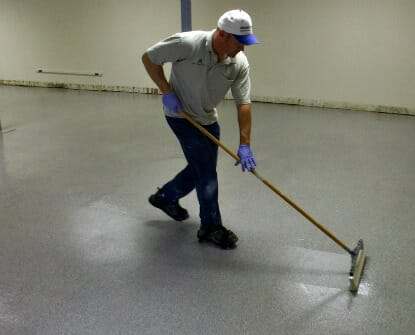
Anyone who has installed a garage floor coating properly will tell you that the hardest and most time-consuming part is prepping the floor for the epoxy. Applying the epoxy goes fast. For many, it is the fun part of the job. So after all that work of getting the concrete ready, you should consider spending a little more time and money to ensure a longer-lasting and even more beautiful floor coating.
There are various clear coating options to choose from. However, the one rule to keep in mind is that the clear coat should perform just as well if not better than the color coat. With this in mind, let’s take a look at the top 10 reasons why you should apply a clear topcoat to your epoxy garage floor.
1. Adds durability and wear
A proper clear coat will extend the life and add durability to your garage floor coating. Depending on the type of clear used, it can provide better stain and chemical resistance than the color coat. Lastly, the additional coat adds thickness to the floor coating to absorb impacts better and reduce any chance of hot tire pickup.
2. Protects the color coat
A clear coat acts as a sacrificial layer to protect the epoxy color coat. Without it, the color coat can lose its luster from wear. Though resistant to most chemicals, some oil spills or leaks allowed to sit for long periods can discolor the coating depending on the quality of the color coat applied.
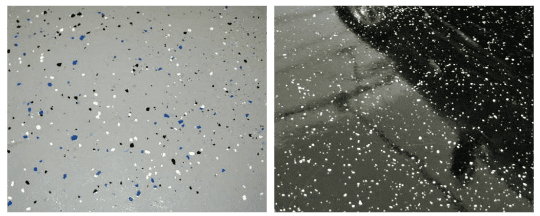
3. Protects the color flakes
If you apply paint chips or color flakes to your floor, the clear coat will lock them in and protect them from peeling up and collecting dirt at the edges. Cleaning the floor and other activities can cause color flakes to pull up or chip away. When a clear coat is added, the color flakes are protected by the clear coat layer.
4. It is easier to clean
A clear coat makes a garage floor coating easier to clean. Dust mops and microfiber mop pads can glide over the floor coating without catching color flakes. This is especially true if you have a heavy flake coverage on your floor. It also allows for scrubbing without the worry of losing color flakes or dulling the color coat.
5. A Clear topcoat Adds depth to the floor coating
The additional layer of a clear topcoat adds depth to the look of the garage floor coating. This creates a richer-looking surface that appears more luxurious and thicker than it is.
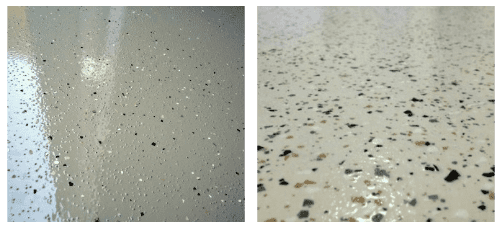
6. It Creates a glossier looking finish
A clear coat will add a glossy shine to the floor coating and reflect light better than the color coat.
This is a great benefit when working on projects in the garage or automotive maintenance. The additional light reflection will brighten up your garage space. You may not need to purchase more overhead lighting or as much as you thought you might need.
7. A Clear Coat hides scratches better
All garage floor coatings will develop microscopic and sometimes larger scratches on the surface. A clear top coat helps to hide or camouflage these scratches so they are less noticeable and do not detract from the coating’s appearance. It does this by effectively acting as the sacrificial layer to prevent the color coat from being scratched which is much more obvious.
8. It’s a good medium for anti-slip additives
Anti-slip additives are hidden much better in a clear coat. Because most anti-slip media is translucent in color they will not stand out. Without a clear topcoat, they are added to the color coat instead. This makes the anti-slip granules much more visible as little bumps resembling sandpaper on the garage floor.
Furthermore, anti-slip media is more effective in clear coats. This is because many clear coat options are thinner in dry film thickness which allows the anti-slip media to protrude more. When used in thicker color coats, it does not protrude as much and is less effective.
9. Can be recoated to look new again
After many years of use, an epoxy garage floor coating can start to show its age depending on how much activity it has seen. If it has a clear topcoat, it can easily be roughed up with sandpaper to have a new coat of clear applied.
The sanding of the old top coat removes any blemishes, scratches, and other imperfections that the clear coating acquired over the years. Once the new clear coat is applied, your garage floor coating will look brand new again.
10. Clear topcoats just look awesome!
When you compare an epoxy floor coating with a clear coat to one that does not, there is no question about which looks better. The clear coat gives the garage floor that extra depth and showroom shine that screams “Look at me!”
If you’re on the fence about whether or not to add a clear topcoat to your garage floor coating, think about all the benefits it will provide in the long term. Yes, it will cost a little more money and yes, it may mean one more day of being without your garage. However, once you add a clear coat, you will be rewarded with a garage floor to be proud of for years to come. You will be glad you did it!
Update – Please read
Clear coats are designed for application over 2-part resinous coatings and single-part thermosetting resinous coatings. Do not confuse garage floor paint or 1-part epoxy paint as a garage floor coating. These are very thin acrylic latex paints that will not form a chemical bond with a resinous coating. Please read our article about applying clear coats over paint if this is your plan.
The story:
I just laid down my full broadcast 100% solids floor in ~420 SF. Everything went great until the clear coat.
1. If you think you purchased polyurethane, make sure to read the can. In all my planning I had gotten an epoxy clear coat and didn’t realize it till it got hot enough to melt the pain tray liner and then get rock solid.
The clear coat now is ~2 weeks old, and I just found a 2″x2″ square that somehow got missed in both touch up rounds following the first application. I am going to order anther batch of clear coat and do the entire surface again (will help even out too, since the screw up above cost me half a batch so I had to do the remaining 3/4 of the garage with 1/2 of the clear coat and there are definitely some areas that are more pooled and some that are barely clear coated)
The question:
I’ve been reading online and the recommendation is to sand the existing clear coat to remove scratches that have occurred since that coat was laid down and then applying the new coat right on top. Few questions:
1. With as new as this is, and the only usage its seen is cars being parked and walking to and from the cars, how necessary is sanding?
2. Do I need to sand the whole floor or just the areas where, in my situation, scratches could have occurred
3. What grit level should be used for the sanding – are we concerned about opening up pores, so that the clearcoat can adhere, like when we profiled the concrete or just knock down any inconsistent spots so they aren’t permanently locked under the new clear coat. I guess it comes down to if the new clear coat will be chemically bonded to the underlying clearcoat or if it is just physically bonded.
Hello Alex. Sorry to hear about your mix up with the clear epoxy top coat thinking it was polyurethane. You ask some great questions however and your experience with the 100% solids epoxy getting hot enough to melt your tray liner is a testament to why it’s poured on the floor. As you know, polyurethane can be rolled out of a tray and explains why you thought you had a clear polyurethane coating. No worries though, after you fix it you most likely won’t notice a thing.
When you are in the 24 hour re-coat window, epoxy or polyurethane makes a chemical bond with the previous coating. Once you are past that window, the finished surface requires sanding or roughing up in order for the epoxy to physically bond like it did with the concrete. Use 80 to 100 grit sandpaper. A pole sander works well for this. You only need to rough up the surface of the epoxy, not remove it, so the sanding should not be very labor intensive. You are just trying to remove the gloss. Sand down any roller marks or visible high spots that you have observed. Since you did a full broadcast of chips, there is no need to sand the area you completely missed as the chips create their own grip for the epoxy. Once done, vacuum up the dust and wipe down the floor with denatured alcohol to remove any remaining dust or contaminants. After that, apply your coat of clear for the final top coat and you will be done.
That was excellent information, thank you very much. There were some high spots (when the epoxy had started to cure during my mistake, so it almost “piled” where it got rolled out) so this will also be a good opportunity to get that fixed as well.
Now to explain to the wife why she can’t use the garage again, lucky me!
How long after applying Rustoleum Epoxy water based paint, do I have to put down their clear coat on top? As always thanks for your time and help
You need to wait approximately 10-12 hours depending on temperature before applying the clear coat and no more than 24 hours. It bonds chemically to the epoxy during that period. You can test to see if it’s ready by pressing your thumb on the surface. If it doesn’t leave a print, you are ready to go. If you wait longer than 24 hours you will need to rough up the surface of the epoxy in order for the clear coat to bond mechanically instead.
I’m a bit confused. I don’t know anything about this subject but I’m not seeing any polyurethane that is for anything other than wood. I’ve talked to people at 2 different home improvement stores and they say the same thing. Can you link to what kind of products you’d suggest for clear coating. Neither store I went to carried anything that this article suggests. I want to do what this article suggests but I can’t find anywhere what kind of specific product I should be using. Thanks
Hi Bryan. This is a great question and a subject for a future article. Home improvement stores are not the place to purchase concrete floor coating products. With few exceptions, the only products they carry are the inexpensive water based epoxy floor coatings. The only polyurethane products you will find is for wood floors and furniture.
Most of these products are purchased online from specialty concrete coating companies. An example would be our sponsors Legacy Industrial and EpoxyMaster. They both sell clear polyurethane and epoxy coatings for concrete. We suggest giving them a call and they will make the best recommendaton for your project. There are many others to choose from if you do an internet search. Depending on where you live, there may be a brick and mortar company you can buy it from such as Sherwin Williams. They have an entire line of concrete coating products.
Last summer I used epoxy and then clear coated my father-in=law’s garage. This spring it flooded, and he wanted to put water seal on top of the epoxy and top coat. I have the garage have done and it won’t dry. Have I messed up completely by doing this, or will it dry, or do I need to try to get the water seal off, somehow, and apply another coat of clear coat?
Hi Dee. Why does your father-in-law want a water seal on the epoxy? Epoxy is already a sealer. What type of sealer did you apply? The only thing that will stick to epoxy is another 2-part resinous coating and that requires that you prep the older epoxy first.
He got Thompson’s water seal for multi-surfaces. I now know that that was the wrong thing to put on it, how do I get it off from there, without taking the epoxy off?
The first thing we recommend is contacting Thompson’s directly via phone and ask for tech help. They should have the best solution for removing the sealer. It will not adhere well to the epoxy and most likely can be cleaned off via chemical means. Keep in mind that it should not remove any epoxy but it will degloss the finish. Once the Thompson’s is removed, you can apply another clear coat to the epoxy.
This is not a floor question but my grandson did a stained glass mosaic on a table top, grouted it, and then poured a two part epoxy over it. Some spots did not cure and remained sticky. Someone suggested sanding with a fine paper and now it is worse. Its scuffed and dull and with the pretty mosaic underneath it may be ruined. Any way you know of that we can try to save it? Still sticky and now scuffed and dull. Please help if you can!
Hi Joni. It sounds like your grandson may not have mixed the epoxy up well. Let it set for a few days or more to see if it cures all the way. Sometimes it will. If it does finally harden up, lightly sand it again, wipe it down with some denatured alcohol and then apply another thin coat of epoxy. It will fill in the scratch marks and shine things right back up. Remember that it will be tacky for at least 24 hours after application.
I recently applied epoxy paint to my garage floor. I prepped the floor as well as I possibly could. I added a coat of primer before adding the epoxy paint. I did put the flakes down as well. The epoxy paint was put down about 10 days ago. I already see a small spot where the paint has chipped. Looks like a place where a tire sits. My question is, would putting down a clear coat now do any good? If so, what type of additional prep work would be necessary? Thank you for your time.
Hi Tim, did you put down a 1-Part epoxy paint or an actual 2-Part epoxy product? Also, what type of primer did you put down? It’s never too late to apply a clear coat, but the answer depends on what you put down.
I have a similar question. We hired someone to assist us in installing an epoxy coating as part of a new garage build (concrete was cured for a couple months before this went down). The epoxy is a 2-part epoxy (Sherwin Williams HS 1000) and it is covered with flakes – about 30-40% coverage. Unfortunately in one half of the garage, they made a pretty bad mess of the flakes, spilling piles of them in a few areas and then left it to cure like that for more than a week while we were gone (no top coat installed). Obviously when we returned, we asked for it to be fixed, so they came back in, ground down that half of the garage and just re-coated and re-flaked that half of the garage yesterday. Unfortunately, now the first half has been down for more than a month.
We understand the benefits of a clear coating and had intended upon doing a coat, but now with one half having been down that long and having flakes on it, we are not sure if we are able to put down a clear coat on the “old half” without ruining the flakes. Because there are flakes, scuffing up/sanding doesn’t seem to be possible.
Is it possible to still add the clear coat, and if so, what kind is best based on the epoxy that we have installed and any special instructions for installing it on a well cured epoxy-flaked floor? (No cars have been put into the garage yet and have only had very minimal foot traffic). Or are we just best off dealing with the floor the way it is without a coat, knowing that we will have a harder time cleaning and the flakes could break off with cars being parked on it? Will we be leaving tire tracks on the flakes? Any advice will be greatly appreciated. Thanks in advance!!
Hi Colette. It’s not too late to add a clear coat, but you will need to prep the floor for a mechanical bond since you are past the point of achieving a chemical bond. Since it’s new and you haven’t driven on it yet, you can get a good mechanical bond by de-glossing and roughing up the surface with a green scrub pad on a low speed floor buffer. The green scrub pad is not as rough as sandpaper or a sanding screen and will treat your color flakes much better without gouging them. It will pull up and break some of the partially attached flakes on the floor, but it should not be that noticeable if they were applied correctly initially. The clear coat will fill in the fine scratches in the flake. Just run the buffer over the floor dry. The idea is to de-gloss it, not try to remove any of the existing epoxy. Once you are done, sweep or vacuum and then wipe the floor down with denatured alcohol on a towel. This will evaporate fast and clean up all the residual dust on the floor. After that you can apply the top coat. Stick with Sherwin Williams. They have a nice high solids polyurethane that you can use. You will want to put down 2 coats.
If you decide not to clear coat you will still have a nice durable floor. The Sherwin Williams HS 1000 you put down is a nice higer solids product that is much better than the typical DIY stuff from the home improvement centers. Yes you will loose some of the advantages of a clear coat, but you will find that the floor is still much easier to clean than concrete and the tires from your cars will not damage the color flake. Yes, you will loose some, but it should not be that noticeable for a few years.
We installed the Rust-oleum Rocksolid garage floor coating kit, industrial-grade polycuramine with chips yesterday, my question is how long do we have to let it dry before we can put the clear top coat on? It says it is ready for foot traffic in 8-10 hours, so is that dry enough to apply the clear top coat?
Hello Nancy. RockSolid states a long recoat window – up to 7 days in some cases. Test for a thumb print after the 8-10 hours. If you don’t get one then you are ready for the next coat.
We just put 1000 hs epoxy on our floor. now we want to put clear coat on top of it. Any recommendation for clear coat ? sherwin williams rexthane clear? I was looking ArmorSeal HS Polyurethane but its is expensive.
Hi Raj. The SW Rexthane Clear is a good moisture cure polyurethane that will provide good protection for a typical garage floor. If you anticipate heavy use in the garage for things like fabricating, working on or restoring vehicles, and other big projects, then the ArmorSeal polyurethane would be the better choice in the long run.
I am prepared to put down the Rustoleum garage floor epoxy in the morning. I then hope to put down a poly coat tomorrow evening. My question is is there a guesstimated squarefootage that a gallon of poly will cover? My garage is 580 sq. ft.
Hi Josh. The polyurethane you purchased should give you that information. Generally it’s around 350 to 400 sq. ft. per gallon, surface dependent.
If I do use a clear coat is the non slip additive still added on to the epoxy or do I add it on the clear. Also I plan on using the epoxy master kit, can you add the nonslip directly to the batch when mixing for better uniformity? Or if added with the clear directly to the can of clear prior to rolling?
Hi Jason. Apply the non-slip additive in the last coat you plan on putting down. EpoxyMaster is a thick 100% solids coating. If you don’t apply a top coat to it you will need to broadcast the non-slip over the surface immediately after it is applied. If it’s mixed in with the epoxy it will not be very effective due to the thickness of the epoxy.
EpoxyMaster offers a great polyurethane for a top coat. If you apply that, then it’s best to add the anti-slip in as you mix the polyurethane. Because polyurethane is only 2 – 3 mils thick, the anti-slip disperses nicely in the coating. If you are working out of a paint tray vs. pouring it all out onto the floor, you will want to remix occasionally or the anti-slip will start to sink to the bottom of the tray or pot and cause clumping.
Thanks for the advice. Will all polyurethanes for epoxy be compatible? Might source locally. Also do you have any suggestions for epoxy coating a vertical surface. The garage pad borders a two foot high grade beam that I’d like to coat as well.
Most polyurethane coatings for concrete will be compatible, however check with the manufacturer of who you purchase it from first. You will not find polyurethane at a home improvement center and make sure you don’t confuse it with polyurethane for wood floors. If you have a Sherwin Williams locally they should carry it.
Any reason to use a prime coat with epoxy master? Will it increase lifespan?
It won’t increase the life span but it will provide for a higher build coating. EpoxyMaster will adhere just fine to a properly prepped floor. An epoxy primer is not required when applying a floor coating, however, a primer does have many advantages. You can read about epoxy primers here.
We are planning to use 1 coat of Garage Guard water based epoxy followed by 2 coats of Kennel Seal (nontoxic water based) clear coat on the concrete floor of our small (240 sq ft) dog kennel. Should we apply 2 coats of Garage Guard and when should we apply the clear coat – within 24 hrs or after the Garage Guard is completely dry? Thanks.
Hi Amy. We are glad you contacted us. The Kennel Seal is a water based acrylic sealer and is not compatible with epoxy. It’s designed to be applied to bare concrete and not used as a top coat to other products. It will not adhere to the epoxy nor is it as durable.
The Garage Guard is a low solids epoxy that will seal the concrete. We recommend using two coats for a kennel. Some low solid epoxy products have been known to stain from pet urine if allowed to sit however. If you want a clear coat that will provide great chemical protection against stains, we recommend applying a polyurethane (urethane) concrete floor coating over the epoxy. You would wait 12 – 24 hours before applying the polyurethane.
Hi Shea, Thanks for your reply. You saved us a lot of time and lots of headache! Can you recommend a polyurethane to go over the 2 coats of Garage Guard? Ideally we’d like something that is DIY user friendly (which is why we chose the Garage Guard in the first place). Thanks again.
There are quite a few good polyurethane floor coatings out there Amy. Legacy Industrial has a very good single part moisture cured product with excellent abrasion, chemical, and stain resistance. No mixing of two products required and you can apply it with a roller out of a paint tray. You can find it here.
If I added a 1 part rustoleom epoxy garage paint with flakes yesterday morning around 10am would it be too soon or too late to add the clear coat 1-2 days later without doing a mechanical bond?
Hi Pete. If you applied a 1-Part product by Rust-Oleum you can’t apply a clear coat over it. The 1-Part paint by Rust-Oleum is a latex paint, not an epoxy and a true 2-Part resinous clear coat will not bond chemically to it. It what you applied is the 2-Part EpoxyShield Garage Floor Epoxy you can get a chemical bond but you are fast running out of time. Ideally you would need to do it today.
thanks shea for your assistance…
Your are welcome!
Need some guidance on an epoxy floor installation problem.
Did the prep – used floor grinder to knock down high spots, three power washing rinses, muriatic acid etching and three more power washing rinses to get to a point where there was no residue on my fingers when I did the finger test. The concrete had some areas with a darker color, but not stains.
I have installed Rust-Oleum’s Professional 2-part solvent based floor coating with the addition of colored flakes. All looked great. None of the different colored areas were visible after painting Started to apply the clear coat, Rusto-leum Premium 2-part solvent based Clear Coat, with a roller and immediately (10 seconds) had the different colored area bleed through. I immediately stopped the application of the clear coat after only about 6 square feet. The other issue was a lot of bubbles imbedded in the clear coat, which were still in place after the clear coat hardened.
Is there a polyurethane (non-epoxy) product which may not have the same issues? The paint will have been on the floor for more than a week by the time I can readdress the clear coating, so what prep will I have to do for the entire floor? I already plan on sanding the area which was clear coated.
Thanks in advance!
Hi Mitchell. How long did you wait before applying the clear? You need to wait at least 10 hours. If not, the color coat will bleed through to the clear no matter which brand you use. A polyurethane top coat is much better than an epoxy clear in terms of durability and being U.V. stable. You can order polyurethane from a number of vendors. EpoxyMaster, Legacy Industrial, and Garage Flooring LLC are just a few.
For prep you will need to degloss the coating by roughing it up with 100 to 150 grit sandpaper to provide a mechanical bond. Vacuum and then wipe the surface down with denatured alcohol on a clean towel. After that you are ready to go.
The clear coat was applied 4 days later, almost the end of the window, per Rust-oleum’s recoat charts. Do you know if SW offers a poly solution? Thanks for the quick feedback! Great information source.
That’s odd Mitchell that you had bleed through after 4 days. You didn’t by chance clean and reuse a roller from the color coat did you? As far as Sherwin Williams product they do have a few. AmorSeal Rexthane and their Hi Solid Polyurethane are a couple. If you compare Data Sheets you can see that they aren’t as durable as the others we recommended, but they are still much better than the Rust-Oleum clear epoxy. Give your local SW dealer a call or pay them a visit to see what they have currently available for you.
No, I used a separate roller for each batch of the color and the clear coat. I spoke with SW this pm and they suggested I contact Rust-oleum as it may have been a bad batch, but I still do not understand how the clear coat could pull something through rock hard epoxy, let alone in 15 seconds. Very puzzling. I will research your non-SW recommendations.
I applied Rustoleum Epoxyshield Garage Floor paint on this past Tuesday. Yesterday I applied Rustoleum Premium Clear Coat. I used a 3/8 inch nap roller per the instructions. Today I notice all the lint that is embeded in the top coat. I also did not use the anti-slip additive which now I wish I had because it looks like it will be really slick. My question is do I need to sand the surface and recoat it with another top coat with the anti-slip additive and can I use a foam roller to apply the top coat ?
Hello Duane. Do not use a foam roller as will not apply the epoxy at the correct thickness. It’s important to use a premium lint free roller when applying epoxy. This is an example here . Even with the lint free rollers it’s important to remove any remaining lint from the manufacturing process. Do this by taking a 2′ to 3′ strip of duct tape and then step on one end and pull it taut with your hand. While the tape is taut, run the empty roller (using the roller frame) up and down the strip of tape making sure to run from one end of the roller to the next. This will remove any lint that may me left on the roller.
To remove the lint from the surface you will need to sand it first, vacuum, and then wipe the surface down with denatured alcohol on a clean towel. Once you do this it will be immediately ready for the new coat. Since the EpoxyShield clear is not real thick, you can add the anti-slip in during the mixing process. Just be sure to remix occasionally or the anti-slip will sink to the bottom of your tray and cause clumping.
Thanks Shea for the tips.
Hi I have painted my garage floor with Rustoleum Garage floor paint .It was a single pot paint with water clean up for brushes and rollers .Can I apply the Rustoleum Epoxy Clearcoat over this product as it is a solvent based product.
Thanks Brian
Hi Brian. The Rust-Oleum Epoxy Clear Coat is designed to be applied to either bare concrete or another 2-Part epoxy coating such as the EpoxyShield Garage Floor Epoxy kit. It sounds like you have the 1-Part acrylic concrete paint, not epoxy. The solvent based clear coat would soften the latex acrylic paint as you were applying it and cause multiple problems.
Thank you for your help it has saved me creating a huge mess.I think these company’s should put warnings on there products about not using solvent based over the water based paints , as its says on the epoxy shield clear coat that it is suitable for coated and bare concrete
Many thanks Brian
I applied a polyurethane topcoat over my epoxy but am noticing that the polyurethane is yellowing under rubber (bike tires, compressor tires, etc. no car in there yet). The topcoat is over a week old. What’s happening and can it be prevented or will it stop? Thanks.
With respect to the browning it seems the supplier sold me the wrong stuff. What do you recommend to sand with prior to recoating? Also is there a way to strip the polyurethane without damaging epoxy underneath.
Hi Jason. Sanding is the only way to remove it. The easiest method is to use a floor buffer with a sanding screen attachment. Use an 80 grit sanding screen and check it from time to time for clogging. Don’t worry about scuffing up the epoxy. It helps with the mechanical bond of the polyurethane you are going to apply over it.
Once the wrong product is off, vacuum well with a shop vac and then wipe down the surface with denatured alcohol applied liberally on a towel. This will remove the remaining dust and debris on the surface. It evaporates fast so you can start applying the polyurethane immediately after the wipe down.
Cleaned cement garage floor,one coat of behr concrete bonding primer,one coat of behr one part epoxy paint with flakes. Would like to add a top clear coat very confused if possible and what to use also time limit? Painted 6 hours ago. Light use garage turned rec room thank you
Hi Linda. Clear is not available. 1-Part epoxy paint cannot be made clear since it is paint, not epoxy. The true clear top coats are more expensive and made to be applied on top a 2-Part resinous epoxy coating in order to achieve a chemical bond.
I just did a 2 part epoxy floor, and went fairly heavy on the chips…. Surface is fairly rough due to the .amount of flakes I used…. Now would like to put a clear coat over the top… It’s been approximately 36 hours…. Will I need to “rough” the surface for adhesion now?
Hi Shanon. Here’s the problem. Roughing up a surface that has a lot of chips can be very difficult without messing up the chips. If it’s a fairly heavy color chipped floor, more chips than epoxy showing or close to full refusal, then you can get away with applying a clear directly over them since the chips will create a mechanical bond. If you have more epoxy showing than color chips, light to medium flaked floor, then you will need to rough it up depending on the product used. Since you didn’t state what you used, call the manufacturer to verify their recoat window for a chemical bond.
So I am repairing a chipped epoxy floor. The chipped portion that needs to be repaired has been patched with vinyl cement patch and has cured. Here is what was previously put down in the rest of the garage: Rustoleum Garage Epoxyshield (2 part) along with the Rustoleum Epoxyshield Premium Clear Coat with antislip additive.
If I want to put down two coats of of the Garage epoxy in the repaired area (to give a “thicker” layer), how long do I need to wait before applying the second coat of the Garage Epoxy. On the FAQ’s at the Rustoleum site, they were saying 7 days before re-coating so that the first coat could fully cure. Is that correct? Also, when going from the Garage epoxy to the Premium Clear Coat, the instructions say to wait 24 hours, then apply it. That seems reasonable.
What about the time needed to wait before applying a second coat of the Premium Clear Coat?
Thank you in advance for your assistance.
Hello Martin. You need to wait a minimum of 12 hours and usually no longer than 48 with the Rust-Oleum EpoxyShield products. This includes the color coats and premium clear coat. Test the area for recoat by lightly pressing down with your thumb. It should feel somewhat tacky but not leave a thumb print. If it leaves a print, wait a little longer till it doesn’t.
7 days is how long it takes to fully cure. Waiting much more than 48 to 72 hours would require that you rough up the surface by sanding first before applying an additional coat.
Hi Shea,
Thank you very much for the information. If for some reason I had to wait the 7 days (I ordered the clear coat but it won’t get here until the end of the week and/or next week so I will probably wait a few days to put the 2nd colored coating down) and had to sand it down a bit to rough up the surface, I assume that I would have to rinse the grit/dust off the first layer of colored coating from that sanding process, is that correct?
How intense of a sanding would I have to do? I have read before that you said a pole sander would work. Is a light scarring enough?
Thank you again for your assistance.
The cheapest method is a pole sander and 100 grit sandpaper. Your goal is just to scratch the surface up good enough to remove the gloss. You can feel the difference. Once you do that, vacuum the surface to remove the heavy dust and then wipe it down with denatured alcohol applied liberally to a towel. This will remove the remaining dust and ensure a nice clean surface.
Applied SherWill shield Crete water based epoxy w flakes today. Reading this now looks like I should apply a poly over the floor w slip additive. Which poly would work well with the shield Crete ? Thanks for the advice
Hello John. We recommend purchasing from your local Sherwin-Williams store. Rexthane polyurethane floor coatings by SW is popular. They will be able to tell you which is most compatible with the Shield Crete coating. Keep in mind you will want to do this fairly quick to retain a chemical bond between the two coatings. If you wait too long, you will need to prep the color coat by roughing it up with sandpaper before applying the polyurethane.
I applied Rustoleum 2 part epoxy to my garage floor yesterday. Floor was properly prepped, etched, etc. Looks good but not as shiny as I expected. Would like to top coat with a water based polyurethane. Is that a good idea, any suggestions?
Hello Gary. Unless you live in a state with highly restrictive VOC regulations (So. Cal.), a water based polyurethane is not the best recommendation. Few companies manufacture it, they don’t work as well as solvent based though some have gotten much better, and they can be very pricey. A solvent based polyurethane generally costs much less and will have slightly better protection. Legacy Industrial is an example of a good vendor who sells both.
Also, do not confuse the polyurethane that is sold in home improvement centers as a concrete floor coating. They are for wood floors only. They will not adhere to epoxy and are yellow in color. Polyurethane for concrete floors can only be purchased from specialty stores or online floor coating vendors.
Hello All Garage Floors,
I want to say your website is extremely informative and I am disappointed that I didn’t come across it before I did my garage floor. I purchased Rustoleum Garage Floor Coating Kit for my garage floor. I wanted a nice clean glossy looking floor, similar to what you have in your picture gallery and that is not what I have. I hired a handyman to apply it. He had never done this before, but figured could follow instructions. My concerns started immediately afterwards as it took almost two weeks to complete dry. Had a tacky feel to the floor for weeks. A part of the floor near the wall also had a different color since application. In addition, I brought my car in the garage once after a rain and there are now water stains throughout my garage floor that I don’t know how to remove. I tried to use a water and a rag and some of the decorative chips came out. I want to add a clear top coat to give it a glossy finish, but want to know how to fix my current issues with the Epoxy, before I attempt that. Any advice would be great.
Thanks,
Hi Hector. A mild solution of vinegar and water are good for removing water spots. There isn’t much you can do about the different shades of color though. You would need to add another color coat to get better color uniformity. It’s perfectly normal for some color chips to flake off when a clear coat has not been added. If you decide to add another coat, either clear or color, you will need to rough up the surface first with 100 grit sandpaper. A pole sander works well for that. Sweep or vacuum up the dust and then wipe the floor down with denatured alcohol applied liberally to a lint free towel.
Pay close attention to the induction period that is required after mixing. It’s based on temperature and is in the instructions. Many times people don’t follow this and end up with the same problems you had with the epoxy not curing properly.