
Two questions that we are often asked is how to recoat or apply a new coat of epoxy to an older epoxy floor that has already cured and can you apply a clear coat to an older epoxy garage floor coating? If you’ve done a little bit of research on epoxy application, then you know how important floor preparation is. So let’s discuss how to determine if your floor qualifies for a recoat and then how to prep the floor before you do.
When can you apply epoxy over an older coating?
There are many examples of when you can apply a new coat of epoxy over an older cured coating. The most common of these are for people who had previously applied a color coat and now realize that they want the glossy looks and advantages of adding a clear coat.
Sometimes it’s as simple as someone who planned a multiple coat flooring system and waited too long between coats, allowing the epoxy to cure, before applying the next coat in order to get a chemical bond.
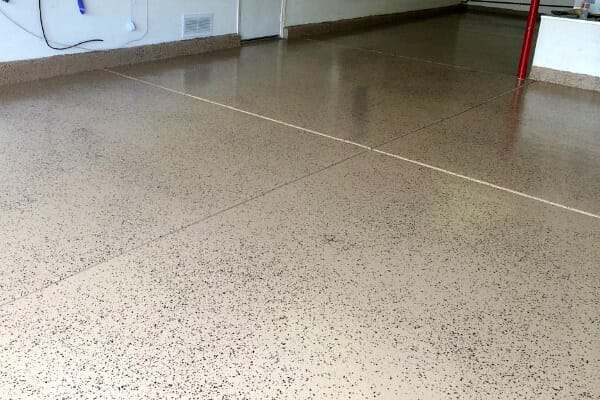
Another reason is to renew the clear top coat. After many years of service in a busy garage, the clear top coat of an epoxy floor can start to show its age. With the proper floor preparation, you can add another coat of clear and make the floor look brand new again.
And then finally, you may have an older existing coating that is showing wear from years of heavy traffic and getting thin. As long as the floor is not experiencing any delamination issues, many times you can recoat right over a worn epoxy floor to create a brand new looking finish.
As long as the existing garage floor coating is a 2-part resinous product such as epoxy, polyurea, polyaspartic, or polyurethane, then you should be able to apply an additional coat of a compatible product without issue. However, to be safe you should always consult with the manufacturer of the new coating first.
When not to apply epoxy over an older coat
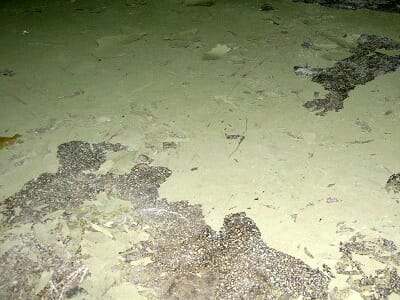 If the existing epoxy floor coating is peeling up or showing other signs of delamination, then you do not want to epoxy over it. There are bigger issues at play here that are causing the delamination. Applying a new coat of epoxy over such a coating will only lead to more problems. A complete removal of the old coating by grinding would be required.
If the coating is fairly worn with more concrete showing through than there is epoxy, then you will want to start fresh by grinding the floor.
Do not attempt to apply epoxy over existing concrete sealers. These need to be removed first as epoxy will not adhere to them. Also, floor paint is not a good base for epoxy and needs to be removed as well.
How to prep epoxy for another coat
The key to applying a new coat is to mechanically rough up the surface of the older coat to create enough bite for the epoxy to adhere to it. There are a couple of ways to achieve this.
The first is to use 120 grit sandpaper on an orbital sander or pole sander like this one at Amazon![]() . What you are trying to do is rough up the surface, not remove it. The surface should look deglossed after sanding.
. What you are trying to do is rough up the surface, not remove it. The surface should look deglossed after sanding.
Once done, sweep up the heavy stuff and then vacuum the entire floor with a shop vac. Next, use denatured alcohol on a small towel and wipe down the entire surface. The denatured alcohol will remove all the fine dust particles, evaporate quickly, and make sure that the surface is clean.
The other option is to use a floor maintainer (buffer) with a 100 grit sanding screen. You can usually rent these fairly inexpensively from your local home improvement center. They should have the sanding screens to purchase as well.
This method will go faster than the pole sander and cover a lot of floor quickly if you have quite a bit of square feet to prep. Just remember to occasionally check the sanding screen for wear and to make sure it hasn’t clogged up. After you are done, vacuum the floor and use denatured alcohol as described with the sanding method.
If you have an older clear coat that you want to renew, then you will want to use 80 – 100 grit sandpaper or a 60 – 80 grit sanding screen first to actually remove a small layer of the coating. This will help to eliminate any deeper scratches and/or embedded dirt that has marred the finish.
Do the same if you have a worn coating that is adhered very well but has some spots where the coating has worn through to the concrete. The more aggressive grit will insure that the bare concrete will be prepped properly as well.
Floor prep such as this goes fairly quickly. Once you wipe down the floor with the denatured alcohol, your floor is ready for a new coat of epoxy or floor coating of your choice.
I Have a brown epoxy floor (RUSTOLEUM KIT) thats 20 years old I want to change the color to a white high gloss epoxy finish The original clear sealer has been prepped sanded and degreased. My question is do I have to completely strip the old brown color or can I apply thje new color over the brown and then apply the high glosss clear finish
Hi Tim. As long as the older coating has adhered very well, your prep is fine and a new coating can be applied over it. Our only concern would be which product exactly you are using for white. Colors tend to show through white and are why it typically requires the application of a white epoxy primer coat first, followed by a coat of a high solids white epoxy – sometimes two. This article here explains why and shows the application of a white floor over bare concrete.
Hi
i have hot tire marks on my epoxy garage floor(coated 6 months ago) and it started peeling off on areas the cars was parked. So can i apply primer and then recoat epoxy(polycuramine rock solid) on just those areas since epoxy is in good condition entire garage floor except those hot tire areas.
Or do you suggest to apply primer and then recoat entire garage floor ?
Hi Prasad. What epoxy product exactly is currently down on the floor now?
Thank you for looking into my use case. I hired a local painter who bought the epoxy so unfortunately i do not have the details of epoxy used. But looking at it my best guess is he used 2-part water based epoxy with less to zero glossy which doesn’t seem to resist hot tire marks.
Except the places where it has hot tire marks entire flooring is in good condition.
Did you see him etch or grind the concrete? Did he mix a Part-A and Part-B together before applying it? The fact that you hired a local painter and not a floor coating contractor and that the floor has almost zero gloss is concerning. We get more questions about coating problems from people who hire painters. Most assume coatings and paint are the same (they are not) and tend to skip proper prep steps because they think they know better. Based on this information, we are guessing that the painter applied a 1-part epoxy which is not a true epoxy coating. It’s essentially an acrylic latex concrete paint in a satin finish with a little bit of epoxy resin added for durability. This article here explains more. If you can’t confirm what concrete prep he did or what product was used, we suggest testing the surface. Pour a small amount of acetone, Xylene, or Mineral Spirits on an inconspicuous spot of the floor and let it sit for a few minutes. While it’s still wet, wipe it up vigorously with a rag. If you get any sign of paint transfer to the rag, then what was applied was paint and not epoxy. This is important information to know before you attempt any repairs since it will determine what your next steps or options will be.
I have worn epoxy. I do not want to re-apply another epoxy. This is around a pool on concrete and it previously was slippery. What product can I put down that will be nonslip and will cover the old epoxy. Some of it is peeling off.
Hi Linda. The problem you have experienced is due to epoxy not being approved for outdoor use. It is not U.V. stable and will oxidize and deteriorate under full sun exposure. Before you apply another coating, it will be important to remove as much of the epoxy as you can. The last thing you want to do is apply a new coating over one that will peel up and take the new coating with it. We recommend that you use an MMA acrylic coating. These are solvent-based, they are U.V. stable, and will last for years in the sun. Acrylics are typically clear in color, but they are available in color tints. All coatings are slippery by nature. What you need to do is add a non-slip media into the final coat that is applied. You learn more about non-slip media here.
We have blue textured epoxy floors at our school and where the teachers chairs (on rollers) dulled the floor, I assume scratches, would this have to be taken down to the cement or can we rough up the floor and recoat? thanks
Hi Richard. You can rough up the current coating and then recoat. No need to remove a coating that is otherwise sound and adhered well.
Hello Richard,
I wanted to thank you for your excellent article, which provided me with a better understanding of epoxy. As someone new to this product, I am moving to a new property where the living areas are made of concrete and covered with epoxy.
The current epoxy coating has been in place for 15 years and is generally holding up well, aside from a few scratches here and there. However, it is a very dark color, and my wife would like to change it to a clear one.
I reached out to a contractor, and I was surprised to learn that they are charging me the same price as if it were a new installation on bare concrete. Does this pricing structure make sense? I thought one of the advantages of epoxy was that it becomes easier and cheaper after the initial installation.
Additionally, I am concerned about how frequently I will need to perform this type of “refreshment.” I am accustomed to wood and tile flooring, which seem much easier to maintain in the long run.
Thank you once again for your insightful article!
Hi WJ. In order to change the color from a dark one to clear, it requires removing the entire coating to bare concrete. The reason for this is that the clear coat is clear. In other words, you can see through to what every material (concrete) or color (coating) that it is applied to. Otherwise, if you just applied a clear coat to the dark coating, it would still be a dark and glossy coating. That is why they are charging the same price. It requires a lot of labor in grinding to remove a coating vs prepping bare concrete for a coating via grinding. The additional labor cost is making up the difference most likely.
Thanks Shea for the reply, my mistake when I said clear I meant a less dark color like going from black to light grey.
OK, I see. Well, the amount of materials required to go to the lighter color is the same. This includes the lighter base color coat, optional decorative color flakes, and then a clear coat to lock in the color flakes and protect the color coat. The clear coat is the wear coat. It may even require two color coats since you are going from dark to light. Providing the current coating is sound and adhered well, it still requires the proper prep for the new coating to adhere properly. You can’t just clean it and then apply a new coat. It needs to be roughed up. Some companies will not apply their coating to another if they were not the ones who installed it originally. This is because they do not know how the original floor was prepped or exactly what type of coating it is. As a result, they want to remove it first. 80% of a coating being successful has to do with the prep. Otherwise, it can just peel up at a later date. I would ask what installation procedures they plan to use along with a materials list. Have them explain what it is they are quoting you for.
We live in Dallas, TX, and had epoxy with vinyl flake installed in our garage a handful of years ago. It was done properly and looked great, but it has yellowed over the years. This company has done many garage floors but now they are telling me the yellowing is not their fault and re-coating it with epoxy, even if sanded, could be an issue because of adhesion. They want to start over from scratch, and now the cost is more than double. Ouch. Any advice?
Hello LSDallas. You may want to find another floor coating company. It’s standard procedure to rough up the surface to apply a new coating over one in that is in good mechanical shape other than cosmetics. It shouldn’t be an issue for the same company. The reason they are charging so much more is for the labor to grind the old coating off. Just keep in mind that other companies may or may not want to warranty their work since they are not the ones who installed the coating originally. They can become a little persnickety about that because they don’t want complaints or a reputation for their work peeling up off the concrete if they are not the ones who installed it originally.
Something to be aware of is that epoxy is not U.V. stable. Despite any additives that may be added to resist yellowing (ambering) epoxy will amber over time if exposed to direct sunlight or strong indirect sunlight. This article here explains more. You may want to consider a full color flake application with a polyurea or polyaspartic clear coat. Neither of those coating nor the color flakes will amber. They are all U.V. stable.
Thanks, appreciate the info. I read their messages again and they did say the new coating would be polyaspartic. I had asked for an estimate to re-coat the epoxy.
Regardless, I’m going to hire a different company. I lost trust in these guys. Thanks again.
Hello,
Thank you for your insightful article.
Considering the fact that we don’t wear shoes indoors, and taking into account the presence of children and a cat, what would be the anticipated longevity of a professionally done installation of epoxy and urethane on my living room floor?
Hi MM. A professional installation will provide 15-20 years or more of service. The only think to worry about is scratching from dragging heavy furniture or chairs. However, the clear coat may loose some luster and need to be recoated once every ten years or so.
Hello. Thanks for the great article. The top coat (very thin paper-like semi-transparent matte top coat) has started peeling off from my concrete & epoxy basement floors in a few high-foot traffic areas after about 8 years of use. I want to fix my floors without having to remove the epoxy coating. What is the best way to do this?
Hi Miro. We are assuming that the color coat is fine and it’s just the clear coat that has worn thin and is peeling in places. If so, you would reapply a new clear coat just as we describe in the article. Clean the surface first and then use 120-grit sandpaper to rough it up. You can sand down to the epoxy color to remove any of the peeling clear coat. Don’t worry about deglossing and scratching up the epoxy coat. The new clear will make it all disappear. Once you are satisfied with the sanding, sweep/vac the surface and then wipe it down with denatured alcohol (or equivalent) applied to a microfiber mop pad. Once it has dried, you can apply the new clear coat. It’s best to do the entire floor when you do this. If you only attempt to recoat high traffic areas, the new coating will be obvious and stand out.
Hi I have applied rustoleum 2 car garage epoxy approximately 2 months back. Due to rush of moving things to new house i did not add clear coat to it. now that things are settled was thinking of adding a clear coat to it. is it possible to add to it and what prep work should i do to add this . thanks in Advance.
Hello Pravin. You can apply the EpoxyShield Clear Coat. It will require that you degloss the surface by roughing it up with 120-150 grit sandpaper. Sweep/vac and then solvent-wipe with denature alcohol (or similar) applied to a microfiber mop pad. Once you do that, it’s ready to accept the clear coat. You may lose a few color flakes during the process, but it shouldn’t be much if they were applied immediately after the epoxy was applied.
I have an 1,110 square ft garage floor that “appears” to have blue epoxy already applied and would like to resurface it. I bought the house 4 years ago and can not speak to what was exactly used. There are a few small spots with exposed concrete and other areas that look “worn”. I have surmised that it is epoxy because I performed the acetone test and no color came off on my cloth. Is this a correct assumption?
If so, what are my options to 1) prepare the surface for refreshing and 2) what kind of product do I want to use (2 part epoxy, just clear coat, epoxy paint…? ) Any guidance would be greatly appreciated.
Thanks,
Jon
Hello Jon. You would prep the surface as we state in the article above. Since you don’t know exactly what was applied, the question you need to ask yourself is; Are you comfortable spending the money and time to apply a coating over another that may or may not be sound? If you apply a clear coat the floor will look as it is, but with a glossy finish. If you opt for a new coating system with a color coat and clear coat, we would recommend a high solids epoxy system or better yet, a single-part polyurea. We discuss them here. Do not use paint or 1-part epoxy paint if you don’t want it peeling up from hot tires or you want a glossy surface. we discuss the differences here.
I have a relatively new garage floor (3 years old) that was final coated with a water-based polyaspartic clear coat after a base coat of grey 2-part epoxy with flakes. It was done in January in Colorado and the garage was closed and hoarded in to retain as much heat as possible. A grinder was used to totally flatten and open up the concrete for best adhesion prior to application. Approximately 6-7 months after final application, the top coat began to show milky areas all over the floor (is in topcoat). Area always below a walk-off mat looks perfect… all exposed areas show this milky area… could this be an issue with UV exposure? At any rate, I would like to now just go over the top of the polyaspartic clear coat with a colored gray topcoat… possible to use a 2-part colored epoxy over the top of this clear coat? And what preparation should I use if that is possible? Abrade or just clean and degrease or both? I work for a manufacturer that has a primer that is designed to go over a 2-part epoxy moisture mitigation product… it has an micro aggregate in it that enhances adhesion. Any help would be appreciated. Thanks.
Hello Kirk. Polyaspartic coatings cannot be formulated in water-borne formulations. What product was used exactly? Are you sure it was not a water-based acrylic or polyurethane coating? What type of coating you have makes a difference in terms of what you do next.
Hello, Shea-
I’m hoping you can give me some guidance. My 24 year old garage floor appears to have a penetrating sealer on it, as it does not appear to have a surface coat, yet water generally does not abosrb into it within a few minutes.
The epoxy instructions and your website indicated to remove any old sealer. With penetrating sealer, that is hard to know when you have succeeded!
Would the idea be to do a grind on any floor protected with a penetrating sealer? Or.. what is the appropriate preparation method for a floor with an existing penetrating sealer?
Many thanks!!
Hello Camden. The only way to remove a penetrating sealer in concrete is via mechanical means. Grinding is the most typical.
Thank you very much for your quick response and guidance.
I know that this is an older post, but hope that it is still being monitored. I recently had an epoxy coating with metallic pigments installed over a concrete slab in an interior room. Unfortunately, after two attempts, the installer has not been able to successfully apply the clear top coat without errors (roller marks, streaks/smudges/etc.). I have decided to try to re-do it myself and would like to completely remove the clear coat from the installer’s attempts and start over with a fresh coat. The room is about 250 sq ft. and, after reading this article, it sounds like I can go with either a pole sander or renting a buffer from my home center. I just want to be sure I understand what the recommended grit is to completely remove the coating. Would that be 60-80 for the buffer screen and 80-100 for the pole sander?
And, since I am a novice, would it be a good idea to go over it in “rounds” and to check after each one to be sure I don’t go too far down and damage the color coat?
Hello Michelle. What clear coat product was the installer using? To remove most of it is going to require using a floor maintainer. It would be extremely laborious trying to remove it all with a pole sander. We recommend starting with 80-grit sanding screens. Once you get down to the metallic coating, switch to 120-grits screens. Don’t worry about scratching the metallic coating. They will disappear once the clear coat is applied. Sweep/vac the surface well and then wipe it down with denatured alcohol or equivalent applied liberally to a microfiber mop pad. This will remove any loose dust and contaminants still on the surface that would otherwise show in the clear coat.
He was using a two-part product with a satin finish that I think also has a slight anti-slip feel to it. I’m not 100% sure of what the brand is, though. The first time he put it down, there were a lot of roller marks so I asked him to re-do it. He used a hand orbital sander to rough it up and reapplied it, but dropped something on it right before he finished rolling it out…which made a small smudge that got worse when he tried to wipe it up. Plus…more roller marks. At this point, I’m just going to try my hand at it and completely remove what’s there first. I’m not sure exactly which clear coat I’m going to use, only that I want a matte/satin (not glossy) finish. I read through the site and know that I want to use a polyurethane coat… just need to figure out which brand (unless you can recommend one that works fairly universally on its own and not specifically as part of an overall system, since I don’t know exactly what brand he used for the metallic color coat and can’t really ask now).
And based on what you described- am I just using the more coarse screen to do the brute force work of getting most of the clear coat off and then switching to the finer one so that there’s a smoother surface before applying the clear coat?
Thank you!
Hi Michelle. Yes, the more coarse grit screens are for removal and the finer grit is for prep. Some good professional installers sand the metallic coat before applying a clear coat. This removes little bumpy imperfections, grit, and dust that be in the surface of the metallic coat. These type of imperfections typically are not seen in more traditional floor coatings since they are lighter in color. Metallic coats are very glossy in nature and usually darker in color which only tends to highlight these imperfections.
Legacy Industrial has a very good water-based polyurethane clear coat that is available in a low sheen finish. You can price it here. The key to avoiding roller marks is not to backroll too much and not to stretch out the coating. If the roller starts making noise, it needs more material. Also, polyurethane coatings go on thin to win. Do not attempt to apply a thick coat or you will have curing and cosmetic issues. Lastly, use good lighting and bend down low and look across the surface to make sure you don’t miss a spot. It’s easy to do with clear coats.
Thank you so much for the answers, tips, and recommendations. I know that some of it repeats what is elsewhere on the site and in the comments, but I just wanted to be extra sure. I’m going for it and hoping it all works out – at the very least, at this point, I figure I’ve seen it done wrong twice so maybe I’ll have a leg up. In particular, I think your tip about the lighting is important because it’s a room that loses a lot of its natural light after the morning hours and I asked if they needed to bring more light in to do a good job, but they always said no (even though they were often working later in the day). Thanks again!
You are welcome!
My basement floor has regular floor paint (not epoxy) with a few spots where the paint is coming out. How do I prepare that floor for Rust-Oleum shield? Should I remove the old paint? BTW, the paint is pretty well attached to the floor. Can I just use the Primer and then the shield?
Hi Marge. I assume you are referring to EpoxyShield 2-part epoxy? If so, you can apply Rust-Oleum Recoat Primer to the paint before applying EpoxyShield. Make sure the floor is degreased first and then allowed enough time to dry sufficiently. Basements take longer than garage floors to properly dry. The coatings will stay adhered as long as the original paint does since that is what it is attached to.
I have a garage floor coating that is 18 years old. it has chipped in several place, but i filled with a 2-part epoxy patch and it is holding well. Can i use a water based product over the old floor? should i use chips again or a solid color? Its a tan with dark chips now!
Hi Timothy. I’m sorry for the late reply. I missed your question somehow. Yes, you can apply a water-based product over the old coating. It will require that you first degrease the surface and then rough it up with 120-grit sandpaper. Sweep/vac the surface, then wipe it down with denatured alcohol or an equivalent, applied liberally to a microfiber mop pad. This ensures a proper mechanical bond to the old coating.
I have a 15 year old epoxy garage floor, not sure what type of epoxy that was used. There has been some of the epoxy come off in the tire areas, but the coating is in place everywhere else on the floor.
I have sanded the floor to rough up the floor, but not sure if I should use a primer and what type of epoxy to recoat.
What are your suggestions?
Hi David. A primer is not necessary if the current coating is in good shape and adhering well. The only exception would be where the tires have pulled it up. However, that can be addressed depending on what coating products you use. It’s also essential to degrease those bare spots well and prep them via etching. Lastly, wipe the entire surface down with denatured alcohol or an equivalent just before you begin application of a new coating.
If your coating has performed well for 15 years, then it’s a commercial-grade product. I don’t recommend applying a budget coating over it unless you only want it to last a few years. What is your goal?
Shea, thanks for the reply. My goal is more short term. Last question, when you say “budget coating, do you mean the options available at big box stores (Lowes/Home Depot)? And, what commercial grade coatings do you suggest for a DIY project?
Thanks again, David
Hi David. Yes, I’m referring to coating kits such as EpoxyShield or RockSolid. An excellent commercial-grade option for DIY is single-part polyurea. We have an article here that tells you all about it and where you can purchase it.
Shea,
Last question. I noticed there is a Gorilla product at my local Lowes. It’s a bit more than the EpoxyShield/RockSolid options. Do you know if this is a better quality “big box” option?
thanks David
Hi David. Yes, it can be a better option if you reduce the coverage rates. The Gorilla product is similar to the Craftsman brand. It’s a cycloaliphatic 100% solids epoxy with overly generous (too high) coverage rates, resulting in a thin coating. It’s similar in thickness to budget water-based epoxy coatings, at approximately 3 mils. They do this to keep the cost down. Typical 100% solids epoxy is applied at coverage rates of 8-12 mils thick, which requires more material. We recommend reducing the coverage rate by 20-25%. This will provide a thicker single coat that is more durable. Just be aware that Gorilla does not offer a proper high-performing clear coat option to lock in the color flakes and protect the color coat.
Shea,
I went with the Rustoleum Rock Solid gloss gray. Very tight on the amount they provide to do a two car garage, I barely had enough.
My question is should I put down a clear coat and if so, should I stay with the rock solid option? I see a rock solid textured clear that appears to match up with the colored rock solid I put down.
If this helps with durability, I would rather invest in the clear coat.
If there’s a better option than the rock solid textured, please let me know.
thanks,
David
Hi David. The clear coat locks in the color flakes to make cleaning easier and protects the color coat. It adds to the overall durability of the floor. Rocksolid allows up to 7 days to apply additional RockSolid coats without further prep. I don’t recommend the textured clear coat because it will dull the finish, making the entire floor have a matte to satin look, which most people do not like. The standard clear coat with included anti-slip media will provide enough wet weather traction for most people and will not dull the finish nearly as much. Be aware that they only include one burst pouch instead of two to cover up to 500 square feet. This will make the clear coat half as thin as the color coat. We recommend applying two burst pouches for anything over 400 square feet.
perfect. thanks much!
Shea,
Last question, I promise. Had an unfortunate thing happen. I got my rock solid gray down and everything worked fine (with a primer underneath).
I ordered the high gloss clear coat (through Amazon), last week, and when I poured the clear coat on the floor (per Rustoleum’s instructions to pour directly on the floor), it was the same gray and not clear coat. I had to re-cover the entire floor with another thin coat (I was inside 6 days from the original coat). I covered the flakes and now have a medium gray gloss floor.
Bottom line is the seller on Amazon put the wrong rock solid coating in the wrong box. Ironically, the Rustoleum box was in rough shape when I received, which I thought was odd. Once I realized the wrong product was in the wrong box, it made sense why the clear coat box didn’t look new. Lesson here is be careful with any seller on Amazon besides Amazon.
After working with Amazon, they agreed to send me another full Rock Solid kit (2.5 garage coverage), and my question for you is do you see any issue with me putting on another coat to put the floor back to it’s correct look (with flakes showing)? I will be inside of 6 days from the second coat.
If you don’t see where this is an issue, I will be putting on a third coat, and then once dry, finally apply the clear coat.
I hope this makes sense.
Thanks again,
David
Yikes! No worries, though, you can most certainly apply another coat just as you described. It will only help to increase the durability of the overall coating. If you purchase the clear coat from Amazon again, make sure it’s from the Rust-Oleum store, like this one here.
Shea,
Perfect, thanks much. I have to give Amazon credit, they stepped up and are shipping me an entire new kit. I will put the third coat on and then clear coat.
thanks again for your guidance,
David