
When to use an epoxy floor primer is a subject that is often overlooked by the average home owner who is investing in a premium garage floor coating. In fact, many people aren’t aware that they exist or think that it’s just an added cost by the manufacturer or vendor that they don’t need.
Epoxy primers provide an abundance of benefits for your coating, with some specializing in problems associated with the surface of the concrete itself. With exception to the inexpensive one-coat epoxy paint kits, if you want to insure that you achieve the best possible adhesion and endurance of your garage flooring for years to come, then you should seriously consider the use of an epoxy primer for your floor.
Benefits of an epoxy floor primer
The benefits of using an epoxy floor primer for your garage are many. Let’s take a quick look at these to get a better understanding of what they do.
- Epoxy primers are thin and provide for better adhesion because they penetrate into the concrete substrate for a better bond.
- Primers provide for a better chemical bond of the thicker epoxy base coat which results in a longer lasting and more durable garage floor coating.
- Because of their thinner nature, epoxy primers help to eliminate bubbles and pinholes that can form due to outgassing of the concrete.
- They allow for the subsequent base coat to achieve a higher dry film thickness and coating uniformity since it is not soaking into the concrete.
- Some epoxy primers are effective in providing a moisture barrier for garage floors that have light moisture problems such as efflorescence.
- Most are moisture tolerant and work well when being applied in high humidity areas of the country or concrete that has not fully dried from being cleaned or acid etched.
- Some are specialized such as oil blocking primers. These are solvent based primers made to cover concrete that has been contaminated by oil and can’t be completely cleaned.
How epoxy primers work
Epoxy adheres to concrete by forming a mechanical bond within the pores of the surface. This is why you need to profile the surface by either etching or grinding the concrete.
Primers are designed to penetrate deeper into the pores in order to achieve a better mechanical bond. This reduces any chances of delamination of a properly prepared surface. The primer also produces a thinner epoxy film or tie coat that the much thicker base coat can chemically fuse with. This process produces a much stronger bond of the base coat and is why most contractors always use a primer.
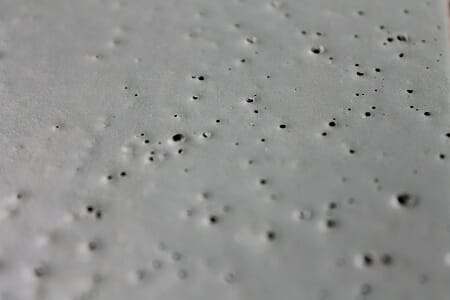 Air bubbles, craters, and pinholes can be created in epoxy from outgassing of the concrete. Air in the slab will rise due to a temperature increase or change in humidity. If this happens during the initial application and curing process of a high solids or 100% solids epoxy to bare concrete, it can form these bubbles, craters, or pinholes when the air escapes the concrete.
As a side note, these bubbles can also happen due to poor mixing of the epoxy or improper back rolling.
Because of their thinner film, epoxy primers reduce the likelihood of bubbles and pinholes forming. They do this as they soak farther down into the concrete to fill the voids that can hold air and reduce the chances of air finding its way to the surface. If air does find it’s way to the surface, the bubble will usually pop and then slowly fill back in before curing due to the low viscosity of the epoxy primer.
Since most epoxy primers are water based, the chemical makeup provides for moisture tolerance as well. As a result, some brands can actually be applied to a damp slab. This is beneficial for the DIY epoxy installation that profiles the slab with acid etching. Instead of waiting 24 -48 hours or more for the slab to dry completely, you can apply your primer when the concrete is still damp or if the humidity is up.
Many of these same primers will also form a vapor barrier to ward off the problems associated with moisture that tries to work its way to the surface. If you think you have a moisture problem, contact the manufacturer first to determine how much moisture you can have in order to use their product.
Oil stop epoxy primers
Finally there is epoxy primer for those who thought they could not epoxy coat their garage because of oil contamination that could not be removed completely. Some manufacturers make an oil stop primer that is solvent based and works by actively seeking out and bonding to the oil contaminants embedded in the concrete.
These are usually dark in color, however, and need to be covered with more than one base color coat or with a full refusal paint chip application. If not, the darker color may bleed through and alter the color coat.
Will your epoxy floor coating fail without a primer? No, if you prepped your floor correctly, chances are your coating will not fail. However, with all the benefits that can be gained from using an epoxy floor primer, it’s hard to come up with an excuse not to. They are definitely something to strongly consider and most cost less than the high solids epoxy formulas due to their thinner film thickness.
If you are going to spend the money for a commercial quality, high solids garage floor coating, then it’s well worth the few dollars more for an epoxy primer. It will help to provide the most durable and trouble free coating that you can have for your garage and the investment will provide a great return for years to come.
*** Update ***
We have been receiving numerous questions regarding the use of an epoxy primer for the single coat DIY garage floor kits that you can find at most home improvement centers. Some of these include but are not limited to, Rust-Oleum EpoxyShield, Valspar, Quikrete, and RockSolid floor coatings.
With the exception to RockSolid, these kits are low solids epoxy with a low viscosity. In other words, they are a thinner coating. They do a good job of penetrating the concrete already. While RockSolid is a higher solids coating with a higher viscosity than some other DIY epoxy kits, the Polycuramine formula does an excellent job of penetrating the concrete like the other brands.
While epoxy primers are typically a lower solids water based coating, they cost just as much or more than the typical DIY single coat kits and they are of a higher quality. The performance and durability of the typical epoxy primer is better than most of the DIY home improvement garage floor kits as well.
If you are concerned about the benefits of a primer, you are much better off applying two coats of the DIY kits versus one coat. The second coat will allow for a thicker coating with much better color uniformity. It will also provide the opportunity to cover any cosmetic defects in the first coat that can be caused from environmental conditions in the substrate and application errors.
Hi
I recently bought a new construction home and planning to start my first DIY to epoxy coat my garage floor. I ordered the DAICH Daihard Industrial Strength 3.7 Qt. Gray Gloss 100% Solids Epoxy Concrete Floor Coating Kit from Home Depot. I have few questions before starting my project,
1. Since it’s a newly built home should I still grind the garage floor?
2. What primer is recommended to go the with my epoxy base coat?
3. What top/clear coat is recommended?
4. What steps are required to prepping the new bare concrete floor?
Thanks in advance for all the help!
Hello Praveen. How many square feet is your garage floor and how many kits did you purchase? When using a 100% solids epoxy, you will need to acid etch at a minimum in order to get an aggressive enough surface profile. Grinding is the preferred method for 100% solids. This article here explains why even new garage floors or new concrete still needs proper prep (profiling).
You are not going to find proper epoxy primers and clear coats from a home improvement center. They need to be acquired from actual concrete coating vendors online. These are companies that specialize in concrete coatings and provide much better customer service in terms of using the correct product and how to apply it than what home improvement centers provide. We would recommend a polyurethane or polyurea clear top coat. Here is an example of the correct type of epoxy primer.
Hi Shea
My garage is 380 square foot. I bought two kits since one covers 250sqft. I was planning on etching and power washing the floor for prep. Do you recommend grinding the floor as well ?.Can you please recommend some good online vendors for primer and clear coat. I’m also open to getting a different base epoxy coat if needed.
Thanks!
Hi Praveen. What epoxy kits did you purchase?
DAICH Daihard Industrial Strength 3.7 Qt. Gray Gloss 100% Solids Epoxy Concrete Floor Coating Kit from Home Depot
That’s right. It’s hard to keep track sometimes with all the questions we answer. If you are applying a high solids epoxy (greater than 90%) direct to concrete, then we recommend grinding. If you are applying an epoxy primer first, then most do just fine with a good acid etch. Grinding is always better than etching, so no need to etch after grinding. If you grind, do not introduce water to the floor. Just sweep and vacuum well. If there is a little bit of dust left, you can wipe the surface down with denatured alcohol applied liberally to a microfiber mop pad.
We provided the red link in the answer above to a vendor that carries the proper primer. They also carry polyurea and polyurethane clear coats. Just give them a call if you have questions and ask for Scotty. There is always an advantage with going to one supplier for all your materials. If there were ever to be a warranty issue with any of the coatings, you would be covered. Once you mix manufacturers, none of them with warranty their coatings when used with something other than their own. Unfortunately, your square footage kind of puts you in no-mans land and you have to pay for more material. However, the high solids epoxy will allow you to apply it thicker, so that’s a bonus. This vendor here is excellent as well and is a good example of what it would cost to purchase an entire commercial quality epoxy system that includes epoxy primer, high solids epoxy, color flakes, and a polyurethane clear coat. Just scroll down the page to the 500 sq. ft. section that lists the included high performance polyurethane clear coat. The other advantage to using vendors like this is that they specialize in what they do and are very knowledgeable. They will help you with all your application questions. I hope this helps.
I used Ghostshield 9500 on my garage floor, but being a clear sealant the floor is mottled and ugly. I have decided that I’d like to paint it, but everything I read says you can’t paint over top of sealant. Is there a primer that with adhere to the sealer and allow me to paint the floor.
Hello Brian. Before we can answer your question, we need to know if want to just paint the concrete for a short time fix or apply a durable coating. There are differences in required prep. This article here explains the difference between 1-part epoxy acrylic paint and actual coatings.
I have a lift in my garage, so the floor needs a durable coating. The Ghostshield sealer seems to have made that a difficult task now. Can a primer and paint be applied?
OK, that helps. I hope you read the article I suggested because you have mentioned paint again. Paint is not durable and is not a coating. If you want to apply a quality coating system that will be durable and last years, then you will need to grind the concrete in order to open up the pores that the sealer helped to close and to provide the proper surface profile for the coating. There is no getting around it. Etching will not work either due to the sealer.
If you want to apply a residential quality coating that will last a few years and possibly suffer hot tire pickup, then Rust-Oleum has a concrete and garage floor primer that can be used on sealed concrete. It does not adhere like a quality coating and it’s designed to have Rust-Oleum products installed over it such as EpoxyShield or RockSolid. You cannot apply a commercial quality coating to it. I hope that clears up any confusion for you.
I have 3 gallons 100% solids epoxy from Epoxy2U to coat a new build 1 car garage. I will grind the floor and properly prep the floor first. I wanted to use the first gallon as my primer and the last 2 gallons as base coat before a full broad coverage flakes, then coat with polyaspartic coating to end. Should I thin the first gallon epoxy with 10% volume denatured alcohol to use as my primer? Should I just thin the 3 gallons epoxy with denatured alcohol and and not apply a prime coat and just use it as base coat? Should I even thin it? Thanks for all your help. Because of your response to my question on joints, I ended up getting joint filler from legacy. Thanks again!
Hi Earl. How many square feet is the surface you are coating?
It’s 200 sq ft. 10×20
OK, based on that square footage you have plenty of material to provide for a very thick coating. We would recommend that the first coat be thinned 10%. We prefer MEK, but denatured alcohol will work. This should prevent any issues with bubbles forming from out gassing and it will allow the coating to penetrate better. If you do incur any bubbles, it will allow you to sand the surface before applying the thick final coat. The final coat should not incur any cosmetic issues since the concrete is sealed at this point by the first coat.
One thing to remember is that the 3 gallons you have is actually two 1.5 gallon mixing batches. It’s going to require that you properly proportion the correct amount of part-A resin and part-B hardener to get one gallon. Do not mix the remainder with the other kit. It will create too large a volume and your working time will radically decrease. 1.5 gallons is about as large of a batch you want to mix at any one time. You might want to consider color batching if you want to make sure that the color from the remaining .5 gallons looks the same as the other 1.5 gallon kit. We explain what that is here. Or, you could just elect not to use the remaining .5 gallons since the 1.5 gallon kit will still provide approximately 12 mils dry film thickness on top of the first coat.
Hi there,
There is an epoxy primer shortage in my area, I was told that I can use standard 100% solids epoxy and thin it at 10% ratio with acetone as a primer instead.
If I use this method, should I mix part A and B and 10% acetone together. Or Mix A bad B first for 3 mins, and then add acetone and mix again?
Hi Ramsey. Mix the contents all at once. High solids epoxy should not sit in a mix bucket any longer than necessary or it starts to build up heat and reduce pot life. This is why it is poured out onto the floor immediately after mixing. As a tip, pour the hardener into the bucket first (usually part-B), then the colored resin, then the thinner. The resin is much more sticky and doing it this way forces the hardener up along the sides of the bucket making it stick less to it as you mix.
Hi,
I missed the window to lay down the epoxy coat after the primer. I am using 100% solid epoxy from Epoxy-Coat. I called their support line and they suggest sanding down the primer to take off the shine. My floor is not flat and I have several divots from hand grinding the floor. Sanding down the primer with square sander or orbital sander doesn’t reach the low spots. It is a lot of work to take out all the sheen off of the primer. How perfect does sanding have to be? Can I live with normal sanding process where shine on only about 70% of the floor will be removed with sander?
Hi Vijay. The deglossing of the surface (sanding) is very important in order for the epoxy to bond properly. We suggest purchasing a round black scrubbing pad that is used on floor maintainers for cleaning concrete and floors. If you can’t find black, then green is the next roughest. You can usually find them at your local Home Depot. Cut the pad in smaller sections that you grip by hand or attach to a block and use that to rough up the surface. The pads will conform with surface and should provide enough abrasiveness to get the majority of the gloss out.
Can SIMIRON ROKREZ be used on wooden floors, and what type of primer is used?
Hello George. Most epoxy can be applied to wood floors. However, the epoxy will crack if the floor has any flex to it. The reason is that though epoxy is extremely hard, it has 0% flex. As a result, it will crack. If the floor has joints, it’s recommended to use a special epoxy bridging primer first. If not, the Rokrez epoxy can slowly seep into the joints as it cures, thus exposing those joints with depressions. Most prep for the wood involves sanding with 40-60 grit sandpaper to provide the proper surface profile. If you have further questions, we recommend consulting the manufacturer.
Hi,
I have a 580sqft garage. The slab on grad was poured over 8 years ago with no moisture barrier underneath. I have an efflorescence issue plus a 6.91 lbs per square foot 24hrs of moisture coming up through the concrete.
Do you have any suggestions for this flooring? I was thinking about possible putting engineered hardwood flooring down at some point but need to fix this moisture issue first.
Hi Andre. Is the slab below grade? If not, have you checked all the usual suspects such as water spouts not draining away from the slab or water pooling against it? Do you park cars in the garage at all or do you plan to convert the area to a livable space?
Hello,
I currently just laid a layer of self leveling concrete on my screened in porch. After a day of drying there is some sufarce dusting. I ordered Epoxyshield from Rustoleum. With so many website I’m not sure what my process should be. Etch? Primer? I’m not sure. How or What should my process be when I install the epoxyshield? If I need a primer what is the best option for the Rustoleum product? Any help with a step by step process would be great, thank you.
Hello Bryan. Dusting can be caused if too much water was used in the mix. If it’s very light dusting, then it’s OK. More importantly though, did you use a self-leveling underlayment or an actual self-leveling overlay that is designed as a wear surface? Self-leveling underlayments are not wear surfaces and not approved for coatings. They are used to place carpet, wood, vinyl, etc. over the surface. Assuming you used an overlay intended as a wear surface, you will need to lightly grind or rough up the surface with 40 grit sandpaper. Self-leveling concrete products are polymer-modified. They do not have the the lime and other minerals like standard concrete. As a result, etches will not react with them and rough up the surface.
EpoxyShield is a low solids epoxy that does not require an epoxy primer. In fact, most epoxy primers are better performing and cost more than EpoxyShield. Just as an FYI, if the floor of your porch gets any direct sunlight or strong indirect sunlight, you are going to experience ambering (yellow tint) of the coating. There are better options we can recommend if that is the case.
Thank you for the information, we used Levelquik RS product from HD. If that is not the correct product what are my options? I really do not want to install tile. I would like a painted surface since this is an outdoor area. Also, im assuming if I leave it blank it will continue to “dust”. Any help would be great and thank you so much for your quick response.
Hi Bryan. LevelQuik RS is an underlayment that is not approved as a wear surface. Most underlayments like this are not approved for coatings either. A polymer-modified self-leveling concrete resurfacing material is what is typically used when applying coatings. However, we checked their data sheet and it did not mention coatings as being approved or not approved. We gave the tech line a call and they said that a true coating (not paint) can be applied if the area sees foot traffic only and no vehicle traffic. As a result, you should be OK. A 2-part epoxy coating will work, but epoxy is not approved for outdoor areas or areas that receive direct sunlight as we mentioned earlier. If that is the case, then we recommend using a product called DuraGrade Concrete by Rust Bullet.
Hi,
I am trying to coat my garage for the first time on the bare concrete using rust oleum garage kit. Wondering if I need to prime it first? The kit says just to clean and etch but I am reading that people are needing 2 coats. Should I prime first? Do you clean, etch, prime and then coat?
Hi Asheana. As we explain at the beginning of the article, epoxy primers are not for the inexpensive epoxy paint kits like Rust-Oleum. These DIY kits are thin, lower quality coatings that actually cost less and do not perform as well as a proper epoxy primer. It’s less expensive to apply two coats of Rust-Oleum than apply an epoxy primer first.
Ready to do a metallic 100% solid two-part epoxy floor in a bar .The concrete is old but has been totally grinded,cleaned and etched and I’m wondering about primer. I have a 5 gallon bucket of the rustoleum paint /primer for garage floors that was given to me and I’m wondering about putting it down prior to my metallic epoxy. Or possibly maybe I should dilute part of my 100% solid epoxy and use it as a primer ,what would you suggest? I was thinking by using the rust oleum as a primer I would be able to get a good look at any flaws in the floor and also save some money if a primer like that would work
Hello Bret. Rust-Oleum paint and primer for garage floors is acrylic latex concrete paint and is not compatible with epoxy. Epoxy will not adhere to it unless you sand it first. In addition, it does not adhere as well as epoxy. You would be applying a coating to an inferior base. It’s like building a home on a sand foundation. DO NOT USE IT.
100% solids metallic epoxy requires an EPOXY primer. There are many reasons, primary is to make sure that you don’t have cosmetic issues with the coating creating bubbles. Many times, a dark colored epoxy primer is used depending on the color of the metallic coating. It helps to create depth in the look and bring out the true color. I don’t want to be the bearer of bad news, but trying to save money and taking shortcuts with a 100% solids metallic coating is only asking for problems that will cost more $$ to fix. If you don’t have the budget to do it right, then it’s not recommended to do it at all.
Lastly, a high-performance clear coat should be applied as well. It is the wear coat and protects the metallic coat. Furthermore, metallics are typically darker in color and extremely glossy. They will show every little scratch (and scratch easier) if a clear coat is not applied. I highly recommend you read up a bit on the proper way to apply metallics if you want a successful outcome.
Thank you for your info. I kinda already assumed that answer was coming. My friend is remodeling a old restaurant into a bar and we started looking at Epoxy for a floor covering. The more we looked into it and have watched a ton of DIY videos the metallic looks so awesome compared to the basic garage floor epoxy kits, that he wants to attempt to install it ourselves. He’s kind of a penny pincher and bought the rustoleum because it was marked down from $165 to $42 on clearance. I’ve been in the construction trade for many years , but I hang drywall so this is somewhat new to me. I do feel fairly confident in the prep work we’ve done. We’ve been weeks renting floor grinders, using angle grinders with diamond blades on our knees removing layers and layers of adhesive and now we’re starting to infill some cracks and divots and after researching I’ve told him you can’t just fill them with any grout or concrete filler it has to be the high priced 2 part epoxy just like the primer needs to be. The floor area is about 2000 sq ft and looking at the cost compared to his budget doesn’t seem to pan out? I was hoping for a long shot that we could cut some corners here possibly? I have seen a few videos that the installers aren’t even using a primer, just the main color first coat directly onto the concrete. It seems like a lot of what I’ve watched everyone has different methods or opinions on how to do it? Thanks again and wish us luck on this endeavor, I’ll try my best to talk some sense into him about the reality of what it costs to do it right.
Hi Bret. Did he purchase Rust-Oleum RockSolid metallic coating? If so, he definitely should not use it. It’s a very thin coating that is not a 100% solids epoxy. Plus, it’s residential quality and won’t last 6 months in a bar setting. He needs to use commercial quality products. And if he is (not RockSolid), he needs to follow proper procedures for using it in such an environment or he is going to have the problem of a bad looking floor with the requirement to close the bar for a few days to spend money to fix it. I can’t begin to tell you how many emails we get from readers with floor problems that start with the statement “I tried to save money by not doing…”. The floor of a commercial space with lots of traffic is not the place to pinch pennies for a particular look. There are some good videos on installation and many more bad ones. However, just because someone put up a video, it doesn’t mean they know what they are doing. If you read or watch any installations by a vendor that sells commercial metallic floor coatings, then you will see it is a minimum 3 coat process. Epoxy primer, metallic coating, and then clear coat. Prepping the floor properly is a great first step and very important. And yes, epoxy or polyurea crack fillers must be used. However, it’s pointless if shortcuts with materials are taken after that.
There is an option that would be less expensive. The concrete could be stained with a water-based dye and then coated with a high-performance clear coat. Not as much material would be required. The dye would highlight all the imperfections and crack repairs which gives the floor character. The clear coat then protects the floor and makes the colors pop. Here is an example of a product that could be used.
Hi,
My garage flooring is almost 35 years old, poked and worn out in some places. I have very thoroughly prepped it and applied one coat of Kilz primer. Last night painted one coat of Drylok. The floor still looks very poky in some places. Can I apply one of primer again, let it dry for 8 hours and apply again a two coats of paint and then seal it
Hi Sonal. Applying more paint is not going to change the look. The reason is due to the fact that paint is low solids (approximately 25%) with a DFT (dry film thickness) of approximately 1 mil. For reference, a sheet of paper is approximately 3 mils thick. Paint does not self-level. Once applied, 75% of the product evaporates and the WFT (wet film thickness) shrinks as it dries. The remaining 25% (solid content) is what remains on the floor. You can fill a small hole level, but you end up with a large depression once the paint dries and shrinks. The correct product for filling small defects is a 100% solids epoxy. There is nothing to evaporate out as it cures and what you see wet is what it looks like once cured.
Just as an FYI, paint is not intended to be sealed or have a clear coat applied. Only actual coatings are compatible with clear coats, not paint. There are not any products that you can apply directly to the painted surface that will withstand vehicles in a garage environment. This article here explains more.
Hello,
I purchased the Rust-oleum professional epoxy coat and am planning on using their clear top coat as well. I have also completed grinding my garage floor. Do you recommend using a primer as well, and if so, what would you specifically recommend?
Hello Andrew. No, an epoxy primer is not necessary for Rust-Oleum Professional epoxy coating. It’s a solvent-based epoxy that is approximately 70% solids and will penetrate the surface fairly well. It’s not as thick and viscous as high solids epoxy. The grinding will allow the concrete to absorb more of the coating for good adhesion. As a result, make sure to lower the coverage rate by 10 – 15% to allow for this loss of material in order to provide the recommended wet film thickness.
My garage floor is 43sqm is untouched concrete 4yrs old. I washed with Dulux concrete acid ( 12:1 )
24 hrs to dry.
I applied 2 coats Dulux Avista water based epoxy resin tinted ( Beige Tusk ) Paint soaks and shows up the pose of the concrete which is visible small holes.
please advise if primer can be applied solve the issues as i need apply flakes before top coat sealer
Hello Sagren. An epoxy coat primer (actual epoxy coating) needs to be applied to bare concrete before the color epoxy coat is applied – not after. Dulux epoxy is a lower-cost thin coating with an approximate 50% solids content (low). These types of coatings are not intended to be used with an actual epoxy coat primer. If you read the section under “Update” in the article above, it explains why. Dulux falls in this category. Was your concrete finish smooth or somewhat rough before you etched it? A rougher finish combined with the low-solids coating would explain your current results.
We recommend sanding the surface with 120-grit sandpaper and then applying a new color coat. Unless your concrete had a fairly rough finish at the start, this should help with covering up most of the cosmetic issues. You would then broadcast the color flakes into the coating immediately after application.
hi, my garage is 40sqm. I did diamond grinding and blast washing as well. I use 100 % solid epoxy two coats with flakes and a clear coat over. I’m just worried about moisture. I want to use water-based epoxy primer. it is capable for solid epoxy. Second, if I use water base epoxy as a prime coat, can I put one coat of 100% solid epoxy or do I still need to do 2 coats? thanx
Hi Raman. Why are you worried about moisture? Did you moisture test? If you have moisture issues, then you need to use a special moisture vapor blocking epoxy primer. In terms of a standard primer, it needs to be epoxy that is specified as an epoxy primer. Not just a standard water-based epoxy. Epoxy primers are formulated for good penetration and adhesion, and less so for wear from traffic since they are coated over. Once and epoxy primer is applied, you need to wait approximately 10-12 hours and then apply the 100% solids epoxy directly over it. If wait longer than 24 hours, it will require deglossing and roughing up the surface first.
I’ve already put down 2 coats of behr 1part epoxy paint can I put a sealer over the paint then put down another coat of epoxy
Hi Mike. 1-part epoxy paint is not epoxy. It’s a latex acrylic paint with 3-4% epoxy resin added to help increase adhesion and durability. I suggest reading our article here that explains the differences. What do you mean exactly about apply a sealer over it and then another coat of 1-part epoxy. What are you trying to accomplish exactly?