
When to use an epoxy primer coating is a subject that is often overlooked by the average DIY installer who is investing in a premium garage floor coating. Many people aren’t aware that they exist or think it’s just an added cost by the manufacturer or vendor they don’t need.
Epoxy primers provide an abundance of benefits and can prevent cosmetic issues during the curing process of high-solids epoxy coatings.
They can also specialize in problems associated with the surface of the concrete or moisture from below. In short, applying an epoxy primer coating will ensure you achieve the best possible adhesion and endurance of your garage floor coating for years to come.
Benefits of an epoxy primer Floor Coating
There are many benefits of using an epoxy floor primer for your garage. Let’s take a quick look to get a better understanding of what they do.
- Epoxy primers are designed to penetrate the concrete substrate to provide optimal adhesion. Many are low-solids epoxy, though some can be specially formulated high-solids epoxy.
- Epoxy primers provide a better chemical bond for the thicker epoxy base coat to adhere to. This creates a longer-lasting and more durable garage floor coating.
- Because of their thinner nature, epoxy primers help to eliminate bubbles and pinholes that can form due to the outgassing of the concrete.
- They allow the subsequent base coat to achieve a higher dry film thickness and coating uniformity since it is not soaking into the concrete.
- There are moisture vapor-blocking epoxy primers. These effectively block moisture from under the slab that would otherwise delaminate a typical coating.
- Most are moisture tolerant and work well when applied in high humidity areas of the country or concrete that is still damp from being cleaned or acid etched.
- Some are specialized such as oil-blocking primers. These are solvent-based epoxy primers made to adhere to concrete contaminated by oil that can’t be completely removed.
How epoxy primers work
Epoxy adheres to concrete by forming a mechanical bond within the pores of the surface. This is why it is required to properly profile the surface by etching or grinding the concrete.
Epoxy primers are designed to penetrate deeper into the pores to achieve a better mechanical bond. This reduces any chances of delamination of a properly prepared surface.
The primer also creates a thinner epoxy coat that the much thicker and better-wearing base coat can fuse with. This process produces a much stronger chemical bond than a mechanical bond. It is one of many reasons why most contractors always use a primer.
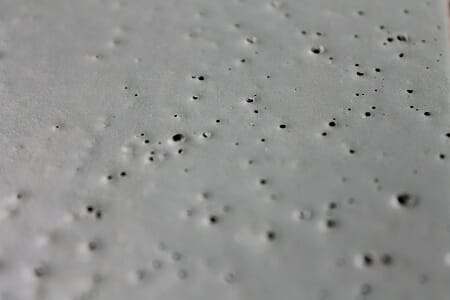
Air bubbles, craters, and pinholes can be created in epoxy from the outgassing of the concrete. Air in the slab will rise due to a temperature increase or a change in humidity.
When this happens during the initial application and curing process of a high solids epoxy to bare concrete, it can form bubbles, craters, or pinholes when the air escapes the concrete.
As a side note, these bubbles can also happen due to poor mixing of the epoxy or improper backrolling.
Because of their thinner film, epoxy primers reduce the likelihood of bubbles and pinholes forming. This is due to sinking further into the concrete to fill the voids that can hold air. As a result, it reduces the chances of air finding its way to the surface.
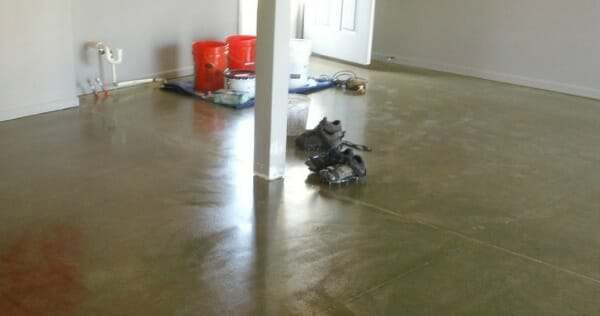
If air does rise to the surface, the bubbles will usually pop and slowly fill back in before curing. This is due to the low viscosity of the epoxy primer. Even if they don’t, the bubbles will be covered by the epoxy base coat that is applied on top. That is why the epoxy primer coat is sometimes referred to as the ugly coat.
Since most epoxy primers are water-based, the chemical makeup provides for moisture tolerance as well. As a result, some brands can be applied to a damp slab. This can be beneficial for the typical DIY epoxy installation that profiles the slab with acid etching. Instead of waiting 24 -48 hours or more for the slab to dry completely, you can apply your primer when the concrete is damp or if the humidity is up.
Many of these same primers will also form a vapor barrier to ward off the problems associated with moisture that tries to work its way to the surface. If you think you have a moisture problem, contact the manufacturer first to determine how much moisture vapor transmission is allowable for their product.
Oil-stop epoxy primers
Lastly, there is an epoxy primer for those who otherwise would be able to coat their garage floor due to oil contamination that could not be removed completely. Some manufacturers make an oil-stop primer that is solvent-based. It works by actively seeking out and bonding to the oil contaminants embedded in the concrete.
These are usually dark in color, however, and need to be covered with more than one base color coat or with a full refusal color flake application. If not, the darker color may bleed through and alter the color coat.
Will your epoxy floor coating fail without a primer? No. If you prepped your floor correctly, chances are your coating will not fail. However, with all the benefits that can be gained from using an epoxy floor primer, it’s hard to come up with an excuse not to.
If you are going to spend the money for a commercial quality, high solids garage floor coating, then it’s well worth the few dollars more for an epoxy primer. It will help to provide the most durable and trouble-free coating for your garage. The investment will provide a great return for years to come.
*** UPDATE ***
We have received numerous questions regarding the use of an epoxy primer for the single-coat DIY garage floor kits that you can find at most home improvement centers. Some of these include but are not limited to, Rust-Oleum EpoxyShield, Valspar, Quikrete, and RockSolid floor coatings.
Except for RockSolid, these kits are low solids epoxy with a low viscosity. In other words, they are a thinner coating. They do a good job of penetrating the concrete already. While RockSolid is a higher solids coating with a higher viscosity than other DIY epoxy kits, the Polycuramine formula does an excellent job of penetrating the concrete.
While epoxy primers are typically a lower solids water-based coating, they cost as much or more than the typical DIY single coat kits. In addition, the performance and durability of the typical epoxy primer are better than most DIY home improvement store garage floor kits as well.
If you are concerned about the benefits of a primer, you are much better off applying two coats of these low-cost DIY kits versus one coat. The second coat will allow for a thicker coating with much better color uniformity. It will also provide the opportunity to cover any cosmetic defects in the first coat that can be caused by environmental conditions in the substrate and application errors.
I will be using Armorseal 8100 for my car garage, do you recommend applying primer? If so, what do you recommend from Sherwin Williams?
Hello Jose. The Armorseal 8100 is a low solids, water-based epoxy. The consistency is similar to that as the home improvement DIY kits, but a better quality. Because it’s a thin coating you do not need an epoxy primer. In fact, most epoxy primers are a higher solids product than the ArmorSeal. Instead, we would recommend that you apply two coats. The first would act as the primer coat.
You would let the first coat fully dry. Then apply another coat. How long would you wait before putting on the first coat?
Hi Philip. You need to wait approximately 10-12 hours after applying the epoxy primer coat before applying the base color coat. If you wait longer than 24 hours, you will need to rough up the surface first as the next coat will not be able to bond chemically. Just as a precautionary note, do not confuse an epoxy primer coating with latex concrete priming paint.
I am building a house and wish to seal the garage floor. The floor was poured about 7 months ago. They put down a bed of gravel, then a moisture barrier and then the concrete. I have a guy who is going to install the sealer, but he is reluctant to do so, because the moisture level of the concrete is over 6% in some areas. I did the plastic sheet test and see no moisture coming out of the concrete, so it looks like the concern is the actual moisture content of the concrete. I don’t know what product he uses, but do you think it would be safe to seal this slab, or should he use an epoxy primer first? He said there is a primer he can use, but he thinks it will add about $1000 in cost to use it for this 400 sq ft slab. Thank you!
Is it a decorative coating that you want to apply or just a sealer for the concrete?
What type of primer is recommended for a newly poured slab (3 months old) to use with Rustoleum Rock Solid Metallic Garage kit?
Hi Bob. RockSolid does not require a primer for their product. Like other home improvement store garage floor coating kits, it is a relatively thin coating that penetrates well on its own.
Hi Shea,
While I note your comment that a primer is not required, I’ve seen videos where bubbles and other imperfections still show up with the Rock solid metallic kits. Will a primer help to alleviate this? Can it still be beneficial and using an epoxy primer cause other problems?
Hello Felicia. The reason you are reading about bubbles has to do with not letting the garage floor dry long enough or from rolling it on too quick/aggressively. Other cosmetic issues have to do with porous concrete, stretching the coverage rate, and the fact that RockSolid it a bit thin to begin with.
An epoxy primer would help to alleviate these issues and build a thick overall coating, but it will require more work. RockSolid is a proprietary blend of polycuramine that has not been tested with chemical adhesion to epoxy. It most likely would adhere well, but you would be taking a chance. What you would need to do is let the epoxy primer cure for 48 hours, rough it up with 120 grit sandpaper, and then apply the RockSolid to ensure a good mechanical bond instead.
An epoxy primer is actually thicker than RockSolid, less expensive per square foot, and provides better protection. If you were going to go this route, we would recommend not applying the RockSolid over it and instead apply a high solids epoxy over the primer for a much thicker and longer lasting system. Other than a real glossy coat, it doesn’t make sense to apply an inferior coating (RockSolid) over a better one (primer).
Want to seal a 50 year old garage floor in Vermont. Has significant water that rises through the floor. Also do to age and years of moisture, the concrete is heavily “pocked/worn in many places. Any thoughts?
Hi Steve. The first thing that should be done is to make sure all preventative measures have been taken to keep moisture from getting under the slab to begin with. Examples are making sure water drains away from the slab and does not collect against it, downspouts are directed away, and etc. If the slab is below grade, sometimes there is only so much that can be done. Next, you would need to clean the concrete and then treat the slab to a densifier or penetrating sealer that is used for basements. These products react with the concrete to fill the pores and help slow down and sometimes stop moisture. This is an example of a densifier. After that, you can fill all the pitted areas with the appropriate repair material. This article has more information about that. After that you can conduct a moisture test to see where you are at with the moisture issue. The results you get from that will determine what more (if any) can be done with your floor. Coatings will seal the concrete, but they cannot be applied if you have moisture issues or the coating will eventually peel from the concrete deteriorating underneath. The exceptions are special moisture blocking concrete epoxy primers, but it all depends on how much moisture the concrete is emitting.
I loved the article about epoxy primers. What I did not find after spending hours at home depot w no luck is what are the best epoxy concreteprimers and Where do I get them.
I’m doing about 3,000 sq ft and to prime the concrete first before I apply Epoxy Tech Epoxy.
Any recommendations would be very appreciated.
Hello Bryan. You will not find an epoxy primer at a home improvement center. You will only find them from concrete coating specialists and vendors. Home improvement centers do not want the hassle of dealing with commercial types of coatings with the DIY market. They want something simple, easy, and cheap. Legacy Industrial is a good example of where you can find quality epoxy primers.
Thanks for the response. I checked out legacy industrial and was wondering it “lock Down Concrete Bonding Primer” would be suitable as well? Its price per gallon is much more affordable. Since I need to purchase a large quantity if this is also a suitable primer for epoxy would this work?
No, Lock-Down bonding primer is an acrylic latex concrete paint. It is not an epoxy, nor is it compatible. It will not adhere as well as epoxy does to concrete and epoxy will not chemically bond to it during the recoat period. An epoxy primer is a specially formulated epoxy that is less viscous than high solids epoxy. It is designed to penetrate deeper into the concrete and allow any entrapped air within the concrete to escape.
Thank you very much. Was hoping to find a primer for my application that isn’t $90 per gallon since we are on a tight budget and hoping there is the right epoxy primer that is really good for less.
If you have any other known more affordable primers I am open to additional recommendations.
Thanks!
Hi Bryan. Unfortunately most decent epoxy primers are all within a few dollars or so of that price. Legacy Industrial is one of the few that endorses its use with other brands.
I started the process of installing an epoxy garage floor (275sqft) in a MW 75 yr old home. After grinding, I plan to use 3 layers: epoxy primer, epoxy color and polyurethane top-coat. Because of surface moisture late winter/early spring (likely more from below than from above), I’ve been heavily researching epoxy primer products. Those sold as “vapor barrier” are too expensive but I’m concerned that a “standard” epoxy primer wont be effective.
Q1. Is there a significant difference b/t the standard epoxy primer vs those sold as vapor barriers?
Q2. Are you familiar with the product below &/or can you recommend an equivalent I might find at a local contractors supply store?
VAPOR-STOP PRIMER, “…..a 100% solids pigmented epoxy sealer designed for use over concrete floors to eliminate moisture vapor emissions and increase adhesion of subsequently applied systems.” The 1.5 gal kit sells for $132 on garagecoatings.com which seems “relatively” economical given a coverage rate of 250-400sqft. THANK YOU!
You are correct to worry about an epoxy primer not being effective, Matt. They are not designed as moisture barriers. The key to effectively blocking moisture successfully is to know your true moisture vapor emission rate. Without knowing for sure, you are just guessing at which product is best for your needs. The Vapor-Stop primer is a good product for up to 15lbs. There are other products that block moisture up to 20lbs. However, it doesn’t make any difference if your transmission rates are higher than that. How wet does the floor get? Keep in mind that you do not need to apply an epoxy primer over a moisture vapor blocking product as it will act as a primer as well. Lastly, moisture vapor blocking products require a good grind in order to sink deep into the concrete and adhere well.
On top of grinding, I’ve completed two additional preventative measures : 1) sealed all “known” water access points around the garage and 2) performed CaCl moisture test yielding 1.7 lbs moisture emission.
Recognizing 1.7 lbs is a conservative value (dry/July) – I’m making a “5X” assumption (wet/winter) which increases the result to 8.5 lbs or 5.5 lbs over the maximum value stated by Taylor Tools.
Question: based on the above steps and test results, I’m wondering what class of product will make for the best, initial (preventative) layer: a “vapor stop” type epoxy primer 15-20 lbs – or – a densifier sealant product??? Thx!!
Based on your readings, Matt, a moisture vapor blocking epoxy primer is by far the better solution over a densifier when applying a coating. The last thing you want to do is apply a densifer before applying moisture vapor blocking epoxy primer. If you do, it will require more grinding to provide an even rougher surface. The moisture vapor blocking epoxy needs to seep in to the concrete and not be blocked.
I plan to use Rustoleum epoxy shield for my new 3 car garage floor. I already purchased two of the 2.5 car garage kits, knowing that most reviews say coverage is not always as advertised. I also have two of the gloss clear coat kits to apply after. Should I consider using an epoxy primer before the rustoleum to ensure better coverage and color? The article says “with the exception of one-coat kits”, but it’s not clear if there would be any problems associated with priming before a one-coat kit.
Assume that the floor will be THOROUGHLY prepped. I plan MULTIPLE cycles of sanding, pressure washing, scrubbing, and muriatic acid etching before application of anything.
Hello Mark. No, there is no need to use an epoxy primer for the one coat DIY epoxy paint kits. These kits are a lower solids epoxy like most epoxy primers are and generally get good penetration. Plus, most epoxy primers are slightly more expensive than the DIY epoxy paint kits due to their quality. It would make more sense to to just apply a second coat of the EpoxyShield if you like than to purchase an actual epoxy primer.
I am moving into a new build home in mid October and plan to epoxy the unfinished side of my basement to keep down the dust etc. This website has been an amazing resource so I want to thank you. I have a walk out basement and two windows, however they are on the finished side of the basement. The area I want to cover is approx. 550 square feet with poor ventilation. I was trying to avoid acid etching due to the fumes and I would prefer to keep the acid from my furnace and pipes. Here is my plan, and I would love for you to shoot a hole in it if you think it’s not a good one.
Step 1. Cleaning of the floor, vacuum and mop (new floor so no grease etc)
Step 2. Use Eco-Etch Pro at full strength to etch the floor
Step 3. Put down an epoxy primer from Legacy Industrial
Step 4. Put down the base color coat from Epoxy-Coat with flakes
Step 5. Put down the Epoxy-Coat clear coat system (From same kit)
Step 6. Have a daddy soda and enjoy my work
What weakness do you see here, any steps you would add? Do you think the Eco-Etch Pro with an epoxy primer will do enough to produce a quality job with the Epoxy-Coat?
Thank you for your time and experience, like I mentioned this website is extremely helpful.
Hi Jeremy. Yes, that’s a very good plan. Step 6 should be a requirement for most jobs. The one potential issue that was not mentioned is moisture. Where any steps taken to avoid moisture in the basement when the home was built? Most basements are below grade and many can have floors that develop moisture unless the slab was poured with a vapor barrier installed or the proper backfill material and drainage system constructed against the outside perimeter walls for moisture mitigation. Coatings do not fair well if moisture builds up under the coating and can lead to delamination issues later down the road.
I know there is moisture mitigation around the perimeter of the home, however I do not know of a specific vapor barrier below the slab. Would you say in this case that an epoxy floor may not be my best course of action? I will be using the area quite a bit, work room, mancave type things, I just wanted something to cover the concrete to keep that dirty dusty aspect that bare concrete gives you.
We can’t give you that answer for sure, Jeremy. Moisture mitigation around the perimeter can be very effective. However, if your area of the country gets a lot rain, there is the possibility that moisture could eventually work its way up under the slab. The products you are looking to use are excellent and will tolerate some moisture due to the use of the primer. You may never encounter any issues at all or you might at some point down the road. Is there any way to contact the builder and ask if a vapor barrier was installed?
Another option would be interlocking tile flooring. They take abuse well and the substructure allows for air flow under the tiles. It is easy to install and the only concrete prep we would recommend is a penetrating sealer. Sealers are very inexpensive and easy to apply as well. Interlocking tile flooring would cost more, however. There is also the third option of applying the coating and if you do encounter moisture issues later on, you could apply interlocking flooring right over the top of the coating.
I talked to one contractor who stated that he uses a 100% solids epoxy base coat but does not do a primer coat. He says he uses Sika and that the epoxy he uses is self-priming.
What are your thoughts on this? Is there truly a self-priming option or should I find a different contractor that will include a primer coat?
The reason some floor coating contractors use what they call “self priming 100% solids” is to save money on materials in order to compete with other floor coating companies. It also saves time and labor on installation. Sikafloor 216 is a 100% solids epoxy that can be used as a primer. However, it requires that it be applied much thinner in order to provide a proper priming base that adheres like it should. As a result, you lose the inherit build thickness when 100% solids is used on top of a primer coat. The overall floor thickness will be much less compared to other companies that use an epoxy primer and 100% solids base coat. We recommend that you contact a couple different companies and get quotes. We have an article here that discusses how to choose a floor coating contractor.
First off, thank you for all of the helpful knowledge! I’ve learned a lot from this reply chain but still have a few questions of my own… I’m smitten with the look of metallic polycuramine DIY kits but am wary based on customer reviews of the product. Can you add metallic pigment to an epoxy primer and get the same result or are there more steps to be taken? I’d like to use a product with better coverage potential to minimize cost as the area I’d like to treat is a 900 sqft, 20-year old naked concrete garage floor. All guidance and any pointers are greatly appreciated. Thanks again!
Hello Josh. The RockSolid or Rust-Oleum polycuramine metallic coating kits are an entry level type of metallic coating. For epoxy metallic coatings, they require that you use 100% solids epoxy for the metallics to work as they should. It also requires application of a dark epoxy primer first. Additionally, a high performance clear coat is highly recommended to protect the metallic coating from scratches and etc, especially for a garage environment. While these type of metallic coatings will perform much better and are approximately 3-4 times more thick, the materials required are going to be more expensive.
I am trying to coat my restaurant kitchen floor. It has been there for 50+ years. We have had a moisture problem in the past but believe we have corrected it. We are going to grind down or etch the surface to take up the existing epoxy coating that did not hold very well. I have started to look at using a mobile polyurea company but I will be doing all of the prep work myself. What kind of primer do you recommend using if we are using a polyurea material as the finished product?
Hello Michael. You will want to use a commercial quality epoxy primer coating. If there is a possibility of moisture becoming a problem, then you may want to consider a moisture vapor barrier epoxy primer. Though these are more expensive, they work quite well. Here is an example of where you can find such products.
Grinding is the preferred method to prep concrete and the only way to properly remove an existing coating. Etching will have no effect. To be honest, most reputable floor coating companies are leery about applying their coatings to a floor that they did not prep themselves and will usually refuse the business or will put down in writing that they are not responsible for any problems that may occur with the coating afterwards. Were you planning on prepping the concrete, applying a primer, and then have them apply their coating? If so, they would have to apply their coating within 24 hours of you applying the primer. If the primer cures for longer than 24 hours, then it will need to be deglossed and roughed up properly before anything can be applied over it.
I did two Rust-Oleum Epoxy shield kits on my 600 square foot garage about 5 to 7 years ago. In many places the floor has held up very good and there’s little fading of color or diminish of gloss. There are a few areas where it appears there are oil marks that will not come over, and a few areas where there is some rust staining. To top it off there are a few areas that have pits or chips that went into the concrete. I would like to re-coat my floor and fix the areas that chipped open. I keep getting mixed reviews with what I should do. Would I be able to use a Primer over the previous Coat and then use a Rust-Oleum Rock Solid Coating? The previous coat I did not do a clear top coat, which this time I will do that. Or should I use a grinder and get the old coating off instead of using the primer? Any suggestions would be greatly appreciated. I also plan on doing 3 kits this time to ensure I’m not thinning the application.
Thank you
Hello Chris. Rust-Oleum actually has a new product called Garage and Interior Floor Primer. We wrote about it here. It’s intended use is for projects such as yours as long as the current coating is sound (adhered well). It will require that you patch the concrete chipping and sand out the oil and rust spot first before application. I think the article will answer most of your questions. If you have any more after that, just fire away.
I’m in the process of doing a 440 sqft garage floor with Arizona Polymers products. These are the 200 primer, the 400 base coat and 100 poly top coat. I’m on my second go with this as the first attempt did not stick. The garage is 40 plus years old and has never been painted. I didn’t think it had been sealed, since if you pour water on it doesn’t bead up. I would say it doesn’t soak in very fast. The first attempt I cleaned it, degreased areas as needed and rented a floor grinder with diamond head. The primer didn’t seam to adsorb much at all and when I put the base down and went to knock off the flakes which didn’t lay down some came off down to the concrete. A few hours later I had removed the entire floor.
Fast forward another couple weeks and I’ve re-ground the floor using a 7″ diamond cup, in some places down to the aggregate. It looked clean. I tried thinning down the primer more, and did a small test area. This pulled up just like before. Oddly, I tested no primer and this area is bonded much better. I’m now torn between scrapping the whole project, looking for a better primer, or taking everything back and putting down a cheap Home Depot kit. Any ideas what is going on? Could it have some sort of deeply penetrating sealer which is preventing the primer from soaking in?
Hello Laurence. The grinding with the diamond cup wheel should have provided a rough enough profile for the primer to stick. How long have you been waiting before discovering that the primer was coming up?
(Edit)
I just checked the data sheets for Epoxy 200. This is a fast curing primer. Part of the issue may be that the primer is curing before it has a chance to soak into the substrate.
That could indeed be the issue. On the previous attempt I noticed that the primer stuck very well to the areas where I did the Rustolium crack patch, so it’s not a deficency of the primer itself, but it seem to be lack of penetration into the concrete. Even though the top has been cut down with the grinding, it appears to be very hard and dense concrete, so I think this primer just can’t penetrate into it. After consulting with Arizona Polymer’s tech rep I went ahead and did the entire floor last night with no primer. The base 400 material states it can be used as a primer, so it’s thin enough. I ended up thinning it 15% with acetone in order to get a bit better penetration. I really wish this had been recommended to me from the start, it would have saved me many hours and $$. Bottom line, I don’t think a separate primer is always the right choice….
Thank you for your comments.
Great decision to contact the manufacturer, Laurence. I’m glad it has worked out. We usually recommend that from the start with unique issues. We failed to do so in this case, but you prevailed. The Epoxy 400 is less viscous than other 100% solids product. With the thinning and the much slower curing time compared to the primer, it would explain the much better results. I think you wouldn’t have had the problems to begin with if the Epoxy 100 primer had been used instead. The fast curing Epoxy 200 has it’s benefits for particular projects, but yours was not one of them unfortunately.
Hi, I’m looking at trying to lay down a 3D vinyl print on my bathroom has concrete floor! Is it really as simple as 1. Prime 2.wait 3. Lay vinyl. 4. 2 coats of clear epoxy ? Also what would be best epoxy primer to use. It is a small area bout 9SM.
Hello Matt. No, it’s not quite that simple. It requires proper prep of the concrete first (acid etch or grind). You then apply a very high solids epoxy primer (80-100% solids) in clear or color that will create a dry mil thickness of 7-10 mils. Once it has tacked up after 10 hours or so you then lay the graphic. After that, you need to apply two very thick coats of 100% clear epoxy that are approximately 15 mils thick per coat. You will need to use commercially available products. Your local home improvement center will not carry anything remotely close to what you need. It may also be more expensive than you think. Epoxy coatings are typically sold as a 1 to 1.5 gallon kit. You can do partial mixes though for each coat of the 100% solids epoxy.
Thanks for you reply, didn’t realise I needed quite so much depth of clear epoxy. Would you happen to know where I could get the desirable products for my needs (primer, high solids) ( super clear resin) thanks again
The reason for this is that vinyl prints, logos, and etc. can be almost as thick as one layer of coatings. I also forgot to mention to make sure that the print inlay is compatible with floor coatings. Many of these have very small holes in the print that allow the coating to penetrate to the primer below to allow a good bond. We would suggest contacting ArmorPoxy for materials. They have experience with vinyl inlays and can help you with the materials you will need.
Thank you Shea, very helpfully
Can a 100% epoxy primer be used with a water Bourne two part epoxy base.
It can, yes.
Hi,
We applied rock solid straight on concrete hence most of was soaked into concrete, can you please advise how can this be rectified?? Should we buy another kit and apply on top to get the finish??
Thank you.
Hi Nikhil. Yes, it will require a second coat to get good gloss and color uniformity. RockSolid allows up to 7 days to recoat without further prep.
Hi,
Thank for the reply. It’s been over 10 months since we did the first coat. Obviously we didn’t knew the whole process. I am happy to buy another kit and do second coat but I wanted to ensure we doing it right now.
Thanks
OK. You will need to rough up the surface with 120 grit sandpaper first before applying another coat. Once you rough it up and vacuum up the dust, wipe it down with denatured alcohol on a microfiber pad and you will be ready to go.
Hello! I’m in a similar boat — I have 3 2.5 car kits of RockSolid for my 20×20 garage. I’ve read some reviews that suggest applying a thicker 1-time coat and not necessarily multiple coats. Would this be okay?
Also — after throughly degreasing and etching the concrete I kind of got carried away with the Rusoleum Concrete Patch kits (100% solids 2 part epoxy). I didn’t really have much in the way of cracks, but instead a lot of pitting and some softer/coarse areas that had been eroded by salt. I basically filled in the big voids and skim coated the more porous areas. Should I be worried that using it in this way will have the opposite effect of an epoxy primer in that it’s so thick it doesn’t adhere deeper in the substrate?
Thank you for your time!
Chuck
Hi Chuck. When it comes to thin mil coatings such as polycuramine, you are always better off applying two coats versus one thick coat if you are worried about color uniformity and gloss. The first coat acts as the primer coat. Regarding the RustOleum Concrete Patch; as long as you cleaned the area properly first and pressed the epoxy material into the concrete as you went, then it will hold up just fine. If you just kind of spread it across the concrete without pressure, then you may end up with delamination issues. It’s also important to grind any areas flush after the repairs or those areas will telegraph the texture of the repairs right through the coating.
Thank you so much for your reply!! I defintely pressed the patch in firmly as I went, however I did feather out the edges so I hope those areas don’t delaminate?
If I’m concerned about the final finish filling in small voids and remaining pits, will 2 regular coats be as effective as 1 thicker coat?
Also, will 1 thicker vs 2 thinner coats have any impact on durability in either direction?
Thanks again – I really appreciate your time!
Chuck
100% epoxy concrete patch will not delaminate if feathered, Chuck. You cannot fill in small imperfections, cracks, and pits with a thin mil coating. Thin mil coatings such as RockSolid, EpoxyShield and etc. will all shrink to some extent during the curing process and expose where these areas are. A typical example are small cracks. When applied heavily over these areas they look great at first. However, as the coating cures and shrinks and the cracks absorb a little of the coating, they are revealed with darker lines. If RockSolid goes on too thick, you can get bubbling from solvent outgassing and sometimes a more cloudy look to the color. That is why to you should treat the first coat as the primer coat (ugly coat) and the second coat as the finish coat. The second coat does not get absorbed into the concrete and goes down at the correct mil thickness when the coverage is not stretched. As a result, you get a better looking finish. One way to avoid the issues with thin mil coatings is to purchase a commercial quality thick mil coating system instead. It’s not that much more after paying for two coats of RockSolid, you will not have cosmetic issues, and it will last years longer. Here is one such example.
Hi,
I am looking at the one of your recommended vendors, Epoxy Master, to purchase an epoxy garage floor kit. They do not use a primer and do not recommend a primer before Epoxy is put down. The tech said “ours is thicker and is engineered to be used on a bare, ground, concrete floor”. EVERYONE else says to prime, what do you think?
Hi Garage1. Yes, EpoxyMaster has been selling their 100% solids epoxy without a primer for years. They are one of the few remaining vendors that still do this. As much as we like their epoxy, we really wish they would offer an epoxy primer as well. It seems to work for them though or they would make the change. You can always purchase an epoxy primer somewhere else to use in conjunction with their epoxy. Legacy Industrial sells one here for example.
Thank you, Shea! I have decided to return my 3 2.5 RockSolid kits and will be purchasing the Roll On Rock kit with 1.5 gallon of 5205 and 2 gallons of 5073, and 4 packs of accelerator! Sound like a good approach??
Yes, the Roll On Rock is a much higher quality product that will be over 4x thicker and much more durable. You might want to think twice about the accelerator packs. Though they do decrease the epoxy cure time quite a bit, they also shorten the pot life of the epoxy and only give you a very small window (20 minutes or so) to get it applied.
Hi Shea!
I ended up diamond grinding the surface after filling in all the pits. I went with the 5085 (2 gallons for 450 sq ft) over the 4195 with flake broadcast to full refusal. I really like the way it turned out!
A couple things I wanted to mention/run past you:
1) When up very close you can see areas of the floor with micro bubbles — which I’m confident are due to over back rolling or rolling while racking up.
— just wondering your thoughts on micro bubbling and final durability of the finish?
2) The floor (probably because of the potential extra backrolling) has a pretty even build across the plane – which I’m happy about! However, there are some likely high spots that, while certainly coated in the 5085, have noticeably less build and thus a more granular texture as the flake is more exposed.
– Just wondering if you think
these areas will be noticeably less durable over time?
I’m planning on purchasing a 5085 “touch up kit” and, after lightly sanding the areas, applying a very light coat to add some build. I
Understand the area will stand out but I’m wondering if you think any potentially added durability would be worth it?
3) I ended up getting some 5085 In the expansion cracked which caused a bead of bubbled material to form. I talked with Versatile and they said I could just carefully cut it out with an Xacto knife — which I did. I’m just wondering your thoughts on whether or not it would be worth it to feather in some 5085 where I cut the bead so there isn’t a theoretical blunted, unnatural edge in the expansion joint?
4) Last, there were 3 or 4 1/8” high and 1/8” diameter flake bundles that cured abOve the plane of the floor. I carefully knifed them off, but am wondering if there should be any concern for moisture getting between the 5085 and 4195? If so, is this another spot that is advisable to add a dab of 5085 ….. or am I just overthinking all of this!?
Thanks again for your time, Shea!!
Chuck
Great to hear it turned out well for you, Chuck. It’s a floor coating that will last years longer than the RockSolid coating you were considering. I will answer your questions by the number.
1). The micro bubbles will not affect the durability of the coating. They are a cosmetic issue only.
2). You technically would be making those spots more durable in terms of wear. However, if they are not noticeable now other than a texture difference, I would leave them be instead of making them more noticeable from adding more coating in those spots. The nice thing about quality clear coats like this is that in the event the floor starts showing its age in the years to come, you can always rough up the surface and apply one new coat of clear to make it look brand new.
3). You can do that if you have the material. However, the performance of the coating will not be affected as it is in its current state.
4). Yes. Apply a dab of the 5085 to those areas if you can.
I am planning to coat an approximate 60 year old concrete floor in a boathouse, approx 800 sq feet. so far, I have ground the concrete the floor. The floor occasionally gets wet in certain areas, not sure if it’s from above or below. it is in a somewhat humid environment being an all concrete structure (block walls and poured ceiling on i beams and being on a fresh water lake)
I will likely be storing a car in the structure, not a daily driver. So not sure that I really need much hot tire performance. will will have some workshop equipment in there.
Am I better off with two coats of the rust-oleum, the first serving as primer or just go with the 100% solids (epoxy coat) on the bare ground concrete.
I also want a no slip surface as there will be foot traffic with wet bare feet, this being a lake boathouse. What is the best method of ensuring this (by a dyi’er)
Hello Tim. The first thing you need to determine is what causes the moisture issue. If it’s coming up through the concrete, we do not recommend a coating until you can stop the moisture intrusion or do a proper moisture test to see how much you have. This will determine if you can use a special moisture vapor blocking epoxy primer (expensive). Epoxy coatings do not breathe and will delaminate if moisture builds underneath. Hopefully it is an issue with concrete sweating. If that is the case, then no worries as the moisture is just condensation on top of the concrete. A simple test would be to tape a 16″ square sheet of plastic to a couple areas of the floor that are known to get wet. Seal all the edges good with the tape. Leave them there until the concrete shows signs of moisture around the plastic. Pull the plastic up and check the concrete. If it’s dry under the plastic and the concrete is dry, then you have concrete sweating. If it’s wet under the plastic or the concrete is dark from moisture, then you have a problem with moisture from below.
In terms of epoxy, if you want to use Rust-Oleum then we would recommend two coats of the Rust-Oleum Professional EpoxyShield. It’s a solvent-based epoxy and will adhere better and stand up to wear much better than the water-based EpoxyShield. You can mix an anti-slip media into the second coat. Don’t use aluminum oxide as it can be harsh on bare feet. Use a polymer bead media.
I will do the moisture test, thanks
Thinking about the slippery floor in the boat house (wet bare feet & all) Is there a good product that has a matte finish? Perhaps the primers have a matte finish??
The Rust-Oleum products are the least glossy colored coatings available, Tim. They are a semi-gloss where as most other coatings are glossy. A matte finish is still going to be slippery when wet, just not as slippery as a gloss finish. A hard, non-porous coating combined with moisture is going to have this affect. As long as you use a polymer-base anti-slip media, you shouldn’t have to worry. FYI – the anti-slip media reduces gloss as well.
I grinded my garage floor last year but could not complete the coating, so I bought two G-force vinyl mats and laid them on the garage floor. Over the past year, I noticed when it rains outside, the garage floor underneath the mat was so wet. Two weeks ago, I removed the mat and found the underneath concreate floor was complete wet, even without rain. I washed the floor and removed oil etc and it took 3-4 days to dry the garage floor. after that, I did the plastic sheet test, I did not get too much moisture underneath. It did not rain for the past 1 week. Should I repeat the same test when it rains? Or do Calcium test? Can I go ahead to bough epoxy or polyurea? I do plan to use primer for epoxy, but concerned it does not bind tightly enough due to moisture. It does get humid here in DC area.
Thank you very much!
Hello Quan. Is the slab below grade at all or up against or near a dirt embankment? Any moisture present with the plastic sheet test is not good. Let the concrete thoroughly dry and then do the test again when rain is expected. Make sure to seal the edges well. If the concrete turns darker or you get moisture on the plastic underneath after 24-48 hours, then you need to do a calcium chloride test to determine how much moisture you have. The results will indicate if you need a special moisture vapor blocking epoxy primer or not (not standard epoxy primer). If you don’t get any moisture, then you should be OK.
Shea,
Thanks for the quick reply. What does “below grade” mean? Lower than the ground/soil level? My garage is attached and has one side next to the external wall. The level is not lower than the soil level outside.
I will take your advice to repeat the plastic test after the rain.
Thank you so much again!
Yes, Quan. Below grade is for any slab that is below the surrounding ground level.
i have a garage floor which was concreted. However, about 11 years ago the builder had to seal the concrete due to chalk residue on the surface. I would like to either paint the garage floor or epoxy. What would your suggestion in regards to preparation?
Hi Glensye. If there is a sealer on the floor you will need to grind the surface to remove it for either paint or a coating. The grinding will prep the concrete at the same time. If you are going to go through with the exercise of grinding, then we highly recommend applying a coating over paint. Coatings are much more durable. Paint will only last a year or two and a quality coating can last 10 years or more.
I thinkI have decided on the Norklad 200 100% solids Epoxy for my Gareage. What would be the best Primer to put down first? I have already used a floor grinder on the floor and am ready to go.
Hi Dennis. Use Norklad Pre Prime.
Hey Shea,
I have a garage that I put down a 2 part epoxy 10 years ago and it has held up fine. I want to re-coat with another 2 part epoxy to freshen it up and change the color. My question is can I clean my floor with TSP or another product and then put on a primer then re-coat. I don’t want to get into sanding. Thanks
Jim Hovis
Hi James. We have an article here that discusses the proper procedure for recoats. Epoxy needs to be roughed up for the new epoxy to adhere properly or it will soon begin to peel, especially under car tires. Proper primers for epoxy are actual epoxy primers (not bonding paint) and still require the same procedures. Remember that unlike paint, one of the benefits of true epoxy coatings is that they create a tenacious bond to properly prepared surfaces. If you don’t put in the effort to create a properly prepared surface, then they will not work as intended. If your coating is a Rust-Oleum product, then there is one exception. They now make a recoating primer that is intended for use on their products only. We have an article about it here.
Thanks for getting back so quick. I have 2 garages and in my schooldays I used to paint houses to pay for school so I know all about the prep is the most important part of the job. Anyway I saw that Rust-oleum product and didn’t do my research so I cleaned and de-greased the floor and rolled a coat of Rust-oleum recoat primer. I then started putting down my first coat of high gloss black 100% solids epoxy on top of the primer. I could tell right away that I was in trouble. Instead of stopping and licking my wounds I moved forward and finished the base layer. It looked awful. Bubbles, fish eyes, you name it it was on my floor. Well I could not stand the thought of grinding down the floor so I bought a gallon of rustoleum enamal paint and put that over my base. Then I went back and put another coat of epoxy on top and it was awful as well. I then put another coat of epoxy on top of that and it began to look OK. Then I put a clear coat on top and it looks well enough that I can live with it. I know now you can’t put 100% solid epoxy on top of Rustoleum’s primer. I am trying to avoid another disaster on my next garage, thanks for your advice.
One more question please. Just read your review of AWF POLYUREA and it sounds interesting. Can I apply AWF POLYUREA on top of my preexisting epoxy? Should a primer be used?
Thanks
Jim Hovis
Yikes, you have quite the project there, James. No, we do not recommend applying AWF Polyurea over the existing coating you just described. Save it for a new slab or when you remove a coating down to bare concrete. Remember, a coating system is only as good as its weakest link. In your case you have two. The first is the Rust-Oleum enamel paint which is not compatible. Paint does not adhere nearly as well as coatings do and should never be used in a coating system. Everything on top of it is subject to how well that paint stays adhered. Additionally, the coating on top of the paint will not stay adhered unless the paint was sanded first. The other weak link is the Rust-Oleum Recoat Primer. It was not formulated for 100% solids epoxy, so how well that coat will stay adhered is questionable as well. Your best bet is to quit spending your hard earned money after bad with the current coating 🙂 Just cross your fingers that you won’t soon have issues. If you do, then grind it all off and then apply the AWF Polyurea.
I appreciate your response Shea, and I know I have a cluster F with that floor. I’m going to wait it out and see what happens. I wondering about my other garage floor that has a previous 100% solids epoxy that was put down correctly 12 years ago and has held up well but needs to be recoated to look better. Can I apply AWF POLYUREA on top of this floor and if so would I use a primer or what prep would I need to do. There is no delamination or peeling. It is in good shape just old and dirty.Thanks
Yes, you can apply the AWF Polyurea to that floor, James. Clean and degrease the surface first and then rough it up with 120 grit sandpaper. A floor maintainer with a few 100 grit sanding screens makes for easy work of this. Just be sure to sand the corners and edges that the machine can’t reach. After that, sweep and vacuum up the dust. The last thing required is to do a chemical wipe with denatured alcohol on a microfiber mop pad. As soon as it evaporates you are ready for the new coating.
shea
you are so helpful I can’t thank you enough.
Jim Hovis
You’re welcome, James.