
Garage floor coatings are one of the most durable, stain-resistant, and easy-to-clean decorative finishes available for garage floors and workshops today. They will protect the floor from the elements, instantly transforming your dull or ugly concrete surface into a professional-looking floor that combines beauty and functionality.
And since the garage has evolved beyond just a parking space, the benefits of concrete coatings have made them one of the most popular DIY garage flooring options today.
As a result, we will briefly explain what a garage floor coating really is. We will discuss the features, benefits, and how it is applied. More importantly, we will list the available coating options for DIY application, along with the pros and cons of each.
Additionally, we will provide excellent examples of where you can purchase quality coatings and DIY coating kits that we have reviewed and can recommend.
This article was updated in March of 2026 to reflect the most current trends and coating technology
What is A garage floor Coating?
A garage floor coating is a viscous thermosetting polymer resin that chemically crosslinks as it cures, creating a hard, durable, and chemically resistant wear surface. Epoxy, polyurethane, polyurea, and polyaspartic are the most common concrete coatings.
A catalyst activates the exothermic (releases heat) crosslinking reaction. For 2-part coatings, such as epoxy, the part-A resin/pigment is mixed with the part-B hardener, which serves as the catalyst. Moisture and/or oxygen in the air act as catalysts for single-part coatings.
Visit our Garage Flooring Gallery to view the various garage floor coating options.
Shop our collection of Pro-Quality Coatings from Top Vendors
Benefits of Garage Floor Coatings
Commonly used for both residential and commercial applications, a high-quality coating or coating system will protect the concrete from oil and related automotive fluids, stains, chemicals, spills, and other substances vehicles may track into the garage.
In addition, they seal the concrete to prevent liquids, deicing fluids, and road salts from penetrating the surface and causing damage.
Most notably, coatings are very easy to clean and to keep looking clean.
Commercial-grade coatings receive high reviews from home mechanics and hobbyists. They are popular in automotive and workshop environments where rolling floor jacks, jack stands, rolling toolboxes, and other mechanical equipment are used.
Furthermore, the high gloss and lighter colors of floor coatings reflect overhead and natural light. This results in a brighter work environment that makes more efficient use of available light.
Lastly, when applied to a properly prepared concrete surface, coatings can form a strong mechanical bond, making them highly resistant to peeling and hot tires. The overall result is a decorative, scratch-resistant surface that lasts for years.
Single Coat vs Multi-Coat Garage Floor Coatings
The most durable garage floor coatings are multiple-coat systems, and the industry standard for professional installers. They are also the most popular among DIY enthusiasts who want the best protection and value for their money.
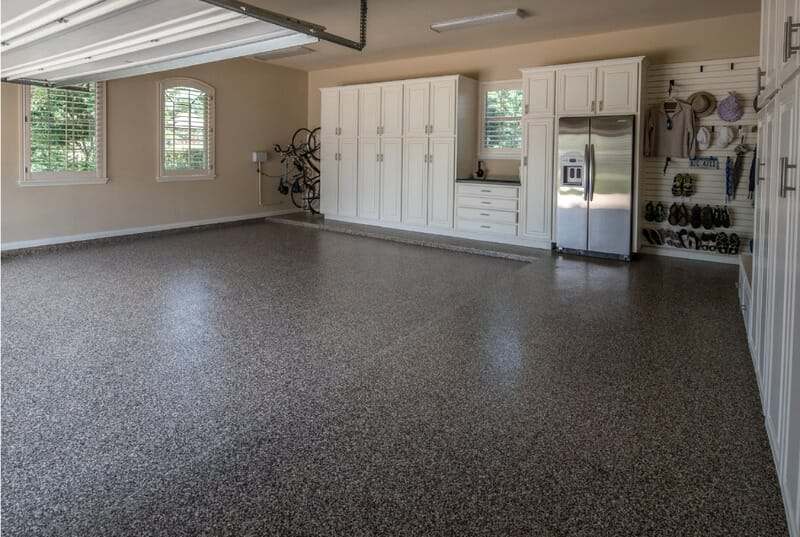
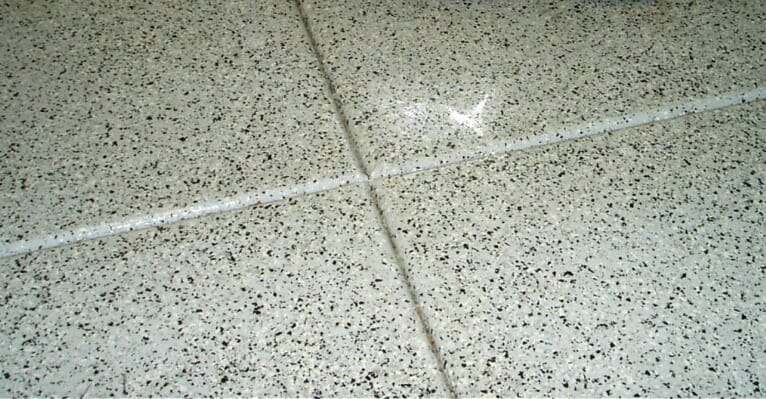
These coating systems consist of a minimum base color coat, optional decorative color flakes, and a high-performance clear topcoat. The clear coat is essential for locking in the color flakes, protecting the color coat, and extending the coating’s life and durability.
Many times, these are hybrid coating systems. In other words, the base color may be a thick, high-build epoxy coat with a polyurethane, polyurea, or polyaspartic clear top coat.

Options may include an epoxy primer coat for highly porous concrete, high-solids epoxy base coats, or other coatings. They are also used as a primer color coat for very light (white) or very dark base coat colors to achieve proper color tone.
Lastly, some are specially formulated to provide moisture-vapor-barrier protection for concrete with moisture issues.
Tan, beige, and various shades of gray are the most common base coat colors because they hide dirt best. However, high-quality coatings offer a wider range of colors for the DIY installer to choose from.

Other options include metallics and custom color-flake blends that match your style, home, or even your favorite sports team.
A more budget-friendly option for the DIY installer is a single coat application. Examples include a single color coat or a high-performance clear coat that protects and highlights the character of bare concrete.
Single coat applications are not as durable as multi-coat applications. However, they are less expensive to install and still effectively protect and seal the concrete, including stain protection. High-quality single-coat applications will also provide longer wear than budget, store-bought options.
How Thick are Garage Floor Coatings?
The overall thickness of a garage floor coating varies and depends on many factors. These include the type of coating material used, the number of coats applied, and the choice between random or full color flake coverage.
A typical commercial-grade garage floor coating system averages 8-12 mils of dry film thickness. These coating systems typically include a base color coat, partial color flake coverage, and a single clear coat. A mil is 1/1000th of an inch. Standard copy paper averages 3 mils thick for reference.
A concrete coating system that consists of an epoxy primer coat, a high-solids epoxy base color coat, full color flake coverage, and the appropriate clear coats can average 15-25 mils or more in overall thickness.
In contrast, a lower-performing single-coat kit, such as EpoxyShield by Rust-Oleum, averages only 3 mils dry film thickness. You can expect an overall thickness of 4–4.5 mils when the optional EpoxyShield Clear Coat is applied.
Are Garage Floor Coatings Slippery?
Most floor coatings are not slippery when they are dry. However, epoxy and other coatings can become slippery when wet. Typically, the glossier a coating is, the slipperier it becomes when wet.
A heavy application of color flakes can add texture to a coating and reduce slipperiness, but it is not a substitute for a slip-resistant surface. An anti-slip media is typically mixed into the final coat to achieve a non-slip surface.
Are Coatings and Garage Floor Paint the Same?
Concrete garage floor paint and 1-part epoxy paint are not the same as thermosetting garage floor coatings and provide far less protection. They are thin, water-based acrylic polymer formulations containing pigments, binders, and additives.
When applied to concrete, they dry like paint on a wall. All will peel from hot tires, generally sooner rather than later. Furthermore, they are much less wear-resistant and are only available in a satin finish.
The primary reasons for their use in a garage environment include their low price point, ease of application, and deceptive marketing tactics that prey on the average consumer’s lack of knowledge about coatings.
Of the two, 1-part epoxy paint performs better and is worth the few extra dollars per gallon. It incorporates 2-4% epoxy ester resin as an additive to enhance durability over standard paint.
DIY Garage Floor Coating Options
The choice of concrete coating materials available for DIY application has expanded in the last decade. Epoxy is no longer the only player on the field.
Some are easier to apply than others, and each has its own benefits and drawbacks that you should be aware of.
Epoxy
Epoxy has been the most common garage floor coating material for decades. It is a 2-part coating consisting of part A, an epoxy resin, and part B, a hardener/catalyst. High-solids (>85%), commercial-grade epoxy is typically 8-10 mils dry film thickness.
High-solids to 100% solids epoxy has self-leveling properties, provides an excellent build coat, and is the best medium for receiving a full-color flake application.
Epoxy is popular for use in industrial applications, warehouses, garage floors, and workshops. Return-to-service times are longer due to slower cure rates. You can walk on it in 24 hours and drive on it in 72 hours.
Epoxy Pros
- Longer curing time allows for the best adhesion to concrete
- High solids epoxy (>85%) will not peel from hot tires
- Provides the thickest build coat at 8-12 mils DFT and greater.
- Self-leveling properties
- Good impact resistance
- Best at hiding surface repairs and concrete imperfections
- Best for receiving full broadcast color flake applications
- Offers the most color options
- Excellent chemical resistance
- Good wear resistance and stain resistance
Epoxy Cons
- Shorter working time of 25 – 55 minutes
- Limited application temperatures between 60° and 85°
- Not UV stable – develops a yellow tint with exposure to sunlight
- Does not flex, making it less resistant to cracking
- Longer cure and recoat requirements add to the overall installation time
- Has increased in cost over the years
Polyurethane
Polyurethane is a thin coating with an average DFT of 2-2.5 mils. It is available in single-part and 2- part (2K) formulations. With some exceptions, it is primarily used as a final clear or colored topcoat for other coatings, such as epoxy.
Before the advent of polyurea, polyurethanes’ UV stability and superior wear, stain, and scratch resistance made it the go-to high-performance top coat for epoxy on garage floors, workshops, and in industrial applications for many years.
Newer water-based versions with low to no VOC content have become popular for indoor applications. However, they are not ideal for garage floors. They are susceptible to tire staining and to some chemicals and solvents.
Polyurethane Pros
- Great topcoat for epoxy
- UV stable
- Excellent chemical, stain, and abrasion resistance
- High gloss appearance
- Ideal for high traffic areas
- High flexibility increases abrasion resistance and impact resistance
Polyurethane Cons
- Can be finicky to apply and leave roller marks if not careful
- Sensitive to moisture and high humidity during application
- Requires multiple coats for application over full color flake floors
- Can be high in VOCs
- Moderate resistance to tire staining
Polyurea
The characteristics of polyurea are similar to those of polyurethane, but with some distinct advantages. It adheres very well to properly prepared concrete surfaces, it cures faster, and it’s thicker at 4-10 mils DFT. Polyurea is also more resistant to moisture and extreme temperatures during installation.
It used to be that only 2-part polyurea was available as a concrete floor coating and was used strictly by professional installers. Its extremely short working time of 15-20 minutes and fast curing time of 2-3 hours enabled same-day installation.
However, the arrival of single-part polyurea has been a game-changer for DIY garage floor coatings. The easy application, long working times, no mixing of components, UV stability, and extended wear have made it a favorite over epoxy.
It’s our #1 recommendation for most DIY installers looking for an incredibly durable, easy-to-apply garage floor coating system.
Single-Part Polyurea Pros
- Multiple color choices
- Excellent, clear topcoat for bare concrete or epoxy
- No mixing of A and B components
- Long working time reduces installation anxieties over other coatings
- Adheres well to properly prepared concrete
- Faster cure times = quicker return to service
- UV stable
- Excellent chemical and stain resistance
- High abrasion resistance – wears longer than epoxy or polyurethane
- Excellent impact resistance due to flexibility
- Flexible and better withstands the expansion and contraction of substrates
Single-Part Polyurea Cons
- Higher VOCs during application – NIOSH-approved respirator recommended
- Not as thick as high solids epoxy
- Won’t hide imperfections in concrete as well as epoxy
- Cannot be shipped to the South Coast Quality Air Management District
Polyaspartic
Polyaspartic is essentially an advanced type of polyurea. 100% solids polyaspartic is harder than polyurea and typically provides the best chemical, abrasion, and UV protection. It is primarily used by professional installers as a clear topcoat due to its very short working time (15-20 minutes) and quick return to service.
DIY-friendly polyaspartics have 65-80% solids content and/or slow-cure options allowing for longer working times. Depending on the solids content, it can be applied thicker than polyurea, making it an excellent choice as a clear topcoat for full color flake and outdoor applications.
It is also the most resistant to tire staining. However, the abrasion and scratch resistance of DIY-friendly polyaspartics is slightly less than that of single-part polyurea.
Polyaspartic Pros
- Excellent, clear topcoat over epoxy, polyurea, and full color flake applications
- Best UV stability
- Excellent chemical and stain resistance
- Long wear
- 2-3 mils thicker than single-part polyurea
- Shorter cure time means quicker return to service
Polyaspartic Cons
- Does not adhere to bare concrete as well
- Can be high in VOCs, similar to those of single-part polyurea
- Higher cost than single-part polyurea
- Typically not found in kit form and must be purchased separately
Moisture-Cured Urethane
Though not as common as the previously mentioned coatings, moisture-cured urethane (MCU) concrete coatings are fairly new to DIY installers. They are thin, single-part, high-performance, industrial-grade floor coatings designed to deliver exceptional durability and chemical resistance.
MCUs cure by reacting with ambient moisture in the air, creating a dense, tightly crosslinked surface that bonds aggressively to properly prepared concrete.
Newer aluminum-metallic MCU concrete coatings with long working times are becoming increasingly popular in workshops and some garages. They have high heat tolerance, making them less susceptible to welding burns. They are ideal for garages and workshops where floors are exposed to vehicle traffic, hot tires, dropped tools, oils, fuels, and heavy equipment.
Some MCUs may not require etching of the concrete before application. DuraGrade Concrete by Rust Bullet is one such example.
MCU Pros
- No mixing of A and B components
- Shorter recoat times decrease overall installation time
- Quicker return to service
- Better UV resistance than epoxy
- Excellent resistance to abrasion, chemicals, fuels, and solvents
- Excellent impact resistance
- Aluminized MCUs have high heat tolerances up to 500 degrees
- Excellent adhesion to properly prepared concrete
- Can be less expensive than some commercial coatings
MCU Cons
- Thin dry film thickness of 2-3 mils requires two or more base coats
- Some can be high in VOCs – similar to single-part polyurea
- Sensitive to moisture and excessive humidity during installation
- Can be finicky to apply and leave roller marks if not careful
- Aluminized MCUs are not as decorative and glossy
How Garage Floor Coatings are Applied
Garage floor coatings can be professionally installed or done yourself. A DIY installation can save you quite a bit on labor costs and materials. It’s not that difficult as long as you make yourself familiar with all the steps required and plan accordingly.
The first and most important step for a successful coating is preparing the concrete surface. The process involves etching or grinding the surface to create the proper profile for the coating to adhere to.
Next, concrete cracks are repaired. This includes any surface damage, such as pitting or spalling. It is important to use the appropriate concrete repair materials.
Once repairs are complete, the base color coat is applied, followed immediately by the optional color flakes. The clear coat is applied within the recoat window, after the color coat has cured for the minimum required time.
Read our complete guide on How to Apply Garage Floor Coatings
Most coatings require 24 hours before they can accept foot traffic and 48-72 hours before they can accept vehicle traffic. Some exceptions apply.
Where to Buy Commercial-Grade DIY Garage Floor Coatings
Most commercial-grade DIY concrete coatings for garage floors and workshops are purchased online from professional concrete coating vendors. These vendors provide the knowledge and experience required to assist DIY installers with all their project needs.
At All Garage Floors, we make it easy for you to find these vendors and shop for the coatings that best meet your needs and budget. Just visit our Shop Page and select a coating category.
Shop our collection of Pro-Quality Coatings from Top Vendors
Home improvement centers, hardware stores, and most paint stores typically do not sell commercial-grade concrete coatings. The primary reason is that they do not employ staff with the experience, knowledge, and time needed to provide proper customer service for such coatings.
Drawbacks to Garage Floor Coatings
As tough as garage floor coatings can be, they are not resistant to everything.
Welding is hard on floor coatings and can create burn marks from the hot slag that falls on them. In fact, metal fabrication in general can be rough on floor coatings. This is due to the tendency of heavy, sharp objects to be dragged across the surface.
If you are interested in a more utilitarian coating that makes cleanup easier while also resisting hot slag and grinding sparks, we suggest an aluminized MCU coating.
Furthermore, coatings are not a good choice for garage floors and workshops that have moisture issues from below the slab. An excessive rate of moisture vapor transmission from beneath the slab can cause coatings to delaminate.
Final Thoughts
As we mentioned, a garage floor coating can completely transform the appearance of your garage or workshop floor. It’s durable, easy to clean, highly stain-resistant, and flat out looks great.
One important point we want to make is that you genuinely get what you pay for with concrete floor coatings. If you want a budget product, you will get budget performance and looks. If you spend a bit more, you will be rewarded with a much more durable coating that performs better, lasts longer, and looks fantastic.
In the long run, it will actually save you both time and money to purchase higher quality coating products – by far.
So, whether you are turning your garage into a man cave, a working shop for car repairs and projects, or just a place to park your cars, it’s hard to beat the benefits of a quality garage floor coating system.
Hi, I just came across this site and the concept of epoxy coating for garages. It’s sounds good. I am looking for a change in flooring for the garage to use it as a dance/ workout studio. I read about anti skid coating that is available. I will have to look for a contractor to do this. How much does this cost approximately for a standard 2 car garage? Is it really that durable and maintenance free? I don’t have any tools or equipment in the garage just cars and some storage.
Thanks
Hello Ashwini. Yes, it really is that durable and easy to keep clean. Pricing usually starts around $4 a square foot to have a quality system installed by a good contractor.
Question: Does this epoxy floor coating have an “R” rating, does it provide any insulation qualities above a poured concrete floor- a direct application?
Hello Michele. Epoxy, including most coatings, do not have an “R” rating. It neither holds or insulates heat.
Hello,
I am considering using epoxy inside of my home. How difficult would it be to do the 2nd story of my house? In other words, does epoxy work well on other surfaces other than concrete?
Hello Brian. The second story in most homes will be a wood sub floor. While epoxy will adhere to wood very well, you do have issues to contend with. The first is flexibility. Epoxy does not flex at all and can easily crack under weight if the sub floor flexes. This is where a polyurea coating may be a better solution as it has some flexibility to it.
The second issue is joints in the sub floor. You will need to fill these with the proper joint filler and then sand them flush. A flexible epoxy bridging primer will need to be applied to the entire floor after that and then the coating of your choice. While it can be done, it’s usually a more expensive proposition and the prep work required takes a lot more time.
Can I do this to my floor in my sauna?
You could Brent, but it’s not the most desirable coating for a sauna. You would need to use an anti-slip additive for sure which can be rough on bare feet.
I just want it for looks but will definitely use cedar decking tiles for walking areas. Thanks.
I’m building a new garage this spring. It will be approx 700 sq ft. I’m also thinking of an acid stain. Two questions.
At what stage of construction would be a good time to acid stain the floor and
Can I then Epoxy the floor over the acid stain?
Hi Allan. For most flooring it’s best to keep the floor covered until most construction and drywall is done. Then do the floor. Acid stain can look very nice, just make sure that your concrete guy didn’t use a cure and seal or other type of sealer to help the concrete cure or the acid stain will not react with the concrete. Once the floor is stained, rinsed, and dry, you can apply epoxy over it. However, since epoxy will amber, our suggestion would be to apply a good clear DIY polyurea coating instead. It will not amber like epoxy, it’s more abrasion resistant, and more chemical resistant. This is a good example here.
Hi – we had this flooring applied by a profession company almost a year ago. The flooring is in our man cave which we use often. Well our floor seems to be having multiple areas that form blisters that pop and leak an oil type liquid. The fluid that comes out looks just like dirty car oil. There are also areas that almost boil up and leak out a clear fluid that smells like oil. Can you tell us what may have cause these issues? The company says it is from “the cleaner” we used which was just a mister clean mixed with water. The surface is also very rough in spots. We would appreciate any feedback you may have. I also have photos I could send to an email. Thanks for your help.
Hello Anna. We’re sorry to hear about your problem. The cleaner you have used on the coating is fine. The problem is not from a bad coating either. Was the surface moisture tested by the company before installation? Is any part of your slab below grade? The reason we ask is what you appear to have is a moisture problem. The blisters you are experiencing is from water vapor under pressure. The slab is pushing moisture up to the surface and your coating is blocking it. The blisters most likely contain mineral rich smelly water. This can happen from localized minerals in the concrete carried up to the surface in water. It develops its own micro environment under the coating. This micro environment is what makes the water brown and smelly. The pressure eventually causes the coating to delaminate in the form of a blister and the moisture escapes. The brown smelly substance is not very common with blisters.
The proper moisture test would have determined if a moisture blocking epoxy primer should have been used to avoid the issue or reveal whether the concrete was suitable for a non-breathing coating at all.
Thank you for the response. Now we are trying to figure out what to do about this problem. Do you have any advice on something to install over it so we don’t have these spots all over. Especially will small crawling/running children on it.
Since you are having a moisture issue Anna you need something that will breath and not trap water vapor. You might want to look at interlocking tile. You can really customize the look of your room with them and they are available in both hard plastic and rubber like styles.
This sounds exactly like osmosis which fibreglass boats suffer from. Solvents or salts trapped under the epoxy are absorbing moisture up through the concrete by osmosis and causing the epoxy to blister. With a boat you have to blast off the gelcoat and wash the trapped solvents out with acetone and thoroughly dry the hull before applying a new gelcoat. I don’t think there’s much you can do for your floor if the concrete is damp, so the best thing to do is to prevent the concrete getting damp by lowering the ground levels outside or constructing french drains alongside the house. Only when your concrete is dry will the blistering stop, and now the floor is covered with impermeable epoxy this will take months if not years.
Toerag:
Excellent point. This can be an issue. The advent of liquid moisture barriers such as our Aqua-Dike take this issue out of play.
We use in low lying areas or if the customer wants extra insurance.
When applying the epoxy do you recommend taping off the expansion joints at garage perimeter (where slab meets stem walls) or simply painting with the rest of garage floor. Ours is a tar based product
It you have a tar-based expansion joint then yes, tape those off.
Could this be used as flooring on a room inside the house?
Yes it can Connie. It’s popular being used as a clear over bare concrete or clear over acid stained concrete. Metallics are popular in the home as well.
I would like to know if you can apply the epoxy finishes in a home garage that has been painted with oil base concrete paint??
Thanks
Phyllis
Yes you can Phyllis. It requires grinding the concrete during the prep phase in order to remove the oil based paint and provide a good substrate for the epoxy to adhere to. Technically you can apply a water based epoxy to oil based concrete paint if you rough up the surface first. However, a coating is only as good as what it is adhered to. Since oil based paint can peel much easier than epoxy, the epoxy coating performance is limited by the properties of the oil based paint.
Thanks much.
Phyllis
I am thinking about doing a 25 year old garage floor in good condition. It does have a couple of cracks however. What kind of affect will the cracks have on the quality of job I get? Will it cause future problems? The floor is also cracking away from the driveway just an inch or 2 . How would that area be treated?
Thanks for your time.
Mike
Hello Mike. At 25 years old, the chance of your slab experiencing anymore cracking from settling and curing is low. Properly repaired, they should not be an issue at all. If you have cracks still growing, then there are other issues with the slab at work that should be solved first.
We’re not sure what you mean exactly about the floor cracking away from the driveway. Could you explain that a bit better?
I’m having a new house built and would like to epoxy the garage floor (375 sq.ft.) myself. What kind of prep should I do to the new concrete?
Thank you
Mike in Estero Fl.
Hello Mike. You will need to either grind or acid etch the surface of the concrete when you are ready to install the epoxy. Whether concrete is new or old, this is always a requirement and the most important step.
Thanks Shea for your repsonse!
What kind of acid would I use and are there any instructions on how to do it? Also how would you grind it?
Thank you very much
Mike in Estero
Hello Mike. You can find how to acid etch here and how to grind a garage floor here.
I’m prepping my old concrete floor to epoxy coat. I’ve ground it and will now also etch it. The question I have is about base trim. The garage I’m working on is in a basement and so has about 3/4 of the walls concrete. The transition from floor to wall is kind of ugly and in places a small gap. What I’m thinking about is using Harie Trim concrete trim to base the walls out and then epoxy coat the base trim. I think it will look much better than doing nothing or a rubber style base trim and because the trim is concrete water shouldn’t bother it. . Also if I do that it occurs to me that I can install the cabinets I have planned and base them as well which should protect them from any water or anything. Do you think this material would work well for this? What’s the best way to go up the wall say 4 to 6 inches? How do you put chips on it?
I meant to say HardiTrim. Also the cold air plenum (galvanized steel)for my furnace sits on the floor in the garage. How do I protect it from acid etching the floor?
Hi Charles. There is no need to acid etch your floor if you have ground it. Grinding is better than acid etching 9 out of 10 times. You can use the Hardie Trim along the base of the wall, but it is not a good medium for the epoxy. It would need to be roughed up with 40 grit sandpaper first which is kind of hard to do with all the ridges and texture in it. You can however paint match the epoxy color with a good latex paint and paint the Hardie Trim that way without having to sand it. You just wouldn’t apply color flakes to it. This is a very common procedure that people do to paint the 4″ to 6″ high stem walls in a garage. It works great since you aren’t walking or driving on it. Since these concrete areas can be extremely rough, they suck up a lot of epoxy which can get expensive.
Another alternative is to repair these areas with an inexpensive concrete repair patch like Quikretes Vinyl Concrete Patch. You can usually pick up a 20 lb tub for $10. Mix it thick so it doesn’t slump on the wall and trowel it on smooth. Once it cures, you can either paint it as is or rough it up with some 40 grit sandpaper or a hand grinder in order to apply epoxy. If you elect to epoxy, do the base walls before the floor. The key with the color flakes is to stand back, grab a pinch or color flake, and then toss it at the fresh epoxy. It will stick. Just sweep up the excess before doing the floor.
Hey thanks for the reply! Using base trim will fix some problems for me so I think it’s the best way to go. I like the look of the epoxy and chips on it best. You can get the Hardi trim in a smooth version so should just require sanding. What can you use to calk the floor to wall joint? Would some sort of wood work? Something pre-primed or pressure treated without incise marks? If I was to etch the floor how would you protect the metal on the furnace? Do you need to?
You’re welcome Charles. If the Hardie Trim works well for you and they have a smooth version, then yes, sand it up and go for it! The floor to wall joint should be an actual expansion joint. A product like SikaFlex works well. If the joints are deep, you will want to use a backer rod that fits about 1/4 to 3/8 deep so it doesn’t take a lot of the sealant. If they are too narrow for a backer rod you can always use silica sand. Flexible joint fillers can’t be coated. If you elect to etch the floor as well, you will want to wrap the metal in plastic to protect it. One of the draw backs to acid etching is even the vapor from the fumes can have a caustic effect on metal. If you can wrap it in plastic sheeting and duct tape it you should be good.
Thanks again Shea!
I wanted to etch the floor as I wasn’t sure the grinding went as well as it should have. I rented from Home Depot what I call a buffer with the concrete prep wheel. They claim it’s an alternative to diamond grinding. Not sure I agree. I went over the floor 3 times and it seemed to work fairly well until I cleaned the floor and it still had dark spots. Since etching the floor it now looks like it should. I was very careful with it because of the metal and I had to run the rinse water out onto a sealed driveway. I’ve ordered the epoxy and will install it when it arrives. Thanks for the help!
An epoxy floor contractor in my area is beating the competition in price substantially. However, they have rave reviews and many references. Their process seems in line with other contractors; diamond grinding, crack filling, epoxy coat, broadcast system, and clear. I’m wondering how they are beating most prices by nearly 50%. The epoxy product they use is PPG Megaseal. Other than the manufacturer website, I have not been able to find much info on Megaseal. Do you have experience with or knowledge of this product? I wondering if the low pricing could be due to inferior product…
Hi Jason. Ask what the solids content is of the epoxy they use. You can also ask to see a TDS sheet of each product. You can compare that to the other contractors if you like. Also, what kind of clear is it, what is the dry film thickness, and how many coats? Ask what the overall dry film thickness is of the floor and compare that with the other contractors. It’s not unusual for a contractor that does good work and high volumes to have lower prices, but not 50% lower. They have to be saving money somewhere. PPG makes some good product, but if they are using a lower solids epoxy and/or do an epoxy clear or less coats of a polyurethane or polyurea clear, then that is where they are cutting corners.
Hi. I recently had an interior french drain installed in my basement. This system also includes a drain at the foot of the door to catch any water that might come through the bottom of the door. Now i’m exploring flooring options and wanted to know if epoxy flooring would be a good option? There’s a possibility that water might still get into the basement and if that were to happen, would the epoxy hold up against water. Also, i read an earlier post where some mentioned that their epoxy coating was bubbling up. While I don’t believe much water comes through the ground, there are cracks in my basement floor and within the cracks is a reminiscence of calcium deposits. If I did go the epoxy route would I have the same bubbling up issue?
Hello Mark. When dealing with basements, it’s very important to do a proper moisture test before applying any type of coating. The best time to test is after a rain storm if possible. The hydrostatic pressure from moisture vapor transmission in a basement can cause the strongest of coatings to delaminate, sometimes taking chunks of concrete with it. Water on top of epoxy has no effect. The coating acts as a sealer and the water will just sit on the surface until it’s cleaned up.
#1
Is such a floor flammable?
If I drop anything burning or very hot on concrete nothing can happen; is there any risk on an epoxy coated garage floor?
#2
Will there be a huge amount of fumes from the chemicals around in my garage during or after installation.
Hi Wolfman. No, epoxy is not flammable, but it you weld close to it or use cutting torches that drop hot slag on it you will create burn marks. Just like you would with bare concrete. In terms of fumes, it depends on the product. Water based epoxy and high solids to 100% solids epoxy does not produce many fumes. Solvent based epoxy and top coats such as polyurethane can. A high solids polyurea polyspartic is low in VOC’s however. Most of the smell dissipates within 24 hours, but some may linger for a few days while it cures.
Not enough material on the floor to maintain combustion.
We recently did a test for a very careful customer using a blow-torch with our new polyurea, Nohr-S. Again, not enough material on the floor to support combustion. Great question though!!
Hi,
I have a question. My current garage has an epoxy coating. The house is about 20 yrs old. I suspect that the garage paint is also that old. I want a new coat on it. Do I have to etch it or can I directly apply the epoxy paint to it ?
Thanks
Viv
Hi Vivek. Do you have an epoxy coating or paint? There is a big difference between the two. Here is an article on how to apply a new coat to an older floor.
Will this epoxy flooring cover oil stains on the concrete?
Thank you!
No, you need to clean up the oil stains first. If you have exceptionally oily concrete there are special oil stop epoxy primers that can be used after the floor has been prepped properly. They allow for better adhesion to the concrete where oil may be an issue.
Please Help! I had a friend epoxy my garage floor using a 2 part process base coat then clear coat. This is the result attached below the clear coat is hard and cured like this? I have no clue what happened what is the best way to go about fixing this? Do I need to re-epoxy the entire floor? Can I get away with sanding and just re-clearing? Any input is much appreciated. Does anyone know what could have caused this to happen?
https://imageshack.com/a/img921/4879/rMSIpA.jpg
https://imageshack.com/a/img922/9669/V1vB7z.jpg
What color was the base coat and what brand and type products were used? Are those air bubbles we see in it as well? It’s hard to tell from the angle of the pictures.
I am buying a brand new home with a 700 sq ft garage. The concrete floor in the garage is unsealed and couple of months old. Clean and no stains or imperfections.
What prep work do I need to do to the floor before applying 100% solid epoxy? I don’t want to acid etch… and not to excited about grinding. Can I just rough it with a pole sander and 100 grit sand paper? Then sweep it and leaf blow it? I won’t have time to let the floor dry, so I don’t want to use any water… Thoughts?
How much epoxy would be required, including top clear coat. How many lbs of flakes, (I like lots of flake)? What about Shark Grip?
Hello Ty. Of all concrete surfaces, none needs acid etching or grinding more than a new one. The finishing of the concrete smooths out the surface and effectively closes up many of the pores that epoxy needs to penetrate in order to form a good mechanical bond – especially with much thicker 100% solids epoxy. Trying to profile concrete properly with a pole sander is ineffective. Proper preparation of the concrete surface is the most important part of a successful coating. The leading cause to epoxy coating failures are poor concrete surface prep. If the proper concrete prep does not appeal to you, then you may want to look at a different type of coating such as Rust Bullet.
You will need approximately 4 gals. of 100% solids epoxy to cover 700 square feet. A medium to heavy coverage of flakes would require 10-12 lbs of flakes, and the amount of clear coat depends whether you want to use polyurethane or polyurea. A heavy flaked floor usually requires at least 2 coats of polyurethane and 1 coat of polyurea. Approximately 12 ounces of an anti-slip aggregate can be applied to the final top coat.
Two questions for you as I am getting ready to do my garage floor and want your expert opinion. What type of roller should I use when applying the 2 part epoxy and what type of roller should I use when applying the urethane top coat? More specifically what nap but if you have a brand you recommend that would be helpful.
How much time should I wait if I decide to put a 2nd coat of epoxy and how much time should I wait if I put a second coat of the urethane top coat. Not sure how much flakes I am going to put down and I hear if you do go heavy you need 2 coats of the top coat but what do you think. I am going to use a fertilizer spreader to broadcast the flakes as this worked well for me the last time I did my garage.
NOTE: I did my garage around 8-9 years ago and you gave me great insight on how to prep it…floor maintainer with a 100 grit sanding screen then go over with denatured alcohol on a rag.
For my project I am using the Supercoat product 2 part epoxy and their 2 component waterborne urethane top coat.
Thank you very much.
Hello Felix. We recommend that you read our article on how to apply a garage floor coating. It covers most of the questions that you have asked, including the type of rollers to use. We do recommend checking the manufacture’s instructions first, however, regarding nap thickness, mixing, and application as our instructions are general in nature. You will need two coats of the polyurethane for a heavy flaked floor and most likely three coats if you go for flakes to full refusal.
I am having a professional painter install my epoxy paint to my garage floor. What guarantee should I expect? I heard its 2 to 3 years. Also, can I use a rubber mat on it in the winter to help shield flooring from salt and brine?
Hello Jeni. We can’t tell you what to expect without knowing the quality of the product that is being installed. Professional coating aren’t installed by painters though. They are installed by floor coating contractors who specialize only in coating concrete. Generally a written contract is provided before the job starts that states all warranties. If a painter is installing it and he referred to it as epoxy paint, then our guess is not to expect much. A true epoxy coating does not need protection from salt and brine. They are developed to protect the concrete exactly from such things so that you don’t need additional protection. However, good epoxy or not, you should be able to put down a mat without worries.
Hi, multiple questions… first I am about to pour concrete next week in my personal shop( 960ft/sq.), radiant floor heat, northern Ohio, automotive restoration hobbyist, welding, grinding, painting, etc. I’ve heard about “broom finish” for a good prep for epoxies,(allows for proper adhesion without etching/further prepping) any truth to that? Also any recommendations for before/during/post pour? What type of product would serve my situation best for wear tear and abuse?
Hello Scuba. There is no truth in the myth to do a broom finish as prep for epoxy. In fact, it actually can create more work. New concrete requires proper prep just as much if not more than old concrete does. The pores of the concrete need to be opened up in order for the epoxy to penetrate properly and gain a proper mechanical bond. If that is not done, the epoxy can only adhere well to the weak ridges of broomed concrete and will delaminate under stress. We suggest a troweled finish for a few reasons. If a broomed finish is only acid etched, it requires multiple applications of a high solids epoxy to fill the valleys of the ridges in order to get a smooth finish. A broomed finish also requires more grinding to effectively remove those ridges. A standard hand troweled finish is not going to require as much grinding or as much epoxy if you acid etch only.
If you want a good quality coating as an automotive restoration hobbyist, we recommend an epoxy primer, high solids base color coat, and a top clear coat of high performance polyurethane or polyurea. This creates a nice high build coating and the clear coat will stand up well to acids, brake fluid, and other automotive chemicals without damage. Just remember that you need to the slab to cure for at least 30 days before application.
Do you have a list of professionals by state that can be used? I am having a new house built and want this. I know “u coat it” had a product years ago. Not sure I want to take on myself.
Thanks
No we don’t Matt, but we do have an article on how to choose a garage floor coating contractor which you can read here.
i am astonished about the way of your answers ..i have had a three days formation in epoxy flooring : simple – metallic and 3d ….all you have mentioned is true and correct and i totally confirm it …you are even adding some more knowledge to it and some extra tricks …you are so appreciated …i am pleased to see that someone is much helpful .
thank you so much from ALGERIA .
You are welcome Kakamo.
Good day!
Great information you are giving!
I have a 900 sq/ft new garage and would like to know my options that are available. I do car repairs, so there will be some oil and sparks from torches that the floor will be exposed to. I would also like a floor with good traction and isn’t completely smooth. What do you recommend?
Thank you!
Hello Pat. You asked this question in the epoxy section, so we are assuming your question is about what type of epoxy system would work best. Since it will be a working garage, we would recommend a system with an epoxy primer coating first, followed by a high solids or 100% solids epoxy based coat, and a clear top coat or two of either high performance polyurethane or polyurea. The epoxy provides for a high build and the top coat options provide the best chemical and abrasion resistance. Oil and other fluids, including brake fluid, will not harm the coating. Sparks from torches can create burn marks on the coating however if the cutting is done close to the floor. For traction, you would want to apply an anti-slip additive to the final coat to provide grip for when things get wet.