
This post may contain affiliate links. If you use these links to make a purchase, we may earn a small commission. As an Amazon Associate, All Garage Floors earns from qualifying purchases. You can read our full disclaimer here.
Learning the basics of how to apply an epoxy garage floor coating isn’t hard. A quick search on the internet will reveal a list of simple 8 step plans to get it done or an abundance of short videos to watch. They make it look easy enough. However, the more stressful part is when you discover in the middle of the application process that you need to know more about the finer details of applying a coating. That’s when you realize that you have more questions than answers.
This DIY garage floor coating application guide is designed as one of the more comprehensive and detailed instruction manuals. We will cover in detail the application process of a multiple coat floor system that consists of an epoxy primer coat, 100% solids epoxy base coat (with or without color flakes), and a clear polyurethane, polyurea, or epoxy top coat.
In addition, we also discuss application of the newer and easier to install single-part polyurea garage floor coatings.
Our ultimate goal is to help our readers benefit from these epoxy application tips in order to achieve a successful garage floor coating that looks fantastic and doesn’t suffer from the typical problems associated with poor preparation and applicator errors. Though the steps required might seem complex at first, when you break it down and read about the various tips, you will find that it really isn’t that complex at all — just thorough.
Note to our readers: This article has been updated to include the latest information as well as application tips for the newly popular single-part polyurea floor coatings as well.
While the actual application of a garage floor coating can be accomplished by one person, we highly recommend using a minimum of two people. This is due to the fact that higher solids epoxy is time sensitive during the application process. Two or more installers will ease the anxiety that some people experience, it reduces the chance of errors, and it ensures that you can cover a larger area of your garage floor in a shorter amount of time.
If you are installing a DIY single coat epoxy paint kit such as those by Rust-Oleum, Quikrete, H&C, Valspar, and etc., you can still follow most of this guide. Because these are lesser expensive low solids kits, they go down much thinner and have a longer pot life that allows you to work with a roller out of a paint tray.
Note: Please be aware that this guide does not overrule any specific instructions provided by the manufacturer. If in doubt, always contact the manufacturer with any questions that you may have.
Preparing your garage floor for epoxy
The single biggest reason that garage floor coatings fail is due to poor floor preparation. This is where all the hard work is at and is why it is so important to learn how to do it properly. Many times a good epoxy product is put to blame when actually it was the fault of applying it to a poorly prepared surface.
The second reason for failure is applicator error. This usually occurs because many epoxy floor coating instructions are rather vague and not detailed enough. When this happens, the DIY installer is left to guess and fill in the details for him or herself. Applicator error is reduced significantly when you better understand the process of applying a floor coating or epoxy paint product.
A very important tip is to thoroughly read through the application instructions at least twice before starting your project. If you have any questions, call the vendor where the product was purchased or the manufacturer of the product. Most provide toll free numbers to help with these application questions.
Inspect the garage floor
 Before you purchase any coating, the first thing you want to do is inspect the garage floor to make sure the concrete will accept a floor coating. Epoxy will not adhere well to sealed or painted concrete.
This also includes any “cure and seal” that may have been applied to the concrete after it was poured. If you have a sealer of some type, it will need to be removed first by mechanical means such as grinding.
You can test for sealers that may be present in bare concrete by sprinkling water on the surface. If the water beads up immediately without turning the surface darker, then you most likely have a sealer that will need to be removed. If the water doesn’t bead and the concrete turns darker as the water slowly soaks into the concrete, then no sealer is present.
If you still are not sure that your garage floor is sealed and you have planned on acid etching the concrete for the surface preparation, then go ahead and apply some acid etch solution to a small area to test it. If it immediately begins to turn yellow and fizz then you do not have sealed concrete. If the acid just sits there with little to no reaction, then you have a sealer on the concrete.
Make note of any cracks, pitting, or spalling that needs to be repaired. Though epoxy is self-leveling, it will not fill-in cracks. If you have extensive cracks or repairs that need to be made, you may want to consider an optional garage floor covering such as interlocking tile or garage floor mats instead.
For newly poured concrete, you need to let it cure for a minimum of 30 days for a typical 4” thick slab before applying a coating. Curing concrete is still releasing moisture and will cause the floor coating to delaminate if installed too early.
Moisture test the concrete
The next step is to inspect the garage floor for any signs of visible moisture and do a moisture test if necessary. What you should be looking for are areas of damp concrete or efflorescence.
Efflorescence is a white powdery substance that is formed on the surface. When moisture rises up from beneath the slab, it carries lime and other minerals with it. When the moisture evaporates at the surface, it leaves behind the white residue.

Efflorescence can also form due to the concrete collecting moisture at the surface from condensation. Also known as concrete sweating, it is most prevalent during humid periods of the year. Efflorescence from condensation will not affect a garage floor coating once it is removed before the application of epoxy.
If there are visible signs of moisture you will want to conduct a calcium chloride test to see if your garage floor will qualify for an epoxy coating. Most commercial epoxy products can withstand up to 4 lbs of moisture flow per 1000ft² per 24 hours. Always consult with the epoxy manufacturer or vendor first with the results of your calcium chloride test if you have moisture issues.
Even if the garage floor looks dry, moisture could be evaporating off the surface quicker than it can form and not be visible to the naked eye. At the minimum, you want to do the plastic sheet test if the concrete doesn’t show any visible signs of moisture.
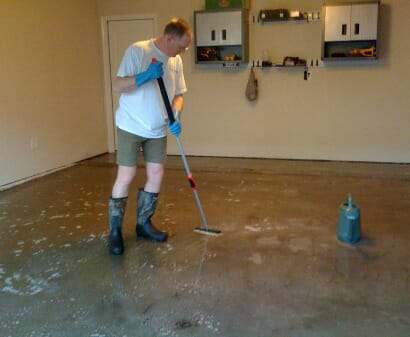
Clean the garage floor
Once you have decided that the garage floor will accept an epoxy coating, the next step is to clean the surface of the garage floor. If the floor is new or free from any oils or greasy residues, then you can just sweep it good and continue on to the next step.
It’s important to remove any oil or grease stains from the concrete and pay particular attention to areas that may have absorbed tire dressing. These areas will act like a sealer by repelling water and will not allow the epoxy to adhere properly. This includes old glue and mastics as well.
If you need to protect your walls from water while cleaning, it’s a good idea to tape up some cheap plastic drop cloths to the wall at this time.
Complete your garage floor repairs
Once the concrete is cleaned, the next step is to make repairs to the garage floor where needed. Do not use a latex crack repair product when applying a garage floor coating.
Latex products are soft relative to the concrete and the epoxy. Additionally, latex repair products will shrink as they age and can create a depression underneath the floor coating that can highlight the repair. Lastly, most coatings will not adhere well to latex.
If you are opting for the seamless floor look and you want to fill in your contraction joints, now is the time to do that.
Remember that when making crack repairs or going for the seamless look, it is very important to make sure that the surface of the affected areas of the garage floor are smooth and flat. If not, the repaired areas and seams can telegraph through the coating and reveal themselves. The best way to do this is to grind these areas after the repairs have cured in order to create a smooth and even transition that will not show through.
If you have done extensive repairs, one tip is to go heavy with the color flakes if you are opting for that look. The color flakes do a good job of hiding smaller imperfections in the concrete.
Profiling the garage floor
Once the concrete is clean, the next step is to profile the garage floor. Profiling is the process of exposing the pores in the surface of the concrete for the epoxy to flow into and achieve a good bond. This is the most important part of garage floor prep. Read here to learn more about why it’s necessary.
You can choose to either acid etch or grind the surface of your garage floor to achieve the proper profile. Grinding the floor is the preferred method by most professional installers and epoxy manufacturers, but a proper acid etch is adequate for most applications.
You can learn how grind a garage floor here and how to acid etch a garage floor here.
Make sure to vacuum the entire floor with a good shop vac thoroughly after grinding. You should be able to run your fingers over the concrete without the finger tips getting very white.
Some white dust on your fingers is normal as you won’t get it all. However, if your fingers are coated with it, then you have more vacuuming or sweeping to do. One tip is to wipe the surface down with denatured alcohol on a microfiber pad if you think there may be too much dust.
If you decide to acid etch, make sure to allow the garage floor enough time to dry completely before applying the epoxy. If you don’t, moisture being released from within the concrete can create bubbles and in some cases, delamination issues. Unless you are using a water based epoxy primer that allows for application on damp floors, you will need to wait a minimum of 24 to 48 hours for the floor to dry completely, sometimes longer if the weather is more humid. Use fans if necessary to help facilitate the process.
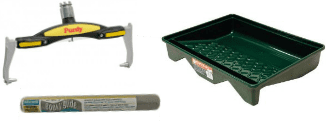
Required tools and supplies
The following is a list of tools and supplies that you will need. If you are purchasing a garage floor epoxy kit from an online vendor, some of these tools and supplies may be included with the kit.
We also included optional tools such as 18” rollers. They are not mandatory, but the wider rollers make the application process go much quicker. We highly recommend these if you are covering areas larger than 500 ft².
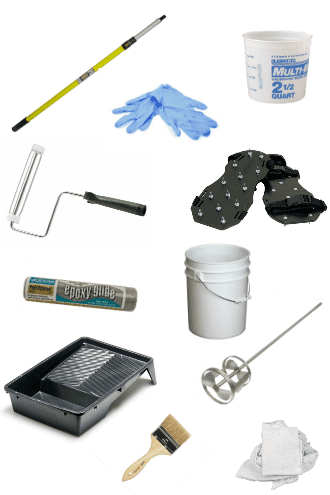 Tarp for mixing station (6’x8′ works well)
- Variable speed drill
- Mixing paddle (jiffy mixer)
- Paint stir sticks
- 1qt., 2.5qt., & 5qt. calibrated containers – for mixing quantities for smaller sections
- 3 gallon or 5 gallon buckets for mixing (1 for each coat plus any additional for batch mixing)
- Latex gloves
- Rags
- 1 gal. MEK or acetone for clean up
- 9” roller frame
- 3/8” nap premium lint free phenolic core rollers (1 for each coating)
- Standard paint tray and liners (for water-based epoxy or polyurea and polyurethane coatings)
- Threaded pole extension for roller frame
- 3” Chip brushes (1 for each coat)
- Spiked shoes for full color flake floors (1 pair for each installer)
- 10” drywall taping knife (for heavy color flaked floors)
- Heavy duty painters tape
- Cheap plastic drop cloths
Optional Tools
 18” roller frame
- 18” 3/8” premium lint free phenolic core rollers (1 for each coating)
- 18” painters tray
The 18” roller frames, rollers, spiked shoes, and paint tray will most likely need to be purchased online if your kit does not come with them. Some home improvement centers carry them. These products greatly improve the speed and ease of applying a garage floor coating.
Amazon is a great place to find some of your supplies. You can find some examples in the links below.
9″ roller covers – Pro/doo-Z, Purdy, and Epoxy Glide all use phenolic core rollers
Spiked shoes allow you to walk out onto the coating during installation and for tossing the color flakes. We recommend a pair for each installer.
Application of the epoxy to your garage floor
First and foremost – always unpack and inspect all garage floor coating kits and supplies that you order well before you plan to start. More than one person has gone through the process of prepping their garage floor only to open up kits and packages on the day that they plan to apply it and find something was wrong with the order. Don’t let that person be you.
One note we want to make you aware of when it comes to the application of epoxy. Many of the videos that you can watch online showing the epoxy application process do not use 100% solids epoxy. They are using a thinner water or solvent-based epoxy that can be rolled out of a paint tray like you are painting a wall. The video shown below is an example of this, but it still does a good job of giving you an idea of what is required.
High solids and 100% solids commercial quality epoxy is much thicker and requires that you pour the epoxy out onto the floor immediately after mixing. It is then rolled out and back rolled as the final process. That is the method that we discuss here.
Floor prep and application of a base color coat, full color flake, and epoxy top coat
Once the floor is properly prepared, now is the time to double check your materials list, required tools, check the weather, insure that you have a proper work station for mixing, and go over your game plan.
If your garage floor extends out past the garage door and doesn’t end at a slab joint, you will want to tape off the floor where the garage door seal meets the floor. Remember that you will need to remove the tape about 30 minutes after the epoxy has set. If not, the epoxy will be too hard and you will have torn tape residue in your clean line.
You will need to re-tape for each additional coat. Tape residue is not a big issue if you plan on installing a garage floor door seal afterwards since it can be installed over the tape line.
Temperatures and humidity for epoxy
 Epoxy as well as other garage floor coatings are influenced by weather and can affect curing times, viscosity, and adhesion. This is why temperature and humidity play an important role when applying epoxy to your garage floor and why you want to check the forecast before you start.
Most epoxy paint coatings can be applied in temperatures from 55 to 90 degrees, with temperatures between 70 and 80 degrees considered ideal. Since coatings are exothermic and chemically cure rather than dry like paint, your working pot life shortens as the temperatures rise and lengthens if it is cooler.
Please read up on applying epoxy in cool temperatures if you are worried that it may not be warm enough to install properly.
Single-part polyurea coatings have temperature minimums as low as 40 degrees. This is one of their advantages. Check the data sheets or call the vendor to find this information.
Humidity and dew point are important factors as well. Do not apply epoxy and other coatings if the humidity is forecast to be over 85% and/or the temperature of the substrate (concrete) is 5 degrees or less above the dew point.
A very thin film of moisture can form in these conditions and have an adverse effect on how the epoxy bonds to the surface. It can also cause blushing of the epoxy as it cures. Always check with the epoxy manufacturer first as these guidelines are general in nature.
If you know that the conditions may change to put you outside these parameters, then you should delay installation.
Mixing your epoxy coating
 These epoxy mixing instructions apply to each coat that you will be applying to your garage floor. Always consult with the manufacturer’s instructions first.
In addition, we include general mixing instructions for single-part polyurea below.
Before you start, lay a tarp or large piece of cardboard down on your driveway just in front of the garage to establish your mixing work area. It’s a good idea to place the edge of the tarp near the edge of the garage floor to ensure nothing is spilled on the driveway.
Make sure all the tools, supplies, and cleaning materials that you will need are laid out and available. Now is a good time to put on the latex gloves and spiked shoes if required.
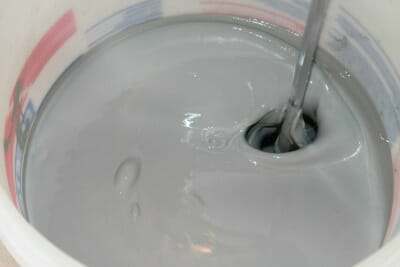
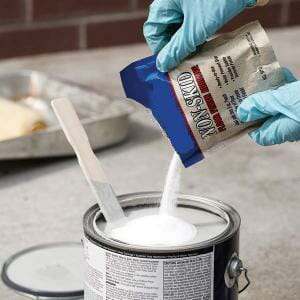
The colored resin for epoxy (typically part-A) tends to settle. To ensure proper color, it’s important to mix the colored resin first in its respective container. Make sure to scrape the bottom of the container with your paint stick to get all the colored tint that has settled. Be careful. Never introduce any residue from part-A to part-B or vice versa. You will start the chemical reaction if you do.
If the size of your floor requires using more than one kit per coating, it is recommended to batch mix. This is done by first pouring all containers of the part-A colored resin together in one bucket to mix. This will ensure that you get even color uniformity for each kit you need to mix.
Now that you are ready, start by pouring the part-B hardener from one kit into a 3 – 5 gallon mixing bucket first, followed by the part-A resin. The part-B hardener is lower in weight and viscosity than the more sticky part-A resin and will flow up and around the sides of the bucket as the part-A is poured in. This greatly reduces the inconvenience of separating the sticky part-A from the sides and bottom of the bucket as you are mixing.
Important: If you have batch mixed, pour the required amount of part-A colored resin into a measuring container first before adding it to the part-B.
If you are mixing the final coat or top coat and plan on using anti-slip media, now is the time to add that as well.
Using your mixing paddle and drill, slowly start mixing the epoxy for a minimum of two minutes. Be sure to work the bottom and edges of the bucket to ensure the entire contents of each part are mixed. The colored veins need to disappear. If the two components are not mixed completely the epoxy will not cross-link well and can develop curing problems that will lead to a substandard coating.
It’s very important when mixing not to run the drill too fast or pump the mixing paddle up and down hard. Doing either of these this will introduce air into the mix which will be rolled into the coating and create air bubbles at the surface. The epoxy should have a nice even consistency without any color streaks.
It is extremely important to follow the manufacturer’s directions when mixing the epoxy. If mixing smaller quantities, all measurements should be exact. If you are using something other than 100% solids epoxy, check the manufacturer’s instructions about induction time. The mix may need to sit for a required amount of time before applying to the concrete. Failure to do so can lead to a coating that will not harden properly.
Mixing single-part polyurea
Though single-part polyurea does not require mixing of A and B components, some do require mixing in tint packets for color. Mix the the respective tint pack for each container first. After that, pour each colored container into a 5 gallon pail to mix again. This ensures color uniformity for the entire coating.
If the polyurea comes already tinted, just mix each container for settling and then pour them into a 5 gallon bucket to mix again. As before, this ensures color uniformity for the entire coating.
As with epoxy, always premix both tinted and clear polyurea first to avoid issues with settling.
Applying the first coat
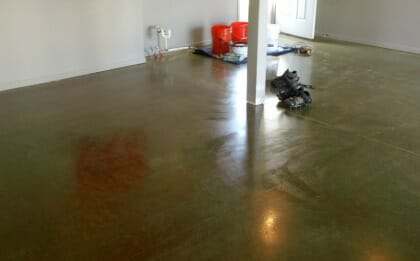
Depending on which epoxy coating system you are installing, your first coat will be a primer coat or the color base coat. Contingent on the manufacturer, you will have approximately a 40 minute working window during ideal conditions.
This window will shorten if the temperatures are warmer than ideal and lengthen if it’s cooler. Pay close attention to this window.
If you are applying polyurea, then you have plenty of time to get the product applied. In most cases, you will be working out of a paint tray.
Make sure your chip brushes, rollers, and epoxy are staged and ready to go. If this is your color coat and you are applying vinyl color flakes, make sure they are staged and ready as well.
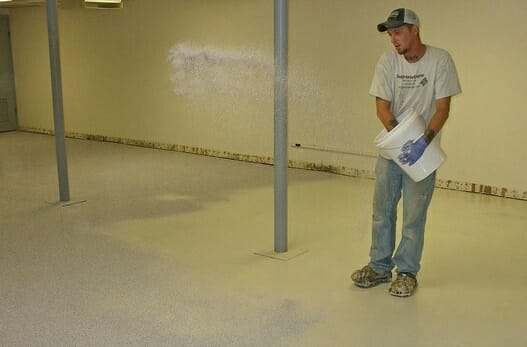
After the epoxy is mixed, immediately start pouring it out in a 1”-2” ribbon along the back border of its designated section. Continue working the ribbon back and forth across the entire section until it’s all poured out.
Do not pour the mix out over the minimum coverage rate for the amount mixed. For example, if you mixed 1.5 gallons to cover 200ft² – 250ft², pour the entire amount of epoxy out in ribbons up to 200 ft² of floor. Because it’s the first coat and you don’t know how much epoxy the concrete will soak up initially, it’s best to start rolling for 200 ft² of coverage first. If you have additional epoxy left over after rolling the 200 ft², continue rolling on the additional 50 ft² if it allows without stretching it.
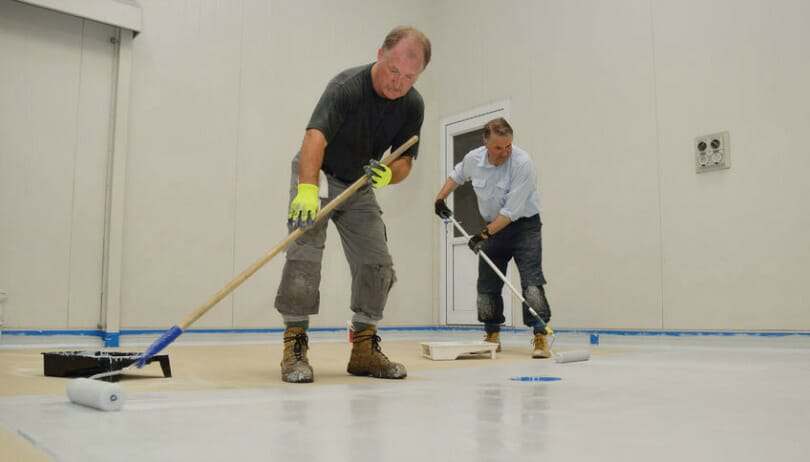
Once poured out on the floor, start in the back corner and begin rolling it out. Be sure to preload your roller with a ribbon of epoxy first. This will remove air in the roller and alleviate the chances of rolling air bubbles into the coating. Take care to keep the roller loaded at all times. It’s OK to roll rather quickly.
While the epoxy is being rolled out, the second installer should preload the chip brush and with his spiked shoes on, start cutting in at the edges. Once done, he can be ready to start mixing another batch of epoxy or start applying the optional vinyl paint chips over the parts of the floor that have been back rolled already.
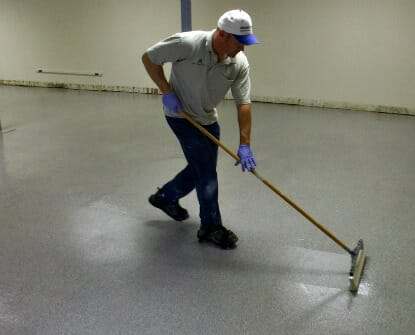
Once you are done rolling out a section, it’s time to start back rolling. Back rolling the epoxy is important because it helps to eliminate bubbles, roller marks, application imperfections, and provides for a uniform thickness of the epoxy.
Start the back rolling process by rolling forward and then rolling back on the same track in a direction that is perpendicular (90 degrees) to the direction the epoxy was initially rolled out. Cover about 6’ or more in your pass letting the natural weight of the roller do the work. Make a second pass if necessary to smooth the epoxy out.
At the end of your back roll, pick the roller up and move it over for your next pass while making sure to overlap the prior one. Continue across the floor this way until you need to start a new row, making sure the new row overlaps the prior row. It’s OK to walk on a back rolled section in your spiked shoes if necessary.
If you are using the 18” rollers, the initial application and back rolling will go almost twice as fast as the 9” rollers. It also reduces the amount of chances by almost half to create a roller line in the epoxy.
If your first coat is the primer coat, it’s OK to spread it out a bit thin if you feel as though you are running out before you complete your first section or the entire floor. This can happen if the floor is more porous in certain areas and soaks up more primer.
Do not spread the epoxy thin if it’s the color coat however. The color coat is the high build coat. Spreading it thin will decrease the durability of the floor and the appearance will be less glossy which is noticeable.
Don’t worry about the contraction joints or saw cuts when rolling. The roller should pull any additional epoxy out of the joint as long as they are not too deep. If the roller doesn’t, you can use the chip brush to push the additional epoxy out of the joints as you roll.
Also, touch up any areas that need it immediately. If you wait till the back rolling is done before you touch up, the epoxy can become somewhat tacky and make the touched up area look worse.
If working alone, cut in with the chip brush first after pouring out the epoxy onto the floor. Work quickly and start rolling the epoxy after cutting in. After you are done back rolling you can start tossing color flakes if you are using them.
Any remaining epoxy on the floor can be scooped up with a wide putty knife, drywall taping knife, or old dustpan and deposited into the mixing bucket for disposal.
When done, you now have time to cleanup while your first coat cures. Remove the roller from the frame and throw it into the used mixing bucket. Throw the chip brush in there as well and let it all harden before dumping it in the trash. Use your rags and cleaning solvent to clean your spiked shoes, squeegee, roller frames, mixing paddle, and anything else that may have collected epoxy during the process.
A note about applying epoxy in sections
Many times a garage floor can be divided up into smaller sections. This is generally done if you are going to be applying the garage floor coating by yourself. The best way to do this is to use the garage floor contraction joints or saw cuts as the natural divider. Figure out the square footage for each smaller section and adjust your epoxy mix accordingly.
If you don’t use these joints or you are going for the seamless garage floor look, you will need to have a newly mixed batch poured out onto the garage floor just as you are finishing the back roll of the previously mixed batch. Since it only takes a few minutes to mix a batch of epoxy, have a second helper do this just as you are finishing the back roll of the current section.
When doing this, it’s important to keep a wet edge going at all times. If you don’t get the next batch down in time, it will create an overlap of one section onto the other that will be visible in the coating.
Also, it’s best to keep your wet edge as short as possible. If the garage floor is much more wide than deep for example, work from side to side instead of front to back. This will provide for a shorter wet edge to worry about. Working in this method, it’s fairly easy to cover very large areas of flooring when two or more people are involved in the process.
Bugs and critters on epoxy
 After each coating is applied, it’s important to take steps to prevent bugs and other critters from getting into your coating while it cures, particularly if it’s the final coat. This can be very important depending on what area of the country you live in. You also want to prevent dust or leaves from blowing in underneath the garage door and getting into the coating as well.
The best way to do this is to close the garage door to within a few inches or so from the floor once done. Do not let the garage door seal come in contact with the epoxy. Use a cheap plastic drop cloth and tape it to the garage door, the floor, and the edges of the garage opening to form a nice seal. This will prevent dust, bugs, and crawling critters from getting onto your floor and getting stuck while it cures.
Epoxy recoat window
Once your first coat of epoxy is applied, you will have a general window of 10 to 24 hours before applying your second coat. This is based on ideal temperatures. These times can change by a few hours depending on temperature. Always check with the manufacturer for recoat times.
There are exceptions, however, with certain types of coatings. Some polyurea and polyaspartic coatings can be recoated in as little as one hour. Other coatings such as RockSolid Polycuramine allow for up to 7 days to recoat.
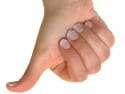 You can test the epoxy to see if it’s ready to recoat by using the thumb print method. Do this by pressing your thumb down onto the surface. It should not leave a thumb print or feel real tacky to the touch. If it does then it is not ready for a recoat yet.
If you are doing a top coat on the color coat, be careful about trying to get on the floor too soon. Unlike the thinner primer coat, the color coat is a high build coat and if you are out on the floor too soon, you can leave marks all over the floor.
If you wait longer than the prescribed recoat window, you will need to rough up the surface of the coating before applying another coat. You can do this by using 120 grit sandpaper on the surface and then wiping it down with denatured alcohol.
Applying the second coat
Your second coat will be the color coat or top coat depending on which epoxy coating floor system you are installing. The mixing and application instructions are the same as the first coat if you are using epoxy.
One exception to the second coat is that you don’t have to worry about how much epoxy may be absorbed by porous concrete. Because it is being applied over another layer of epoxy, the coverage rate for this coat will be very consistent. Since this is your high build coat, pay particular attention to covering only the square footage it was mixed for in order to ensure the maximum dry film thickness as advertised by the manufacturer.
Once done, make sure to seal up the garage to protect the coating from bugs and debris as before.
Applying the vinyl color flakes
You need to start applying the vinyl color flakes after you finish back rolling each mix of your color coat. Do not stress about getting all the flakes applied within the working window of the epoxy.
As long as you start applying them within a few minutes after the final back roll of each section you will be OK. You can learn more about color flakes and how they are applied here.
Unless you are coating small sections at a time, make sure you have your spiked shoes on so that you can walk out onto the floor. Be careful not to slip and leave long streak marks that you will have to repair by back rolling. The small marks from walking with the spikes will close up on their own.
If you are broadcasting the vinyl color flakes to full refusal, it’s a good idea to wait another 10 minutes or so after you are done to check for bare spots that may occur from the flakes sinking into the epoxy. Reapply as necessary.
If doing a partial color flake floor, divide up your total mix of color flakes into the same amount of sections that you are coating. That way your garage floor will get an even distribution of color flakes from one section to the next. If you have broadcast to full refusal, you don’t need to worry about getting the top coat on within 24 hours. The rough vinyl chip surface is what the top coat will adhere to, not the curing epoxy surface.
Epoxy, polyurethane, or polyurea clear top coat
If you are using epoxy for your top coat, mix and apply the epoxy just as you would your color coat. If you have planned on using a non-slip additive, now is the time to introduce it into your mix.
Because the epoxy is clear in color and harder to see, you may need to lean down and check your work at different angles to make sure you don’t miss any spots. This is important in order to get the surface back rolled properly.
If you are using polyurethane or polyurea for your top coat, the addition of a non-slip additive is the same, but the application process is a little bit different.
Polyurethane and polyurea is designed to be rolled onto the floor out of a paint tray instead of being poured onto the floor like epoxy. It has a much longer pot life, 2 to 4 hours depending on temperature, so you don’t have to worry about rushing it.
Once mixed, pour the contents into a paint tray and start with one person cutting in along the walls with the chip brush while another rolls the floor out of the paint tray. If you are applying it by yourself, don’t cut in for more than 10 minutes or so before rolling because you want to keep a wet edge at all times.
Double check to make sure you haven’t missed any areas as you go along. It can sometimes be difficult to see the clear coating as it goes down depending on the light. Once you have done a small section, back roll just as you would the epoxy. Continue on with cutting in and rolling until the floor is complete.
Because polyurethane has a 2 to 3 mil dry film thickness, one coat on a full color flake floor is not enough. It will produce a very thin, rough coat because of the texture from the layers of color flakes. Two coats are the minimum recommended to produce the desired protection. Three coats are better in order to provide a smoother surface.
Polurea is almost twice as thick a polyurethane. As a result two coats of clear polyurea is usually sufficient for a full flake coverage.
Do not attempt to apply polyurethane or polyurea on real thick like epoxy. If you do, it can cause solvent bubbling, orange peel effect, roller marks, and even a cloudy appearance.
Anti-Slip Additives
 Whether you are doing a single coat epoxy floor coating or multiple coats, anti-slip additives should almost always be added to the last and final coat.
The most effective method is to add the anti-slip additive to the mix bucket as you are mixing the Part A and Part B of your final coat.
If you are using a polyurethane or polyurea out of a paint tray, do not let the mixed material sit in the tray too long or it will sink to the bottom and the roller will not pick it up in clumps.
You can read more about how to use ant-slip additives and what types are available here.
Epoxy coating your stem walls
Many times questions come up about coating the stem walls of a garage. These are the raised concrete or block supporting structure that runs the perimeter of the garage floor. You can easily coat these as well; just remember to account for the additional epoxy required. Many times they don’t require much prep because they do not have a smooth surface like the floor.
Just pour the mixed epoxy out on the top of the stem wall (do not keep it in the bucket) and apply with a chip brush or small paint roller.
Always do the stem walls first with each coat you apply to the floor. If you plan on applying color flakes to the wall, you will have to toss them at the wall fairly aggressively in order to get them to stick properly. The trick is to use much smaller handfuls if you are doing a partial coverage floor.
As a tip, if you don’t feel the need to apply color flakes to the stem wall, some people elect to color match their epoxy with a simple 1-Part epoxy paint or concrete floor paint. They then use that for the stem wall without a clear coat. These are less expensive than epoxy and very easy to apply. Plus, you are not walking on your stem walls so you do not have to worry about durability.
Epoxy floor curing times
Once the final top coat is applied, you need to wait a minimum of 18 – 24 hours before the floor can accept foot traffic. Wait an additional 24 hours before moving things back onto the floor, and a total of 72 hours before vehicle traffic. Some polyurea floors will accept vehicles within 48 hours.
Remember that the epoxy floor coating will cure slower when temperatures are cooler than ideal, so you should adjust your wait times accordingly. It takes approximately 7 days for the garage floor coating to harden to its full strength.
Final tips
When purchasing your floor coating of choice, it’s very important to make sure that you have enough to cover the entire garage floor. This is especially true if you elect not to use a primer coat. Some concrete slabs can be more porous than others and soak up more or the coating than estimated in the first coat. This doesn’t take into account what remains behind in the mixing bucket as well as the individual A and B containers.
We like to follow the rule of 10%. Once you figure out your square footage, add 10% to that number (up to 1000 sf.) to come up with the amount of square footage you need to coat for your garage floor.
While a garage floor coating can easily be applied in smaller sections with one person, we highly recommend using two people for installation. It reduces mistakes from rushing and you can coat the average 2-car garage floor (not including stem walls) in less than an hour with 2 mixed batches.
Learning how to apply epoxy to a garage floor isn’t hard once you understand the finer points of the application process and all your questions are answered. Get your game plan written out if necessary before you start and make sure all your tools are available and ready to go.
Good luck and enjoy your brand new garage floor coating!
I applied a 3 part system to a garage floor. A color epoxy, the color chips, then a clear coat epoxy on top. I ran short of the clear epoxy and some areas are thin and I can feel the chips still. Can I just apply more to the low areas to obtain an even surface? The color turned out great just need to even out the top coat
Hello Chris. Yes, you can apply another coat of clear while making sure to cover the area where it went on thin. You will need to check the recoat window of the product you used. If you are outside that window it will require that you degloss and rough up the surface first before applying it.
Gentlemen, I painted my garage floor and it has been a major hassle. It has been almost a month since I painted the last coat, and the floor is still tacky, leaving tire marks and foot prints. I did follow instructions from Rustoleum, which were quite similar to yours; but doing one small square at a time, as per their instructions. The problem is that one side came out light in color and the other side came out dark in color. Tried it again to darken the light side and it would not work.
In total disappointment with Rocksolid Rustoleum product. I decided to repaint over it all, after it dried for a few days, and I used a Rustoleum Gray Acrylic “concrete and garage Floor Paint + primer. The coating came out clear and hardened within a couple of days. However, I felt that I should then protect that paint with a clear “top coat” of Rust-Oleum Clear Finish for bare or coated concrete garage floors again, “Acrylic”, which was advertised to be “Hot Tire and Chemical Resistant, UV and Weather Resistant and quick drying.
It has now been about “20 days” since painting the clear coat; and although we can walk on the floor, as soon as I bring into the garage, we get strong Tire Tracks. It simply will not harden. Temperature in the garage is about 70-80 degrees.
Rustoleum Company, has no answers for us. It would be greatly appreciated if you could provide answer and/or solution to harden this floor.
Bill McNally
Hello Bill. We took out your private information since this website is public. We are sorry to hear of your issues. You didn’t state what the first product was that you used exactly, but I’m assuming it was a 2-part epoxy since you had color differences. We address color issues with epoxy here. The product you applied next was a thin mil water-based acrylic paint (not an epoxy coating) followed up with a thin mil water-based acrylic clear. We are not a fan of the last two products for garage floor for a few reasons, one of which you are experiencing now. If the clear was not hard it would be wrinkling up, balling up, and/or squishing out from beneath the tires. Is this happening? Or are you equating the tire tracks with a soft surface? Tire tracks on water-based acrylic coatings are more common than uncommon. I realize that the literature states U.V. resistant, hot tire resistant, and etc. Unfortunately, all manufacturer’s of easy-to-apply DIY garage floor products market these type of paints and acrylic coatings because they are cheap (relatively speaking), which means they are fast movers off the shelves of home improvement centers and hardware stores. You won’t find one that says it’s not resistant to the common ailments of inexpensive coatings. The only real advice we can offer would be to either live with the marks or grind off the entire coating and apply something that would be much more durable. This is a good example here. There just isn’t an easy solution to solve your issue with this.
Is there a time limit for applying a final clear top coat ( 2 part epoxy) after a second coat of epoxy with full flake coverage has been applied? After applying my first coat of epoxy I am supposed to wait between 24-48 hours before applying the second coat. If I happen to apply the second coat after 48 hrs it says to sand it using 60 grit sandpaper. Is there a 24-48 hr time limit for the clear coat after applying the second coat with full flake coverage? I have 2 good days of weather for my first two coats but rain is in the forecast for the 3rd and 4th day when I would have liked to apply the clear coat. Thanks, you guys are an incredible resource!
Hi Adam. If you are applying color flakes to full refusal, you can wait as long as you need before applying the clear coats over the flakes. The reason is that the flakes are covering and adhered to over 99% of the base color coat and the clear coat will not come in contact with much of it. Once you sweep, scrape, and remove all the loose flakes that did not adhere, the first coat of clear will seep into all the nooks and crannies and be held in place by the flakes. Once the first clear goes down, the second and any subsequent clear coats must follow the recoat window.
Hi, I’m purchasing a house that has a painted garage floor, and was planning on using the Rustoleum water based kit from Lowes. I read that epoxy will not apply to paint in the article, do I need to acid etch the paint first? Or will that make a mess? Looking to avoid using a grinder, not against a primer if thats a thing.
Hi Billy. Technically, you can apply a water-based epoxy to regular paint. It requires that you prep the surface by sanding to rough it up. Also, Rust-Oleum has a new primer that foregoes the sanding process. However, a coating is only as good as what it is adhered to. If you apply a coating to a surface with a paint base, the entire coating will be just as susceptible to peeling as the paint since it’s the paint that is is adhered to. The epoxy needs to be adhered to concrete to get the full benefits. In addition, you cannot etch paint. Etching products, particularly muriatic acid, requires that the solution come in contact with bare concrete in order to etch the concrete. If applied to paint, it will just sit there and do mostly nothing. Your choice is either to apply it to paint and deal with the same consequences as paint on concrete or grind the paint off and apply the epoxy to bare concrete.
So you suggest repairing floors after the acid etch but also suggest to treat it as a clean room after the etching. Can the repairs be done before the etching? If for some reason filling can’t be done, can you at least chase the crack before the etch?
You can do the repairs beforehand, Joe. Sometimes needed repairs don’t show themselves until the concrete has been cleaned and then etched.
We had epoxy floors done earlier this year. Tradesman have stated it still feels rough underfoot. Can I apply more top coats? Even though it’s been months. It has not had people living in it. But a few workman since completeion. Is it ok to reapply now?
Hi Vickie. Did you have a full flake coverage done? If so, then it’s going to have a textured feel to it. What type of top coat was applied? You can always apply new coats, but it requires that you rough up the surface first with 120 grit sandpaper, vacuum up the dust, and then do a chemical wipe with denatured alcohol on microfiber pad. You would then be ready for more coats. Just make sure to get any subsequent coats after that within the 24 hour recoat window or you will be sanding again.
you mentioned above to wipe the surface down with denatured alcohol on a microfiber pad. shall be do this just before applying Epoxy or in Advance ? and since I have already etched the surface and it is no more smooth, will microfiber cloth/pad will work ?
It’s not necessary on bare concrete after all the cleaning you have done, Amit.
Hi Shea ,
Thanks.. I followed your article and responses and finally did my first coat of Rust-Oleum professional yesterday. It went fine without any issue of bubble or fish eye . I am looking forward to do second coat in day followed by clear coat . Thanks for your help .
I only had one issue though , I used Epoxy Glide 1/4’ nap but I was getting shed of roller in my floor … I hope that won’t be an issue as I am going to do second coat tomorrow but shall I use some other roller ? I have only a day so can’t order anything online .
Glad to hear it went well, Amit. It’s unusual for EpoxyGlide rollers to do that. Did you run the roller back and forth over a strip of duct tape first? If not, this is most likely why you encountered shed. Check the other rollers to see what you get. If they are shedding as well, then you can use a 3/8″ Purdy roller. You can usually find these at your local home improvement center.
I will be moving to a new construction. How long do I have to wait to start the process?
Hi Jay. The concrete needs to cure for a minimum of 30 days after it was poured before you can start.
Thanks for that.
Any considerations regarding the new floor? Best products to use, etc.
It all depends on how you plan to use your floor, how you want it to look, and your budget. Can you give us an idea of what you want to use the garage for and how you want it to look?
I am doing the initial research for my plan to apply a 100% solids epoxy coating in my garage. But I’ve been unable to find an answer to my biggest question.
Can I apply an epoxy coating to a garage floor with a drain? If so what is the best method for masking and applying epoxy around the drain?
Hi Mike. It depends on the drain. The best thing you can do is remove the cover if you can and tape off the screw holes. Any excess that flows over the edge can be cut with a razor knife as soon as you can walk on the floor. If the cover does not come off, then you will need to tape off the top part of the cover and then cut the epoxy at the perimeter of the cover to remove the tape as soon as you can walk on it. You may have to do this a few times depending on how many coats total you are applying.
Hi Shea,
I bought my floor coating product before I profiled my garage. After renting the Edco grinder and resurfacing, I unleashed a heck of a lot of large oil stains. I have scrubbed for days with several products to no avail. I purchased a 3 part Polyurea coating system with flake. Since i can’t lay the primer I purchased over oil I purchased a separate oil stop primer. Would you recommend double primer on the floor. Oil stop primer then the primer that came with the kit on top to make a sturdier base?
Hi Kurt. Is the primer that came with your kit pigmented the same color as the polyurea? If so, then we recommend that you use it as well. The reason for this is that oil stop primers are typically dark in color. This dark color can bleed through a single color coating. If the primer coat is pigmented, it tones down the dark bleed through of the oil stop primer so that it will not affect the color coat of polyurea.
Yes it is a colored primer with a colored polyurea. That was my thought exactly but i didnt want to over primer and cause failure or adhesion issues. And since you say it will work with the tinted primer over top of the oil primer thats what i will do. Just wanted advice from a professional. Thank you so much Shea!
You are welcome, Kurt. It’s always a good idea to check with the vendor as well. They know their products and want you to succeed with your project.
We used DaiHard100 Industrial Strength Epoxy Floor Coating to coat the garage floor yesterday, followed by flakes as we went along with the application process. The temps were in the mid 60’s yesterday, but fell into the 40’s overnight. The surface is still tacky today, so we know it will take more time before we can apply the clear coat, which will be Beauti-Tone Clear Coat 100 Industrial Strength Epoxy.
However, in looking at the floor today, it is obvious that the floor absorbed more color coating in some areas than in others and now the color is light in some spots with concrete showing through. We have no more of the color coating so will need to order and it will take time to arrive. As we are entering fall and temps will continue to drop, we are wondering what our best course of action should be at this point?
Can we put down another color coat over the flakes and then just apply new flakes on top? Then follow with the clear coat? Or should we just put the clear coat on now and then reapply another color coat and more clear coat in the spring? Can color coat even be applied over the clear coat?
I should also mention that this is an older existing garage floor that had cracks that we repaired and then resurfaced with a concrete coating last spring. We waited the entire summer to insure everything was dried and cured well before attempting the epoxy coating. The surface isn’t perfect and I’m not concerned about that because it looks incredibly better than before. I’m more interested in evening out the color coating so that, at least, looks nice. But I don’t want to compromise the durability of the floor coating, as that was my main objective.
Please advise. Thank you.
Hi Mary. At what coverage rate did you apply the epoxy? DaiHard 100 lists a coverage rate of 250 square feet per kit. This should produce an approximate dry film thickness of 8-10 mils. Epoxy this thick should not have the color issues you have incurred unless it was stretched out past that limit.
Epoxy actually stops curing once the temps drop a few degrees below 60. That is why it was still tacky the next day. In most cases, if the temps didn’t drop too low, it will continue the curing process once it has warmed up enough. Yes, you can apply another color coat with flakes and then clear over that. You can do the other scenarios as well. Keep in mind though, 100% solids epoxy has a 24 hour recoat window. This is extended 8-12 hours when it quits curing as it did overnight. Once you are past this window, the surface needs to be deglossed and roughed up with 120 grit sandpaper before another application can be made. Our suggestion is to leave the floor as is and wait until the temperatures warm back up properly in the spring before applying another color coat. If epoxy gets too cold overnight, it will not continue curing once the temperature comes back up. If this happens, you end up with a gooey mess on your hands that needs to be scraped up. You need to ask yourself if you want to take that chance. The current coating, though thin in some spots, will protect the concrete from the elements over the fall and winter until temps warm back up. You can then rough up the surface appropriately and continue finishing the coating with subsequent applications.
Shea,
Installed my first coat of epoxyshield professional yesterday. I have planned for a second coat but the first one has more orange peel than I’d like. There are a few stray fibers from my concrete also sticking up. It’s cool outside but my garage is heated and I’ve had it at 68f all week. Maybe slab temp was cooler and led to orange peel? Anyway it’s been about 18hrs since I finished coating and you can walk on in socks but still easily scratch with finger nail.
Seems like I should get a floor maintainer and give a light sand. Would 80 grit be too coarse?
I turned thermostat up to 73F. Any other tips you could suggest to improve my second coat would be much appreciated.
Thanks
Hi Dave. A cool slab will definitely contribute to the orange peel effect. Once applied to cool concrete, the coating becomes less viscous and does not want to flow as well. Turning up the heat will help some, but slabs tend to warm very slowly. Yes, an 80 grit sanding screen will work well. You will need a few of them. After you have swept or vacuumed, make sure to wipe down the surface with denatured alcohol applied liberally to a microfiber pad. As a tip, keep the epoxy for the second coat in the warm house for 24 hours before taking it outside to mix. Once mixed, move it back into the house during the required induction time rest period and then back outside for application.
Shea – I’m planning on installing epoxy floors on a home I just purchased and have some questions.
1) If the concrete is already sealed, can I simply etch with muriatic acid, apply a primer coat and then continue with the epoxy, or do I need to grind the concrete?
2) I’ll be using 2 Rustoleum “professional” kits for a 450 sq ft area that is broken into 4 sections…do you suggest taking 2 days (1 per kit) or getting it all rolled out on the same day?
Thanks in advance!
Hi Josh. You will need to grind the concrete surface to effectively remove the sealer and provide the proper profile for a coating. Muriatic acid will not work on concrete with a sealer. Two of the Rust-Oleum EpoxyShield Professional Floor Coating kits will not be enough. They have a max coverage rate of 200 square feet per kit and that’s assuming that you have a less porous surface from etching compared to grinding. You can view the technical data sheets here. One of the top DIY epoxy application mistakes is stretching coverage rates. The coating will not be thick enough which results in patchy areas of a matte to semi-gloss finish and poor color tone. You should roll it all out in one day, but don’t mix the kits together in one batch. It’s too much epoxy and the exothermic reaction will drastically shorten the pot life. We have an article here on how to apply multiple kits for one coat to ensure color uniformity between kits.
Thank you! Ok so the order will be:
Grind—-acid etch—-primer—-epoxy—-clear coat?
No etching, Josh. Grinding is the preferred prep method because it’s better than etching.
I’m planning on coating my garage floor with an epoxy primer, epoxy base coat with full coverage flakes then a coat or two of polyaspartic clear. I understand the advantages of 100% solids epoxies but I’ve also read that epoxies that contain solvents are less viscous and that helps them penetrate the concrete pores improving adhesion. So should I be thinking say a 70% solids epoxy primer with a 100% solids base coat? The concrete is quite smooth so I’m not trying to hide imperfections with the epoxy.
Hi Kirk. No, the epoxy primer is what will be penetrating into the substrate. They are specially formulated to be less viscous and to penetrate well. As always, proper concrete prep beforehand is the key. You can always use a high solids (greater than 90%) epoxy color base coat in place of the 100% solids. It has a small amount of solvent in the hardener which allows it to go down almost as thick and increases the pot life making it easier to work with.
I did a floor with Behrs white epoxy and then used Parks urethane looked great but days latter it had yellow streaks in it. Not sure what we did wrong
Hi John. There are a couple of issues. The first is that the Behr product is an epoxy paint (not an epoxy coating) and is not intended for clear coats. It’s essentially an acrylic latex concrete paint. This article here explains the differences. The second and more worrisome problem is that it sounds like you applied an oil-based polyurethane floor coating for wood floors. Such coatings are not designed for concrete or vehicle traffic. In addition, they are not compatible with most paint and will look yellow as it cures. Did the instructions state it was for concrete floors? We discuss 1-part epoxy paints and clear coats at the beginning of this article here. If the polyurethane does not stay down, you will most likely need to grind to remove everything down to bare concrete and then apply the proper products.
Thank you for the answer. I plan on doing the entire house like this so there would be no driving or heavy duty on it . Just walking would you know which epoxy and top coat would work . I am extremely confused after reading I figured out what not to do but not what to do
Thanks again
Hi John. Because you are doing this inside the house, you need to use a product that does not have VOC’s. The Behr acrylic paint product you used does not have VOC’s, but it’s not a long term wear surface (budget / cheap quality), nor is it intended for clear coats. It does not have a glossy finish either if that is important to you. You might want to read this article about home improvement centers if that is where you may be getting your information.
The other issue is the color. True white is generally only available in commercial quality coatings that have solvent’s added (VOC’s) or they can be obtained as 100% solids epoxy (no VOC’s). 100% solids epoxy is typically what’s used indoors. It’s thick, it’s glossy, it requires proper preparation of the concrete (etching or grinding), it usually requires two people for application due to the limited time to apply it once mixed, and it’s also much more expensive than paint (not sure what your budget is). You can apply a water-based polyurethane for a clear coat to protect the color coat. They are formulated to last a years with foot traffic in an indoor environment. They are available in gloss or satin if you want to tone down the high gloss of the white.
One exception to the rule is a product called DuraGrade Concrete by Rust Bullet. They make a single-part polyurethane coating that is low in VOC’s and much easier to apply. You would require three color coats for white. Again, white is a tough color because the concrete gray color wants to bleed through. In addition, DuraGrade can be applied without concrete prep if your surface is clean, doesn’t have a sealer, and will absorb water. You can read about DuraGrade Concrete it here.
I want to put an epoxy covering on my patio. The concrete is new (about 6mos.). The finish of the concrete is not smooth, it is a broom finish. Will that be a problem? Will the rough text remain after the epoxy is applied? Or will i still need to add an texture additive for anti slip? I also have a pit that has a steel cover over it level with the floor. Can i epoxy over that cover?
Hello Donnie. Epoxy is an indoor coating. It is not U.V. stable and should not be applied outdoors or anywhere there is a chance for long sun exposure. It will amber (turn yellow tint) and begin to oxidize. You need to use a coating that is approved for outdoor use. This one here is one such example. Any surface with a broom finish is typically treated to grinding to smooth it out. The reason is that the thin ridges that stick up are weak and can break off. In addition, the broom texture tends to telegraph through the coating. It would require multiple coats for it to begin to get smooth.
Will single part polyurea self level in spiked shoe marks the same as epoxy?
Hi Jon. Yes, it will as long as it’s freshly applied and has not sat long.
Hello, I plan to epoxy coat the garage floor after fixing the cracks and after filling with epoxy. One of the cracks actually runs out to the garage door and visible from outside even when garage door is closed. If I fill that crack with epoxy during the repair but do not epoxy coat since its outside the garage, it will look ugly. The crack is hairline but gets slightly bigger as it goes into the garage. What do you propose – should I leave that crack as is or use the crack chaser and then fill it with epoxy too?
Hi Vivek. We would recommend chasing the crack to the door where the coating will terminate and fill it accordingly. If you live in a snowy climate where it freezes overnight, then we would recommend filling the crack outside the door, but don’t chase it. Once it’s filled, wipe the surface with mineral spirits or acetone to clean up the surface. This will be less noticeable and prevent water from entering the crack and then freezing which creates more damage over time.
Is the epoxy used for repair ok if acid falls on it during acid etch process? Is crack chasing needed for hairline cracks? Is it ok to use Simpson Strong Tie epoxy for smaller cracks and where the cracks gets bigger Rustoleum epoxy repair product?
Thanks so much for all the information.
Hi Vivek. Yes, it’s OK for the epoxy to be exposed to the acid etch. It will not affect it. Don’t chase the hairline cracks, just fill them with any type of epoxy crack filler. The Simpson Strong Tie may be easier. The thicker and more viscous fillers such as Rust-Oleum are easier to use on the bigger stuff.
Hi, can you suggest some way to move large storage cabinets (48″W x 24″D x 78″H) to do the repair and epoxy garage floor. Also, how do you suggest one should do the epoxy below appliances like washer and dryer without moving them?
You can’t apply a coating beneath storage cabinets and washer-dryer appliances. They need to be moved first. A dolly and a couple of people work best to move them out of the garage.
Hi Shea, I am planning to do Rustoleum EpoxyShield 2-part epoxy on my garage floor. After I fill the cracks with Rustoleum Patch and Repair to fill cracks and holes, do i need to sand the surface before applying EpoxyShield? The surface of Rustoleum Patch and Repair is very smooth and shiny and I am afraid that the EpoxyShield may not adhere to it.
Hi Vivek. Yes, you will need to rough up the surface of any epoxy or polyurea repair materials before applying the coating or it will not adhere properly. This can be done before or after you etch the concrete.
Shea, does shallow holes in floor need to be filled with Rustoleum Patch and Repair? Why can’t they be filled up with EpoxyShield itself while rolling the epoxy?
Hello Vivek. Rust-Oleum EpoxyShield is a thin coating with a solids content of only 52% by volume. The other 48% is mostly water and some surfactants that evaporate out. This means that once applied, the wet film thickness will shrink by almost half as it cures. When that happens, it will expose small cracks, dimples, and other irregularities in the concrete. They are still covered, but the surface is no longer level smooth like it may have been when first applied. It’s just like painting a wall. Most paint is approximately 30% solids by volume. When you fill that small dimple, dent, or other irregularity, it comes right back when the paint dries. If you use 100% solids epoxy, what you see wet is what you get when it cures. There is no solvents or water to evaporate out and cause the coating thickness to shrink.
Last evening My wife and I put down approximately 600 sq. ft . of 100% epoxy (Craftsman Kit) we started with a 1/2 batch seemed to go well so we continued. After we finished the 3rd half batch (about 2 hrs later)we went back and looked at the start it had bubbles and craters. we were horrified and stopped the process. This morning the whole thing looks horrible. I had thought that the little small bumps were just were just from the 3/8″ roller and that they would “self level” but no, this morning it looks like a heavy no slip surface and I did not apply any grit. this morning if I put high finger pressure I can leave a light finger print. I am sick, I thought I followed the instructions to the letter. What do I do now? Half of my floor is a mess and I half of it to go. Thanks
Hello Bryant. How did you prep the concrete? Did you grind or etch? If you etched, how long did you wait before applying the epoxy? Also, what method did you use to mix it – paint stick or drill with jiffy mixer?
The concrete was etched about a month ago, was thoroughly rinsed(floor was flooded at least three times.) and power washed with last power washing three weeks ago and epoxy applied last evening. Mixing was done with a polypropylene mixer on a battery drill at low speed.
OK, so it sounds like we can eliminate trapped air in the epoxy as it was mixed. From your description of the concrete prep, the most likely culprit is moisture vapor transmission. What happens is moisture vapor that is being released from within the concrete gets trapped under the fresh coating. It can create bubbles under the coating as it cures or craters if it escapes as the epoxy is beginning to harden. A lot of water was introduced to the concrete. Etching opens the pores and will allow more moisture to enter the slab. Power washing drives the moisture even deeper. As a result, it can take days for all that moisture to escape – longer if the humidity was up. Assuming that your slab is not below grade (basement, up against a hill, etc.), we are guessing that all the moisture driven into the slab has not had a chance to dry out and escape.
We suggest taping a 16″ square sheet of plastic to a couple areas of the remaining bare concrete. Seal all the edges with tape. Wait 24 hours and then pull the plastic up. If the concrete is dry and the plastic is not wet underneath, the moisture is gone. However, if the concrete turns darker or the plastic is wet, then moisture still exists. The current area that is coated can be fixed with another coat. It will require sanding the surface with 80-grit sandpaper to knock down the crater edges and smooth out the surface. Sweep/vac then wipe it down with denatured alcohol or equivalent applied liberally to microfiber mop pad.
If I sand the floor and knock down the bubbles, will a second coat mirror the same spots since there was a vapor channel there to create the bubbles in the first place? Some bubbles are little raised spots while others or very small pit.
Could I just as easily put down a colored Polyurethane top coat at this point?
Thanks
Hi Bryant. If you sand to knock down the bubble edges, high spots, etc., a second coat of the same product (100% solids epoxy) should completely cover everything up and result in a much smoother surface. This because none of the coating shrinks do to evaporation of non solids content such as water or solvents. What you see wet is what you get dry. Colored polyurethanes are not 100% solids and will react differently. If it is 70% solids for example, 30% of the wet film thickness will evaporate as it cures. If any small holes or craters were exposed from the sanding, they will be exposed / not completely filled as the polyurethane film thickness shrinks 30%.