

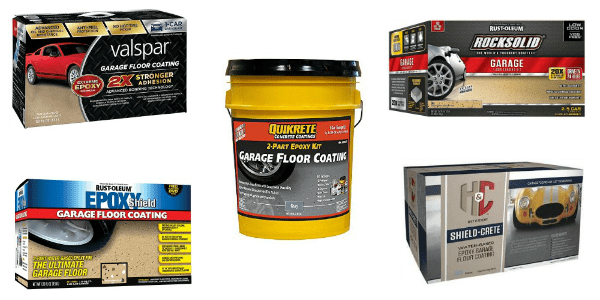
The best garage floor coating kits, also known as epoxy paint kits, are not what you may think. If you were expecting a comparison of Rust-Oleum EpoxyShield, Quikrete, Valspar, RockSolid, or some other kit you’ve seen at your local home improvement store, then you may be in for a surprise.
The best garage floor coating kits are the newer single-part polyurea coatings. They are the easiest to apply, longer lasting, and offer the best protection.
Not familiar with polyurea garage floor coatings? No worries, the majority of other people aren’t either. Consumers who want to apply a DIY coating to their garage floor are commonly familiar with the term “garage floor coating kit”, “epoxy paint kit”, etc. When they are using these terms, they are generally thinking about epoxy coatings and the above-mentioned products.
Why? The reason is simple. These types of kits have been marketed and promoted for many years by the large companies that manufacture them. Rust-Oleum is a good example. These are the typical DIY garage floor coatings. They are designed to be applied in one coat with the optional decorative color flakes to toss on top.
In addition, they are typically packaged in an eye-catching box that includes the coating, a small bag of color flakes, and an ECO-friendly etch/cleaner solution. It’s not everything you need to get the job done, but they like to use the word “kit” to sound all-inclusive for marketing purposes.
These are most prevalent in the home improvement centers and hardware stores where they are seen on a regular basis. As a result, this is all the average consumer is aware of in terms of coating choices in many cases.
The problem with most of these garage floor epoxy products, however, is that they are on the low end of the scale in terms of quality, durability, and performance. This is particularly true when compared to the vast majority of garage floor coatings available.
We suggest reading this article here to understand more of what to expect with these types of coatings. In addition, we have a new article that explains the reasons behind the bad reviews of garage floor coatings.
Now that you know the history of these epoxy paint kits, let’s discuss what makes the newer single-part polyurea garage floor kits so much better.
What is a polyurea coating anyway?
Put simply, polyurea is a subset of polyurethane. It is a coating that seals and exhibits excellent chemical, stain, and abrasion resistance. The high elongation rate of polyurea makes for a flexible (relatively speaking) surface.
Coatings that flex provide very high abrasion and scratch resistance. This is one of the reasons why polyurethane and polyurea are much better topcoats than epoxy for most environments.
Polyurea is actually fairly new for a coating. It was commercially developed in the 1990s and was most known in the industry as a spray-on coating for bed liners, pipe linings, water tanks, pool coatings, etc. When mixed with a catalyst in a sprayer it can cure in as little as 5 seconds. It can also be applied in extremely cold and warm temperature conditions.
It was later developed as a 2-part polyurea polyaspartic roll-on concrete floor coating. This version has become very popular with many garage floor installation companies. The cure rates of less than two hours can provide a 1-day return to service for a complete garage floor coating system.
This is sold as an advantage over a standard epoxy garage floor system. Most epoxy systems require a minimum of three days to cure before full return to service.
The high solids 2-part formulas used for these garage floor coatings are expensive though. It requires experienced installers to apply properly due to the short working time (pot life) of only 20-25 minutes. This is why it has not been popular for DIY applications – that is until recently.
Why single-part polyurea coatings are better than epoxy paint kits
One particular formulation that has been introduced to the floor coating industry in recent years is single-part polyurea. Most polyurea formulas require mixing together a part-A resin and a part-B catalyst – just as epoxy does.
Single-part polyurea, on the other hand, does not require the mixing of two components. Instead, the oxygen in the air provides the catalyst that the coating requires to chemically cure.
Single-part polyurea is a commercial quality garage floor coating that is the easiest of all coating to apply – period.
With the addition of solvents in these formulations, manufacturers have created an extremely durable polyurea garage floor coating. It does not require the mixing of A and B components, has unlimited pot life, and can easily be applied to concrete.
Many of the mistakes from DIY epoxy coating applications generate from improper mixing of the A and B components. The anxiety of this mixing process is a common deterrence that causes some people to shy away from installing epoxy in their garages.
RockSolid has tried to eliminate mixing mistakes with the introduction of burst pouches to mix A and B components, but problems still exist. The single-part polyurea coating completely eliminates this step and greatly reduces the chances of DIY installation errors.
To be more concise; Single-part polyurea is a commercial-quality garage floor coating that is the easiest of all coatings to apply – period.
Furthermore, the typical epoxy coating and garage floor coating kits, as mentioned above, is no match to the superior durability, chemical resistance, scratch resistance, and abrasion resistance of single-part polyurea coatings.
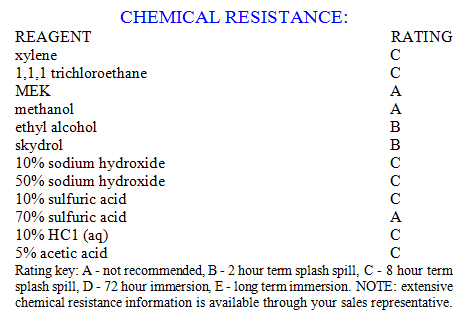
As an example, commercial quality coatings provide a list of ratings based on testing. You can find these ratings as well as other pertinent figures in the Technical Data Sheets. This is what allows consumers to compare and evaluate how coatings will perform.
Abrasion resistance and chemical resistance are two standard tests that can provide very good information.
The example below is a chemical resistance chart that lists how a particular product will react to a variety of liquid chemicals including acids and solvents.
You can’t find this kind of information for your typical epoxy paint kits by Rust-Oleum, Valspar, H&C ShieldCrete, RockSolid, etc. It’s not listed. Instead, they use very vague terminology such as “anti-peel protection”, “2x stronger than concrete”, “hot tire resistant formulation”, and “long-lasting results”. They do not provide any testing data to back up these claims.
To their credit, RockSolid actually provides an abrasion resistance rating, but they do not provide chemical resistance data. The rating they provide for abrasion resistance is 40mg. This is how much material is lost during 1000 cycles for a CS-17 abrasion wheel test. The lower the abrasion numbers the better. As a comparison, many single-part polyureas test at only a 12mg loss.
Important to note is that each mg unit of loss is exponential. For example, a coating with a 4mg loss compared to a coating with an 8mg loss would last 3 times as long in terms of wear under the same conditions – not 2 times as long as most would assume.
Now, can you imagine how much better a 12mg loss coating performs than a 40mg loss coating when it comes to wear and abuse?
Additionally, polyurea is U.V. stable whereas epoxy is not. This means that your coating will not amber (yellow tint) over time when exposed to sunlight. This is a typical complaint about epoxy paint kits.
Coating thickness is another issue. Most DIY epoxy garage floor kits have a dry film thickness of only 2-3 mils when applied at the standard coverage rates. Thin coatings such as these can sometimes create cosmetic issues with the color looking inconsistent and blotchy. This is due to the coating being absorbed at different rates into the concrete.
Single-part polyureas on the other hand have a 4-6 mil dry film thickness. The thicker coating makes for a more durable surface and is less prone to color inconsistencies.
Benefits of single-part polyurea coatings
- No mixing of A and B components
- Long working times so you don’t feel rushed
- Recoat times as little as 2 hours versus 10-12 hours
- No primer required
- Can be applied in lower temperatures – most epoxy paint kits require a minimum of 60°F
- Over 50% thicker coating than standard epoxy paint kits
- Long lasting – 10 years or more versus 2-5 years for standard epoxy kits
- No hot tire lift – water-based epoxy kits will get hot tire lift
- 100% U.V. stable for no yellowing – epoxy kits will turn yellow over time
- 100% more flexible than epoxy for superior scratch resistance
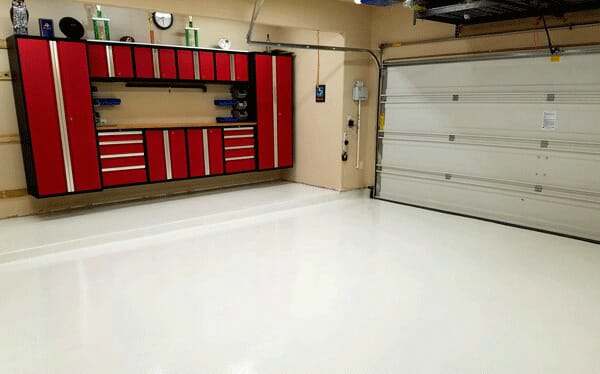
- Higher gloss ratings than most epoxy kits – maintains gloss longer
- High chemical and abrasion resistance – data not available for epoxy kits
- Excellent protection against road salts and deicing fluids
- Can be used as a clear sealer over bare concrete or stained concrete
- Available in both gallon and quart sizes to modify for any square footage
Single-part polyurea coatings can be used as a one-coat stand-alone system if you like. You can add color flakes or not just like the standard epoxy paint kits. You also have the option of adding a clear topcoat of polyurea for a two-coat system. This can allow for a full color flake floor of your choosing to get a real custom look.
Another advantage is that single-part polyurea is available in gallon and quart sizes. This allows you to order only what you need for your square footage to avoid overspending.
Most garage floor coating kits only allow for purchases of 250ft² at a time. If you have a 550ft² garage floor, for example, you would need to purchase three kits. There is no way you could stretch out two kits for the 550ft² without cosmetic and performance issues.
Concrete preparation is the same with single-part polyurea as it is with any other epoxy coating kit. You need to etch or grind the concrete to create the correct surface profile. This will open up the pores of the concrete at the surface in order for the coating to penetrate and achieve a mechanical bond.
One characteristic of single-part polyurea you need to be aware of is that it is solvent-based. There will be some strong fumes during application. Most of the smell from the fumes dissipates within a few hours though as the solvent evaporates out of the coating.
As with any solvent-borne coating, it’s not uncommon if it takes a few days for the smell to completely diminish. However, it will go away.
Polyurea coatings can also be more slippery when wet compared to epoxy. The curing process produces a tightly cross-linked structure that smooths out almost like glass. This is one of the reasons it cleans up so easily and is very difficult to stain.
If you live in a wet climate or worry about the floor being slippery, we would suggest adding an anti-slip additive to the final coat.
Additionally, they are not the best choice if you have a concrete surface with numerous cracks and/or surface irregularities either. Though thicker than their epoxy paint counterparts, they still are not thick enough to fill in such surfaces. A high solids or 100% solids epoxy is a superior candidate since they are better at self-leveling with a dry film thickness of 9-10 mils and higher.
Lastly, some single-part polyureas are packaged in clear only. They require that you mix in a pigment pack for the color you choose. However, this is not the same as mixing 2 components together. You just pour in the pigment pack and mix it with a paint stick. This does not activate the coating, nor does it mean you have to start immediately applying it after you mix in the color packs.
This post may contain affiliate links. If you use these links to make a purchase, we may earn a small commission. You can read our full disclaimer here.
Where to purchase polyurea garage floor coating kits
One of the best advantages to purchasing a single-part polyurea is that they are currently only available from vendors who specialize in concrete coatings. These are the same companies where professional installers buy their coating materials.
Legacy Industrial was one of the first vendors to offer a single-part polyurea in a DIY application. Called Nohr-S, we were so impressed with the coating that we wrote an article about it.
Price and Purchase Nohr-S Coating Kits Here
Some time afterward, ArmorPoxy made their SPGX polyurea available to the public as well. One of our readers in Chicago applied it to his garage floor and we did an article about the process here.
The latest to offer a polyurea coating in kit form is Garage Flooring LLC. Customer service is excellent and they would be more than happy to help you out and answer your questions. You can read our latest evaluation of their All Weather Floor polyurea.
Price and Purchase All Weather Polyurea Here
Unlike home improvement centers, these vendors are experienced in garage floor coating applications and are extremely knowledgeable. They want you to be successful with your project. Customer service is excellent in most cases and they can answer any questions that you have about the product and application.
They are also very good at making sure you understand what you are purchasing. They will tell you if the product you are interested in is the best choice for you or not. We highly recommend contacting these vendors with any questions you may have before making a purchase.
Important to note is that these vendors are not national brand companies with brick-and-mortar stores that you can walk into. Products and materials are ordered online via their websites and then shipped directly to you. With some exceptions, most of these companies ship for free as well.
Though the coatings don’t come in a neatly packaged box with nice artwork and graphics, they can provide everything you need in true kit form for a successful application.
you would have to purchase and go through the process of reapplying an average of four water-based epoxy paint kits over the life of just one single-part polyurea coating.
Cost per square foot for a single-part polyurea coating averages about twice that of the lowest-priced, water-based epoxy garage floor kits. RockSolid polycuramine and the solvent-based Rust-Oleum EpoxyShield Professional coatings are priced midway between.
1 gallon covers approximately 250ft², the same as most epoxy paint kits. SPGX by ArmorPoxy covers 300-400ft² per gallon, but the additional square footage is reflected in their price point.
Though the initial cost of single-part polyurea garage floor coating is higher than the typical epoxy paint kits, they are a much better value. This is particularly true when you carry that expense out over the many years of use.
For example, you would have to purchase and go through the process of reapplying an average of four water-based epoxy paint kits over the life of just one single-part polyurea coating.
Are polyurea garage flooring kits the best of all garage floor coatings?
One important question that people want to know is how single-part polyurea coatings compare to other garage floor coating systems available. Is it better than epoxy? Is it better than polyurethane? Is this the best garage floor coating I can apply?
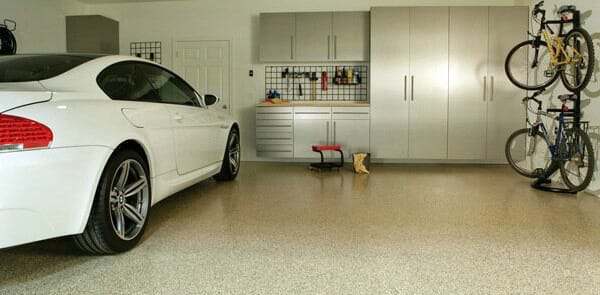
A single-part polyurea garage floor coating kit and/or system is the best choice for those that want a professional-looking, commercial-quality coating. It is the easiest to install and at a reasonable price point.
They deliver excellent performance and long life. They are best for the typical residential garage that will see light to medium-duty automotive repair and medium to heavy traffic. This includes inclement weather conditions and other hobby or home improvement projects that are performed in the garage.
Application is easier than epoxy paint kits. They will not experience the potential peeling, hot tire lift, color fade, and wear over 2-5 years that is typical of such kits.
However, in terms of ultimate performance and durability, nothing really outshines a hybrid coating system. Such a system consists of an epoxy primer, a high solids epoxy color coat, and one or two coats of a high-performance polyurethane or polyurea topcoat. We discuss the best garage floor coating systems here.
Final thoughts
Needless to say, we are impressed with this product. Hands down, single-part polyurea is the easiest of all coatings to apply while still performing to commercial quality standards. It delivers excellent protection and performance at a very reasonable price point.
The large companies that provide inexpensive epoxy paint garage floor kits have been relying on relatively older epoxy coating formulas for years. We would not be surprised if one of them doesn’t come out with their own version of this polyurea in the near future. It would eliminate many of the complaints about their products.
Until then, the biggest problem that single-part polyurea will face is a lack of exposure to the general public. The smaller companies that sell the higher-performing garage floor coatings do not have the budget for the type of national advertising that is required.
Though it’s not the cheapest garage floor coating, for the value it’s one of the best DIY garage floor coatings available that you can purchase in kit form.
I applied a coat of Epoxy Seal over my painter garage waited the allotted time before applying a second coat, I’ve waited 5 days but it rained and got some areas wet and it seems that some of the coating has been washed away. Can we sand it down and apply another coat? If so what type of grit?
Yes you can, Niraj. Use 120 grit sandpaper.
Is Devoe Devran 224V High Build Epoxy Coating Solvent Based is a good coating for a residential garage floor?
Hi Jeremy. It’s a higher solids epoxy that is a much better product than the epoxy kits you find at your local home improvement centers. While not the best, you can expect it to work fairly well in a garage environment and you should not get any hot tire pickup either if the concrete is prepped correctly.
I am going about this process backwards. On a whim bought a Rust-Oleum kit and then proceeded to spend quite a few hrs prepping the concrete. Afrer investing so much time I decided that I better put a top coat on my Rust Oleum kit. Once again, on a whim I bought HPU 747 high performance urethane top coat. At this point I decided to research what the heck I was doing. I realize it’s little late in the process. In conducting my research I found out the kit I bought wasnt the best option. So, I decided to absorb the cost of the kit & upgrade to somethn better. I alrdy have the HPU 747 top coat but now need to figure out what to put down as my base coat w/o breaking the bank since I’m absorbing the cost of the Rust-Oleum kit. I was looking at options where I bought the HPU 747 top coat and they listed products that would work with the 747. One of them being the Devoe Duran 224v that I asked about in my previous question. Do you think the Devoe Duran 224v as a bsse coat along with the HPV 747 would not only look decent but lasst as well? Or can you think of a better choice as a base coat to go along with the HPV 747 top coat. I want to Thank You for taking time to answer my questions. It’ is much appreciated:
It’s not uncommon for this to happen, Jeremy, once you begin doing your homework and learning about proper coatings for a garage after product has been purchased. The system you are putting together will perform well and should last a fairly long time for a typical garage. Just make sure the concrete is prepped well and DO NOT try to stretch the coverage rates. This is a big mistake people tend to make. It is imperative that the coating be applied at the proper thickness it was intended for. Make sure to read the data sheets and follow the instructions and you should end up with a durable coating.
Once again, Thank You for taking the time to answer my questions. One last question if you don’t mind. I’m going to order the base coat tomorrow but wasn’t sure if you recommend putting down a epoxy primer first?
If you can get the corresponding epoxy primer to go with it then we recommend it. There are many benefits to an epoxy primer, one of which is that it will allow you to achieve the prescribed coverage rates. The base epoxy color will not be absorbed at all into the concrete and you will get accurate color tone and gloss.
I had a Premier Garage floor coating installed about 14 years ago. It has held up exceptionally well. I would like to restore its shine. Can you recommend a top coat to use? Single-part polyurea or polyurethane? What prep do you recommend?
Hi Terrence. We would recommend a single-part polyurea. Degrease the entire surface and then rough it up with 120 grit sandpaper. It’s much quicker to rent a floor maintainer and use 100 grit sanding screens. Sweep / vacuum the dust up and then wipe the surface down with denatured alcohol on a microfiber mop pad. We have an article about recoating here. After that, it’s ready to recoat.
We have a 12×8 mudroom we recently had to resurface due to the slab settling. We were told to purchase concrete leveling (not sure of exact name as hubby did that work) in order to fix. Now we are looking at an epoxy type floor. Originally we were going with solid laminate, but can’t fine one we like. We have cats and hate the thought of cat urine ruining a new floor so we want something solid with no porousness or gaps that might absorb liquid. What would you suggest?
Hi K. Hopefully your husband did not use a self-leveling underlayment. Underlayments are not a wear surface and not designed for coatings. They are used when installing a different wear surface over it such as wood, tile, carpet, and etc. Assuming the correct resurfacing concrete was used, are you OK with the traditional grey or tan color of epoxy or do you prefer a different color?
Hello Shea,
We just moved into a house where the previous owner poured a concrete floor about 30 to 40 years ago that is rough to the touch. I cannot tell if it has previous spills or not… What prep do you recommend? I am leaning towards the Single Part Polyurea. Is it ok to apply this product in a basement laundry room?
Appreciate your feedback!
Hi Alan. We don’t recommend applying a single-part polyurea in a basement. The reason is that these type of coatings have a solvent-base which creates a stinky fume. It dissipates quickly for a garage since it’s well ventilated, but it would linger for days in a basement and stink up the whole house. You would be better off using a water-based or 100% solids epoxy. We can’t really give advice about the concrete without seeing it. If it’s a real rough texture, similar to a broom finish for example, then we would recommend grinding to knock it down some and create a smoother looking profile.
I own a dog daycare where the floors get lots of abuse from dog paws, mopping, chemical cleansers, and human foot traffic. I’ve been researching which floor products are best for DIY surfacing a new location we’re opening soon that has smooth concrete floors. The amount of information is overwhelming. Can you tell me which is the very best and most cost effective way to finish these floors? I want something very durable and long lasting. Thanks!
Hi Cliff. Since you said DIY, we are assuming you are applying this yourself? Also, will this be outdoors or exposed to direct sunlight?
This is an indoor facility. Yes, I’ll be doing the work myself. Only sunlight exposure will be through windows. Aesthetics aren’t rally a concern, the dogs won’t care, but I want something long lasting and durable most of all. Also, something that’s not too difficult for me to apply effectively would be great. Thank you!
We wouldn’t recommend a single-part polyurea for an indoor facility, Cliff. The reason is that these type of polyureas are solvent-based and put out quite a stink when applied. Garages are well ventilated with the open doors and the smell goes away fairly rapidly. However, when applied indoors it can really stink up the place and linker for days. What we would recommend (and what most kennels use) is a 100% solids epoxy system. It would consist of an epoxy primer coat, 100% solids epoxy color coat, optional color flakes, and then clear top coat of 100% solids epoxy. A full color flake option makes the floor more durable, hides imperfections better, and shows less scratches from dog claws. This type of system will be close to the same price as a polyurea system. A budget approach would be just the epoxy primer and 100% solids epoxy color coat with no flakes. The epoxy does require mixing and the 100% solid epoxy had limited pot life. With proper prep, planning, and a minimum of two people applying it, it can be a very manageable DIY project. It will require a minimum of acid etching to prep the concrete. Another consideration would be an epoxy cove molding to create a water tight surface for hosing down.
OK, thanks!
I have been considering epoxying my basement floor, but then I ran across this. My question is a few parts. 1st, can a single-part polyurea be applied over “kilz” primer (I was jut going to paint the floor again, but then I primed it and I liked the look of the white, so I decided I would epoxy it white, like a showroom floor), or do I need to add some sort of bonding primer. I ask about bonding primer, because the house was built (and tiled) in the 50’s and most likely have asbestos floor tiles, which means (because I’m on a tight budget) I can’t grind down to the cement. Also, how shiny/glossy is the finish? Not to mention, I will probably be using a bit of self leveling compound to take car of some areas where the floor/tile is uneven.
Sorry if my question isn’t detailed enough
Hello Zach. We don’t recommend a single-part polyurea for a basement. The reason is that they are solvent-based and create a stinky smell and some VOC’s. This smell dissipates rapidly in a garage environment due to the good ventilation. However, in a basement it will stink up the house for days and make it very unpleasant. In addition, the solvent-base with cause the water-based Kilz to soften and bleed, creating quite the mess. In order to use white in the house, it would require that you use a water-based or 100% solids epoxy in order to avoid the VOC’s as well as work with the Kilz. If it was a garage floor, we would not recommend it though since hot tires would cause the entire coating to peel up due to the Kilz base. Sherwin Williams ArmorSeal 1000 HS is one of the few companies that offer a white in a water-based epoxy. There are quite a few to choose from with a 100% solids epoxy.
If you use a self-leveler, DO NOT USE the self-leveling underlayment products that you can purchase from your local home improvement centers. They are an underlayment and not a wear surface like concrete. The do not accept coatings well. They are designed to have carpet, vinyl, wood flooring, and etc. laid over the top. You will need to use a polymer-modified concrete or epoxy slurry in order to level for a coating.
I have a covered porch(it gets direct sun in the evening hours). The floor is the original concrete slab(about 5 years old). The slab has a few surface cracks but is level and not shifting. I plan to chisel out the cracks to make them a little bigger and then fill with sika crack fix(epoxy based).
Would a single-part polyurea be good coating to apply for this situation?
Hi Scott. Yes, it would work well for that. If you anticipate any moisture getting on the surface we would recommend an anti-slip additive for the final coat since it can be slippery when wet.
Hi Shea:
First, thank you folks for your website. After much wandering in the wilderness looking for information on garage floor coating for a house we are finishing up, I found your site. What a wonderful resource. We have some past experience with the Epoxy-shield type coating, but they do not seem to be the best option for this project. This is a 3 car garage where one stall will be used as a workshop with heavy woodworking equipment, one stall will park a car, and the third will double as a car stall and a home gym, (with mats covering anywhere weights may be dropped. Further, the garage has a number of windows, (mostly frosted), and the last 12” of the garage floor is on the exterior of the garage structure. This home is located in Hawaii, so UV issues are significant. Further, because we are in Hawaii, we are having significant problems finding sources of products that can/will ship to Hawaii on a timely and/or cost effective basis. Based on my understanding of what I have read on your website, it seems like our best option would be to put a high solids epoxy base coat, followed by a pigmented Polyurea top coat with broadcast flakes and a anti skid additive. However, I am not sure we can get this in Hawaii, and if we can, at a cost/timetable that works. With this as a backdrop, could you give us some advice on:
1. Shouldn’t the pigmented Polyurea top coat solve the UV issues that will arise in this situation, (as well as the fact that a 1 foot strip of the garage floor will be exposed to the “elements” as it is located outside the garage walls in a place that catches the afternoon sun)?
2. If we cannot get the high solids epoxy base coat, but are able to get Polyurea, would putting the Polyurea over a Rustoleum Rock Solid Base, (we can get regular Rock Solid and regular Epoxyshield in Hawaii), be a possible option? Or, would straight Polyurea be better?
3. If we cannot get Polyurea, do you have any suggestions on how to deal with UV caused discoloration/failure?
Sorry for being so long winded, but I wanted to make sure to give you the pertinent facts. Thanks, Scott
Hi Scott. Yes, we are aware that it can be difficult to get quality coating products in Hawaii. Do you have a Sherwin Williams near you? If so, check with them to see if they carry their moisture cured ArmorSeal Rexthane 1. It’s a polyurethane that you can have tinted a variety of colors. Polyurethane concrete coatings are U.V. stable, more chemical resistant than epoxy, and more scratch resistant. What you can do is apply the Rexthane over RockSolid. With properly prepared concrete, RockSolid will adhere better than EpoxyShield. You will need to let the RockSolid cure for a few days and then degloss and rough up the surface with 120 grit sandpaper. This will allow the polyurethane to adhere properly to the RockSolid.
Hi Shea- thanks for the advice. We do have Sherwin Williams, but they don’t carry their full line so I will check to see if they have it, or can get it. Also, if we are able to source Polyurea here, would this be a better option than the Armorseal Rexthane1. If so, would it be better alone or over the Rock Solid? If over the Rock Solid, should we let it cure and the scuff as you suggest for the Armorseal? Thank again for your help.
I think polyurea may be even harder to source, but if you can then it would be best to use on it’s own. The issue with Hawaii is VOC’s. There are very high solids and 100% solids polyurea/polyaspartic coatings that can be used because they are low to no VOC coatings, but they are also very fast curing coatings with a max 20 minute pot life. Only experienced installers should use them.
Hi Shea- Again thank you for the advice on this project. We did source the Amourseal Rexthane and followed your suggestions. Things worked out awesome. We put down the Rock Solid, let it cure sanded and then put two color coats of the Rexthane, with color chips in the second coat. After reading your article on color chips the owner settled on a medium amount of chips in a Metallic Sliver blend. After the second color coat and color chips went down, it became apparent that a clear coat would be needed. We scrapped the color chips as described in your article and put down the clear coat with some anti-slip grit. Again, things went great, except for one thing, which I wanted to seek your advice about. Some of The “silver” color chips are still standing proud above the clear coat. The silver chips appear to bend so some of the chips bent rather than scrapping off or breaking. Have you heard of this before, and do you have any advice on how to deal with it. I am trying to figure out if this will solve itself over time, or if we should do some remedial work now. If we do remedial work, what would it be. Could we take a random orbital sander with say a 120 grit sandpaper, and sand the floor to get rid of the bent silver chips and then put another clear coat on top? Or is there some other easier/less expensive way to deal with the issue? Any advice would be greatly appreciated.
Glad to hear things worked well, Scott. We only heard of this issue with metallic flakes once before. If I remember correctly, the metallic coating on the flake is flexible. So even if the the acrylic chip cracks or breaks when scraped, the coating will not and tends to retain shape. It won’t fix itself with the Rexthane coating on them, so it will require sanding as you described and then another coat.
Hi Shea,
I applied Rust-Oleum RockSolid Polycuramine coating on my new concrete 2 car garage (3-4 months old) before that i washed with concrete etch after 1 day applied the coating but unfortunately it looks like its uneven from certain parts like too thin and thick (included roller wear out issue). is that any possibility to get that fixed with 2 coat with the same product?
Any recommendation will be highly appreciated.
Hello Harry. How many square feet is your garage exactly and how many square feet did the kit say it covers? RockSolid allows up to 7 days to recoat before any additional prep is needed. If you are past the 7 day window it will require that you degloss the surface first by sanding with 120-150 grit sandpaper. If you are following the correct coverage rates a second coat will fix the issues you are describing. Also, if there were 2 kits to mix from one box then there should have been 2 rollers as well. Never use one supplied roller to do the entire job or it will fall apart.
Hello Shea. I covered the 2 car garage with 2.5 kit. I am not sure the exact square feet but it enough to complete 2 car garage.The issue is both roller wear out after completing 95% on each side.I used one supply on one section.At last i used the different roller due to limited time. Which ended up applying thicker coat then the included roller ones.
Hi Harry. When applying floor coatings you should always determine the amount of coating material required on the actual square footage of the garage floor. A 2-car garage can range from 400-500 square feet. Also, it’s important to read the instructions on the data sheets provided by the manufacturer for the product you are purchasing. A 2.5 car garage kit is not a square footage number. It’s just an estimate. RockSolid states in their data sheets that the 2.5 garage kit comes with two single kits that will cover 200-250 square feet each depending on the surface of the concrete. They almost never cover the larger amount unless it’s being applied over another coat – and even that is debatable. They barely cover the 200 square feet in most cases. Unless you have a small 2-car garage, one of the reasons for the poor coverage most likely is that you were short on material. The second 2.5 car kit should even out the color tone gloss. If you want to avoid the common complaint of one kit not matching in color with the other, then we suggest you read this article here. Good luck and we hope it turns out looking great.
Hi Shea,
Not sure what type of concrete finish I have in my garage since I moved to the house 8 months ago (sealed, self-levelled, only poured concrete, etc..). I purchased the Rust-Oleum Universal Bonding primer coat kit. Is applying to primer coat before the epoxy coat could be enough to mitigate any problems or dramas could happen later on?
Question 2: My thoughts was to apply primer coat, then epoxy coat, and top the layers with Polyurethane Concrete Floor Finish, is good system or only wasting money and time?
Thanks
Hello Haydon. Return the Bonding Primer. Concrete bonding primer is for latex acrylic paints and not compatible with coatings. You are mixing apples and oranges. Coatings are not paint. Before you do anything, you need to determine if your concrete has a sealer or not. This article here will help. If your concrete has a sealer, then it will require that you grind the concrete to remove the sealer and prep the concrete for a coating at the same time. If no sealer is present, then etching will suffice for most applications (unless you elect to grind anyway).
Primer coats are actual epoxy primers and recommended when using a high solids colored epoxy base coat. A clear coat of polyurethane or polyurea would follow. This type of coating system will last 10 plus years as does the type we outline in the article. They are both well worth the money if you intend to stay in your home for many years.
Hi Shea,
Really appreciate your comprehensive reply. I read in most of your articles and I can say with confidence that now I have a clear idea about how garage flooring works. Thanks.
After doing the water drops inspection I found that my garage is sealed, and because I don’t want to use grinder and go in all these process, can you please recommend a paint or coat that can be painted above the sealed floor? If you can provide a commercial brands that would be great. TIA
Hi Haydon. High quality coatings and coating systems cannot be applied to sealed concrete – period. It has to be mechanically profiled. The reason for this is that you will never achieve an optimum bond and the coating system will fail. It does not matter what you top it with. All manufacturer’s of quality coatings will not warranty or recommend their products for such applications.
If long life of your coating is not as much of a concern, Rust-Oleum makes a product called Concrete and Garage Recoat Primer. We have an article about it here. This can be applied to bare concrete that is sealed. However, it only achieves the type of bond that Rust-Oleum finds acceptable for their products (not nearly as strong as commercial quality coatings) and you can only use Rust-Oleum products over it. Rust-Oleum EpoxyShield and RockSolid are examples. There are two issues with this type of system if you want a long lasting coating. The first is that this type of system is still susceptible to hot tire pickup just like any other residential quality DIY epoxy kit. The reason is that the bond of this primer is no stronger than what is applied to it (we suspect weaker as Rust-Oleum only told us that it passed testing). Second, Rust-Oleum does not make a product that is U.V. stable. It’s still going to amber (yellow tint) over time if exposed to direct sunlight or strong indirect sunlight, even if you apply a U.V. stable clear coat over it. I hope this helps.
This was so helpful. Really appreciate your kind help. Thank you Shea
I have a garage space I also use as a small shop word wood craft.
Which of the 3 products would you recommend? Or are they all fairly equal in quality and should I look for the best price option? Do you have any discount codes? Should I use your website as a reference so you get credit? Thanks for a great article, very informative.
Hi Don. Any of the three manufacturers that we list would be a good choice. They all are very similar in performance. The two big things to look at are current pricing and how much product you are getting for the price. Garage Flooring LLC provides the most product in their kits, but you will need to check current pricing to see how it compares with the others. We don’t have discount codes, but feel free to let them know we sent you. Don’t hesitate to email or call them with questions. They want your project to be a success and want to make sure you understand the process.
Have you ever tested and reviewed KBS Diamond Finish Clear for concrete?
Hello Ed. Sorry for the late reply, but we haven’t reviewed this coating and had to take some time to look into it. Unfortunately, the website doesn’t provide much information about it except for the features of what they say it does. We couldn’t find any technical data sheets for the Diamond Finish Clear as well. It appears to be a moisture cured polyurethane.
I have ceramic tile in my foyer . Last year I used floor paint and painted over it and used a clear sealant .the paint isn’t durable and I was thinking about DIY EPOXY until I saw this ? Can I use this over my tile inside my home …it isn’t very big maybe 12 to 15 ft long ? What is the best product to use ?
Hello Dee. Unless you lightly grind the surface of ceramic tile, you will not get paint or a coating to adhere to it. It peels. Even if you did grind, the adhesion is not the best. Ceramic and porcelain tile is not intended to be painted due to their very smooth and not porous nature. Manufacturer’s of paint and coatings will not warranty their product if it is applied to tile. Your best option is to pull it up and apply the flooring of your choice.
Hello, Can you use these products on Dri Core flooring?
Hello John. Technically, you can make it adhere. However, it’s not going to create the same seamless look as a garage floor. In general, it doesn’t look good.
G/Day
Looking to do my small shed 3mtr x 3mtr
In maybe grey with flake and clear over
Paul
Hello Paul. We removed your phone number so that it won’t be published. Thanks for wanting to purchase from us, but All Garage Floors is an informational website only. We don’t sell garage flooring products. You can check with the vendors we link in the article, but I’m not sure any ship to Oz.
Shea! You are a wealth of information and beyond generous for sharing it with us! I’ve got a crazy idea and I need your professional guidance to achieve success.
The short version is that I want to use a geo grid filled with compacted rock as a light traffic, residential, low cost flooring. The surface would be cleaned before the epoxy(?) coating is applied.
I feel that for various reasons it should have a coating over it to seal it. Keeping the bugs and such from coming up through it and also creating an easy to clean surface inside the building.
I believe that you may be just the person to recommend me an appropriate product or system of products.
I’m assuming some sort of cleaning spray. Followed by a thin sealer to prevent excess from running down through the rocks. Maybe several light layers. Then finally a considerably thicker layer, filling the remaining voids and creating a solid surface. Though not necessarily a smooth surface. (Some rock may still be “high” but still “sealed” into the solid surface.
Ultimately it would be nice to have the final step be as simple as pouring out of a five gallon bucket. (With some geo grid, crushed rock and some five gallon buckets of recommended product, a cool temperature floor could be created almost anywhere in the world.)
For now. We’re experimenting. Your wisdom would be greatly appreciated.
Thanks in advance for your input!
Hi Bruce. Your idea is interesting in theory, but not practical in practice. There are a variety of reasons for this with the foremost being cost (we’ll address that shortly). Coatings, epoxy in particular, need a solid and stable surface for application. Think concrete, steel, etc. Epoxy cures extremely hard and is the only coating that can be applied in thick layers (100% solids only). Though it is hard, it does not flex – period. This means that any shift in the soil that will create a void / depression, can cause the epoxy to crack when weight is applied. In other words, coatings do not provide structural strength. In addition, epoxy and other coatings are exothermic. When the two parts are mixed together, the resulting chemical reaction creates heat. The larger the volume, the more heat that is produced. That is why epoxy (with rare exceptions) is only mixed in 1.5 gallon volumes at one time. If 5 gallon were mixed at once, it would be smoking from the heat and setting up before you could begin to pour it out of the bucket. In order to lock-in the crushed rock and seal it properly, the epoxy would need to be spread out over it and allowed to soak in. You would not want to prevent it from soaking in around the rock by using a sealer beforehand to block it. Subsequent coats would be required to fill in the voids and make it smooth.
This brings up cost. The coverage rate of epoxy is based on mils of thickness. A typical coverage rate of 10 mils on concrete for one gallon is 160 square feet. 10 mils is less than 1/64″. You will need large fractions of inches per square foot just to fill the voids and make things smooth. As an example, the coverage rate of 1/4″ (250 mils) is approximately 6.4 square feet, not counting material loss. 1/4″ application rate might work for the initial application for the epoxy to sink in around the rock. Two coats or more at that rate would be needed to level things out, maybe more. It’s a guess and depends on the gaps to be filled. 5 gallons of 100% solids epoxy will cost over $400. So 30 square feet would cost a minimum of $1200 in epoxy alone. Plus, there is no guarantee that it will not crack at some point. I hope this helps.
Boy does it ever help! If I don’t mind the bad news of reality. Lol. But these are the floors that I am being given by the client and the problem still needs a solution. Honestly the how and why of what they want done makes sense to me.
The part of the problem that we are having problems solving is the sealing of/“solidifying” of the floor. While concrete seems to be the obvious solution, the logistics of it just won’t work at their locations due to inaccessibility and a shortage of water. Ultimately 5 gallon buckets will be the most likely way to get the product to the site.
Maybe a rubber product? Pourable plastic? Some other pourable product? The finished look isn’t important at all. Cost and ease of transport is the primary concern.
Any further advice regarding this project will be greatly appreciated. Amusingly you are the only person involved in our project that isn’t being paid. And ironically you are the only person who seems to know what they are talking about. That’s funny stuff!
Anyhow your original response was greatly appreciated! The time spent so far in answering my questions is something that isn’t done much anymore.
Any further advice or a push in the right direction would be invaluable.
Have a great day!
That’s a difficult problem to come up with a solution for, Bruce. I wish we could help. However, it will be posted here for our readers to see. If someone has a suggestion / answer, I’m sure they will respond.
Hi Shea,
This is my second time commenting on your guys site. We are the ones creating an indoor tumble space for our gremlins…that is children…still dont feed them after midnight! Anyways, we are trying to find the best solution to covering our garage floor for easy cleaning and a nice finished look. Originally looked at acid stain – too much time comitment and didnt like the amount of VOCs involved. Then looked at concrete stain – cost prohibitive for our 890 sqft space. Epoxy – seems to be cost prohibitive, and now this polyurea.
Could you give me some insight into what our best solution is? Can we toss some antiskid flakes into a sealer and call it good? Best outcome for most reasonable price is our goal. We just bought a farm and there are a LOT of expenses popping up. We have in floor heat so it also needs to be something compatible with that. Thank you so much.
Hi Meagan. How much $$ per square foot does your budget allow for?
Hmm I’d like to stay at 200 or less total. I’m starting to think that isn’t possible though.
OK, that definitely changes things. If it’s just going to be foot traffic, then your best bet is going to be a water-based acrylic clear coat. This one here by Foundation Armor is an excellent example. You would most likely need three gallons for a two car garage. It will darken the concrete ever so slightly and create a glossy clear finish. The key is to apply it in thin coats (thin to win). You will need a minimum of two coats. Make sure the concrete is very clean and dry before application. It will not be slippery when dry, however, it can get a little slippery when wet. If you want, you can add an anti-slip additive such as SharkGrip into the final coat. Keep in mixed in your paint tray or it will roll out in clumps.
Just to verify the Behr brand non acid floor stain wouldn’t be a good option right?
The Behr product is actually a tinted acrylic coating. It’s not a stain. We have an article here that discusses these products. For foot traffic only, this type of product will perform OK. However, we highly recommend not using it if the floor is used for parking cars on.
Looking at doing the concrete pad to my front door. It’s open gets cold temperatures, rain and snow. I was thinking of a polyurea product. The concrete is porous and what should the moisture test read for this type of product. I am in Ontario Canada
Hello Avalon. Most coatings will not tolerate much more than 3lbs of moisture flow per 1000 square feet per 24 hours. Make sure the coating you are interested in is approved for outdoor use and be sure to use an anti-slip media with the final coat. If not, it will be extremely slippery in wet or snowy conditions.
Hi Shea. Great information – wish I had read it before my concrete guy finished my garage floor two months ago! We used epoxy over a stain with no anti-slip and it is beautiful but slick as an ice-rink when wet. It needs an anti-slip additive. My question is whether I should do my top-coat with anti-slip additive in epoxy or with polyaspartic? It is a garage floor in Maryland. We get humidity, rain and occasional snow so the floor is wet sometimes. Either way, I assume it needs cleaned and lightly scuffed for the new coat to adhere? Do you have a recommendation on the amount and type of anti-slip for my conditions? Thank you for this great write-up.
Hi Mark. We recommend using polymer-based non-slip media. It’s safe for bare feet and will not get caught by mops or rags when cleaning. Usually, 6.5 tablespoons per 1 gallon of coating will suffice. Just make sure not to let it settle in the tray or mixing bucket during application or it will clump.
Yes, a single-part polyurea would be a great choice. It’s easier to apply and more durable than your current epoxy coating. You can degloss the surface with 120 grit sandpaper. A quicker method is to rent a floor maintainer and use a green or black scrub pad (dry) to degloss the surface. Sand in the corners and edges where the scrub pad missed. Sweep/vac and then wipe the surface with denatured alcohol applied liberally to a microfiber mop pad. A few minutes later, you are ready for application.